The landscape in Arizona is ever-changing. Oases can be found in the middle of the desert, mountains seem to magically appear on the horizon, and the city landscape can quickly disappear into a fairytale forest.
Among Arizona’s grandest landscapes lies hidden treasures: hundreds of turquoise waterfalls and crystal clear swimming holes waiting to be bathed in. If you’re looking for some reprieve from the hot Arizona sun, look no further than these 5 magnificent waterfalls in Arizona, complete with their own natural pools that are perfect for dipping in.
Best Hikes with Waterfalls in Arizona
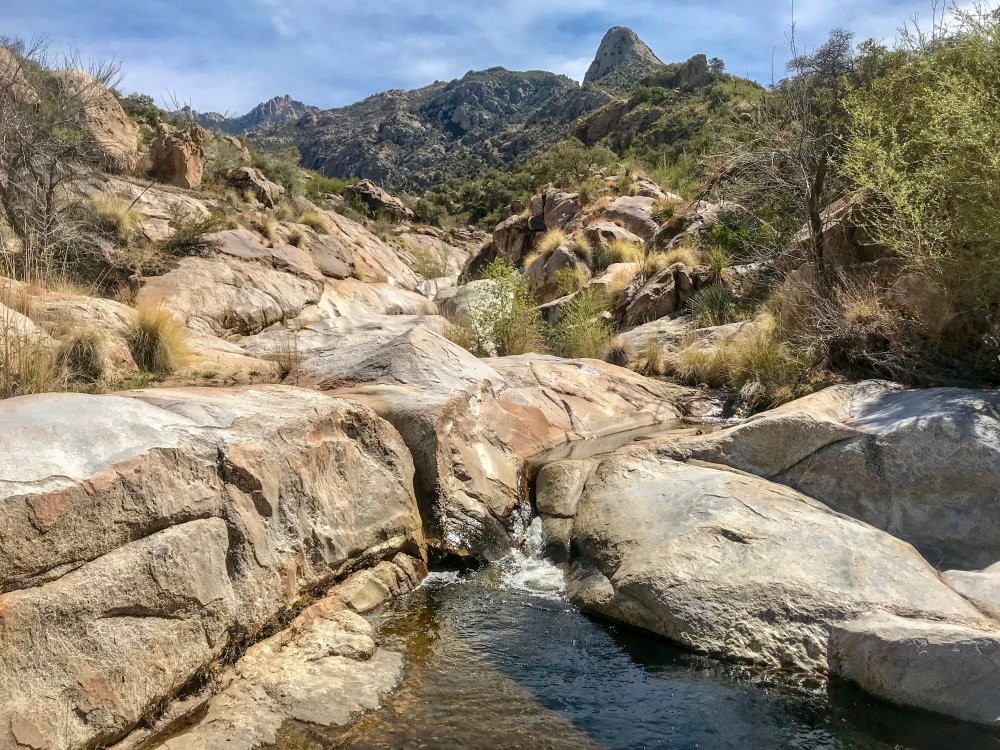
Romero Pools
Imagine wandering through a desert canyon. You’re surrounded by towering Saguaro cacti, vast desert views fill your vision as you walk, majestic mountains lead you further into the desert and all the while you’re on the hunt for pristine hidden pools flowing with chilly mountain water.
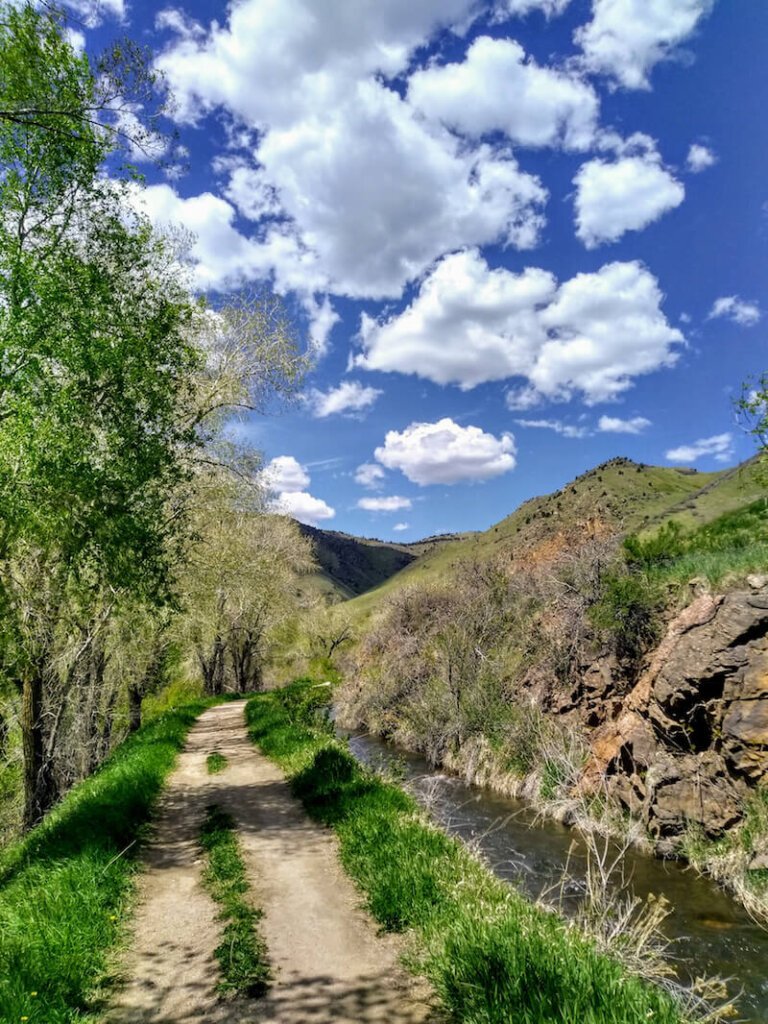
Romero Pools is hidden high in the Santa Catalina Mountains of Tucson, Arizona. It’s a beautiful 6-mile trail that winds through the desert floor and then gradually leads hikers higher and higher into the Santa Catalina Mountain Range.
At the end of the Romero Pools Trail is a series of waterfalls that all flow into their own pools perfect for swimming. Romero Pools is a beautiful oasis set among the desert landscape. It’s a large area full of smooth granite boulders that are perfect for sunbathing, cliff jumping, or just enjoying the views of Tucson in the distance.
Trail Specs: The trailhead for Romero Pools lies inside Catalina State Park. A $7 fee is required for visitors to experience the park. The trailhead starts at Sutherland Wash. A small wash that only flows seasonally, and continues for a flat easy 1 mile to the base of the Catalinas. As you get closer to the Catalinas, the trail ascends for 1.7 miles up to Romero Pools.
It typically takes hikers 2 hours to ascend to the Pools but the reward is well worth it. The Pools look like something out of a fairy tale. Crystal clear water with spots deep enough to cliff jump. Huge granite boulders surround the waterfalls that are perfect for sunbathing. Pack a lunch and enjoy this all-day adventure while soaking up some of Arizona’s best views.
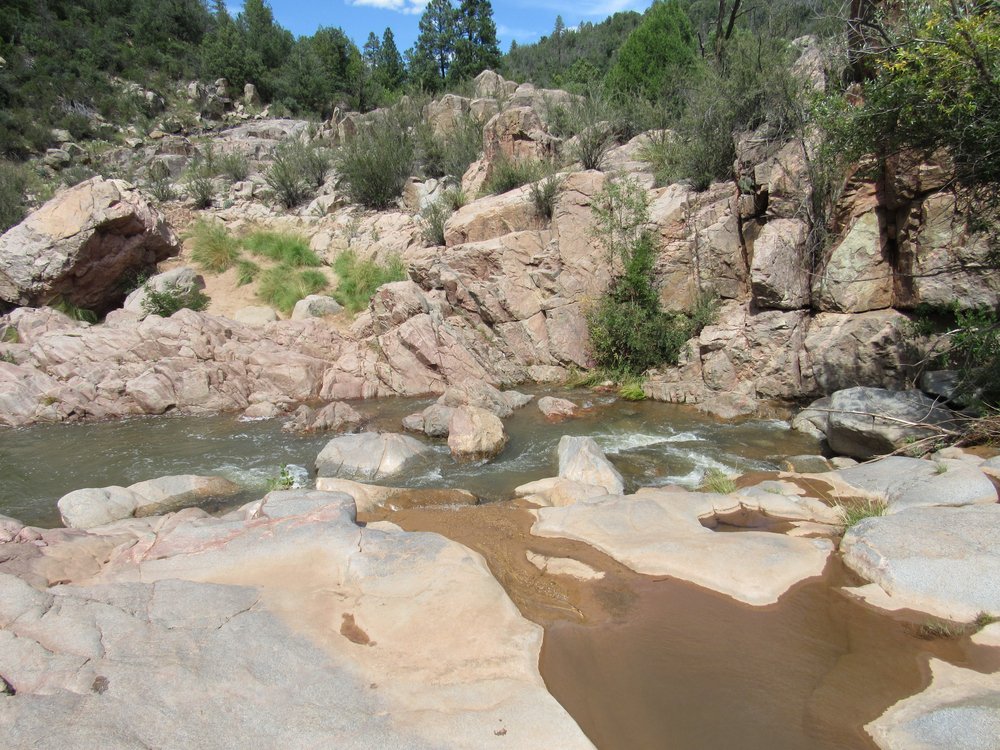
Seven Falls
Seven Falls is another breathtaking Arizona waterfall hike lying just outside the busy city of Tucson.
What draws hikers to this particular trail is, you guessed it, the series of seven waterfalls descending from the walls of Sabino Canyon. Seven Falls is a highly popular hike due to its relative ease, beauty, and location. If you decide to do this hike, arrive at the trailhead early, as the parking lot fills up quickly.
Seven Falls is an 8 mile, relatively flat hike through Sabino Canyon. A couple of shin-high water crossings make this hike exhilarating. Throughout the trail, you can find pockets of swimming holes and plenty of places to sunbathe on your way up to the actual Seven Falls. Seven Falls is such a rewarding sight and boasts several pools to swim in.
Trail Specs: Seven Falls is located outside Tucson in the Sabino Canyon Recreation Area. The trail begins in a small parking lot marked as Bear Canyon Trail. The first 3 miles are speckled with creek crossings and are generally flat.
In classic Arizona fashion, you’re surrounded by beautiful desert landscapes and towering canyons. As you enter into Bear Canyon you begin to ascend. As you ascend, Seven Falls becomes visible in all its glory. Seven continuous waterfalls pour from the walls of Sabino Canyon.
Each waterfall catches enough water to make perfect pools to float in. Be sure to pack a camera because Seven Falls is a sight you’re going to want to remember!
Water Wheel Falls
If you’re looking for an easy, quick trail with a rewarding swimming hole, then Water Wheels Falls is the trail for you!
Water Wheel Falls is a short, flat 1-mile trail located in Payson, Arizona. Don’t let the ease of this hike fool you, the waterfalls and the swimming holes are just as breathtakingly beautiful as others that require a more arduous hike.
Crisp mountain water pours from the East Verde River creating deep gorges and dramatic waterfalls. Water Wheel Falls is the perfect spot to spend the afternoon. The entire trail runs the length of the river so there’s plenty of places to take a dip, relax in solitude and enjoy the sights around you.
Trail Specs: Water Wheel Falls is located on the outskirts of Payson, Arizona off of Houston Mesa Road. Ample Parking can be found at the trailhead. As you begin your hike you’ll see the namesake of the trail, a large Water Wheel that used to be a component in extracting gold.
About a quarter-mile into the trail, you’ll get your first chance to dip into the chilly water of Ellison Creek. Most families choose to stop here and play, but keep hiking! Massive granite boulders begin to appear and the small creek turns into a beautiful turquoise river. A half-mile in, the sound of waterfalls fills your ears. Follow the granite boulders that line the river and you’ll end up at the roaring waters of Water Wheel Falls.
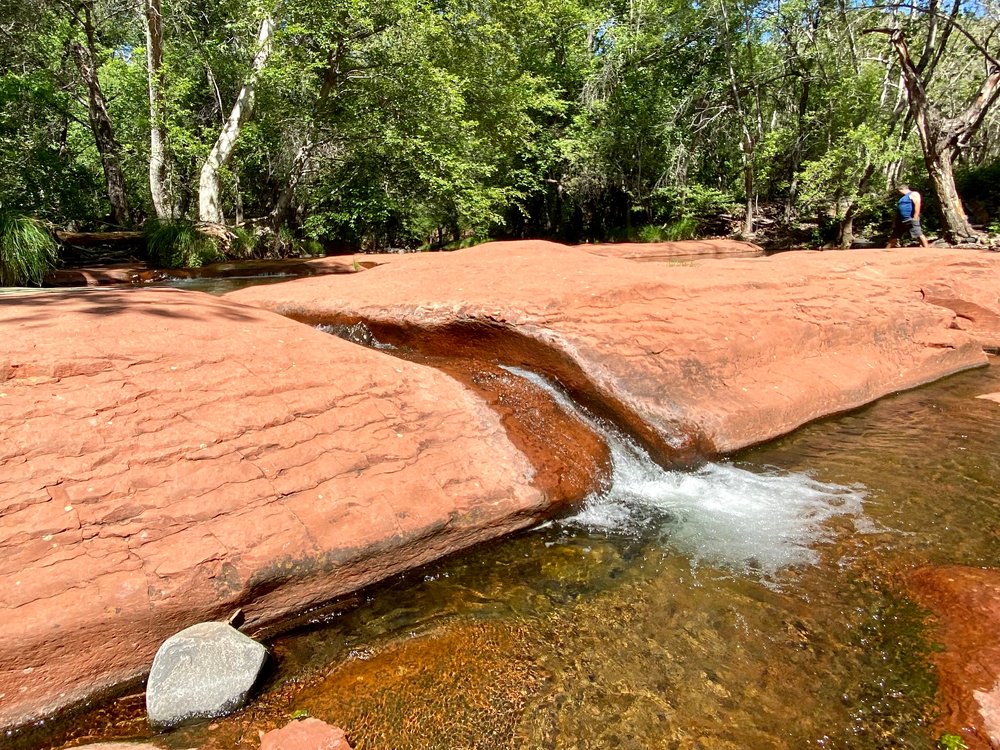
Bell Trail to Beaver’s Crack
Beaver’s Crack is Arizona’s ultimate waterfall swimming hole! Bell Trail to Beavers Crack is located on the outskirts of Rimrock, Arizona. This is a perfect day hike for Sedona visitors wanting to get away from the heat and crowded Sedona trails.
Beaver’s Crack is a moderate 7-mile hike through the Sonoran Desert. Everything about this hike is desert so be prepared! Bring plenty of water, food and sunscreen because there’s not much reprieve from the elements.
But your reward is the ultimate swimming hole! Small waterfalls from Wet Beavers Creek feed into “the crack” making a massive emerald swimming hole. Several cliffs surround the area for those looking for an extra thrill, or there’s plenty of flat, shaded areas for the ones who want a more relaxing getaway.
Trail Specs: Bell Trail to Beavers Crack is located off forest service road 618 in Rimrock, Arizona. A small parking lot is located at the Trailhead. The actual trail itself is an easy 3.5 miles to Beaver’s crack.
Halfway through the hike, you’ll experience a small elevation gain into Wet Beaver Wilderness. As you follow the trail the landscape will switch from flat to the classic red rocks of Sedona. As you wrap and weave around boulders and massive saguaros, you’ll begin to approach Beavers Crack. From here, get into your bathing suit and enjoy the icy flow of Wet Beavers Creek.
Cibecue Falls
Cibecue Falls is one of Arizona’s true hidden gems, which is surprising given its outrageous beauty.
Nestled deep in a canyon, this 40-foot waterfall is every bit worth the exhilarating hike. The out and back trail is a 4 mile, rock hopping, river crossing adventure. Arizona’s most impressive landscape is on display as you walk among the towering canyons of the White Mountain Apache Tribal Land.
Trail Specs: Cibecue Falls is located about 40 miles outside the town of Globe, Arizona. It is located on the Fort Apache Reservation which requires a $30 permit for each visitor. A rocky narrow road will lead you along Cibecue Creek to the trailhead.
From the trailhead, the adventure begins! Expect to get wet as you crisscross and boulder jump through the Salt River. As the trail begins to narrow, the roars of Cibecue Falls can be heard echoing off the canyon walls. The massive Falls pours into the turquoise pools below making it the perfect destination after an adventurous Arizona waterfall hike!
***
The arid Arizona landscape is speckled with roaring turquoise waterfalls. Whether you’re looking for an adventurous day hike or just to catch the serenity of a magnificent waterfall, you’re sure to find what you’re looking for in the Grand State of Arizona.
Sabra is an adventure-hungry outdoor enthusiast originally from Dallas, Texas. She has been to 33 states, 3 countries, and has traveled America while living out of the back of her truck. Besides writing, Sabra can be found powerlifting, running her online personal training business, and enjoying time with friends and family.
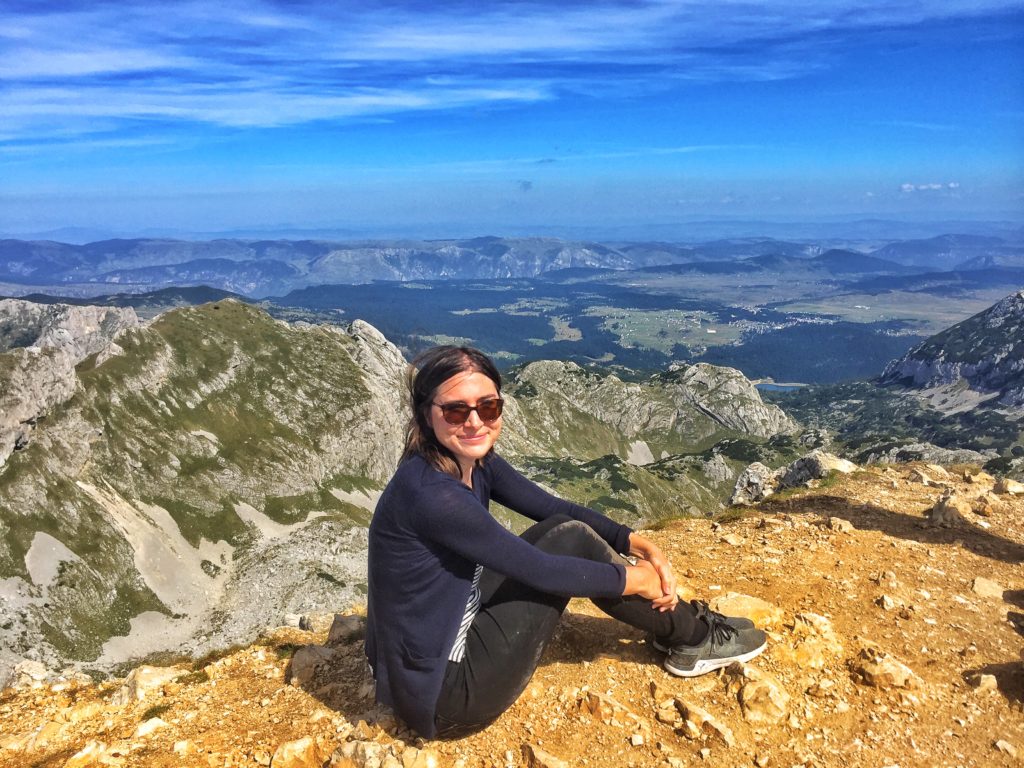
After being stricken with altitude sickness and spectacularly failing to climb Mt. Fuji in Japan in Japan, I was a woman defeated.
Despite knowing that turning back was the right thing to do, I couldn’t shake the feeling of failure.
So it became my personal mission – almost a grudge, even – to finally find and summit the perfect mountain.
When I arrived in Žabljak, Montenegro, the gateway to Durmitor National Park, I at first had no idea I’d be summiting my first mountain the following day.
I had simply been told by a fellow traveler in Kosovo that the landscape in Durmitor was unreal, and to stay at Hikers Den.
After meeting some fellow travelers at the hostel who wanted to hike Bobotov Kuk, the highest peak in Durmitor National Park, I was a woman with a mission: I was summit no matter what.
Spoiler alert: I did.
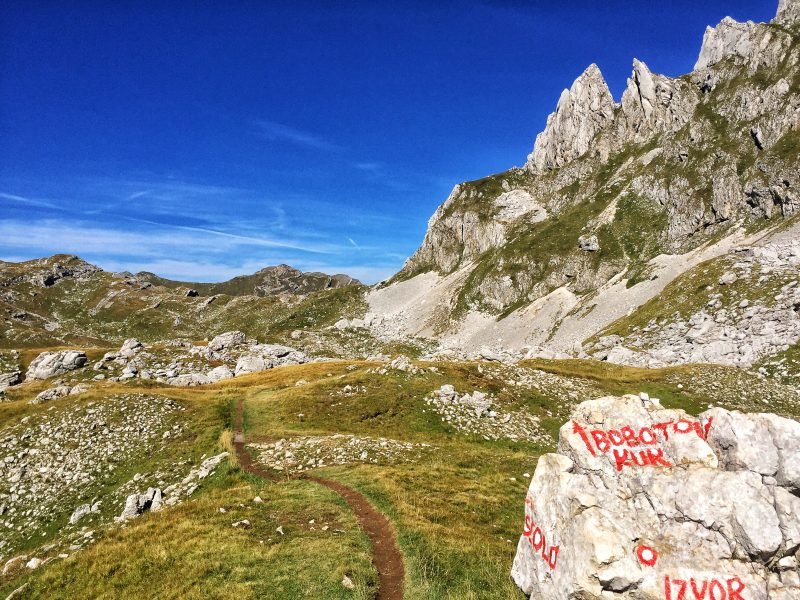
The Details on Bobotov Kuk
Bobotov Kuk is actually a fairly good mountain for beginners to climb.
With an elevation of 8,278 feet (2,525 meters), it’s high enough to give you an amazing view and sense of accomplishment, yet low enough that altitude sickness is not a huge threat.
Altitude sickness typically begins to afflict climbers after 8,000 feet (2,438 meters).
At less than 300 feet over this threshold, Bobotov Kuk does not present a particular danger for altitude sickness.
That is not to say you won’t feel the effects of limited oxygen at altitude, just that it is less likely to present significant health risks.
The way to Bobotov Kuk!
Another thing that makes Bobotov Kuk a good mountain for beginning climbers is that you start off at a relatively high altitude to begin with.
Žabljak is the highest town in the entire Balkans, at 4,777 feet (1,456 meters).
That means you gain a total of 3,501 feet of altitude (1,069 meters) over the course of the hike.
For someone in moderate physical condition, this should not place any particular strain on your body’s limits – though that’s not to say it won’t be tough.
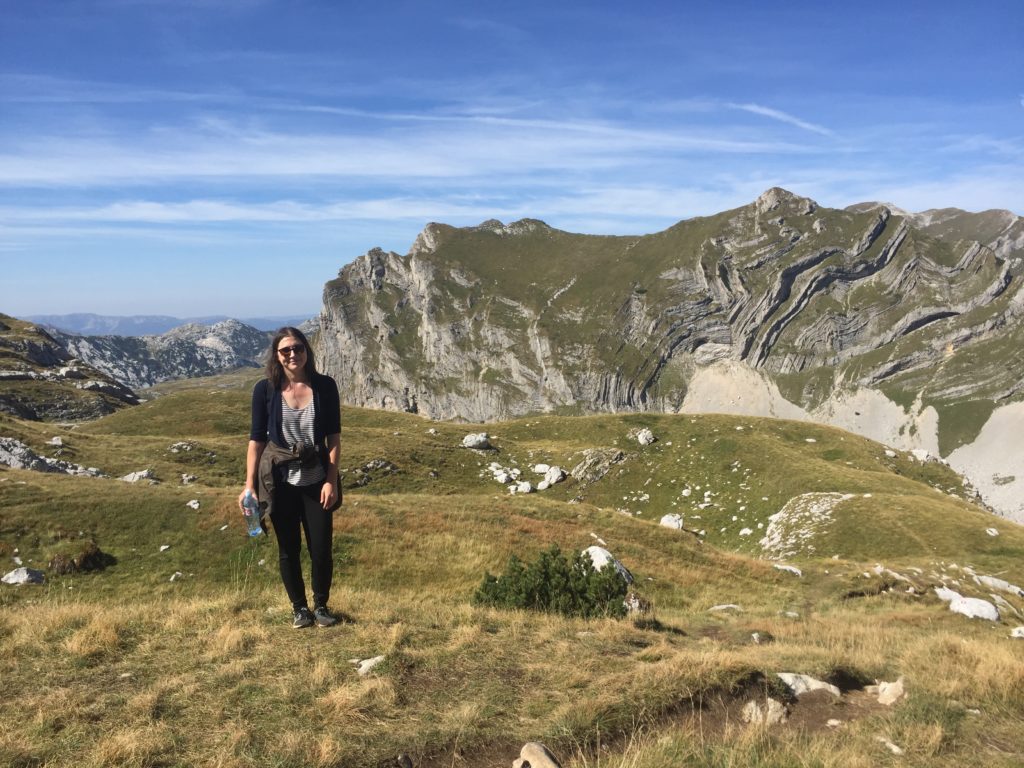
Ignore my atrociously tied jacket around my waist, plz. Although now I realize I’ve totally just made you stare at it.
Getting to Bobotov Kuk Without a Car
This is all assuming you’re already in Žabljak. If you’re not in Žabljak, you’ll need to get there first.
Take a direct bus from Kotor or Podgorica, each of which will take approximately 3 hours.
If you’re coming from another smaller town in Montenegro, or from over the border in Serbia, Bosnia, or Kosovo, you will want to find a bus that stops at Nikšić and arrange onward transit to Žabljak from there.
To get to Bobotov Kuk from central Žabljak, the best way is to hire a taxi to take you to and from the trailhead at Sedlo.
Alex from Hikers Den was able to arrange a roundtrip transfer for our group, which cost 4 euros per person.
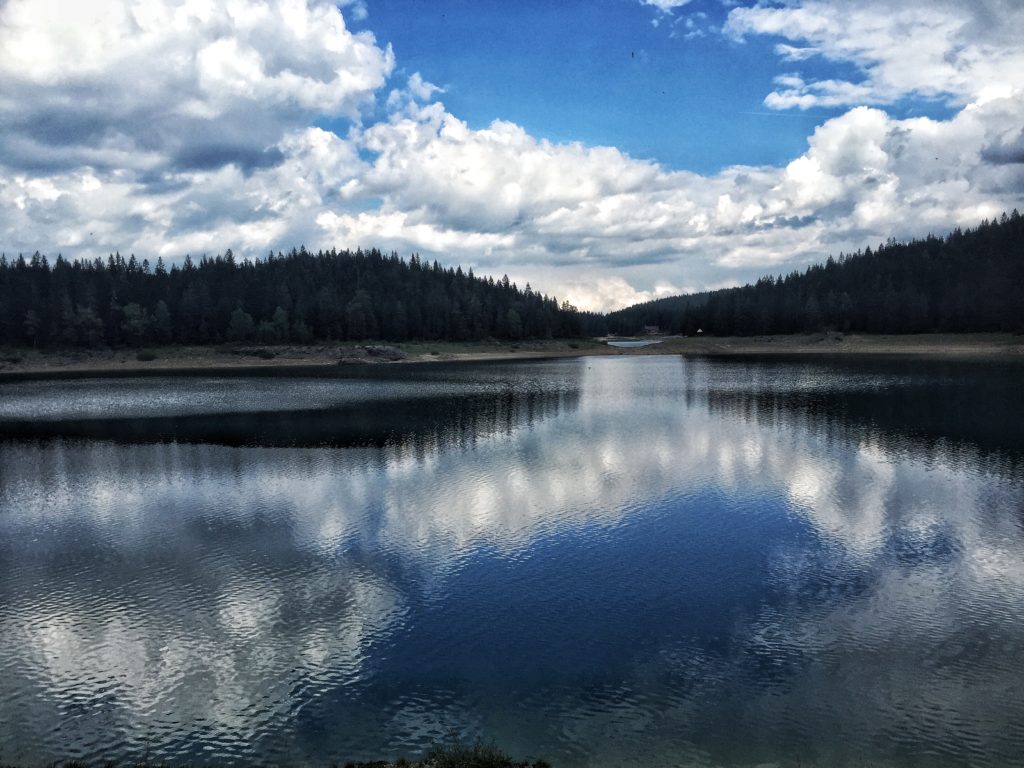
It is also possible to start in Sedlo by taxi and finish the hike by walking to all the way back to Žabljak, passing by the beautiful Crno Jezero (Black Lake).
See why it’s called “Black Lake”?
Theoretically, it is also possible to start from Žabljak and hike all the way to Bobotov Kuk and return the same way, though I imagine this would take all day.
If you stay at Hikers Den, Alex will map out all these possible routes for you and offer advice on the best way to go.
If you stay elsewhere, you can ask your host or seek out information at the Durmitor National Park Visitor Center.
Safety and Difficulty of Hiking Bobotov Kuk
While Bobotov Kuk is not that high, it is technically demanding, though certainly not impossible for novice hikers with decent stamina, myself included.
You should not attempt it in poor weather unless you are an experienced hiker.
The main risk in climbing Bobotov Kuk is rolling an ankle.
The ascent is quite rocky. In fact, one portion of the hike is just a straight uphill scrabble up a wall of loose rocks and boulders – not my idea of fun, but the subsequent views were so worth it.
Hiking boots here would have been perfect, but unfortunately I didn’t have any with me and brought along my crappy trail running shoes instead.
It worked, but my ankles paid for it the next day.
Success! Muddy success, but success nonetheless.
The last stretch of the ascent involves balancing on precarious rocky ledges using ropes to maintain your balance.
While this may sound stressful, take it slow and steady and you’ll be fine.
Also, early on, there can be muddy portions if there’s been recent rain – a definite possibility, especially in September when I was making the climb.
Walk slowly and purposefully so as not to slip in any puddles, as I most clearly did. Evidence above.
For incredibly fit people, the trek from Sedlo to the peak and back to Sedlo should take 5-6 hours.
My group took about 6.5 or 7 hours, though to be honest, that was mostly me — my cardio health is so whack (and I hadn’t done anything close to this kind of gluteus maximus exercises in years.)
If you plan to hike from Sedlo to Bobotov Kuk and hike/walk back to Žabljak, I’d give yourself a healthy cushion of about 8 hours.
Try to find a hiking buddy by staying at a hostel or guesthouse with many other people around if you are traveling solo.
It’s possible to hike solo, but I felt much more comfortable knowing I had people who knew I was out there and checking in on me periodically.
What to Pack for Hiking Bobotov Kuk
The walk back to Zabljak from Black Lake is so cute!
You don’t need any technical equipment for Bobotov Kuk.
I highly recommend hiking boots — I did not wear hiking boots, just trail shoes, and my ankles were definitely worse for wear for it.
Alex at Hiker’s Den has some hiking boots you can borrow if you’re lucky enough to have your size there, but I recently invested in some Ahnus and I wish I had them for my trip!
Plenty of water: I recommend bringing at least 2L of water per day. If you have a filter water bottle like this LifeStraw integrated filter, you can fill up at various lakes in the area, as it will filter out any bacteria or nasties in the water and make the water safe to drink.
Plenty of snacks: I become ravenous when I hike. I always bring some kind of nuts (almonds or cashews are my favorites), cheese, and some sort of snack food like pretzels or chips. Burek is also a great snack for the road when in Montenegro!
Hiking boots: Like I said before, I did the hike to Bobotov Kuk in my running shoes… which may have something to do with why I ended up falling in mud a lot.
I was super envious of everyone with proper hiking boots and now that I’m older and wiser and have invested in proper hiking boots I can assure you that they would have done me a world of good in Durmitor.
I recommend getting ones that go up over your ankle as it’s annoying to always have to stop and pull up your socks as you hike.
A light waterproof shell: Summer hiking in Durmitor National Park doesn’t require that many special items but I do suggest having a good waterproof shell you can throw on in case the weather turns crappy unexpectedly.
I wear this Marmot PreCip all the time, and it’s kept me dry even on hour-long bike rides through pouring rain.
It has underarm vents that help your jacket breathe a bit, which come in handy when it’s both hot and raining (aka hell) at the same time.
Headlamp: I know it sounds like overkill to bring a headlamp for a day hike, but I’ve done several hikes in the past where I ended up descending in way darker light than I thought.
Of course, it’s better to not need to use it, but you’ll be grateful you have it if you need it.
First aid kit: Bring basics like Band-Aids, an Ace bandage, and alcohol wipes. It’s easy to just buy a pre-made first aid kit that contains everything.
Camera: For the photos in this post, I used a Sony A6000 — I bought it because I liked that it can connect with my phone via Bluetooth so that I can use my smartphone as a remote for selfies, and that I can also send photos from my camera straight to my phone for Instagram.
I bought that several years ago and it’s no longer the same deal that it was — I now use a Sony A7 II, which is a good deal for a full-frame camera compared to what the A6000 now costs.
Rehydration packets: I find it really hard to use most rehydration packets because I’m sensitive to stevia and other artificial sweeteners, and I also get migraines from Red 40 dye.
So I was really happy to find (after so much searching) that DripDrop Hydration packets only use natural sugars and fruit and vegetable-based dyes. (If you prefer to avoid sugar, they do have keto ones that have all the artificial sweeteners).
You’ll get quite dehydrated on your hike to Bobotov Kuk, so make sure you have this.
Layers: Make sure you dress warm! It’ll be cool when you start, though it can get a bit hot from time to time, especially as you work up your heart rate and start sweating.
Wear breathable clothing and layer for maximum comfort. I kept taking on and off my layers like a crazy person!
Just make sure you’re prepared for how cool it can be at the summit of Bobotov Kuk!
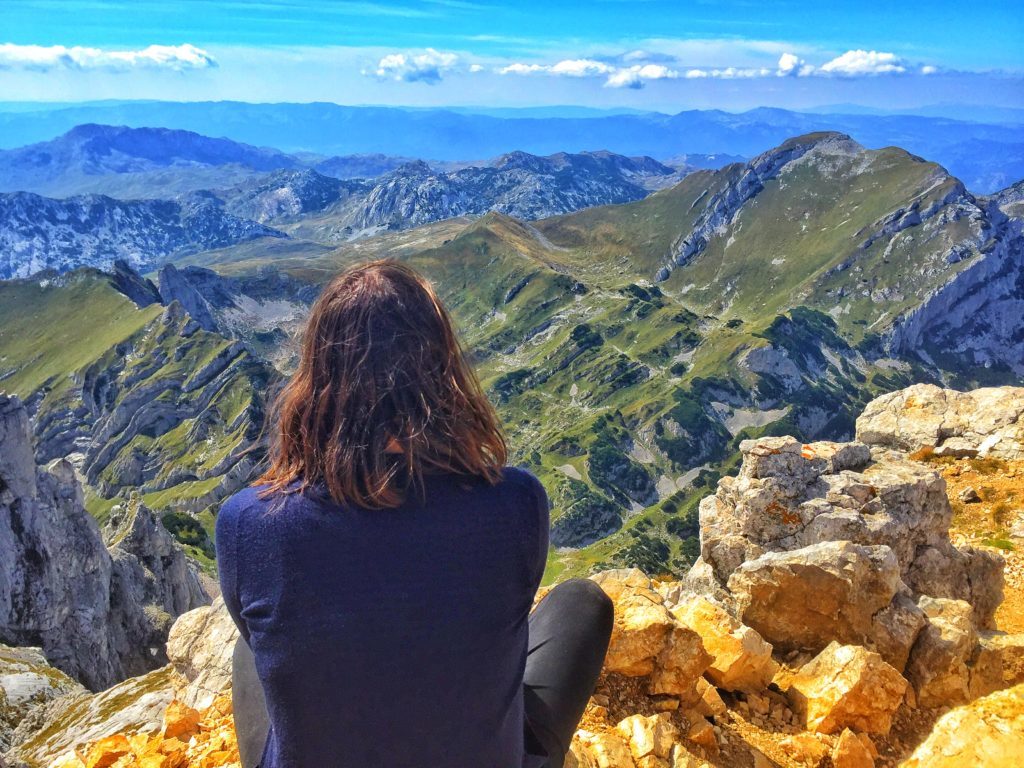
Once you’re at the top, you can enjoy a view of three different countries, all from one vantage point: Montenegro, Serbia, and Bosnia. Where else can you do that?
FAQ About Bobotov Kuk
How long does it take to climb Bobotov Kuk?
It depends what route you take!
From Sedlo Pass to the peak and back, it should take around 5-7 hours depending on your level of fitness.
From Zabljak to the peak and back, it’s a lot longer — expect a minimum of 8-12 hours return (the latter being more likely).
What does the name Bobotov Kuk mean?
The exact name of the Bobotov Kuk is hard to nail down, and no authoritative source exists defining its name.
I can only tell you from my own knowledge of Slavic languages, although I don’t speak Montenegrin (just a bit of Bulgarian, Czech, and Russian).
The word “Bobotov” likely means “of Bobot”, as “-ov” is a suffix that determines belonging in Slavic languages (the possessive case).
It’s also often used in Slavic last names, especially ones from Bulgaria and Macedonia as well as Russia.
“Kuk” means either “hip” or “rump” in Serbian, which is closely related to Macedonian, so the words are likely the same in both languages.
Combining this knowledge, we can assume that one possible translation of “Bobotov Kuk” is something like “Bobot’s butt!”
This is just my personal theory after doing some research and combining that knowledge with my limited Slavic language knowledge — if you’re Montenegrin and know the local lore for this mountain’s name, let me know.
How tall is the tallest mountain in Montenegro?
Bobotov Kuk was long mentioned as the tallest mountain in Montenegro. And that’s true — with an asterisk.
Bobotov Kuk is the tallest mountain that is solely in Montenegro.
There are three mountains that share the Montenegro-Albania border that are technically taller than Bobotov Kuk.
The tallest of those three is Zla Kolata, which stands at 2,534 m (8,314 ft).
By contrast, Bobotov Kuk is 2,523 m (8,278 ft) — a rather minimal difference, but a difference nonetheless.
Allison Green is a former teacher who has been travel blogging since 2016. She has a Masters in Teaching and a B.A. in English and Creative Writing. Her blog posts merge her background as an educator with her experience traveling to 70+ countries to encourage ethical, meaningful travel. She has been a speaker at the World Travel Writers Conference and her writing, photography, and podcasting work has appeared in National Geographic, CNN Arabic, CBC Canada, and Forbes, amongst others. Now a full-time traveler, she has lived in Prague, Sofia, New York City, and the San Francisco Bay Area.
Hiking on the Big Island of Hawaiʻi is one of the greatest opportunities to enjoy incredible landscapes and inspiring views.
The Big Island is otherwise known as the island of Hawaiʻi, and it’s received the nickname of “The Big Island” to distinguish itself from the U.S. state of Hawaii.
The Big Island is of the most beautiful places on earth to hike. One of the coolest things about the Big Island is that there are eight different climate zones. On just one island, you can explore rainforests, desert areas, and ice caps (plus more).
When you come to Hawaiʻi, you will realize that it is largely made up of two massive mountains, Mauna Loa and Mauna Kea.
Mauna Loa is the largest mountain by volume in the world, whereas Mauna Kea is the tallest mountain in the world if you count what’s below sea level — move over, Everest!
These massive mountains lend themselves to some pretty stellar hiking on the Big Island, as you can imagine!
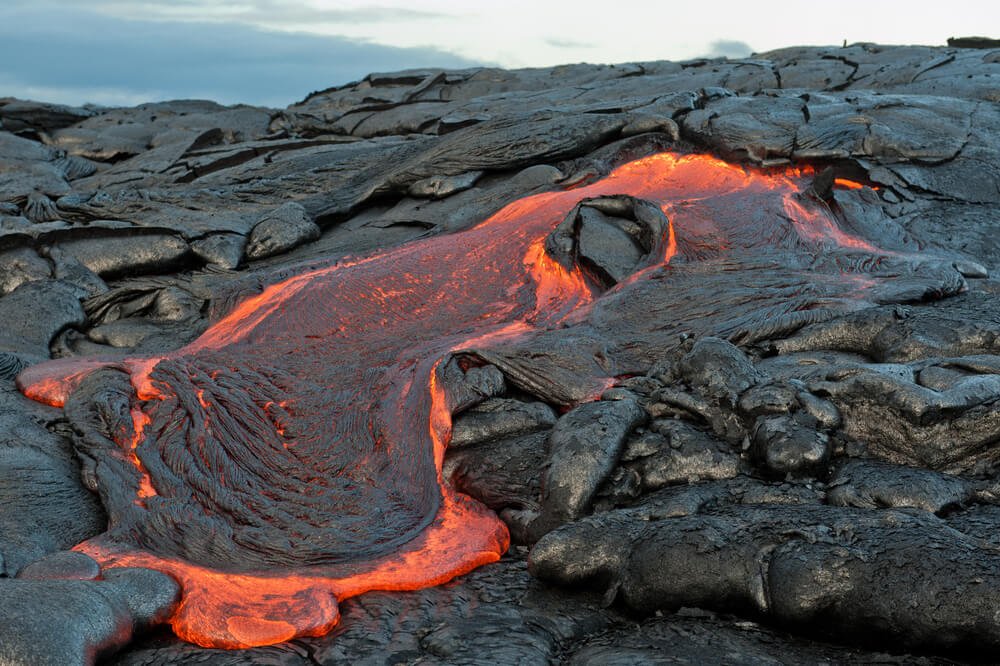
There is also incredible hiking in Hawaiʻi Volcanoes National Park, where you may even get to see lava flowing.
The Big Island is named so because the lava is always flowing, and therefore new land is born every day.
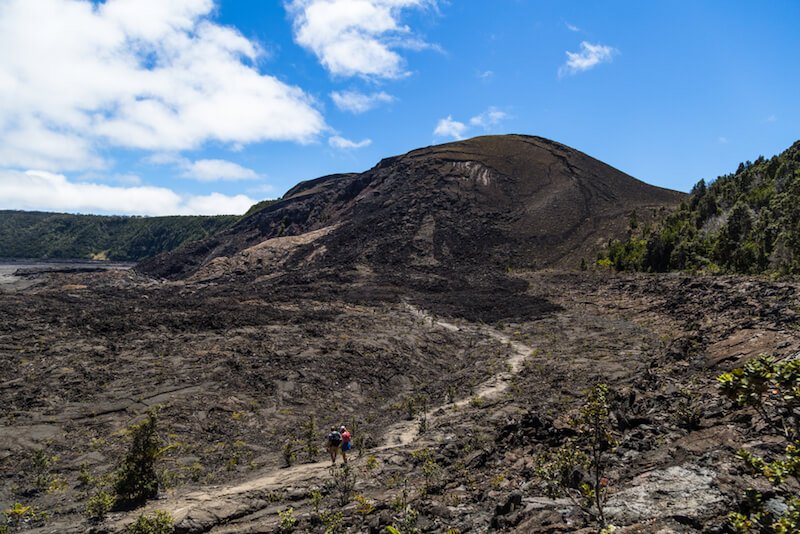
It’s the biggest island of the Hawaiʻian islands, but it’s also the newest. There are five volcanoes on the island of Hawaiʻi: Kīlauea, Mauna Loa, Mauna Kea (Maunakea), Kohala, and Hualālai.
When I lived on the Big Island, I was able to walk right up to the lava flow when hiking in Hawaiʻi Volcanoes National Park!
However, this was because of the timing and is not guaranteed. It just depends on what the lava is doing.
This is also why helicopter rides are a popular attraction on the Big Island. You can always see the flow overhead; it is just too difficult to get to if the lava is flowing in a remote area.
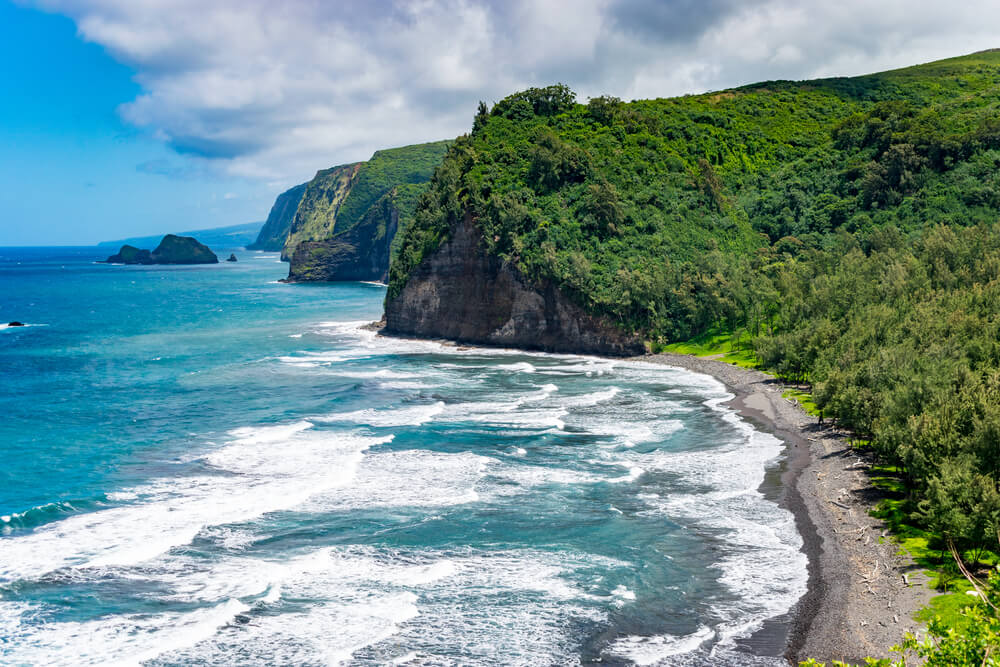
In addition to high elevation climbs and hiking amongst volcanoes, the Big Island is full of beautiful green forests and offers coastal hiking and gorgeous valleys.
Hike on the desert plains, along the shoreline, in the rain forest, or through lava tubes. It does not really matter; every place is spectacular. The Big Island is just that amazing.
We will categorize these Big Island hikes based on regions: Kaʻū, Hawaiʻi Volcanoes National Park, Hilo, Hāmākua, Kohala, Kona, Saddle Road, and Puna.
First, though, let’s talk some quick logistics about getting to Hawaiʻi in these current pandemic times as well as how to get around Hawaiʻi once you arrive!
This post was originally published on June 5, 2021 by guest writer Allison Coulter, who lived on the Big Island of Hawaii for six months traveling by van. It has been updated several times since and was last updated March 29, 2023 to reflect changes and updates since it was written.
Getting Around Hawai’i
Your best bet is to rent a car when you come to the Big Island, especially if you are hiking.
The public bus system does not necessarily go to all these trailheads, and it is just not reliable, especially if you want to see all you can.
Not sure where to get the best deal on your rental? I’ve rented cars dozens of times through various search engines and have settled on Discover Cars as the best car rental search engine.
First, we have rural and scenic Kaʻū, which is home to South Point, the southernmost point in the United States.
There are great places to hike on the plains of this area while enjoying the intensity of the dramatic landscapes, as the ocean is always in sight.
There are no amenities in the Kaʻū hiking areas, so bring what you need to have a safe, comfortable journey: some local Hawaiʻian foods to snack on, plenty of water, comfortable clothing and footwear, and anything you need for camping.
You can, however, freely camp on the public lands here. Leave no litter or trash behind, and be sure to dig a hole for your bathroom needs.
South Point
Length: 0.5 miles Rating: Easy Route Type: Out and back
You can drive down the dirt roads leading to South Point, where you can then take the short hike to South Point, the southernmost point in the United States.
You may see people jumping off the cliff into the ocean here.. and, you may want to join them! There is a ladder you can climb back up after you jump.
Regardless of whether or not you decide to jump off the cliff, you will enjoy spacious views of the Pacific Ocean.
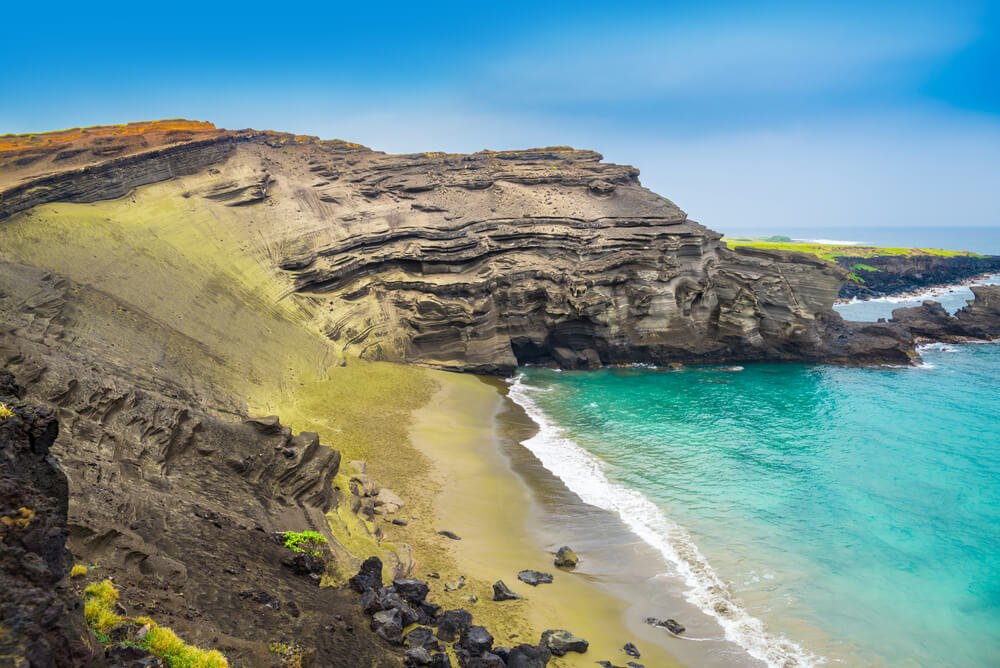
Papakōlea (Green Sands Beach)
Length: 5.6 miles Rating: Moderate Route Type: Out and back
From South Point, you can make the trek to Green Sands Beach. This unique beach gets its name from mineral deposits of olivine crystals.
These deposits come from an ancient lava flow which formed this beach. The beach also contains black and white sands so it is greener in some areas than in others.
The hike follows a dirt road, which makes it easy to navigate. You may even be able to hop a ride with a local driving to the beach. Hitchhiking is very common on the Big Island.
However, I would not recommend driving a rental to Papakōlea unless it’s a 4-wheel drive, as the road is rough.
Once you arrive, either hiking or hitchhiking your way to the beach, stop for a few moments and breathe and take in the beauty. The views are wonderful.
Note: Do not remove any sand from here or any Hawai’ian beach – it’s illegal and fines can be as high as $100,000 (plus Pele may curse you!)
Kaʻū Desert Trailhead
Length: 3.8 miles Rating: Easy Route Type: Out and back.
When visiting the Kaʻū district, you want to be sure to check out this trail on the Big Island! It’s special because you will have the opportunity to see fossils of human footprints in the rock along the path.
You will be exposed to the Kaʻū “desert,” which is largely desolate. You should bring lots of water, a hat, and sunscreen.
You will see some wildflowers and the prolific ohia tree along the way. Plus, enjoy more impressive views of the Pacific!
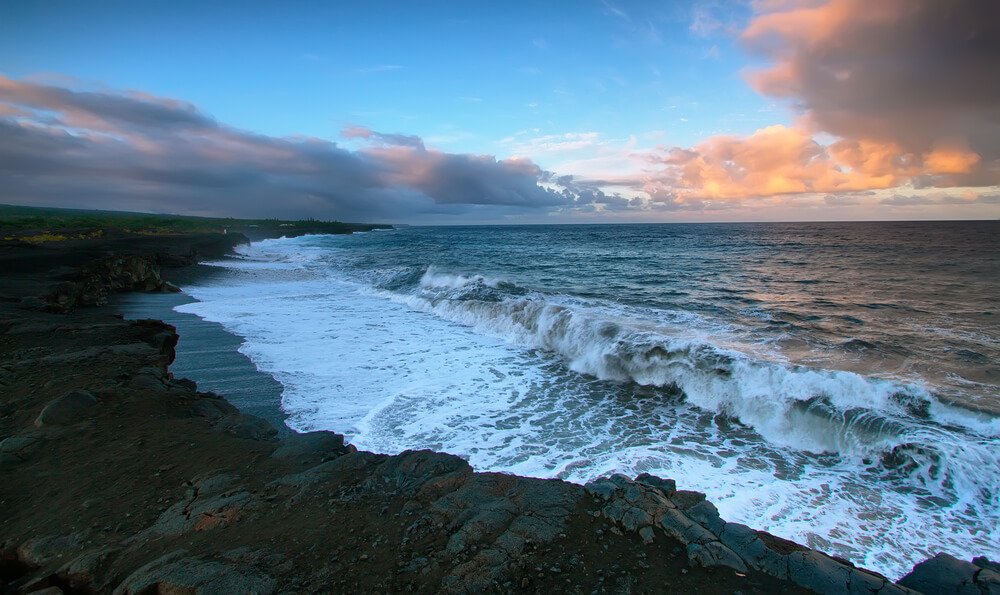
Punaluʻu (Black Sands Beach)
Length: 5.8 miles Rating: Moderate Route Type: Out and back
Come here if you want to see sea turtles — they are almost always laying on the beach!
Plus you get to see rare black sand beaches made of lava rock. You can tweak this hike to your liking or hike the entire length of Punaluʻu Bay.
Plus, there are many places to post up on the beach here. There are also restrooms and sometimes food vendors.
Hikes in Hawaiʻi Volcanoes National Park
This park has it all… including a luxury hotel! There are camping areas here as well if you’re looking for a more low-key way to spend a few nights in this gorgeous national park.
You can fill your water at the visitors center and check out the displays, or head down Chain of Craters Road to view the sea arch. You can find petroglyphs, lava tubes, rainforest, and desolate craters. It is of the ultimate in Big Island hiking destinations!
You can even see the glow of Kilauea Caldera at its corresponding museum! Peep the steam vents on your way down Crater Rim Drive to see the caldera. The glow of the caldera can be seen from long distances
Halapē (Puʻu Loa via the Puna Coast Trail)
Length: 11.3 miles Rating: Difficult Route Type: Point-to-point
This hike is not for you if you are an inexperienced hiker. You will need a water filter to refill water, or you’ll have to bring a lot of water to handle this 11-mile one-way, 22-mile roundtrip hike.
Due to its length, this hike is ideal for an overnight backpacking trip; however, you will need a permit for backcountry adventures.
You will find Halapē on the Puʻu Loa via the Puna Coast Trail. You will begin and end on a road, so if you’re traveling with a friend and two cars, you may want to leave vehicles on either end.
Otherwise, you’ll have to prepare a ride ahead of time or hike all the way back, doubling the length of this difficult hike.
This will be a tough but rewarding Big Island hike with some pretty hefty elevation gains. However, you won’t be disappointed with the result. The reward of hiking to Halapē is supreme!
Picture a private beach and freshwater swimming holes in an incredible oasis amongst the desolate lava fields, practically all to yourself.
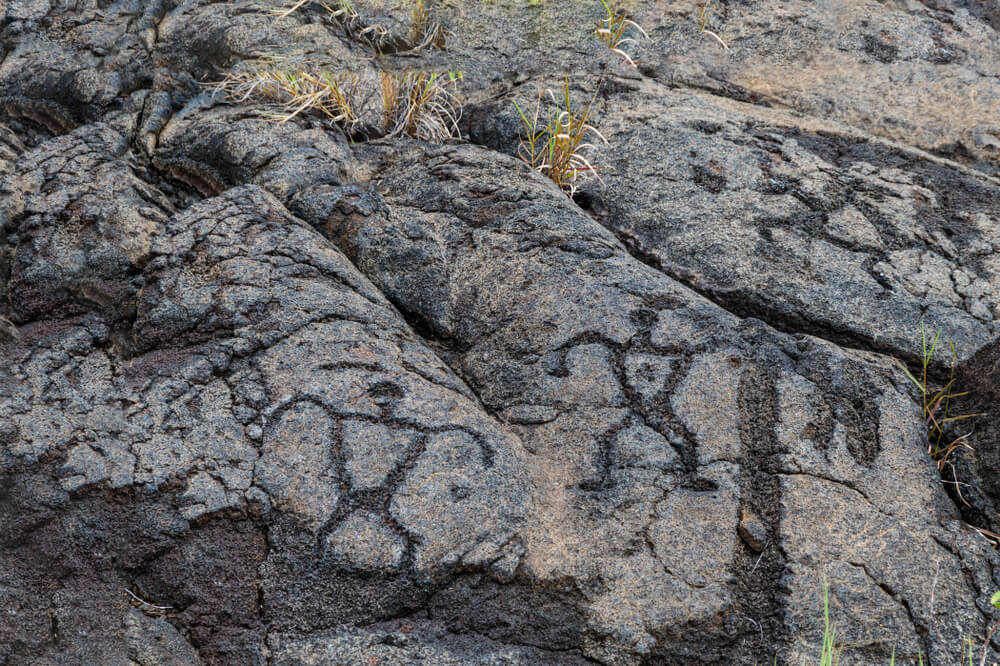
Puʻu Loa Petroglyphs Trail
Length: 1.2 miles Rating: Easy Route Type: Out and back
This is a convenient trail stop-off on your way down Chain of Craters Road, which you can take to check out the sea arch.
This road is a major pipeline through the park with many stops along the way which make a great introduction to hiking on the Big Island.
We like this stop as it is an easy hike with an incredible connection to the ancient Hawaiʻians, where you can acknowledge and pay your respects to their centuries of stewardships of the island.
There is a boardwalk along with parts of the trail which increases the ease of this walk, so this is really one that shouldn’t be skipped while hiking the Big Island.
Kīlauea Craters Trail and Nāhuku (Thurston Lava Tubes)
Length: 8.0 miles Rating: Moderate Route Type: Loop
This trail will give you a well-round experience of Hawaiʻi Volcanoes National Park. You will hike in the craters of long-since-erupted areas of the volcanoes you will be walking on. You may even see steam rising from the ground!
You will get to experience jungle and rare plant species that can only grow in this unique landscape. Plus, as you hike, you’ll walk across lava fields and through lava tube caves — be sure to bring sturdy hiking shoes, as these volcanic rocks can be jagged and rough!
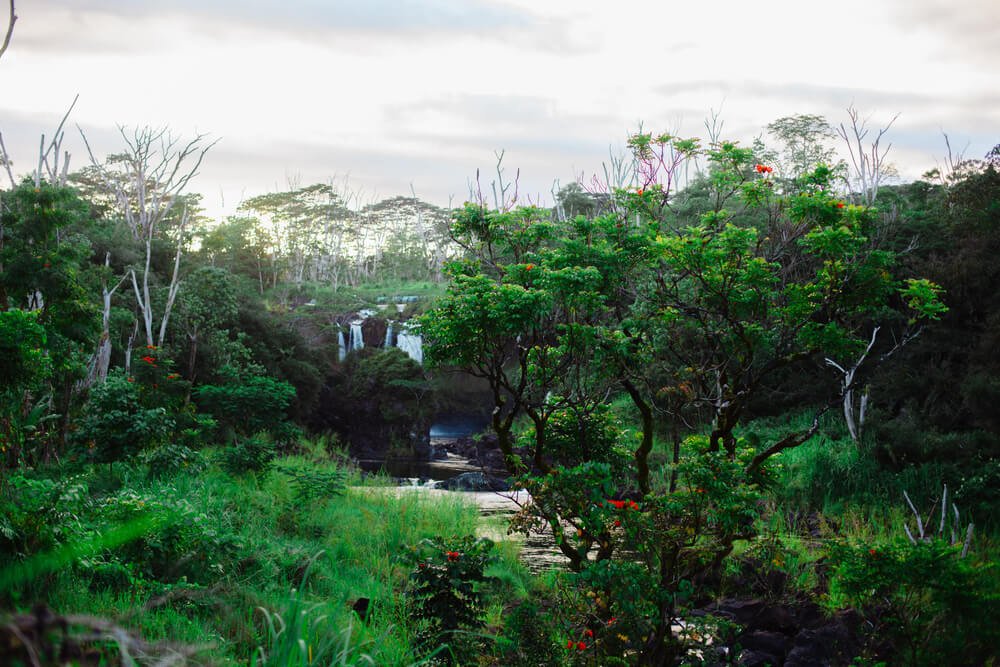
Big Island Hikes in Hilo
Hilo is a rainy area of the Big Island, so you’ll want to come equipped with some weatherproof gear if hiking near Hilo.
It is one of the busier areas of the island, though it is not as busy as Kona. There are lots of places to check out here, but we will stick with hikes for now!
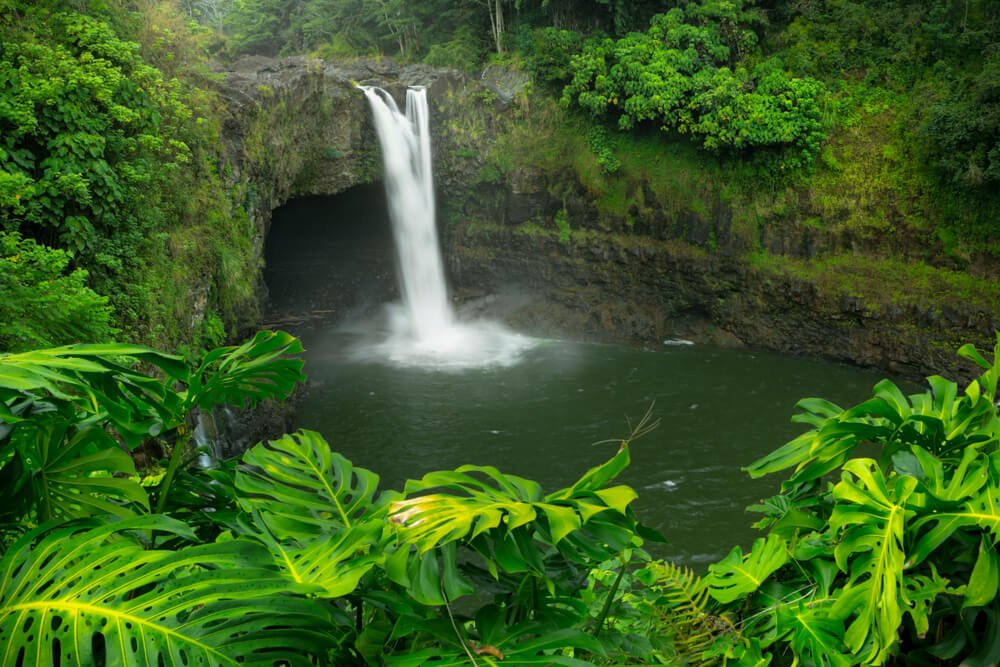
One of the main draws for hikes in this area is the waterfalls: there are several, and we’ll cover a few of the best Big Island waterfall hikes below.
Rainbow Falls (Waiānuenue)
Length: 0.1-0.2 miles Rating: Easy Route Type: Out and back
This is one of the most photographed spots in Hilo, and the hike couldn’t be easier!
You can easily view them after a short 0.1-mile hike. Then hike further up the trail to the upper falls (0.2 miles).
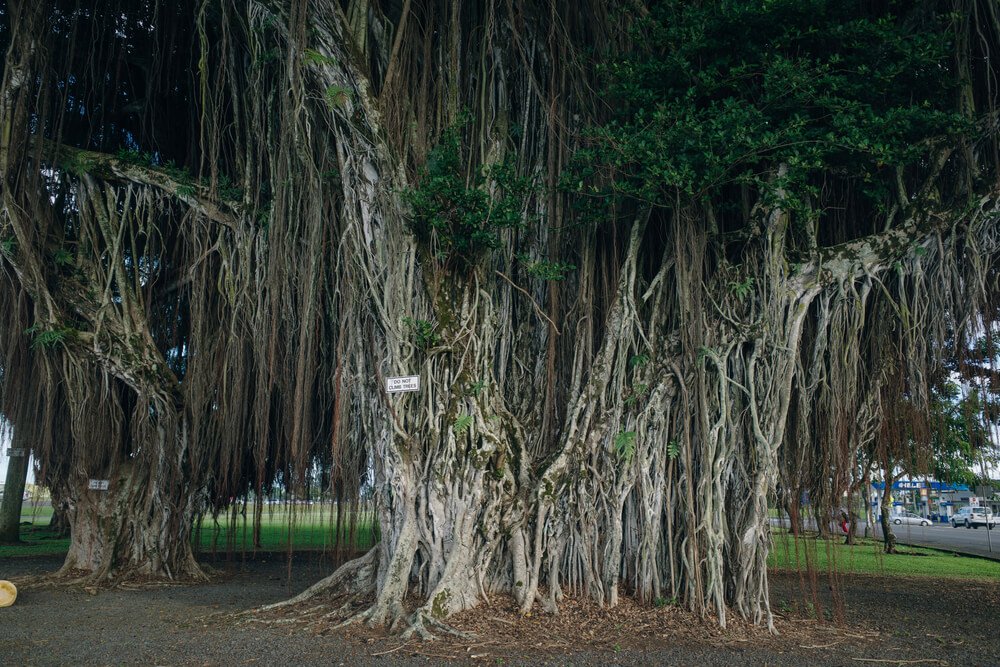
When you venture upwards you will get to view one of the most incredible banyan trees I have ever seen — it is over 1000 years old and truly majestic.
Trust me, you will want to climb it. It is not too difficult as the tree allows for “hallways” that form along its many branches. It is a spectacular sight to see and a fun playground for all.
Waiʻale Falls Trail and Boiling Pots Lookout
Length: 0.6 miles (plus an additional 0.3 miles for the Boiling Pots lookout). Rating: Moderate Route Type: Out and back
Here you can view another gorgeous waterfall, plus the Boiling Pots Lookout is pretty stellar, too, and the rapids below will surely impress!
It is also nice as these are two more short hikes with great rewards. You can easily do Rainbow Falls and Waiʻale Falls in a single day of hiking in Hilo. Have a waterfall-themed hike day!
Liliʻuokalani Botanical Garden, Banyan Drive, and Coconut Island Loop
Length: 2.3 miles Rating: Easy Route Type: Loop
This is a great way to see a few Hilo landmarks in one fell swoop!
The Liliʻuokalani Gardens are absolutely lovely: you’ll feel like you’re in Japan as you walk through these 25-acre gardens, which were built in 1917 as tribute to the Japanese immigrants who came to Hawaiʻi to work the sugar cane fields.
The gardens are named after the last reigning monarch of Hawaiʻi, Queen Liliʻuokalani, who was overthrown when the United States invaded the Kingdom of Hawaiʻi, as a way of honoring her.
You’ll continue down along Banyan Drive, which is cool because of the beautiful banyans, of course! The banyans were planted by celebrities who have placards on the trees. It’s known as the “Hilo Walk of Fame”.
Finally, Coconut Island is a tiny little island with a park, restrooms, and some beaches. It is popular to jump off the tower in the waters of Hilo Bay from here.
Fun fact: Coconut Island was originally called Mokuola by the Native Hawai’ians. It translates literally to “island [moku] of life [ola]” but can be understood as meaning “healing island”. It was said that one could heal themselves by swimming around the island three times!
Big Island Hikes in Hāmākua
Head north from Hilo to picturesque Hāmākua, which is an excellent part of the island for “rainbow hunting” in the wet climate of Hilo… plus it is just such a beautiful part of the island!
Get lost in the jungle or a sacred valley as you explore Hāmākua.
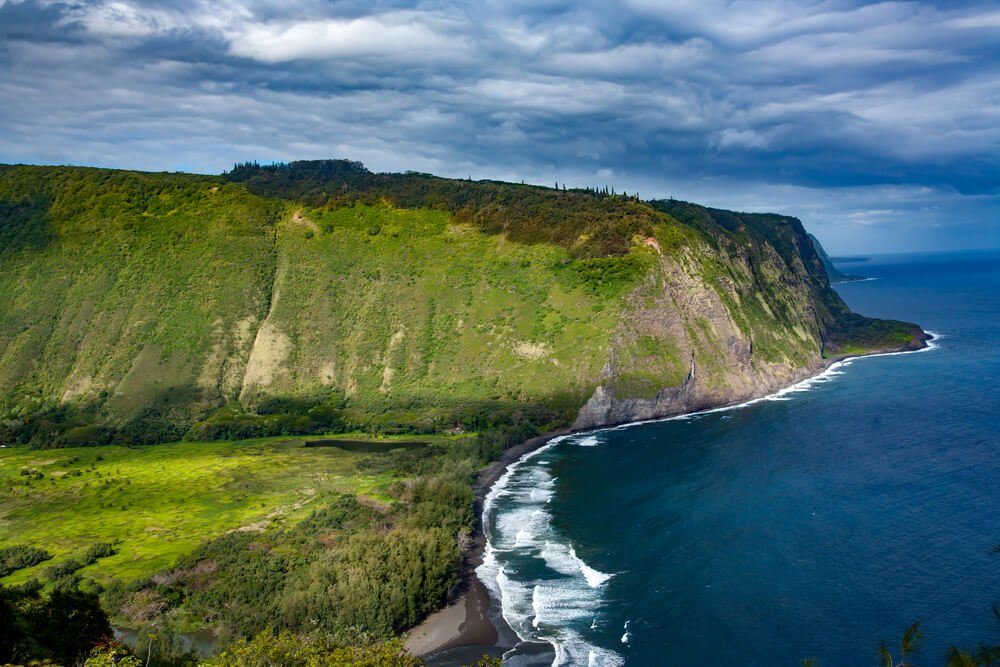
Waipiʻo Valley Trail
Length: 4.7 miles Difficulty: Moderate Route Type: Out and back
This is by far one of the most beautiful hiking spots on the Big Island! It is truly magical.
You will have to endure the steep grade of the road down into the valley, but it is worth every step.
Also, be aware that there is a river crossing here. At times the river is not passable due to heavy rainfall, so keep that in mind.
Waipiʻo Valley is a sacred valley to the Native Hawaiʻians (kānaka maoli). It was a place where they lived and celebrated together. In fact, King Kamehameha — the first ruler of the Kingdom of Hawaiʻi — was raised in this valley.
I urge you to remember this when you visit. Hold space for the remaining kānaka maoli, the Native Hawaiʻians, from whom this beautiful land was taken, and who suffered devastating effects from U.S. imperialism, colonization, and annexation.
You can do this by ensuring history stays alive by learning the history of Hawaiʻi and approaching the culture and language of Hawaiʻi with curiosity.
You will have a fuller, more rewarding experience in Hawaiʻi in general if you hold to this rule of respect and curiosity.
Best Big Island Hikes in Kohala
Kohala is situated at the very top of the Big Island. There are just a couple of spots for hiking here.
Be sure to stop in the wonderful town of Hawi to fuel up for your trip. The town is so charming, you might not ever want to leave!
Pololū Trail and ʻĀwini Lookout
Length: 0.9 miles (3.9 miles to ʻĀwini) Difficulty: Moderate Route Type: Out and back
This Big Island trail will take you down to Pololū Valley, where you can enjoy views of the ocean and the green mountains which cascade along the coastline.
There are some swings here for you to enjoy. We suggest bringing a hammock to relax in while taking in the sights and sounds.
The beach is pretty rocky in parts, but if you bring a hammock, you will be all set!
To explore the area more, keep hiking past the beach and follow the trail up to ʻĀwini Lookout. It can be pretty wet and muddy to hike but you get great views and the heart pumping. This is where the 3.9 miles comes in!
Big Island Hikes in Kona
Next, we have the “Kona side”. There is a huge amount of things to do in the Kona district!
One of the big draws of Kona is hiking to some hidden beaches along the coast. Plus there are forest and lava hikes for you to enjoy among the many other activities in Kona!
Makalawena Beach (Pu‘u Ali‘i)
Length: 2.2 miles Difficulty: Easy Route Type: Out and back
This is the best beach on the Big Island (the hike is fully worth it!)! It is rarely crowded by beachgoers because of the effort it takes to get there.
You will walk down a road to reach the beach. It has no shade so be sure to bring your reef-safe sunscreen, a hat, and plenty of water.
Once you reach the beach you can continue walking to make this a 4-mile hike if you desire. The waters are usually calm for swimming so you may want to just jump right in and enjoy the blue water and white sandy beach!
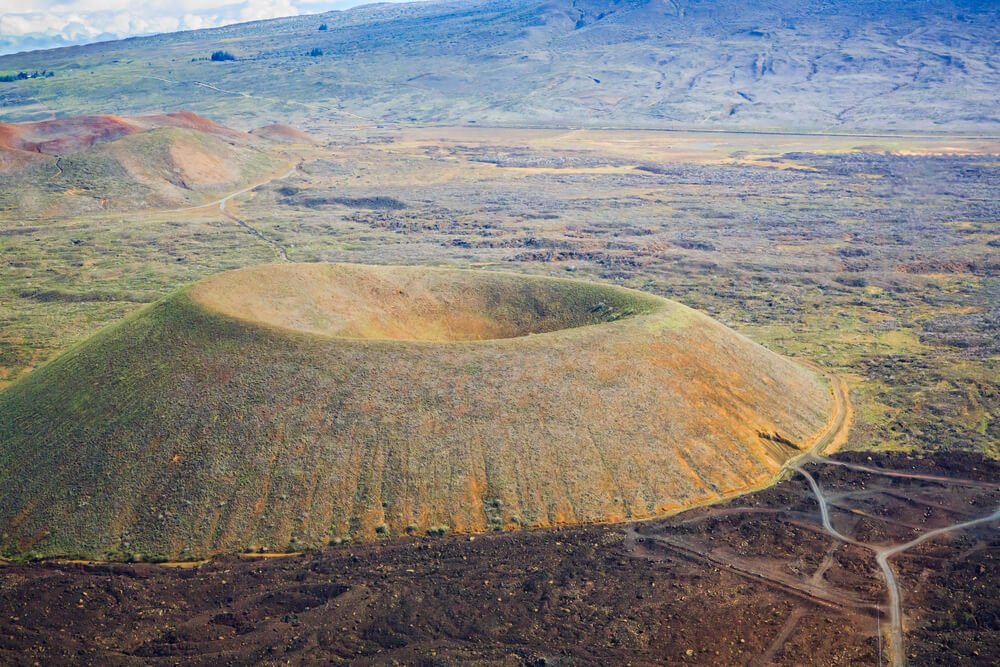
Puʻu Wa’awa’a Cinder Cone Trail
Length: 7.1 miles Difficulty: Moderate Route Type: Loop
Puʻu Waʻawaʻa Cinder Cone State Park has many great hikes! We like this one as you end up at the top of Puʻu Wa’awa’a
You will get to see an awesome view of Mauna Kea and Mauna Loa, two of my favorite mountains in the world.
The rock formation is also super cool, and you can enjoy wildflowers and spacious views from here
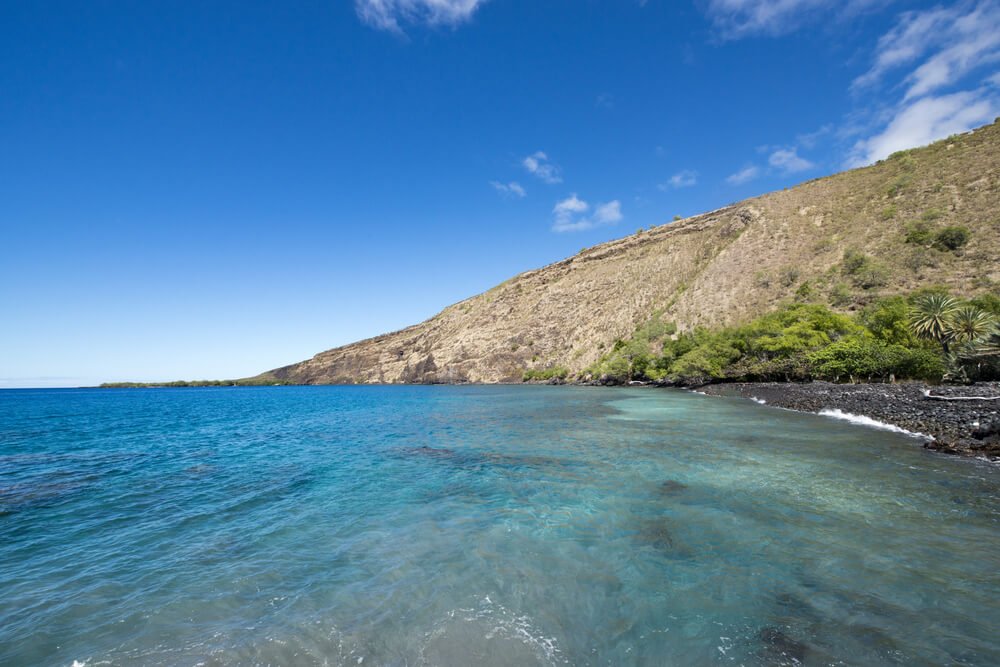
Kealakekua Bay
Length: 3.8 miles Difficulty: Moderate Route Type: Out and back
To find the unmarked trailhead, park on Nāpōʻopoʻo Road at telephone pole #4. There are other turn-outs to park in so please do not block the road!
This is an awesome Big Island hike that ends at the bay, so you may want to bring snorkel gear along. You may get to see ruins from old Hawaiʻian villages.
At low tide, you may see the placard which marks where Captain Cook landed. The story is that Captain Cook was killed by Native Hawaiʻians, but the full story is rarely told.
The real story is that Captain Cook, on this third voyage to Hawaiʻi, attempted to kidnap the King Kalaniʻōpuʻu to hold for ransom in return for a stolen boat, and that Captain Cook died in the struggle. (So, yeah, if you attempt to kidnap the king, you can’t really be surprised by the results…)
Along this hike, besides seeing this interesting historical landmark, you may also get to see Hawaiian spinner dolphins and other beautiful wildlife.
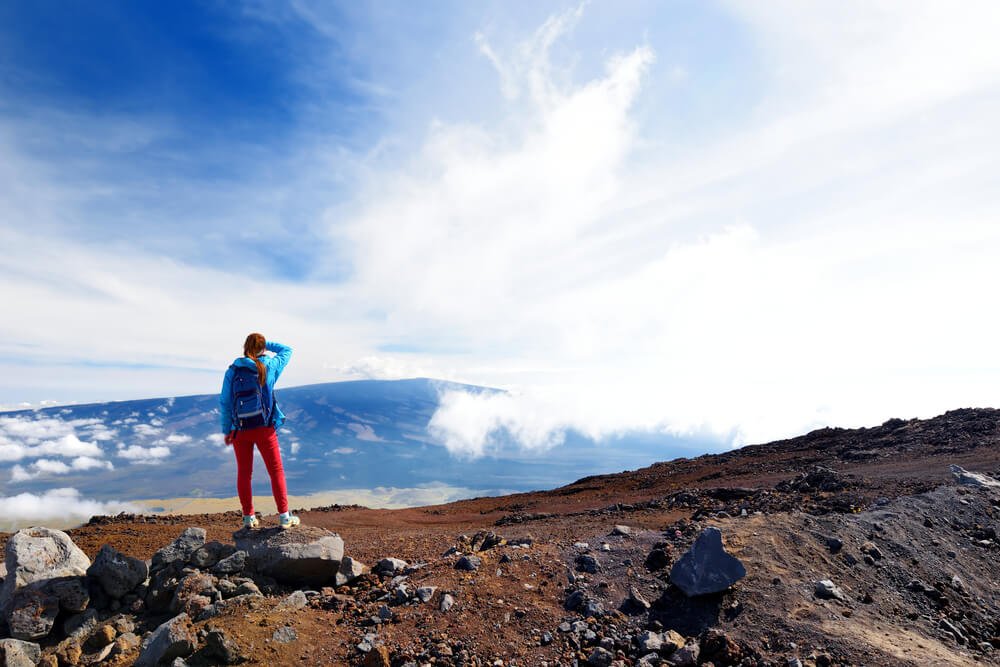
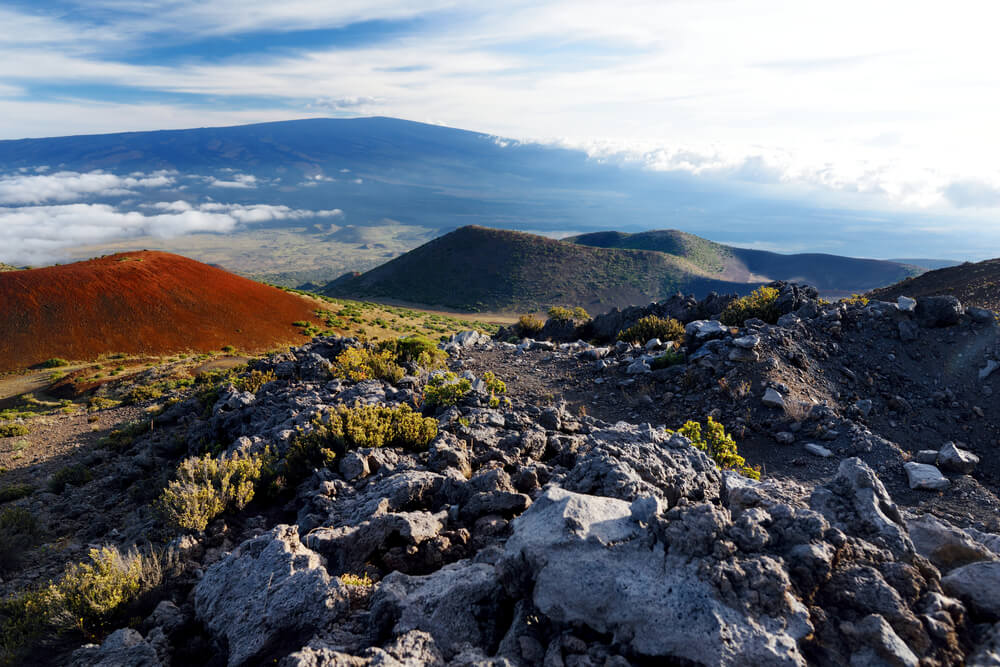
Best Saddle Road Hikes on the Big Island
Cutting across the island is Saddle Road. It is from here you can access hikes on Mauna Kea and Mauna Loa. You may even want to summit them!
Prepare for the cooler temperatures that occur at higher altitudes. Also, be aware that hiking at these elevations can cause Acute Mountain Sickness (AMS). Remember to stop frequently if you choose to hike up the mountain, which is almost 14,000 feet!
Bring plenty of water and snacks. Take your time and allow yourself to acclimate to the elevation. Be sure to bring a hat and sunscreen. It feels cool, but you are super exposed to the sun!
Mauna Loa Summit
Length: 13 miles Difficulty: Hard Route type: Out and back
When you climb Mauna Loa, you are hiking on the world’s largest mountain by volume in the world and the world’s largest volcano!
To get to the trailhead, take Saddle Road to Mauna Kea Observatory Road (between mile markers 27 and 28). Park at the trailhead after 17.5 miles of driving on this road. It is one lane in some spots and rough so drive carefully.
Bring a map, although the route is marked with cairns so it is relatively easy to navigate. Just be sure not to hop on the Mauna Loa Trail that begins in the lowland; that is not the same trail you are on here.
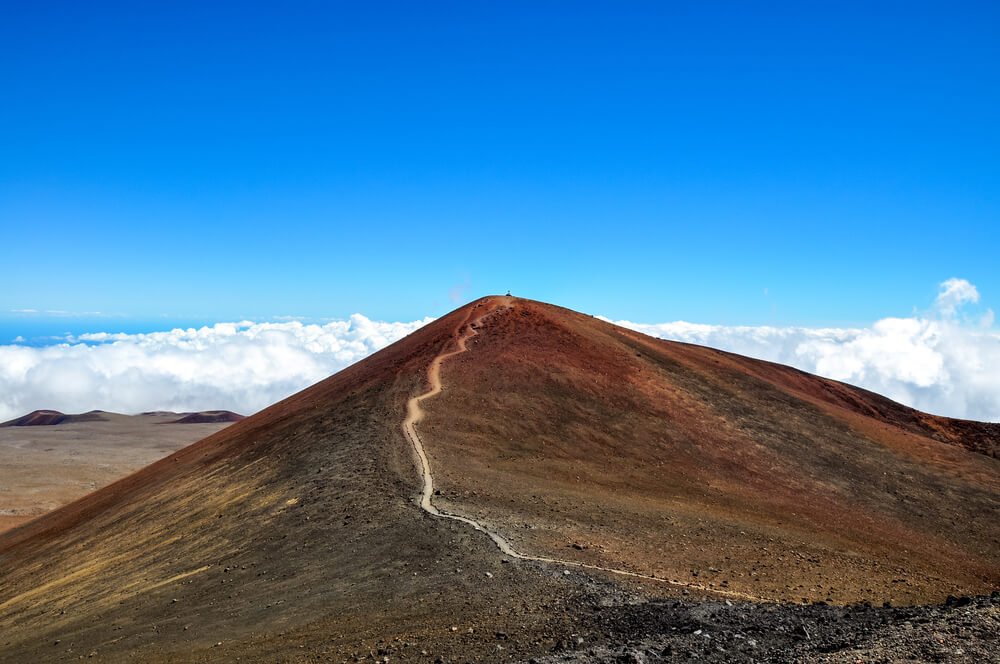
Mauna Kea (Maunakea) Summit via Humu’ula Trail
Length: 12 miles Difficulty: Hard Route Type: Out and back
To get to the trailhead follow the same directions for Mauna Loa’s trailhead but stop at Ellison Onizuka Mauna Kea Visitor Information Station after about 6 miles.
This is where the trailhead will be. You need a permit to hike Mauna Kea (spelled Maunukea in the Hawaiian language), but it is easy to do with a self-registration station at the trailhead. Be sure to drop off your registration at the visitor center!
You will get to hike past Lake Waiau which is the highest lake in the Pacific Basin. Plus when you climb Mauna Kea, you are hiking the highest mountain in Hawaiʻi, in the Pacific Rim, and the highest sea mountain in the world.
Mauna Kea is named for the Hawaiian sky god Wākea, making this a sacred mountain. Please remember this as you climb. Do not litter or remove anything from the island you are not permitted to.
Honor the tumultuous history of this mountain. There are still many activists protesting the 30 Meter Telescope and further development of Maunakea, as it is just that sacred to the kānaka maoli.
A note about “leaving no trace”: this is a Western concept that is not practiced by many Indigenous groups. You may see some offerings made by the Native Hawaiʻians to the goddess of Maunakea, Poliʻahu; however, this is not needed by outsiders as it can be offensive if done incorrectly.
You absolutely should not interfere with anyone you see leaving an offering, as this is not your place as a visitor. “Leave no trace” does not apply to Indigenous people following their ancestral Indigenous practices, and enforcing this on them is a form of cultural erasure.
In addition to these massive Big Island summit hikes on Saddle Road, there are plenty of shorter hikes you can do.
Puʻu ʻo‘o Trail (8.3 miles), Pu’u Kalepeamoa Loop (1.3 or 3.8 miles), or Kaūmana Trail (2.7 miles) are some other great options for this area.
Hikes in the Puna District
The only district not fully covered in this article includes the Puna District. This is where a lot of the rainfall on the island occurs.
If the lava is flowing in the right direction, you can access the lava flow from the Puna District. Hiking on the Kalapana Lava Fields to see lava pouring from the mountainside is truly awe-inspiring.
I hope you get to experience it when you visit the Big Island. There are many beautiful spots along the Red Road to explore, as well. Puna is a really special part of the island, so don’t count it out!
***
The Big Island is full of adventure and learning opportunities, where you can learn the history of these islands through connecting with its nature and its beauty.
Show up with an open heart and an open mind full of curiosity, and the island will embrace you. Honor the ancient and present-day Native Hawai’ians through educating yourself and taking care of this sacred place.
It is full of jaw-dropping views and incredible experiences, so leave it just as beautiful as you found it. Enjoy your exploration as you hike the Big Island!
Allison is a writer, herbalist, musician, and lover of nature. She is an avid traveler and backpacker, having traveled throughout most of the United States and through parts of Asia and Europe. She has lived in Hawaii, Philadelphia, New Jersey, Boston, and of course, California. Allison has lived in California for 5 years, working on farms and in Yosemite National Park. She has been all over the state, enjoying many cities and of course, the many amazing outdoor wonders California offers. She currently resides in Aptos, Santa Cruz County, CA.
Oahu is within the Hawaiian Island chain. It was formed from volcanic eruptions millions of years ago.
Oahu is known for mesmerizing natural beauty — complete with white sands, humpback whale watching, tropical flora, dense jungle and waterfalls.
Oahu is also a culturally rich and historically significant place. It’s known for important landmarks that should be on any Honolulu itinerary, like Pearl Harbor and the Iolani Palace.
Visitors can enjoy extravagant luaus, sip Mai Tais, and learn about the island’s early Polynesian inhabitants.
Tackling these incredible hikes in Oahu, you’ll also experience the island’s captivating allure. See its beauty first hand. Visit historically significant locations, and connect with locals.
These Oahu hikes are perfect for backpackers, tourists, and adventurers. These hikes span a variety of skill levels, so there’s something for everyone to enjoy!
A Note on Visiting Hawaiʻi
One important thing to mention about the island of Hawaiʻi is that it is the home to the Kingdom of Hawaiʻi, which is under U.S. occupation.
When you visit this island, be curious and respectful of the Native Hawaiian way of life. The state we now know as Hawaii was forcibly annexed, without treaty or legal right, from the Kingdom of Hawaiʻi.
This island is their ancestral land, and many of the locations mentioned here are sacred to them. Do not take anything from the island, including lava rock. It is said it will bring you bad luck if you do!
If you are respectful, you will have a wonderful time on this island. It is full of magical, intense energy. With the right mindset, visiting the Big Island, the land of aloha, can be transformative.
Move with Aloha
A note on the concept of aloha: Despite what popular culture portrays, aloha is more than just hello and goodbye!
In the Hawaiian language, “Alo” means “presence.” “Ha” means “the essence of life.” It is an expression of love and understanding that we are all connected to spirit.
When you live with aloha, you live with passion and considerations for the natural world, its creatures, and your fellow humans. Isn’t that a great way to be?
So try it out while you move through this Big Island itinerary. I promise you won’t regret it, and you may walk away with a new point of view!
Enjoy and move with aloha in your heart during your five days on the Big Island.
5 Best Hikes in Oahu
All of these hikes are impressive in their own way. You’ll be guaranteed to enjoy stunning views and natural features. Some of these hikes are very low key, and others are quite challenging.
This guide includes all the information you’ll need to pick the hike that’s right for you… or enjoy them all!
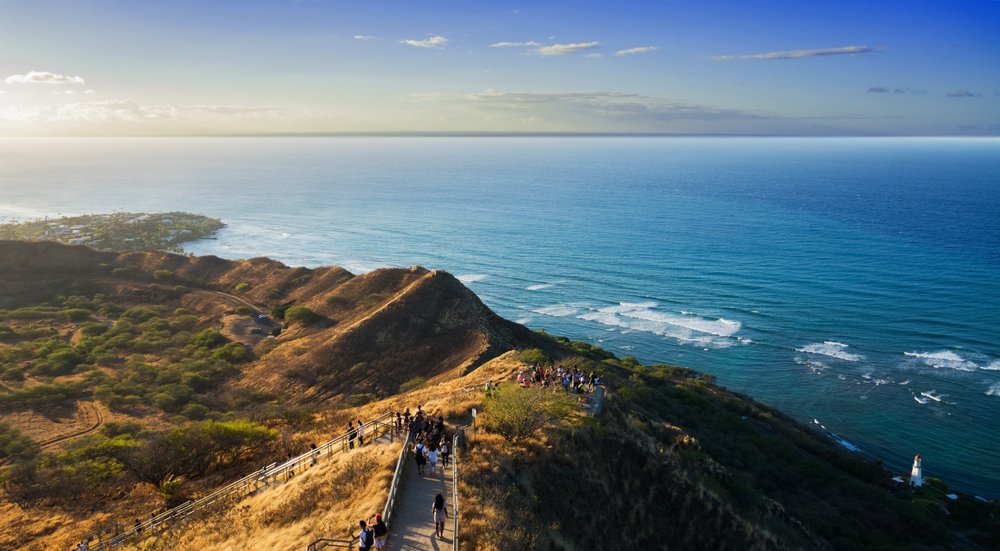
Diamond Head
2023 NOTE: A permit is now required to hike Diamond Head.
Diamond Head is one of the top attractions on the island of Oahu. It is a massive volcanic tuff cone located on the island’s southern shore.
This crater is over 300,000 years old! Also, the topography you see was all made from one single eruption!
Diamond Head is a short 30-minute bike ride from Waikiki. Waikiki Beach is one of the popular places to stay in Oahu among tourists.
Waikiki is where you’ll find all the best shopping, dining and entertainment on the island.
Besides insane geological history, Diamond Head also has a unique military history. The US Government purchased this land in 1905 and built Hawaii’s first military reservation here.
The slopes of the crater were used to store guns and ammo.
Some of these tunnels created by the military still remain, and you’ll be able to walk through one of them!
You’ll also be able to lay eyes on a WWII bunker & the famous Diamond Head Lighthouse.
At Diamond Head, visitors can hike to the edge of this prehistoric volcano. Views from the top are amazing!
Enjoy a 360-degree panorama of the Pacific Ocean and spot the city of Honolulu in the distance.
This out and back trail span 1.8 miles. Along the way, you’ll climb some stairs and gain nearly 500 ft in elevation.
This trail is rated moderate in difficulty. It’s best to arrive early in the morning because the sun can be unrelenting. There is no tree cover along this path.
Waimea Falls
Waimea Falls is a very short and scenic hike. It’s perfect for families. This 1 mile out and back path takes you through lush botanical gardens, ending at a waterfall.
Waimea Falls is located on Oahu’s North Shore. This place has an interesting history as well.
In the past, it was an community entertainment venue where locals would come to watch cliff jumpers and hula dancers.
Today, Waimea Falls is still a cultural hub. Make sure to check their schedule for workshops, activities and classes offered.
It’s a great place to learn more about Hawaiian culture and history.
Once you hike to the waterfall, you will be provided with life jackets. This is one of the few waterfalls in Oahu that you are able to swim up to!
Jump in and enjoy the surrounding jungle views!
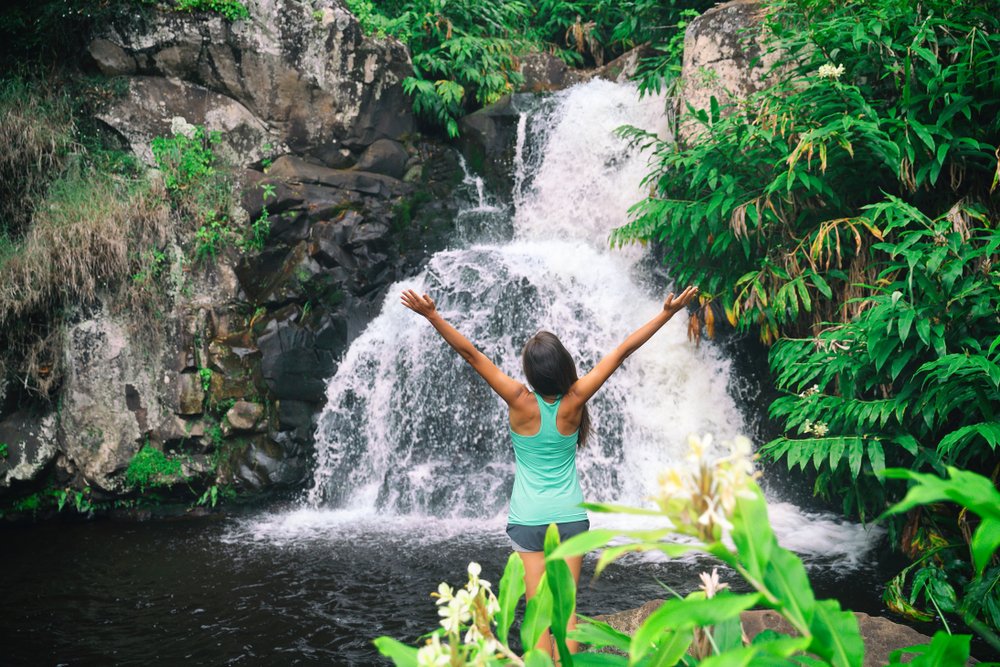
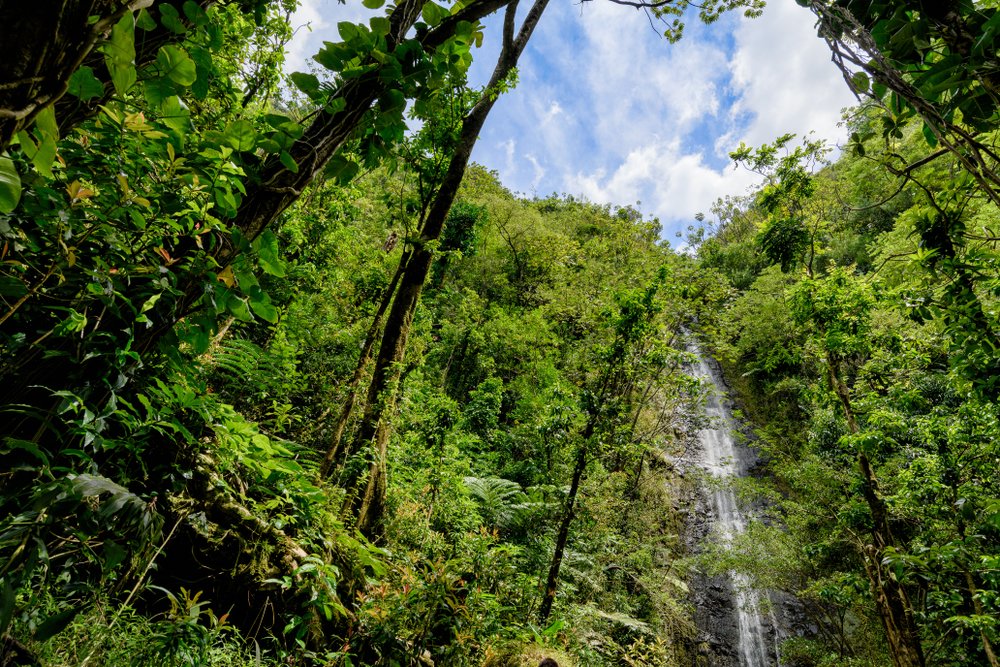
Manoa Falls
Manoa Falls is one of the most captivating waterfalls in Oahu!
The water falls over 150ft over the edge of the mountainside. It’s a popular hike among tourists and locals alike.
It’s a 1.7 mile out and back trail that’s rated moderate. You gain over 600 ft in elevation.
The trail can be a bit slippery and muddy, so be sure to wear appropriate attire and shoes. Along this hike, you can spot guava, bamboo and eucalyptus plants! It takes most people about 30 minutes to reach the falls.
Disclaimer: This is not a waterfall you can swim in! There are some big slippery rocks in the pool and some microbes that can cause disease.
When visiting Manoa Falls, be sure to check out the nearby Lyon Arboretum.
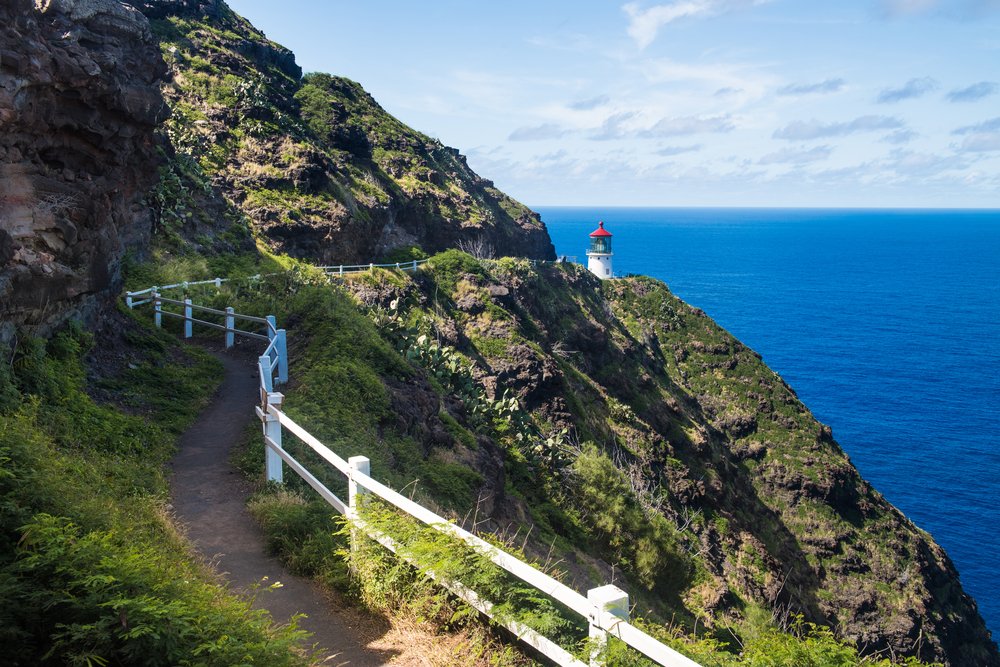
Makapu’u Point Lighthouse Trail
The Makapu’u Point Lighthouse Trail is one of the most scenic hikes in Hawaii.
It’s a 2 mile round-trip trek that offers panoramic views of Oahu’s southeastern shoreline. Along your hike, you’ll be able to catch glimpses of the Koko Crater and Koko Ridge.
The trail’s namesake is the Makapu‘u Lighthouse. This historic lighthouse was built in 1909 and displays an iconic red roof.
It has the largest lens of any lighthouse in the United States, and it’s been listed as one of America’s Historic Places.
Makapu‘u Point is the southeasternmost point on Oahu. Before the lighthouse was built, this area was vital to maritime commerce.
When the lens for this lighthouse was created, it was an engineering and technological marvel. It was displayed proudly at the World’s Columbian Exposition of 1893.
During your hike, you’ll be able to see beautiful views of this distinct lighthouse, and postcard perfect pictures!
On a clear day, you may even be able to see to Moloka‘i and Lana‘i.
Just offshore of the hiking trail, there are many nature sanctuaries including a bird refuge. You can also spot migrating whales! This is a place where you’ll want to bring your binoculars.
There’s not much shade along this trail, so make sure to bring a hat and sunscreen!
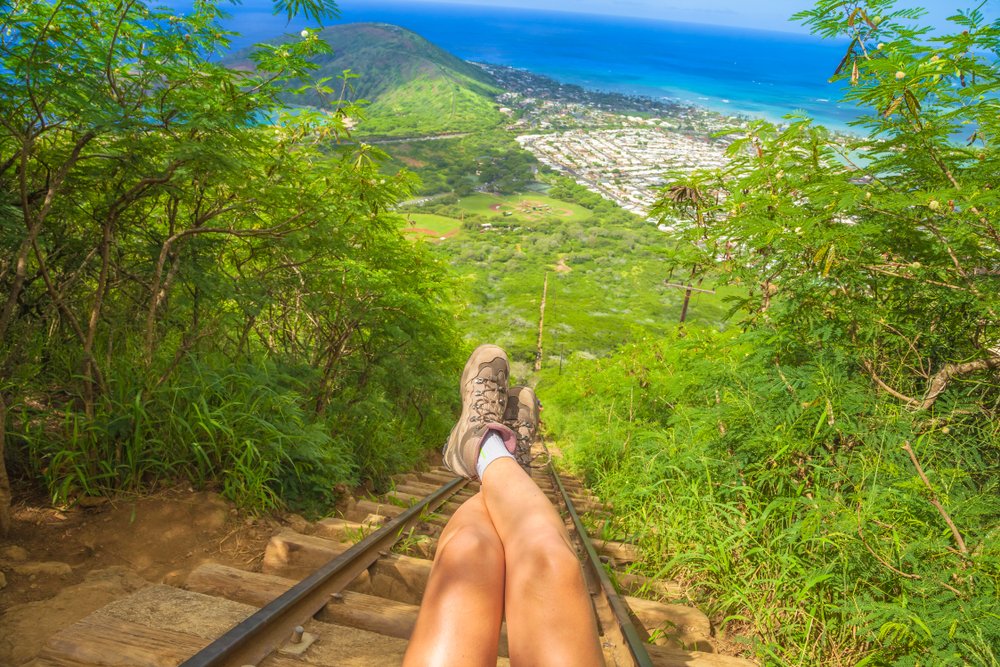
Koko Stairs
The Koko Stairs are also called the ‘Koko Crater Trail.’ It’s a challenging hike that involves climbing up 1,000 stairs! Seriously.
This trail is rated difficult and it’s 1.8 miles total out and back. Hikers will gain nearly 1,000 ft in elevation during this climb!
The Koko Crater is another volcanic tuff cone.
The “stairs” aren’t really stairs. It’s actually an old railroad line that’s been attached to a hillside. One could easily twist an ankle here! So, please bring appropriate footwear.
These stairs also have ties to military endeavors during WWII. They were built to lead up to one of the famous Pillbox bunkers.
At that time, a railway was used to carry essentials up to the bunker.
It’s usually easy to find parking at the base of this hike. It starts off pretty easy, but gets progressively more challenging as you climb.
There is also one scary area where you will have to pass over a questionable bridge. Although, alternative route options are available for hikers wanting to skip that part.
Although, you’ll be graciously rewarded at the top. Soak in the mesmerizing views of Hanauma Bay and the Port Lock Peninsula! Make sure to take plenty of breaks and to pace yourself on the way to the top. There is limited shade on this hike.
Author Bio
Valentina’s Destinations was born from my obsession with meticulously researching, organizing, and planning my travel itineraries. I’m originally from Serbia, but I grew up in Chicago. I love hunting down local restaurants, unique experiences, and hidden gems.
Allison Green is a former teacher who has been travel blogging since 2016. She has a Masters in Teaching and a B.A. in English and Creative Writing. Her blog posts merge her background as an educator with her experience traveling to 70+ countries to encourage ethical, meaningful travel. She has been a speaker at the World Travel Writers Conference and her writing, photography, and podcasting work has appeared in National Geographic, CNN Arabic, CBC Canada, and Forbes, amongst others. Now a full-time traveler, she has lived in Prague, Sofia, New York City, and the San Francisco Bay Area.
Preparing for a hike can take some effort, from picking a trailhead that is the appropriate difficulty, to deciding how to dress and how to pack, to figuring out key safety information before your hike.
Luckily, there is a wide variety of hiking apps out there that aim to make every part of the hiking process less intimidating!
From picking trails and tracking your route and progress to identifying plants and peaks in the distance, these apps for hikers go the distance when it comes to making sure you have a good, safe time on the trails.
I asked 15 fellow trail-loving travel bloggers from around the world to recommend the apps they find indispensable as they travel, hike, and camp their way around the planet.
As a result, this post features a wide variety of hiking apps that work well in destinations all over the world, including the US, Canada, Australia, New Zealand, the UK, and Europe, amongst others!
Undoubtedly one of the best apps for hikers, AllTrails is an essential app for anybody that enjoys spending time outdoors.
Originally created back in 2010, AllTrails now features hiking trails from over 100+ different countries around the world and has in excess of 10 million members – making it one of the most popular hiking apps in the world.
The main function of the AllTrails app is to provide information on hiking trails in a given location.
This information includes the length of the trail, the difficulty, elevation gain, popularity etc.
For example, when hiking in Lake Louise, you could use the AllTrails app to determine that Devil’s Thumb is a ‘difficult’ hike with an elevation gain of roughly 883 m, whereas the Lake Louise Lakeshore Trail is categorized as ‘easy’ due to no elevation gain along the trail.
AllTrails offers two subscription packages – the first, and most popular, is the basic membership that is completely free.
You simply download the app, make an account and you’re free to use all of the basic features on the app like searching for trails, accessing the trails maps online and adding photos and reviews on trails you have completed.
The second subscription option, AllTrails Pro, costs $29.99 for an entire year and features all the perks of the basic subscription package, as well as advanced features such as accessing trails maps offline, notifications to alert you when you go off the trail and use of the app without any ads.
AllTrails also offers a 14-day free trial of AllTrials Pro, which gives you the peace of mind of being able to trial-run the subscription package without having to commit money towards it.
All in all, whether you decide to pay for AllTrails Pro or not, the AllTrails app itself is an essential app for outdoor enthusiasts and certainly one of the best apps for hikers.
Wikiloc
Contributed by Linn Haglund of Andalucia Hiking
One of the best apps for tracking, finding, and following hiking routes is Wikiloc.
They have a free version where you can track your own route and make them accessible for others with the app to follow.
You can add pictures, waypoints, and information on the route so that it is easier for others to follow the same track without getting lost.
If you want to follow another person’s hiking track, you will have to get the paid version.
It is very economical at only 9.99 for a year and I highly recommend it.
With the premium version, you can download as many hiking trails as you want and follow them at the same time as you record your own trail.
This gives you the kilometers/miles you have walked, the average speed, elevation gain/loss, moving time, and total hiking time.
It is a great way to stay safe on the trail, especially when you go hiking solo or in places where the path is hard to distinguish.
The app will let you know if you are walking away from the trail and when you get back on it.
It is also easy to backtrack where you come from. Sometimes it can be hard to find the way back, but with Wikiloc recording, you see where you came from!
Hiking Project
Contributed by Kassidy of The Hiking Helper
When it comes to hiking apps, Hiking Project is one of the best.
Hiking Project is a free app that is available for iOS and Android users.
It’s the perfect place for hikers to find inspiration for new hikes in their area, or around the world.
When you open the app, you’re immediately brought to a map of your location.
Within that map, you’ll see hundreds of hikes that are ready to be explored.
You’re able to zoom in on certain areas on the map and see where there are hikes in that location.
Click on a hike, and Hiking Project will tell you the difficulty, distance, elevation gain, and trail highlights.
If you know how difficult of a hike you’d like to go on, you can also filter by difficulty.
You can also use the app to search for a hike if you already have one in mind that you’re interested in.
One of the best features of Hiking Project is that you’re able to download a map of an entire state or country and use that map offline.
If you find yourself somewhere with no service, you’ll still be able to find awesome trails!
Using Hiking Project, you’re able to find hidden gems that otherwise may have been difficult to find.
Once you’ve found one of these epic hikes, you can favorite it and save it for later.
Hiking Project is definitely one of the best hiking apps out there!
Trailforks
Contributed by Taryn of Happiest Outside
The Trailforks App was originally developed for mountain bikers, but they have branched out and now offer support for other sports like hiking, horseback riding, and skiing.
It’s a GPS app that uses a crowd-sourced database of trails and shows your current position.
I like to use Trailforks when I’m hiking in confusing multi-use trail networks that include a mix of hiking and biking trails.
I use it all the time on the trails near my home in Squamish, an outdoorsy town on the way to Whistler, Canada.
Trailforks has a few features that set it apart from other trail apps.
Most importantly, they partner with local trail associations around the world to ensure that the people who build and maintain the trails can help provide the most updated info about trail status and conditions.
You can also submit conditions reports while you are out hiking.
Another features I like is that each trail has a built-in clickable elevation profile that shows your current location.
That way, you can tell how much more climbing or descending you have to do.
The app also allows you to track your hike, check off trails you’ve completed, and build routes that use multiple trails.
You can access all of the Trailforks features for free on their website, which I like to use as a planning tool.
The app is available in both a free version and Trailforks Pro, which costs $2.99/month.
The free version has all the features, but a limited geographic area – when you install the app you’ll need to pick a home area that is roughly 35 miles by 35 miles.
If you want to use the app elsewhere, you need to sign up for the paid version. Both versions also have prompts to encourage you to donate to local trail associations to support maintenance on the trails you are using.
FarOut Guides (formerly Guthook Guides)
Contributed by Meg of Fox in the Forest
Recently rebranded from Guthook Guides to FarOut Guides, this amazing app is still one of the best hiking apps on the market today.
In fact, it features over 35,000 miles of trails in its database and can be used offline as you get detailed information about wayward points and enjoy comprehensive routes that are specifically tailored to suit your personal needs.
So, if you’re a long-distance hiker or backpacker who is looking to thru-hike some of the best national parks for hiking then this is the ideal app for you.
All you have to do is complete the initial app setup prior to starting your hike and then FarOut Guides will take care of the rest, allowing you to seamlessly use any guides you purchase offline.
Therefore, while you can install the app for free, you will have to pay anywhere between $4.99 and $59.99 per guide depending on the length of the trail.
However, the price is totally worth it since the date provided is super comprehensive, can be used offline, and is regularly updated to give you the best info possible.
Plus, in addition to getting valuable info on water sources, campsites, elevation, and distance, the app will actually track your progress and location, ensuring that you’ll never get lost during your next long-distance trek.
One of my favourite hiking apps is Komoot, which allows you to plan and navigate hiking trails, as well as connect with other hikers and find inspiration.
In terms of navigation, Komoot is one of the best I’ve found!
The Route Planner feature is able to calculate the optimal route to a destination and will provide the elevation profile and terrain details, as well as flag up any “hiking highlights” you can expect to see along the way.
It also has turn-by-turn voice navigation (premium version only) which is really useful when out on a trail with lots of crossroads, etc.
You can simply put your phone in your pocket and be alerted when you need to make a turn.
The Discover tab is really great for finding hiking inspiration as it features “collections” such as “Hiking on the Derbyshire Dales.”
Collections contain a series of hikes with photos, information and maps which you can follow on the app.
Komoot also has a strong community focus. Not only can you connect with other hikers from around the world, but the app will flag up highlights and points of interest that other users have enjoyed along your route.
This can be anything from a nice café to a stunning viewpoint!
Komoot is free to use, but there is a premium upgrade which costs £4.99 per month.
The Premium version has a few added benefits, such as the ability to download maps for offline use, plan multi-day hikes and add camp stops, and share your live location while out on a hike.
Overall, Komoot is a very useful hiking app with the ability to see detailed topographical maps, keep track of your activities, find inspiration and connect with other hikers.
OS Maps
Contributed by Maja of Away with Maja
OS Maps is one of my favorite hiking apps, which uses Ordnance Survey maps at a scale of 1:25,000 for Great Britain.
The incredibly detailed maps on the app are perfect for plotting a route in advance or navigating while you’re out hiking – having the app is much more convenient (and cheaper) than buying the individual maps for each area you’re visiting.
The app was a lifesaver when I hiked Hadrian’s Wall, as it meant I didn’t need to carry bulky maps with me on the trail.
The OS Maps app is a paid app, which costs £23.99/year, but they do offer a free seven-day trial so you can test it out before you commit to spending any money.
If you’re wanting to use the app for less than a year but more than seven days, they offer a monthly subscription for £2.99/month.
The app is great for creating your own routes, as you can plot out hikes and can easily see the public footpaths and rights of way on the map.
You are also able to download the maps, so even if you don’t have signal you’ll still be able to use the app and access the maps.
I always recommend making sure your phone is charged before a hike and bringing a portable charger with you, in case you run out of battery.
Researching your planned route and printing out a hard copy of your map (which you can do from the desktop version) is always a good idea, too.
Garmin Connect
Contributed by Campbell of Stingy Nomads
Garmin Connect is an amazing application used to analyse and plan every hiking detail you can imagine, from routes and maps to physical features such as oxygen saturation, VO2 max and heart rate.
This platform works with the Garmin Fenix watch series that can analyse and track an unbelievably wide range of information!
The Garmin Fenix 7 watch adds routes, tracks points of interest and waymarks with Glonass and GPS satellites, and has a barometric altimeter to accurately measure elevation gain or loss.
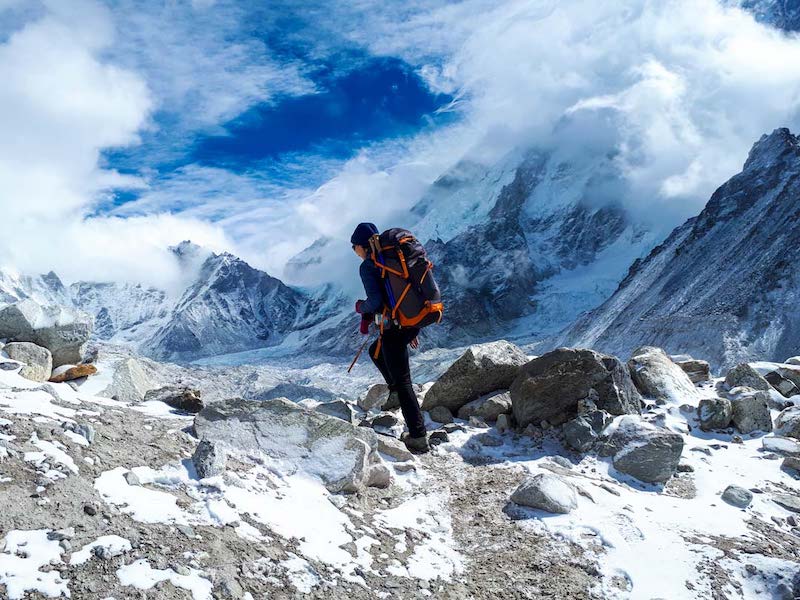
These features are great on high altitude hikes such as the Everest Base Camp Trek, pictured above!
The Garmin Connect platform can be opened on a phone or PC which connects to the watch by USB or bluetooth.
You can use Garmin Connect to plan hiking routes, mark important points of interest and send these maps to your watch to follow while on route.
Following the hike, Garmin connect is a great tool, logging your time, distance, elevation, heart rate, and calories. It is easy to compare all this information on the map at any point of your hike.
Using the hiking app with your watch, it has important safety features that can help you stay on route and at high altitude the oxygen saturation feature can help to prevent altitude sickness.
To improve hiking fitness, tracking the most important parameters like distance, speed, pace and time with high sensitivity GPS is extremely helpful.
All your hikes are recorded by your Fenix watch as GPX files that are easy to follow in the future with most GPS devices.
Your hiking route can thus easily be replicated and shared with others wanting to follow the same route.
Garmin Connect is free to use if you own an appropriate Garmin device.
Strava
Contributed by Jub of Chur New Zealand
Strava is one of the most-used apps on my phone.
Not only do I like it to track my own hikes, but it’s fun to follow adventures my friends have been on as I seek new ideas for hikes in Queenstown and further afield.
It’s this last part that makes Strava also helpful to plan your next hike.
If you saw that I hiked up Ben Lomond, you can head to my Strava recording and that’ll give you an idea of the elevation profile, distance, and time it took.
And I will usually include a few photos to show off as well — all useful information so you can plan your hike!
If it’s a harder hike where navigation is an issue, you can even get the GPX file from my hike via Strava on a desktop computer.
I like using the app in real-time (on the rare occasion I don’t have my watch) so I can see how far I’ve hiked so far.
Ideally, you’ll know the total distance of the hike and can start counting down the distance to go.
The free version of the app gives you most of the details you will want, and you can use the Safety Beacon feature on the app for free.
But for Strava nerds like me looking for extra features, like a heatmap of all the trails you’ve been on, you’ll need to pay the yearly subscription of $94.99.
One of the best hiking apps is Gaia GPS, an app by the company Outside. With this app, you can find lots of hiking routes all around the world!
What’s great is that you can type in a location and then look for hikes at that place.
On a map, you can get an overview of the route, such that you can see where you go when choosing that hike. You can then select a hike and use the app to guide you.
Also, you can find the most popular hikes near you through the app, which is very convenient as well.
Another useful feature of the app is the ability to track your hikes. For example, you can track your speed.
The app is free to use, but there is a premium version that offers more features. The price for this starts at $39.99 per year.
For this, you get access to more hiking routes and maps, including weather maps. Also, you’ll be able to use the app while being offline, which is convenient when hiking at a place with bad internet coverage.
Besides that, there is a plan that costs $99 per year. This gives access to online courses, extra content, and much more.
One of our favorite apps for road tripping and hiking is The Dyrt, which is a camping app with more than 44,000 campgrounds in the US for tents, RVs, trailers, glamping, and more.
The app has lots of photos and reviews from other campers, as well as a bunch of information about each campground’s amenities like toilets, showers, drinking water, picnic tables, trash disposal, cell reception, WiFi, and more.
In our experience, one of the most handy features is the map and filter of all nearby campgrounds, making it easy to find somewhere to stay in the area where you’re traveling.
We used this app extensively on a summer road trip this past year, and it was just what we needed!
It took a lot of headache and stress out of our trip planning so we could focus on finding good hikes to do.
The app is free, but there’s also a paid version for $35.99 per year.
The paid version has a Trip Planner and Offline Search, plus discounts at 1,000 campgrounds across the US.
If you’re not sure about the paid version, they also offer a 7 day free trial so you can check it out before buying!
WikiCamps
Contributed by Tammy of Travelling Tam
Whenever I plan to tackle one of the best hikes in Australia as an overnight trip and need a great campground to pitch my tent, WikiCamps is my go-to resource.
From caravan parks to day stops, dedicated camping sites to free bush camps, this handy app tells me everything I need to know before I go.
The app conveniently lists the cost, facilities, features, water situation, accessibility, photos, reviews and more of popular and lesser-known camp spots, all laid out within a user-friendly interface.
If, like me, you love camping and getting out into nature, you’ll soon end up with a whole heap of bookmarked spots for future adventures!
WikiCamps is available to download from the Google Play or Apple App Store in Australia, New Zealand, Canada, the UK & US.
Although the free version is actually only a 14 day trial, the small one-off purchase fee is great value and certainly does not break the bank.
$7.99AUD gives me access to thousands of site listings across the country and definitely beats wasting time scouring campgrounds on Google Maps.
Before you plan your next big hike, I would highly recommend trialling WikiCamps.
It’s also an extremely useful resource to have in your pocket in case of an emergency or simply when plans change, to help you find somewhere safe to sleep.
Campermate
Contributed by Victoria of Guide Your Travel
One of the best hiking apps you could have on your phone if you’re planning on camping in Australia is CamperMate.
This free app shows you exactly where to find free and paid campsites, public showers, ATMs and a lot more.
Whether you’re travelling through the country in a van and going on occasional hikes or hiking for longer distances you’ll love this app and the security it provides.
Instead of googling campsites and never knowing how much they cost every night you could simply look them up on Campermate to get an immediate overview on the facilities that are available and the prices.
While it can be tricky to find free campsites in Australia it’s not impossible and CamperMate will show them to you.
Camping illegally can result in very high fines so the risk is usually not worth it — use this camping app instead!
Plant, Landscape & Wildlife Identification Apps
PeakVisor
Contributed by Emily of Wander-Lush
If you’re one of those hikers who constantly finds themselves asking, ‘What mountain is that?’, then PeakVisor is a must-download.
As the name suggests, this ingenious app uses GPS and photo technology to help you identify mountains.
Any time you’re unfamiliar with your surroundings, you can simply point your camera at the horizon and PeakVisor will automatically label any peaks in view.
As well as telling you the name of the mountain, the app gives you a snapshot of important data including elevation, GPS coordinates, and a blurb from Wikipedia. This is done using a 3D compass and an altimeter.
There are more than one million summits catalogued in the PeakVisor database, from Pakistan to Portugal.
The app works both in real-time (the free version requires an internet connection) and retrospectively, so you can also use it to identify mountains in old photos.
The app has 3D maps with hiking trails, passes, cable cars and mountain huts marked out, so you can also use it to explore the landscape in augmented reality and map out a future route.
Another cool feature of this hiking app is the sun and moon trails. Tap a few buttons to see a visualization of the sun or moon’s path as it tracks through the sky.
You can use this data to calibrate your compass or snap the perfect photo when the light is just right.
PeakVisor is available on both Android and Apple. The paid version, PeakVisor Premium (priced at $3.49/month), has all the same features but also works offline and allows you to import GPX trail maps.
Seek
Contributed by Lara Hartog of The Best Travel Gifts
My absolute favorite hiking app is Seek, an app to help you identify whatever organism you come across during your hike.
Seek was developed by iNaturalist in collaboration with National Geographic and the California Academy of Sciences.
It uses your phone’s camera to identify which plant or animal you are looking at. All you have to do is aim your camera at whatever you’re trying to identify!
The app will then tell you the name of the plant or animal along with some interesting information about the organism.
Sometimes you need to get different angles before it’s able to tell the exact species name, but it will always give you parts of the taxonomic rank, such as the genus, family, or order, so you’ll have some information.
If you want, you can take photos of the organisms too and keep a collection of all your observations in the app. However, it’s not necessary for identification.
The best part of Seek is the fact that it’s completely free, it doesn’t require any data, or GPS location (so you can save some phone battery for other things)!
If you turn on your GPS location, it will then also tell you which species you can find in your area.
This app literally changed my hiking experience for life.!
I’ve always loved walking around nature and admiring its beauty, but I never knew anything about the organisms I saw.
With Seek, I’ve learned so many new names, which makes hiking even more exciting.
Weather & Safety Apps for Hiking
Accuweather
Contributed by Katie Diederichs from Go Wander Wild
One of the most important things to do before a hike is to check the weather forecast.
If you’re in the mountains, it’s even more important to consult more than just a “general” weather app as there are many microclimates and the weather can be varied even a short distance away.
AccuWeather has different “layers” that you can select to view different weather patterns, like snowfall, fog and smoke, rain, and storms.
Overall, it’s really user-friendly and has a lot of different data points, providing you with a really comprehensive forecast before you set off on a hike.
I love that it not only has the actual temperature, but it has a “ReelFeel” temperature, which is really helpful when deciding what to wear hiking.
However, even if the weather is predicted to be clear, we like to bring layers and rain gear just in case as predictions are never guaranteed.
This app is free, but you can upgrade to the ad-free version for 99 cents per month.
Cairn
Contributed by Jessica of Uprooted Traveler
As a frequent hiker and backpacker, I’m often exploring trails and areas, like Death Valley National Park or the backcountry of the Cascade Mountains, that have extremely limited cell service.
While it’s nice to be disconnected every once and while, this also comes with risks when you’re adventuring outdoors — if you’re hurt or get lost along the trail, you won’t have a means of contacting someone for help, unless you have an expensive (and usually subscription-based) personal locator beacon.
The awesome app, Cairn, helps with that with a couple different bits of functionality!
For one, you’re able to share, via text and email, with loved ones your hiking itinerary before you take off, including things like where you’re going, your starting and ending location, and when you should be back.
Even better, the app will automatically send an alert to those contacts if you don’t return as expected, so that search and rescue can be contacted, if necessary.
It also uses crowd-sourced data to create a map of where certain cell carriers get service along a trail, which you can download before you head out (which may, again, be super handy if you run into any trouble along the trail… or if you simply want to download a Netflix movie to watch during a particularly rainy afternoon while backpacking!).
While nothing replaces having first aid and basic navigation skills, it makes me feel much more secure to know that someone knows that I’m out in the wilderness- and more importantly, when I return safely back to my car.
Allison Green is a former teacher who has been travel blogging since 2016. She has a Masters in Teaching and a B.A. in English and Creative Writing. Her blog posts merge her background as an educator with her experience traveling to 70+ countries to encourage ethical, meaningful travel. She has been a speaker at the World Travel Writers Conference and her writing, photography, and podcasting work has appeared in National Geographic, CNN Arabic, CBC Canada, and Forbes, amongst others. Now a full-time traveler, she has lived in Prague, Sofia, New York City, and the San Francisco Bay Area.
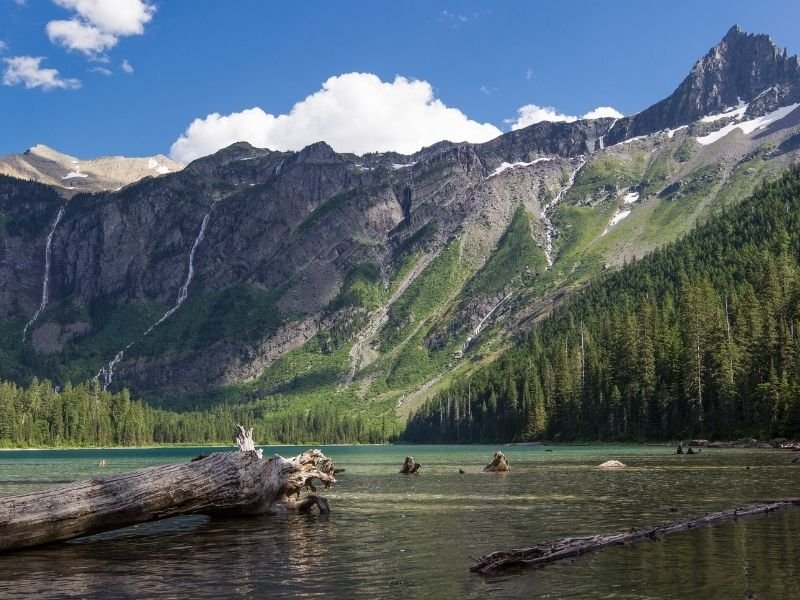
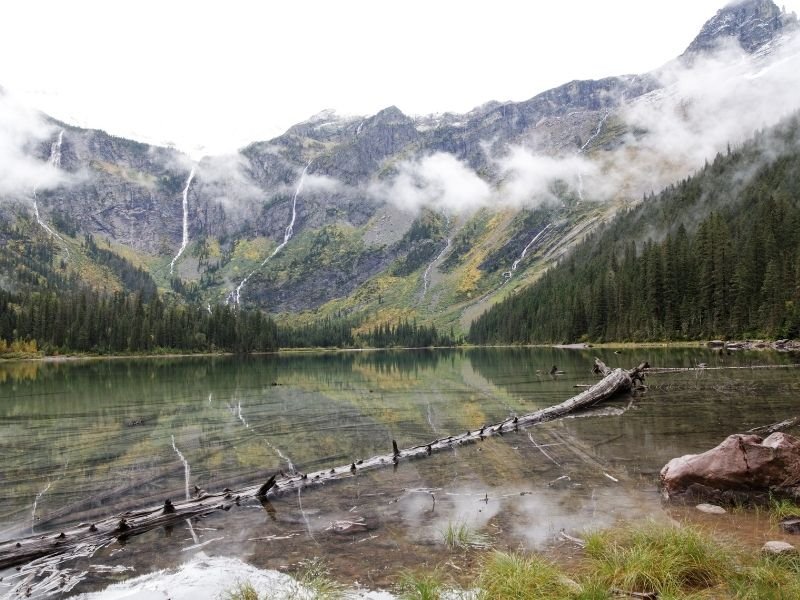
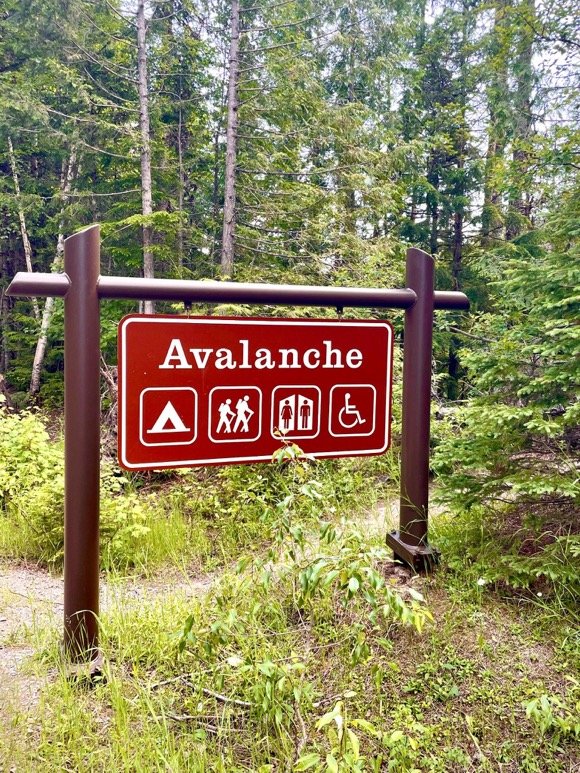
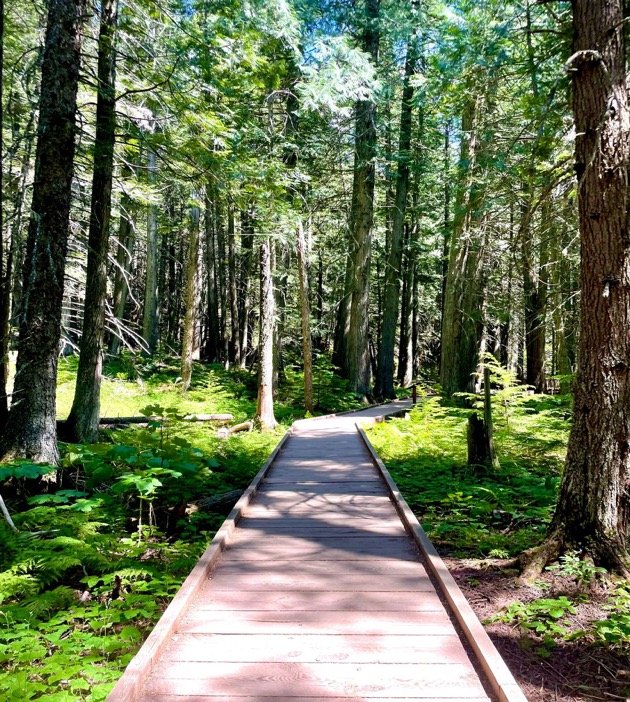
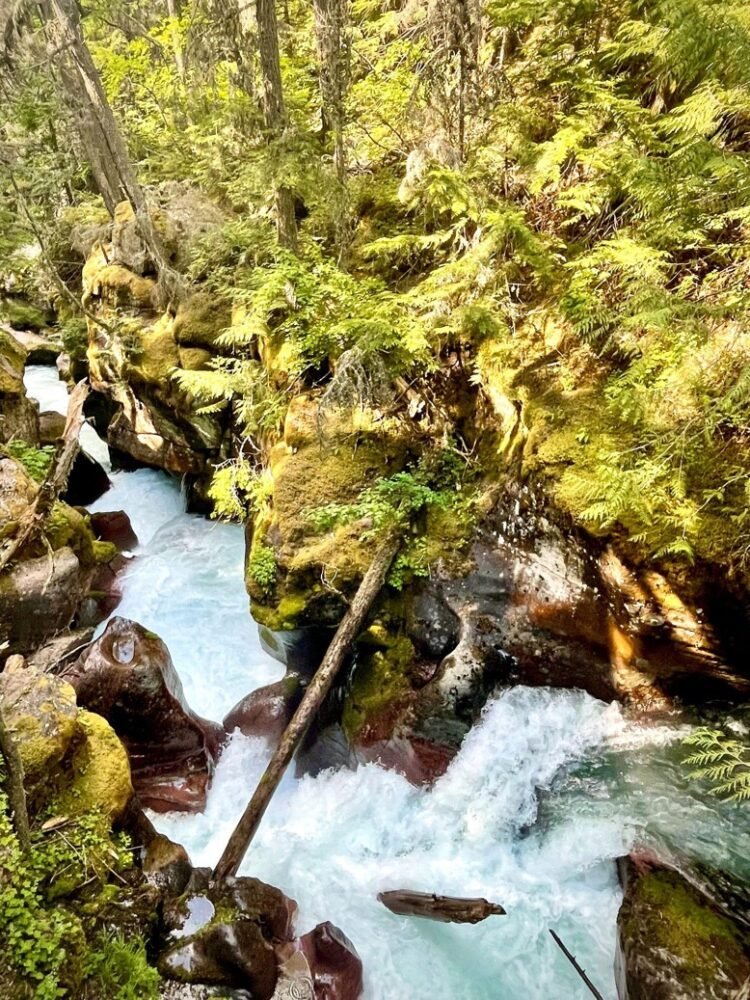
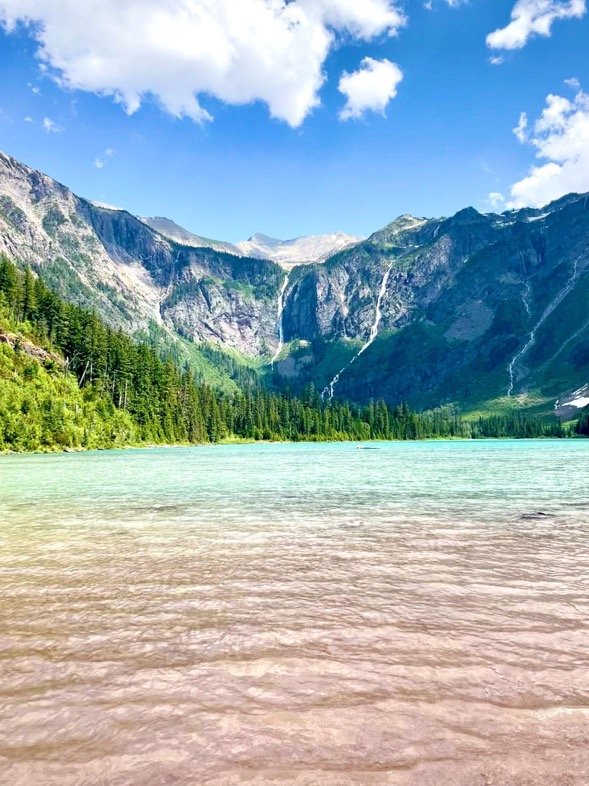
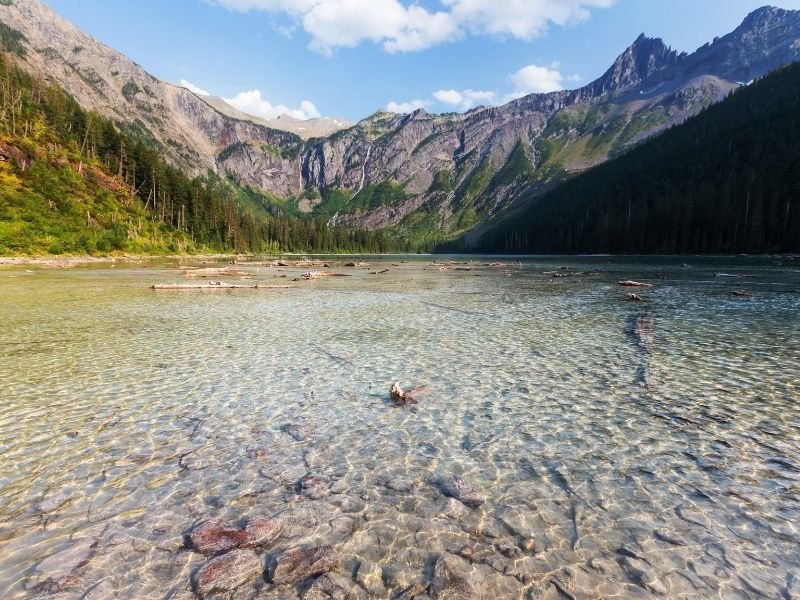
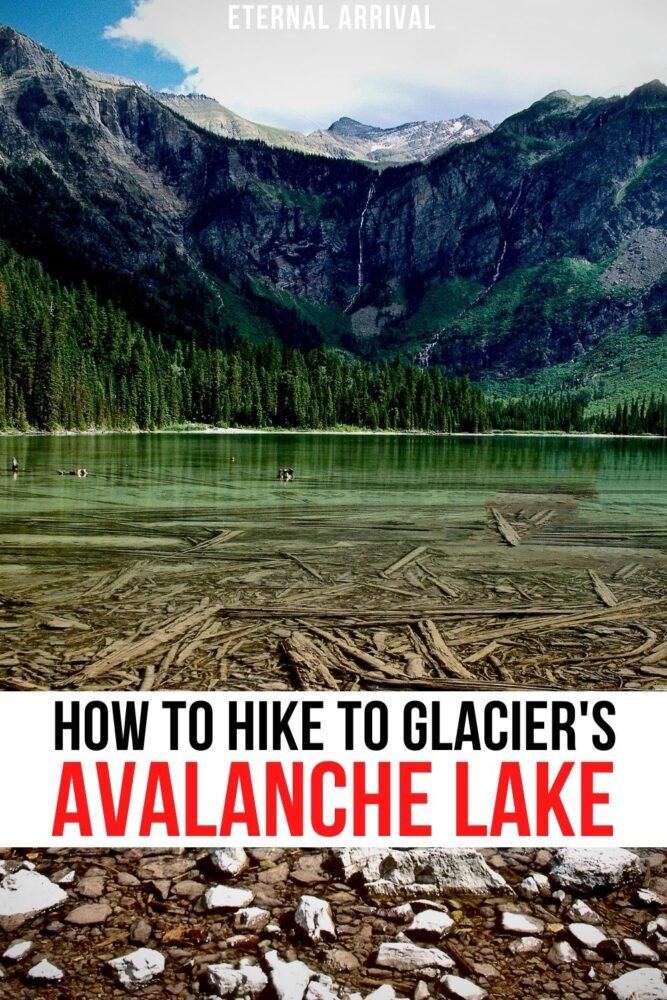
Nestled on the west side of Glacier National Park is one of the most beautiful hikes in the country: Avalanche Lake, sitting pretty at an elevation of 3,905 feet.
This Montana park draws over two million visitors a year, most of them being hikers and outdoor enthusiasts.
Avalanche Lake is known for its impressive beauty and is rated one of the top attractions in the whole park. It’s a must-see when you are visiting Glacier National Park.
Keep reading to find out what you need to know about the Avalanche Lake hike before you go!
PLANNING YOUR AVALANCHE LAKE HIKE AT-A-GLANCE:Mileage: 5.9 miles roundtrip
Elevation Gain: 757 feet
Difficulty: Moderate
Getting Around: Most poeple who travel to Glacier National Park use a car, whether that's their own personal car or a rental from a nearby airport. There is also a shuttle that stops at Avalanche, you can read more here.
Gear: Be prepared for all manner of weather on this hike! You'll want layers that can adjust to variable temperatures, waterproof layers (like this rain jacket), proper hiking boots (I love my Ahnu boots), and you'll probably want some trekking poles to help you on the descent.
Need To Know: If you plan to visit multiple national parks in a year, the America the Beautiful Pass will save you a bundle! It costs $80 for an annual pass (for an entire vehicle traveling together) to all US national parks and federally managed site.
You also need a separate ticket to access Going-to-the-Sun Road. This is different than your general entry into Glacier National Park.
How To Get to Avalanche Lake
Photo Credit: Leah Bilquist
Note: Access to Avalanche Lake is only possible via Going-to-the-Sun Road via the West Entrance of the park, which requires a separate ticket to enter.
Once you enter the park, you will drive towards Apgar Campground. You will begin to see signs for Going-to-the-Sun-Road. Make a right onto Going-to-the-Sun-Road and begin your drive towards the trailhead.
You will first pass Lake McDonald on your left. Once you get to the end of Lake McDonald, you will be a little over nine miles from the trailhead.
You will then see signs for Avalanche Lake. Keep in mind, the main parking area holds about ten cars and is normally full, unless you get lucky and see a hiker leaving the parking lot.
It is recommended to loop around and wait for someone to leave if there is no availability. Popular times are 8:00 AM, 10:00 AM, and 12:00 PM.
There is additional parking about a half-mile north of the trailhead where another five to ten cars can be parked.
You can walk the road back to the trailhead if you find a spot there. This will add mileage to your trip, but it is well worth it once you see the beauty of the lake.
Keep in mind the reservation system is currently in place at Glacier National Park. You will not be able to access this trailhead unless you have a Going-to-the-Sun-Road entry ticket.
History of Avalanche Lake
You are probably wondering how Avalanche Lake got its name… well, you’re looking at it!
The lake’s turquoise blue waters are due to the abundance of avalanches that fall down the Sperry Glacier, the mountain that sits behind the lake.
Avalanche Lake got its name in 1895 from Dr. Lyman Sperry, who is the namesake of Sperry Glacier. The glacier itself provides the water for the lake, from its constant avalanches.
Dr. Lyman was in awe of how many avalanches he witnessed during his short time visiting the lake — hence its name.
Avalanche Lake is also unique because it is one of the few lakes of its size that still has fish in it! It is rare to have fish in the area due to its size and elevation. Yellowstone cutthroat trout are the most popular fish found here in the lake.
The lake itself is a mile and a half long with a depth of 54 feet in some sections, which is an impressive depth for its relatively smaller size.
The Avalanche Lake Hike: Step by Step
Photo Credit: Leah Bilquist
Hiking to Avalanche Lake via the Trail of the Cedars is an unforgettable trek! The reason it is so distinctive is that it is two top-rated hikes in one.
First, you will begin your hike at the start of Trail of the Cedars, which is 0.9 miles long.
This hike starts you out in a wooded forest filled with green trees and mossy rocks. There is a wooden boardwalk that goes through the woodland which you will follow along.
Wildlife such as deer and moose walk the trail freely here and are commonly spotted. The sound of flowing rivers will surround you. Small cascading waterfalls line the trail.
You will even pass over a wooden bridge that provides astonishing views of the bright blue waterfalls!
Photo Credit: Leah Bilquist
This part of the hike is for all skill levels and is even wheelchair-friendly due to the boardwalk.
The trail lives up to its name: you will be surrounded by enormous cedar trees throughout your whole walk! The Trail of the Cedars hike is recommended on very sunny or hot days due to the amount of shade the cedars provide.
Surround yourself in the majestic wilderness while enjoying a much-needed hike in Glacier National Park that will bring you back to nature.
Halfway through the Trail of the Cedars is the start of the Avalanche Lake Trail. Avalanche Lake is two miles from Trail of the Cedars, with an additional two miles back.
This makes the hike in total around 5.9 miles with a 757-foot elevation gain, since you only do half of the Trail of Cedars’ length. This trail is rated as moderate and can be quite the workout, especially on hot summer days.
As soon as you follow the signs to the left on Trail of the Cedars, you will begin your ascent to Avalanche Lake.
The first part of the hike is completely uphill on a dirt trail. There are large wooden steps built into the trail in certain sections, making it an intense workout!
Stop and enjoy the views during this uphill battle whenever you need to catch your breath. You will be surrounded by icy blue rivers and vibrant green mossy trees. It is a very peaceful hike with background sounds of birds chirping and running water over the rocks!
Once you get about a mile and a half up, the trail begins to level out, making the last half mile pure excitement. You will continue your way through the trees until you spot a crystal blue image in the distance, peeking through the trees.
Another wooden boardwalk appears and you will follow that to the lake. The trees will part and the incredible Avalanche Lake will sit before you: a tranquil oasis of clear water merging with turquoise blue water.
Photo Credit: Leah Bilquist
The stunning mountains behind the lake showcase rivers flowing down the sides. A lush green forest fills the surrounding areas. When the sun hits just right, you can see the snow still sitting on the top of the peak. It’s an absolutely scenic and beautiful visual.
Most hikers spend their day here on the sandy beaches of Avalanche Lake. Visitors take off their shoes and soak their feet in the cold glacier water.
Some even become brave enough to swim in it, which is allowed but not commonly seen due to how cold the water is, even in the heart of the summer!
It is recommended to bring lunch and a small blanket to sit on, as this is a remarkable spot to have a bucket list picnic. Hikers lounge out on the beach and enjoy the views.
The hike can be crowded, but there is enough room for everyone to have their space at the beach.
If you want a less crowded area, continue on the boardwalk for ten minutes to reach the other side of the lake. This side is rumored to be just as beautiful with fewer people around!
If you are lucky enough, you can even find your own secluded beach on this side. A lot of people think that the main entrance is the only stop off of the lake, but the trail continues all the way around. I would recommend spending some time at both beaches for optimal views.
When you are ready, begin your descent back down another two miles following the same route you used earlier. The wooden steps are high in some parts, making it a bit strenuous on the knees.
If you have knee issues, plan on bringing a brace or using a walking stick for the hike back down.
Once you reach the bottom of Avalanche Lake Trailhead, you will continue on the Trail of the Cedars to the left. This will eventually loop the Trail of the Cedars trail and provide some new scenery.
The trail ends in half of a mile and brings you back out to the parking lot where you started.
Final Things to Know About the Avalanche Lake Hike
Photo Credit: Leah Bilquist
Due to its popularity, this hike to Avalanche Lake can get very crowded!
Just take your time and use hiker etiquette. If you’re descending the trail, step aside and give space to the people climbing up.
Also do not go off-trail and be respectful of the marked trail signs…. yes, even (and especially) for photos!
If you encounter wildlife, give them enough space and do not approach. Glacier National Park is grizzly bear country, so always be bear aware. You may want to bring bear spray or bear bells.
The hike itself can take anywhere from two to three hours depending on your level of fitness. Add on an additional two hours to spend at the lake. Plan for a total of five hours to fully enjoy this gorgeous day hike!
Remember to pack a delicious lunch and yummy snacks to eat at the top. Most importantly, bring extra water. It may be cooler at the lake with a slight breeze but your body needs additional water for those hot summer days.
If you don’t want to bring a lot of water, you may want to bring a filtering water bottle like the Grayl so you can fill up on delicious glacier water that is filtered so as to be safe to drink!
***
There is a reason why Glacier National Park has gained so much popularity over the past three years. Avalanche Lake shows the secret as to why: a mix between glaciers, waterfalls, and a lush forest makes the beauty surreal.
After driving all over this park, the Avalanche Lake hike took my breath away the most, becoming one of my favorite hikes of all time.
If you have one day or five hours in this park, drop everything else and hike the famous Avalanche Lake: a view that is often only seen on computer screensavers will come to life before your eyes.
Lace up your hiking boots and visit this Montana hotspot — Avalanche Lake is waiting for you to visit!
Breckenridge, Colorado is home to world-class skiing in the winter months and exceptional hiking in the summer.
In the summer, hiking in Breckenridge means beautiful views of the surrounding mountains, a myriad of wildflowers, and great forests to immerse yourself in.
There is truly something for everyone in Breckenridge in the summertime. You can walk down Main Street, window shopping and eating delicious food, or you can dive into the vast trail network in the area.
There are over 100 different hiking trails in Breckenridge, Colorado. The five trails in Breck I will be talking about are a few of my favorites and offer a wide variety of terrain and scenery to enjoy.
A Note Before Hiking in Breckenridge
Hiking and mountain biking are very popular in and around town. Many trails in the summer do become very saturated with mountain bikers.
If you do find yourself on a trail with a ton of bikers make sure to stay alert, always listen for bikes and keep your eyes up.
If you are hiking and encounter bikers, it is always helpful for hikers to step off the trail and let the bikers through so they don’t have to dismount, especially if the bikers are climbing.
The town of Breckenridge is located at an elevation of 9,600 feet. It is important to drink plenty of water in the days leading up to traveling into town as well as continue to hydrate when getting to town.
Some signs of altitude sickness are headache, fatigue, and trouble breathing in adults. For children, altitude sickness often manifests as a stomach ache.
It is important to give yourself time to acclimate before pushing yourself on a challenging hike.
Make sure to bring plenty of water and snacks with you on the trails. It is helpful to carry a backpack on all of your hikes.
It is also extremely important to pack a few extra layers. The weather in the mountains can change extremely fast, and oftentimes it does not matter what your weather app says. Be prepared for anything!
If you have some binoculars, I would pack them as well because there is no shortage of wildlife in this area.
Enjoy your trip!
The Best Hikes in Breckenridge
Bald Mountain Trail
Distance: 10.5 miles out and back
Difficulty: Moderate
Elevation gain: 3,075 ft
The Bald Mountain Trail leads you to the top of one of the infamous 13ers in the community, Bald Mountain.
The Bald Mountain trailhead is located just east of town. On the drive to the trailhead, you get a tour or the beautiful homes in the community.
For this trail, you park at the intersection of Baldy Rd (Rd 520) and Goldenview Dr, right by the Summit Stage bus stop. After you park look to the other side of the road, for the dirt road that is the Bald Mountain Trail.
This hike is best accessed from June through October. Snow can still be found along the trail in June as you get higher in elevation.
This trail offers expansive views of Breckenridge Ski Resort, The Ten Mile Range, and Mt. Guyot, as well as beautiful wildflowers and some wildlife.
Look for a cabin in the woods on your right within the first 0.5 mile of the hike! Further along the hike, about 1.5 miles in you will pass by Iowa Mill, which was built in 1935.
When you get to the top, be prepared to put on extra layers as you will be at the top of a 13,000-foot mountain and it can be a bit breezy up there.
When you are finished, you can head back down the same way you came to get back to the car!
Quandary Peak Trail
Distance: 6.6 miles out and back
Difficulty: Difficult
Elevation gain: 3,570 ft
Quandary Peak is the only 14er in the Ten Mile Range and is a great introductory 14er.
This is a heavily trafficked hike near Breckenridge, best accessed July through September, that offers a spectacular journey through various landscapes.
When attempting to do any 14er, make sure you are acclimated to the elevation that you are starting at, because you will be going to an elevation of over 14,000 feet.
Start early, not only because the parking lot can fill up fast, but you want to give yourself ample time to get to the top.
In the mountains, it is typical for afternoon showers to come in, so getting up and down the mountain as early as you can is helpful.
Bring layers! Sometimes it can feel like a different climate on the top than it did at the parking lot. A wind/rain layer and an extra mid-layer can help you stay warm at the top so you don’t have to cut your time short.
Last but not least, pack snacks and more water than you think you will need. Anything can happen on this adventure. You want to be prepared for weather, injuries, and anything else you can think of.
Parking for The Quandary Peak Trail is located off of Rt 9 on Blue Lakes Road. Once you park you walk onto McCullough Gulch Rd for a short while until you come across the Quandary Peaks Trail on your left.
At this point, you will be on a single-track trail that switchbacks through the amazing forest. After you get above the treeline, you are hiking an exposed ridge with 360-degree views. The trail gets extremely rocky and the wind will start to howl!
As you get closer to the top you might see some mountain goats. Once to the top, you get great views of the Gore and Sawatch Ranges.
Once you’re done taking in the views, head back down the same way you started. Take your time on the way down and watch your footing.
Spruce Creek Trail to Mohawk Lakes Trail
Distance: 8.4 miles out and back
Difficulty: Difficult
Elevation gain: 2,106 ft
The Mohawk Lakes Trail is a must! This is a heavily trafficked trail, best used from July through October.
You start at the Spruce Creek Trailhead and begin gradually gaining elevation. Once you get to an intersection of the Wheeler Trail and McCullough Gulch Rd, continue straight to get to the Mohawk Lakes Trail.
There are seven lakes along this trail and you can see all of them if you would like. First you will get to Mayflower Lakes.
After this, the trail begins to get steeper, but it is worth the effort to keep going to see the biggest lake, Mohawk Lake. Once you get to Mohawk Lake you can turn around to make the hike shorter, or you can continue on to see three more lakes.
I do recommend hiking to all seven lakes if you have the energy to get there as there are not many hikes in the county to see that many alpine lakes!
Gold Hill (Colorado Trail seg 7.1 & 7.2)
Photo Credit: Katie Jakubowski
Distance: 7.2 miles out and back
Difficulty: Moderate
Elevation gain: 1,466 ft
The Upper and Lower Gold Hill Trails offer you an opportunity to hike a small section of the Colorado Trail. The Colorado Trails runs 567 miles from Denver to Durango.
You park just off of Route 9 at the bottom of Sherwood Trail Road. From there you get on the Gold Hill Trail.
You start to climb on the trail and continue to gradually climb for 3.6 miles until you reach the Peaks Trail.
Just a quarter-mile into the trail, you get amazing views of Breckenridge ski resort. When you look back across Route 9, you can see the Colorado Trail switchbacks.
The sage in the area smells amazing and the wildflowers in peak season are incredible.
You can go as far as you would like on this trail, and even add extra miles on the Peaks Trail if you’re feeling good!
B & B to Reiling Dredge to Minnie Mine
Photo Credit: Katie Jakubowski
Distance: 3 mile loop
Difficulty: Moderate
Elevation gain: 413 ft
This 3-mile heavily trafficked loop trail in Breckenridge offers you a view into history!
Breckenridge started as a mining community. On this loop, you are able to see The Reiling Dredge, which used to mine gold in the area, as well as all of the rock and sediment the dredge left behind.
You park at the B & B trailhead off of French Gulch Road and make your way to the B & B Mine Trail.
After hiking for about 1 mile, you will come across the Railing Dredge, which has sunk and now sits in the most beautiful water.
After leaving the dredge you will cross the road and head to the Minnie Mine Trail. Once you get back to French Gulch Road, make a right to head back to your car.
This is a low-intensity trail in Breck you can do if you just want to get out for a nice walk. You will come across many old artifacts around the trail so keep your eyes peeled! This is the trail to do if you are interested in seeing history.
Golden is one of Colorado’s underrated mountain towns — and it should be your next stop for a great hike near Denver!
A former gold rush town that sits at 5,629 feet, Golden is located at the foothills of the Rocky Mountains.
Historically, it was the capital of the Colorado Territory from 1862 to 1867; it is the ancestral home of the Núu-agha-tʉvʉ-pʉ̱ (Ute) and Cheyenne Indigenous peoples.
Photo Credit: Leah Nilquist
Photo Credit: Leah Nilquist
Currently, it is known for being the home to the infamous Coors Brewery and the Colorado School of Mines.
The hiking in Golden is a hiker’s playground, offering a whopping 70 trails, ranging from easy to moderate.
Whether you want to take a leisurely stroll or push yourself, there is a trail for every adventurer. Here are some of the best hikes in Golden, Colorado!
The Best Hikes in Golden, Colorado
South Table Mountain Trail
Mileage: 2 miles
Elevation Gain: 482 feet
A shorter hike in Golden is South Table Mountain, a two-mile loop that starts at the edge of downtown.
The hike brings you to the top of Castle Rock, a popular landmark in Golden that you can view from all over the area!
This spot is recommended for sunset hiking in Golden and the breathtaking views you’ll find there. The trail is a bit steep going up, but the scenery makes it worth it.
North Table Mountain
Mileage: 8.3 miles
Elevation Gain: 1,125 feet
If you are looking for a longer workout, hiking North Table Mountain and Rim Rock Loop will be a better pick for you!
This mountain is known for its mountain biking, but it is also great for hikers in Golden looking for a challenge.
The trailhead starts at Tony Grampsas Memorial Sports Complex – Golden Bike Park. Be aware and share the trail with the cyclists!
The 360-degree views at the top make the distance well worth it! You can even spot Coors Brewery on your way to the top.
Chimney Gulch Trail from Highway 6
Mileage: 6.5 miles
Elevation Gain: 1,755 feet
This is an out-and-back trail in Golden that brings you to the top of Lookout Mountain, one of the most popular mountain roads in the area!
You will be crossing Lookout Mountain Road a few times during this hike, and it is important to be alert for cars and cyclists when crossing.
The hike is rated as moderate but it does have a higher elevation gain.
To get to the trailhead drive up W 6th Ave, towards Lookout Mountain. This scenic spot will show you all of Golden and even Denver in the distance!
Terry Park at Clear Creek
Mileage: 1.6 miles
Elevation Gain: 65 feet
This is one of the easiest hikes in Golden; in fact, it is a more of a nice stroll through the town!
Terry Park at Clear Creek is a shorter route with very minimal elevation gain. We recommend it for all skill levels, and it is great for families.
It is a paved path along Clear Creek, which is a branch of the South Platte River, making it the perfect option for winter hiking as well.
In December, you can see the town lit up with holiday lights! Marvel at statues and trees surrounding downtown Golden on this relaxing path.
Mt Galbraith Park
Mileage: 4.0 miles
Elevation Gain: 928 feet
Located off of Golden Gate Canyon Road is Mt Galbraith Park, a Golden hiking area with over five miles of gorgeous trails.
Mt Galbraith Loop via Cedar Gulch Trail is the most popular in the park, a 4-mile loop that circles the top of the peak. Certain parts of the hike do become narrow, so keep that in mind when planning this hike.
There is a dirt parking lot right off the main road at the trailheadm making this trail is a great option for those living in Denver.
Get a break from the city life and soak in those mountain views, while getting a good workout among this scenic spot known for its unique rock formations.
Golden Gate Canyon State Park – Racoon Trail
Mileage: 3.4 miles
Elevation Gain: 754 feet
When summer begins to turn to fall, Colorado becomes an even more picturesque landscape!
The aspen trees turn from green to golden in early September in Colorado, as the leaves began to change colors at higher elevations.
In Golden, the colorful aspens normally turn yellow in early October, though this is depending on the year.
Golden Gate Canyon State Park is rated one of the top places in the state to view this once-a-year event!
Hike through the golden aspens on Racoon Trail, located in the northern part of the park. This is a scenic loop that is a little over three miles with moderate elevation gain.
Parking can be limited near the trailhead, particularly during the fall, so it is recommended to get an early start!
If parking is unavailable, you can use other lots in the park for added mileage.
Keep in mind, this is a state park. That means there is a $10 entrance fee, unless you have a State Park Pass.
Beaver Brook Trail
Mileage: 13.4 miles
Elevation Gain: 3,297 feet
Those looking for a challenge can take on this difficult hike in Golden!
Unlike most trails, the elevation gain is mostly on the way back, making it a unique challenge for experienced hikers.
The trail starts in Golden and eventually drops you down near Clear Creek. After a few miles through the forest, you eventually drop even further out to Chief Hosa.
It is important to make sure you have enough energy and fuel for the climb back to the trailhead! Packing high-energy snacks like nuts and protein bars is a smart idea.
Take your time on this one and soak up the views of the canyon throughout the trail. It is tough, but it is worth it!
Apex & Enchanted Forest Loop
Mileage: 5.5 miles
Elevation Gain: 1,234 feet
Apex Open Space Park is located only a few minutes from downtown Golden. Follow Lookout Mountain Rd to the trailhead.
Note this park has unique rules to help mountain bikers and hikers share the road. Even calendar dates (for example, the 2nd, 4th, etc.) are reserved for bikes only, no hikers or equestrians.
Odd calendar dates (ex: 1st, 3rd, etc.) are reserved for hikers and equestrians only, no bikes.
This is a perfect summer hiking destination in Golden, since half of the trail is in the sun and the other half in the shade.
Enjoy the colorful wildflowers along the dirt path in the spring and early summer!
Clear Creek Trail
Mileage: 20.1 miles
Elevation Gain: 226 feet
This is a great option If you are looking to improve on distance hiking, without massive elevation changes.
This long trail starts off of US-6 west of downtown Golden. The trail follows the twenty miles of Clear Creek all the way from Golden to Adams City.
Along the hike, pass the Colorado Railroad Museum, the adorable Prospect Park, and the Lowell Ponds Wildlife Area.
This is a unique hike that actually runs opposite of the mountains towards the city. The path is paved and is ideal for biking or cycling.
Hikers recommend this during the winter months for a long walk along the river. Of course, you can just do a small portion of this hike if the full 20 miles aren’t for you!
Golden Open Space Trail
Mileage: 2.6 miles
Elevation Gain: 101 feet
Park on the left side of Tony Grampas park and follow the sign for the bike park.
This short and sweet trail brings you by the Golden High Country Archers Range and the Golden Bike Park. Bring your dog since there is a dog park you will be passing as well!
You even walk through local neighborhoods, all while getting in those hilly views. The dirt path is mostly shaded taking you through the forest, while the other half is out in the sun through the neighborhood, offering you a little bit of everything.
Mother Cabrini Shrine
Mileage: 0.4 miles
Elevation Gain: 173 feet
This hike in Golden leads you to a shrine to Saint Frances Xavier Cabrini, known as Mother Cabrini, where you can hi up to the 22-foot statue of the Sacred Heart of Jesus.
Mother Cabrini found this property in 1902. It was used as a summer camp for the Queen of Heaven Orphanage. The purpose was to provide outdoor activities to the girls at the orphanage.
It was built in 1954 at the highest point of the site. You can now trek up the 373-step stairway that leads you to the statue. This is a short but sweet hike that is very historic to the area.
Dakota Ridge Trail
Mileage: 5.4 miles
Elevation Gain: 1,099 feet
Located right off Highway 70 west is North Dinosaur Open Space Park, a great place for a hike near Golden.
This hike starts you uphill and then drops you down, making it another uphill journey on the way back.
Follow the ridge between Red Rocks Amphitheatre and Green Mountain. You can do the trail in either direction!
This is a fun workout that makes you feel as if you are hiking in the sky once you reach the top. Enjoy the scenery of the famous Red Rocks Amphitheater — it’s simply stunning!
***
The foothills near Golden, Colorado are a convenient option for those looking for a day hike only 25minutes outside of downtown Denver.
Take an easier stroll downtown for those looking for an easy and relaxing day, or for those seeking a challenge, head into the mountains for that steep uphill climb!
Since most of these trails are in the foothills, be aware of rattlesnake activity, which are commonly reported from early spring through mid-fall. Always watch the path and never pick up large rocks where they could be hiding.
In the winter months, take advantage of the snow-capped mountain vistas, but be sure to pack and dress appropriately for the weather.
Golden, Colorado has a hike for every season and every skill level. Lace up your boots and head into the foothills. Afterward, take advantage of the delicious dining options downtown. You earned it!
So, you’re here because you have a hunger for adventure. We love to see it! Whether you’re a Denver native or a tourist planning a future trip or currently visiting the area, we’ve got some great, dog-friendly options for you!
Boasting vivid landscapes of forests, mountains, mesas, high plains, plateaus, canyons, desert lands and rivers, Colorado is one of the most beautiful states of the southwestern United States.
Denver, the capital and most popular city, is known as the “Mile High City” because its official elevation measures at exactly one mile above sea level! (Bet you tourists didn’t know that one!)
This means that hikes near Denver require a little extra stamina due to the lower oxygen levels at elevation, so don’t be surprised if a hike marked as ‘easy’ ends up leaving you feeling a little winded! It’s just one thing to prepare for before visiting Denver.
Denver is where the great outdoors, and Mama Earth, meet urban and artsy sophistication. What people adore about this treasure of a city is that, as mentioned, it offers the best of both worlds. Denver’s an outdoor city with renowned cultural attractions.
It’s got buzzing craft breweries for you beer-drinkers (pun intended,) chef-driven dining your tastebuds will come to worship, bumping music scenes for the dancing folk, and the Rocky Mountains just around the corner.
Alright, you’ve been let in on our little secret: We love this city.
What’s one of the best ways to experience it, you ask? Day hikes.
A day hike refers to a hike that can be completed in a day. (Yeah, nothing gets past you, huh?)
No, really, that may sound obvious but knowing hiking lingo is quite important for this hobby or pastime. Hiking for multiple days, for example, is referred to as backpacking.
The common rule of thumb is that the average hiking extraordinaire can generally walk between 2.5 and 3.5 miles per hour. So, with that estimation in mind, a trained walker can walk up to 20 to 30 miles per day.
A day hike can be any amount you can walk while the sun is up!
The Best Dog-Friendly Day Hikes in Denver
North Table Mountain
This mountain is more of a mesa. A mesa is an isolated, flat-topped hill with steep sides. When the sun rises, you’ll see the details of its steep sides framed by the lower surrounding town of Golden, Colorado.
Trails stretch in abundance waiting for hikers, photographers and mountain bikers alike.
This is perfect for walkers who may not have tons of spare time on their hands, but are in need of a good stretch of the legs and breath of fresh air to their lungs.
The trails of Table Mountain are accessible year-round; however, it’s the most beautiful and picturesque during the spring and early summer months when flowers start to bloom.
In their unique and unruly wildness, each petal reaches towards the sky and serves as a reminder that the loveliest things are free.
Hike Breakdown:
Distance: 2.7 – 7.7 miles
Duration: ~ 1-4 hours
Difficulty: Moderate
Dogs: Leashed only
Drive Time From Denver: 25 minutes
Meyer Ranch Open Space Park
Extending 30 minutes outside of Denver, Meyer Ranch offers three different hiking options. That’s what makes this spot so great, there’s something for everyone, from easy to moderate.
You’ll see meadows so big they could swallow you whole, vibrant flowers, as well as your friendly neighborhood deer and elk.
Bonus activities here include going on a mountain bike ride or picnic. It’s a fantastic area in Aspen Park and the relatively new ramada makes the perfect spot to bust out the snacks for a picnic!
Additionally, if you’re stopping by during the winter, there are perfect hills for sledding!
We’ve mapped out three dog-friendly hikes near Denver in Meyer Ranch below!
Hike Breakdown:
Distance: 2.4 – 4.8 miles round trip
Duration: ~ 1 – 2.5 hours round trip
Difficulty: Easy – Moderate
Dogs: Leashed only
Drive Time From Denver: 30 minutes
Hike Options in Meyer Ranch
Lodgepole Loop (3 miles / Moderate)
Directions:
Owl’s Perch Trail South → Straight left down to next junction → Continue right to the Lodgepole Loop for 1.2 miles → Arrive back to Owl’s Perch Trail → Going left will bring you back to the parking lot
Sunny Aspen Trail Loop (3 miles / Moderate)
Directions:
Owl’s Perch Trail South → Straight left down to next junction → Continue right to the Lodgepole Loop for 0.6 miles → Take right onto Sunny Aspen Trail for 0.8 miles to return to Lodgepole Loop → Going left will bring you back to the parking lot
Old Ski Run Trail (4.8 miles / Moderate)
Directions:
Owl’s Perch Trail South → Straight left down to next junction for .2 mile → Go left onto the Sunny Aspen Trail for .5 mile → Arrive at Old Ski Run Trail → The Ski Run trail loops 2 miles out and back → Return the way you came via Sunny Aspen Trail
Chautauqua in Boulder
The Chautauqua Trail has 1,747 reviews and 4.5 stars on one single trail review site. So, yeah, you could say it’s a crowd favorite!
This heavily trafficked hike leads to many other popular trails such as the Royal Arch and Flat Irons. So, if you’re just getting started at the end of the Chautauqua, you can always hit one of the other treks as well!
On the Chautauqua, you can expect a lot of width, a little incline, and a boatload of wildflowers, vistas, and views of the rugged Flat Irons.
Fun (historical) fact: This is the only Chautauqua west of the Mississippi River that continues in unbroken operation since the peak of the Chautauqua Movement of the 1920s.
Hike Breakdown:
Distance: 3.6 miles
Duration: 2 hours
Difficulty: Moderate
Dogs: Leashed Only
Drive Time From Denver: 35 minutes
South Boulder Peak
We needed to have a difficult one on the list for all you weathered day-hikers!
South Boulder Peak will demand a lot out of you! It’s a 3.7-mile hike one way nestled above the South Mesa.
In the famous Flatirons, near Boulder, hikers can also hit Bear Peak and return through the Fern Canyon for an 8.7-mile loop.
If a tiring (but, rejuvenating!) thrill is what you seek, South Boulder Peak is just that. You’ll be stunned by the views. Don’t take our word for it.
Hike Breakdown:
Distance: 7.4 miles round trip or 8.7 mile loop
Duration: ~ 3 – 5 hours
Difficulty: Difficult
Dogs: Leashed Only
Drive Time From Denver: 45 minutes
Tips for Day Hiking Near Denver
Day hikes are fantastic for beginner hikers to hone in on and build up their skills, no matter how newfound those may be.
The key takeaway I want to imprint on new day hikers is this: Research, research, research. Find trails that are well-marked, well-maintained, and will be easy to get to and from your stay.
You never know how tired you will be when you’re finished with the hike, and want to make sure you aren’t too far from “home.”
Be sure to study a map before you begin your trek. Here are a few things to consider:
Scope out the area to consider how hard it will be for you in terms of time and energy.
Make a note of water sources if you are not bringing your own. If you aren’t, be sure to bring a water filtration system like the GRAYL water bottle, which can filter any potentially contaminated water from an unmaintained source and make it perfectly safe to drink.
Decide ahead of time your calculation of when to turn back and at what time. Be realistic about your energy level and also keep in mind what time during the day this will all take place, especially if it is a new spot. You don’t want to run out of daylight and get turned around!
If you’re tackling a sunset hike or a sunrise hike, be sure to bring a headlamp. In fact, this is just good practice no matter what time of day you’re hiking. It’s lightweight but could save you from a nasty tumble in the dark or worse, getting disoriented, if your hike ends up being in the dark longer than you expect.
Anticipate landmarks. That way, if you take a wrong turn, you’ll notice and know what to look out for.
Finally, pack a lunch so that midday you can take care of your body, soul and mind! Exercise is key, but in order to take on the challenge to your best ability, rest and nutrients are just as important… if not more important!
To piggyback on the previous point, a small sack or pack to store your food and water source will be of GREAT value to your trip. Pack smart as to not weigh yourself down but, with that, be strategic in choosing the right essentials!
Why Hike Near Denver?
In case you run into any motivation issues while hitting that alarm button and planning to head to the trails, we’re gonna end this thang with some health benefits.
So, bring on the phenomenal benefits:
Reduced risk for heart disease
Lower stress levels
Enhanced mental state due to endorphins
Improved mood
Increased control over healthy weight
Lower cholesterol levels
Lower body fat
Improvement in bone density
Increase in coordination and flexibility
Enhanced connection with others
Better quality of life
Lots of that sweet, sweet Vitamin D!
So, despite your achy legs, you’re gaining countless benefits. And, in Denver?
We may be a little bit biased, but we’d say you’re combining the best activity with the best location. You. Just. Can’t. Beat. It. Folks.
We hope this guide of dog-friendly hikes in Denver was everything you needed and more, as well as the navigation, tips, tricks, and health benefits.
We’d love to hear about your Denver hiking experiences below! As well as any day hiking information you may be itching to share with us.
Allison Green is a former teacher who has been travel blogging since 2016. She has a Masters in Teaching and a B.A. in English and Creative Writing. Her blog posts merge her background as an educator with her experience traveling to 70+ countries to encourage ethical, meaningful travel. She has been a speaker at the World Travel Writers Conference and her writing, photography, and podcasting work has appeared in National Geographic, CNN Arabic, CBC Canada, and Forbes, amongst others. Now a full-time traveler, she has lived in Prague, Sofia, New York City, and the San Francisco Bay Area.