Off the Beaten Path London: 17 Quirky Hidden Gems in London

Big Ben. Westminster Abbey. The London Eye. London Bridge.

These things are all quintessentially London, but let’s face it, they’re extremely crowded and a lot of the magic is lost.

If you want to see London without the crowds, you’ll need to go a bit off the beaten path in London, beyond just central London.

Luckily, I have Anissa from London Travellers, a London local, here to share with me all her favorite London hidden gems and show you a secret London that few tourists get to experience!

Here are her top recommendations for hidden gems in London for you to explore.

Off the Beaten Path London: 17 Hidden Gems Worth Exploring

God’s Own Junkyard

Located in East London, God’s Own Junk Yard is one of London’s hidden gems and offers a multi-colored neon art gallery. Just note that where it’s located is not the best area in London, and when I visited, I went past the place. It’s easily missed!

Some of the items include a multi-colored neon arrow pointing downwards with bulbs around the edges. The bright neon “Laughter” lit in the middle of the arrow. Why not see the British Union Jack flag brightly lit in red and blue neon lights? Or see a bright neon Santa next to his sleigh with his red and white costume?

The creator, Chris Bracey, has worked with Vivienne Westwood’s store to install neon lights for her storefront, David La Chapelle, and Selfridges in the past. There are hundreds more to choose from. If you have a retail fashion store, a bar or night club, ask in store for details; it’s a shop too! Enjoy cakes and coffee and spend at least an hour here.

Highgate Cemetery

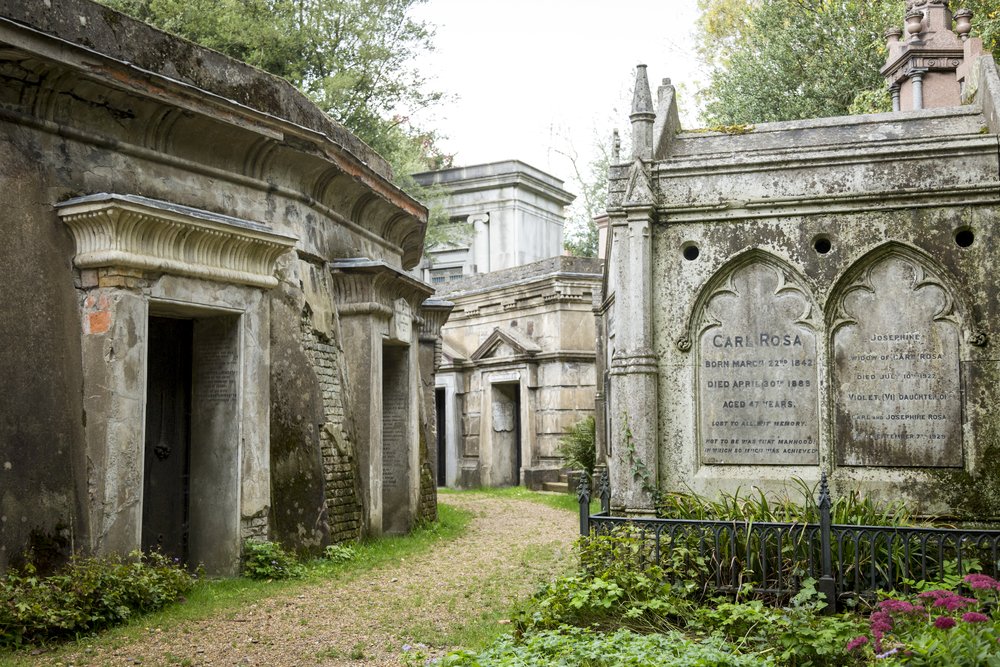
If you love cemeteries, then you’ll love Highgate Cemetery. Situated near Archway Tube Station, and the upper-class area of Hampstead Heath (another London hidden gem), Highgate Cemetery is said to be haunted. Several important people such have been buried here, for example, Karl Marx is buried here.

Check out Egyptian Avenue where you’ll find rows of subterranean passageways on a hillside, used to be used for religious purposes. All around you, you’ll find stuccoed brick in the area.

Check out Waterlow Park where you’ll see great views of London. You can sit by the rows of benches just enjoying the green space and relaxing, looking at wildlife and historical 18th to 19th-century buildings.

Find a place where you can sip your coffee and eat cake and relax for a bit. Don’t forget to take photos of the stone gargoyles on either side of the stone steps, enjoy yourself by the lake and have a picnic.

Be sure to check out Lauderdale House while in the area, an intimate art gallery where you’ll see numerous art collections and another hidden gem in London

Hampstead Heath

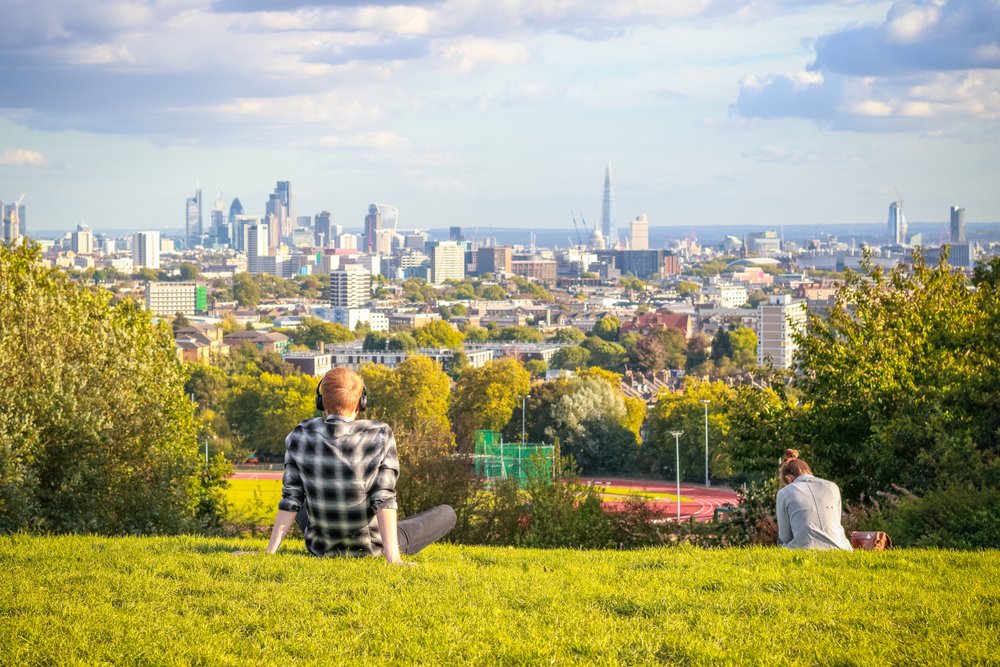
Hampstead Heath is an upper-class area of London and not far from Highgate Cemetery. You can easily walk there and combine two London hidden gems in one outing!

One of the most popular open spaces in London, Hampstead Heath is by far the best out of Hyde Park and Kensington Gardens. With 800 acres of woodlands, you will see a great view of London from the top of Parliament Hill.

If you’re coming from Trafalgar Square, it’s around 30 minutes from Leicester Square on the Northern Line. Alternatively, take bus numbers 88 and 214. Here are some activities you can do in Hampstead Heath Park.

You can swim in the open-air Bathing Ponds and Parliament Hill Lido during the summer (these are usually for residents of the UK rather than tourists, so check ahead of time). You’ll also find the lovely Kenwood House located here.

There are various paid sports events and sports activities, especially for families with young and older children. For sports lovers, you can go fishing, practice your athletic skills, play cricket, ride a bike, go swimming, or play tennis. There are also sports clubs from rugby, running, croquet, bowling and many more.

For wildlife and nature, you can spot woodpeckers, bullfinches, stag beetle, grass snakes, and many more. Although you rarely see beautiful colorful flowerbeds, you will still enjoy green trees turn orange and yellow in autumn, then disappear into leafless trees in winter.

You will often see bats and up to 25 different types of butterflies, along with foxes, hedgehogs, deer, a duck pond, and many more.

Check out Golders Hill Park and Golders Hill Park Zoo (free), adjacent to Hampstead Heath Park for more open space greenery and wildlife.

House of MinaLima

Located in the heart of Central London, Soho, behind Shaftesbury Avenue, House of MinaLima is a Harry Potter gift and merchandise shop. If you’re a fan of Harry Potter, then this place is for you! It’s also a great place if you’re visiting London with kids.

The storefront looks like an arcade: red all over with small light bulbs surrounding the name of the shop. It’s situated below a pink bricked house; you can’t miss it.

You will often see several black and white Harry Potter billboards, a replica of several posters and billboards you’d see in the movies. Other items include the flying envelopes that the Dursley’s kept from Harry, a statue of Hedwig, a large artwork of the Marauder’s Map on the floor (you can step on it), many books on witchcraft and wizardry as well as the Dark Arts. See the exhibition downstairs for more surprises!

Situated behind Shaftesbury Avenue, the major West End theatre district, House of MinaLima has several members of staff who would be willing to help you choose your Harry Potter products. They’re the real Harry Potter fans.

If you haven’t had enough of the Harry Potter Studio Tour in Leavesden, then visit the shop when you get back to London (if you have enough time, that is). The store closes at 7 pm.

Still want more Harry Potter? Take a Harry Potter themed walking tour with my favorite tour company, GetYourGuide.

Read reviews and book your tour today!

Brick Lane

Historically, Brick Lane was the place in London where the poorest of the poor lived and congregated. Many years back, Jack the Ripper claimed his many unfortunate victims in this area; however, now, it’s a place for trendy fashion and it’s the home of many Asian communities.

Situated in the East End of London, you can see the multi-cultural aspect of London here. Brick Lane Market opens every Sunday, selling street food and drinks from around the world. During the rest of the week, Brick Lane is also a place for several curry houses scattered around this area.

You can usually smell the hot spices mixed with different aromas of food as you walk past. Sometimes you can still feel the heat from the hot pan as you choose your dishes!

As for retro fashion, make sure you wear your best vintage outfits to fit in. You’ll see a different side to London, a sight not normally seen in Central London.

The community on Brick Lane is largely Asian, particularly Pakistani, Bangladeshi, and Indian. Although it’s remarkably busy, you’ll enjoy the community feel, and you will see several Asian shops selling saris, headscarves, jewellery, street food, restaurants, and cafes.

Along with the multicultural community and retro fashion all around you, you will see a lot of colorful street art adorning the brick walls and storefronts.

On Brick Lane, you will see a large artwork of a pelican, (a photo popular on social media!), a large painting of a lady in orange/purple street-style outfit with her large silver necklace around her neck, and many more. Take advantage of taking several photos when you pass them!

Don’t forget to give the buskers (playing all kinds of music, from Caribbean to R&B) your attention while in the area as well, and give them a tip if you like the music!

Brick Lane is young, vibrant, multicultural, colorful, and artistic all rolled into one. A place not to be missed!

Kayaking and canoeing along the Thames

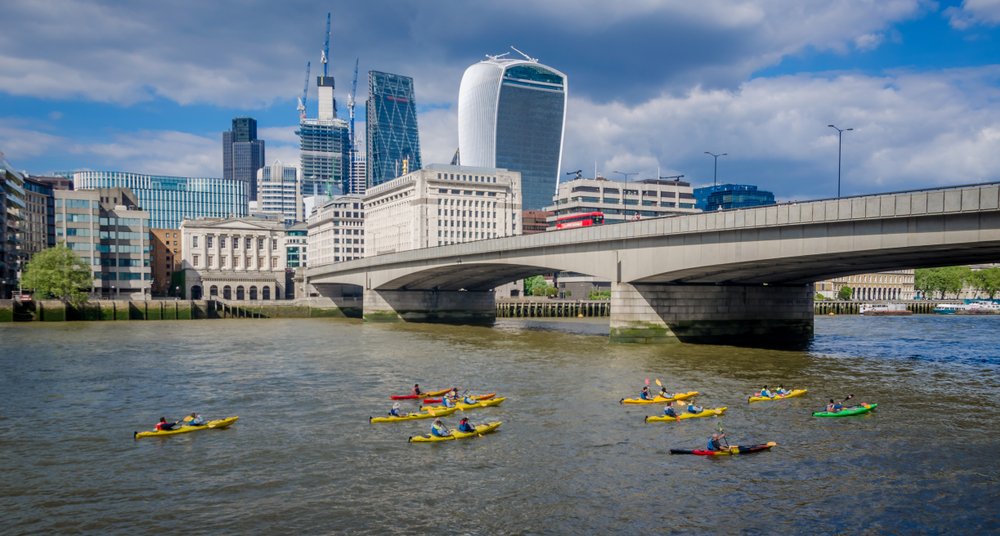
Most tourists do a hop-on hop-off bus tour or take a river cruise along the Thames. To do something a little different, why not canoe or kayak and enjoy the cool breeze as you see the many famous landmarks in London?

Kayaking and canoeing are not for the faint-hearted and not for beginners. The current in the River Thames can actually be very fierce and when it’s windy, it’s wise not to go out. I have seen experienced swimmers struggle getting out of the water because of its currents. Make sure you know the risks and go with a licensed guide!

The great thing about kayaking and canoeing in London is that it covers the quieter side of London too if you want to get away from the hustle and bustle of city life. These places are not always the most scenic, but if you’re into grazelands and abandoned spaces all overtaken by wildlife, then its an interesting sight!

You can also mix it up with a little adventure and go by jet boat! Check out RIB boat tours here.

Little Venice

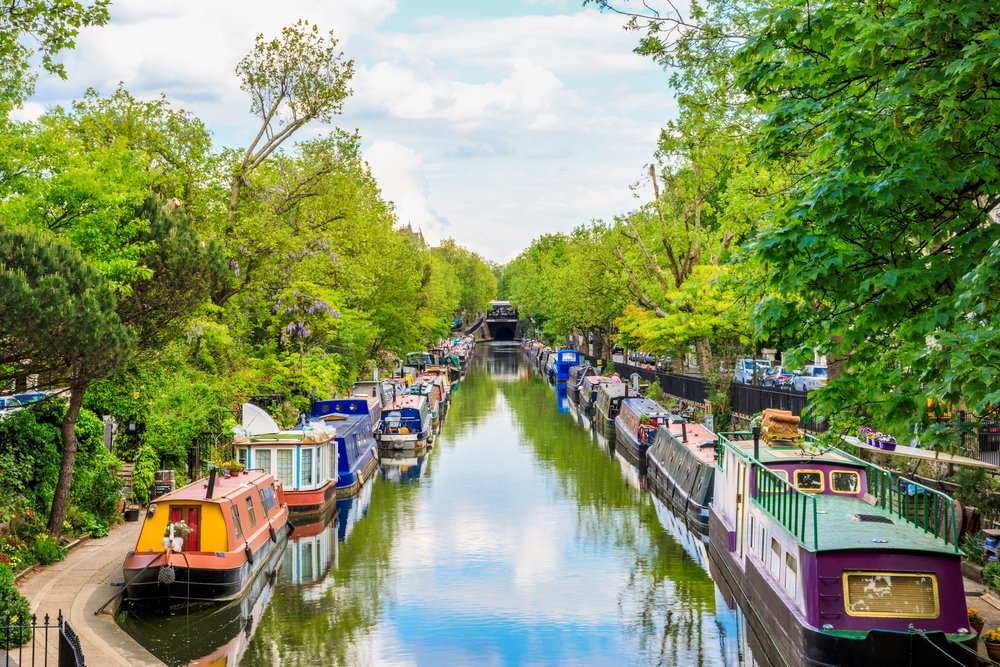
Located in West London, Little Venice consists of boat houses, Georgian houses, waterways, and much more. You hardly feel as if you’re in London at all here!

It’s quiet in some areas and crowded in other areas. Connected to Regent’s Canal and the Grand Union Canal, as you walk further up into the canal, you will see Camden Lock, Camden Market near Regent’s Canal, and Portobello Market near the Grand Union Canal. Those two markets offer vintage, quirky, and trendy atmospheres and more crowds, whereas other areas are a bit quieter.

The crowds of people will make you feel a part of the friendly community and the quiet areas will give you peace. Don’t forget to check out some of the Georgian houses and see how locals live in council estates scattered around the canal.

Why not ride a boat and enjoy the ducks paddling along with you with the currents? I guarantee you that you will have a chance to avoid the crowds, and enjoy some peace in nature.

Book your Regents Canal boat tour today!

Another great thing about the areas near Little Venice is the classic and quirky cafes along and above the canal.

It’s a great feeling, sipping tea and coffees or cocktails in the evening, hearing crowds of people talking, and seeing the lights from boathouses twinkling in the night sky.

Leadenhall Market

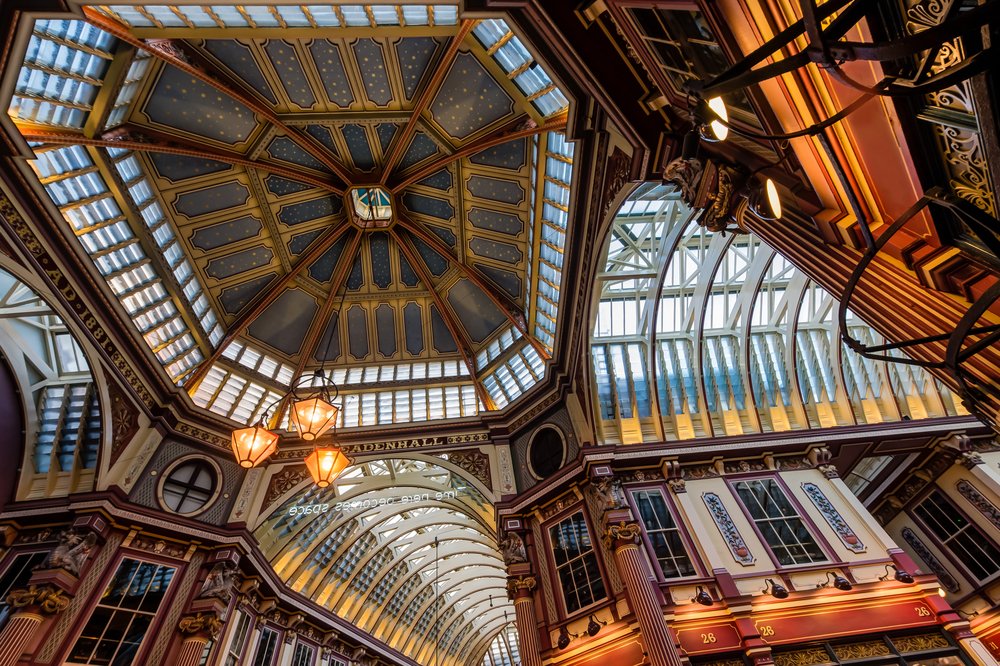
Leadenhall Market is situated near London Fenchurch Street and Monument. If you happen to visit the Sky Garden, give Leadenhall Market a visit before or after.

As you step inside the cobblestone pavement in the market, you will be surrounded by many luxurious shops dating back to the 15th century. Sip some luxurious coffee in one of the coffee shops among businessmen in their suits. Buy some cinnamon pastries or sugary waffles, chocolate croissants, and various cakes to take away.

Not enough? Why not visit the New Moon pub, a brightly lit golden pub for traditional British fish and chips? Other than buying cakes, sipping coffees, and eating fish and chips, you can buy flowers at the florist, fresh meat from the market, or taste fine wine in a casual wine café.

There are plenty of shops, restaurants, and cafes to choose from here, and it’s a welcome contrast to the vibrant working-class Borough Market and vintage Portobello Market.

It’s not just the shopping you’ll experience; it’s the historical architecture all around you. The brightly lit pathway lines many shops and as you look above, you’ll see the exceedingly high arch-shaped glass roof. As you arrive in the middle, above, you will see an extremely high dome-shaped roof. It’s a guarantee that you’ll be surrounded by stunning architecture!

Experience Pie, Mash, and Liquor

Traditionally, pie, mash, and liquor was the food of the working class in the 19th century. This dish consists of mashed potatoes and pie, usually served with gravy called ‘liquor’ (which is actually non-alcoholic), made from the stock leftover from stewed eels.

People usually eat this traditional meal with mixed vegetables such as broccoli, carrots, or peas. Complement it with a traditional British tea with milk. The taste is salty and filling at the same time. The presentation isn’t elaborate, but it’s the flavor that counts.

You can eat it for lunch or dinner, and it can be found in British pie and mash cafes or some traditional British pubs around London.

If you happen to see English cafes scattered outside Central London, the settings consist of simple flat chairs and simple tables. Regular locals will usually eat in these types of places; that’s the beauty of experiencing the British culture, seeing how and where regular Brits eat.

Here are 5 recommended Pie & Mash cafés worth a visit.

  1. Mother Mash: 26 Ganton Street, London, W1F 7QZ, England (Soho).
  2. Castle’s Pie and Mash Eel: 229 Royal College Street, London, NW1 9LT, England (situated near Camden Town and popular with tourists).
  3. M Manze Tower Bridge: 87 Tower Bridge Road, London, SE1 4TW, England (follow the road from Tower Bridge and head South)
  4. Goddards at Greenwich: 22 King William Walk, Greenwich, London, SE10 9HU, England
  5. Fuller’s Pie and Ale House: 33 Tothill Street, London, SW1H 9LA, England (situated in near St. James’ Park)

All Hallows by the Tower Church

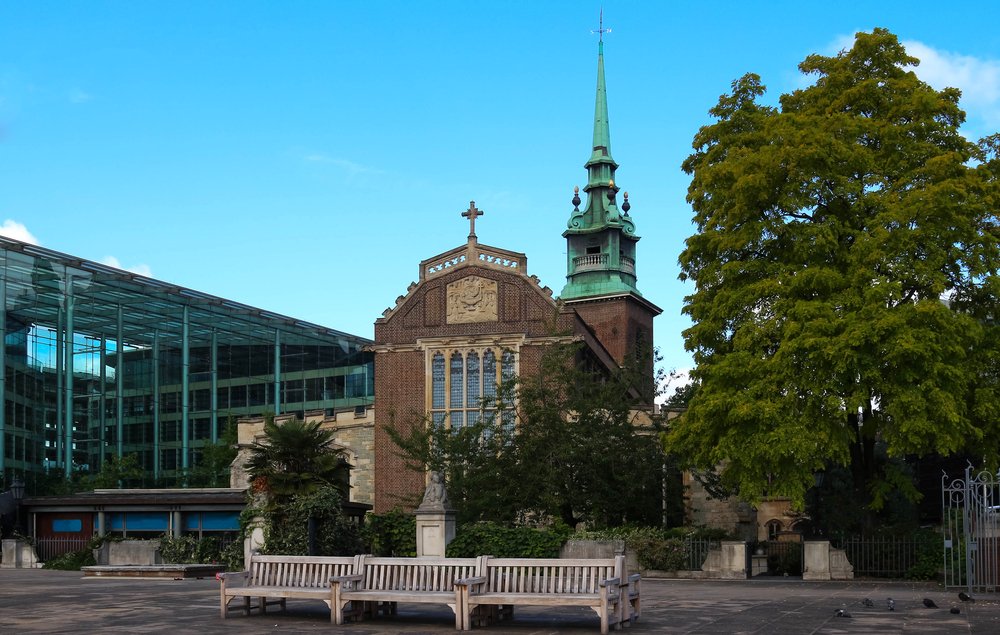
All Hallows by the Tower Church is situated next to the Tower of London. The nearest tube station is Tower Hill. It’s the oldest Anglican church in London and still holds services to this day.

After your tour at the Tower of London, why not give All Hallows by the Tower Church a visit? Later on, you can eat at the Coppa Club Tower Bridge restaurant, famous for its igloos by the River Thames, overlooking Tower Bridge and The Shard (be sure to make a reservation in advance!).

All Hallows by the Tower Church has survived many disasters including The Great Fire of London and the German bombers during the Blitz. It can also be easily missed since everyone will be attracted to the Tower of London.

If you’re into Roman history, the history of Anglo Saxons, and Ernest Shackleton, then this place is for you. Compared to Westminster Abbey and the Tower of London, there are not usually a lot of people here, so it’s an intimate experience if you don’t like crowds.

Check out the crypt museum and the many multi-colored glass crests on the stained-glass windows. It’s historical, spooky, creepy, and interesting at the same time!

The Operating Theatre and Herb Garret

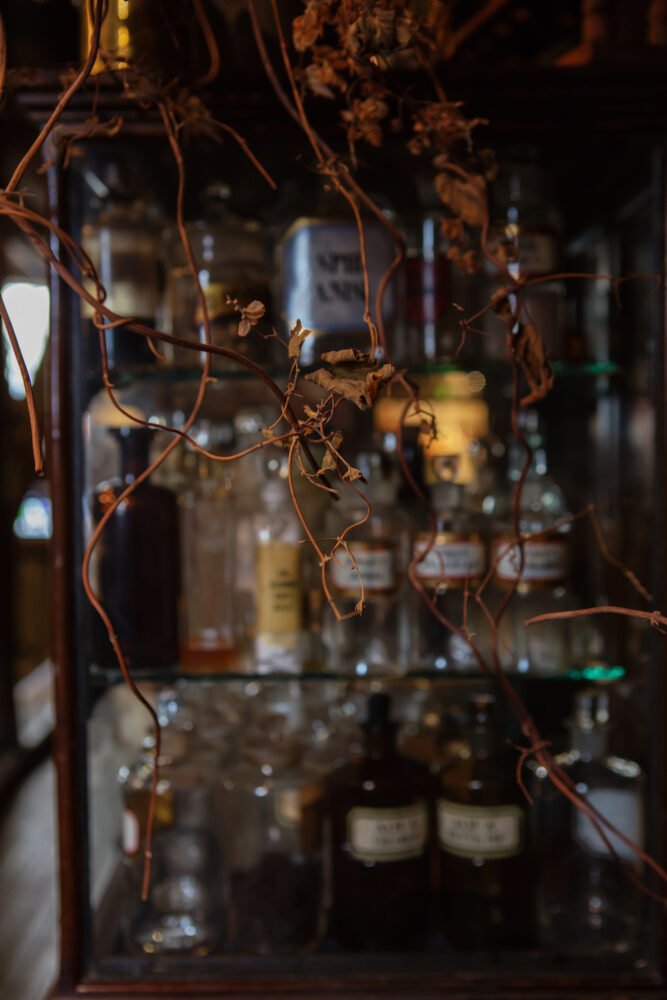
The Operating Theatre and Herb Garret Museum is in the South East of London. This place was used to store herbs for medicine, and it’s one of the oldest surgical theatre in London between the 18 – 20th Century.

If you’re a science buff or you’re into the history of medicine, this museum is for you. Here, you will see a collection of different flavored aspirins ranging from mint to coffee and usually taken with milk or water.

Other interesting items include a red velveted surgical box with its complete silver surgical tools. The item that most caught my attention was the blood testing kit. Seeing it, I could imagine how much it hurt when the thick syringe went into the skin to take blood samples!

In different areas of the museum, you will see other items: a 17th-century wooden hospital trolley, a 19th-century urinal glass shaped like a vase with a handle, a rusty tinned ward lantern, and a tool known as a blade scarificator, used for bloodletting. Bloodletting was intended to draw blood from a patient to cure and prevent future illnesses. Most of the time, they used to use leeches to extract blood.

It’s great fun for all the family (if you’re not squeamish or have very young children, that is) and educational if you’re curious to see what life was like during the 18th to the 19th century.

The museum is situated next to London Bridge Station. If you happen to visit The Shard, Borough Market, or the Southbank area, then you can’t miss this London hidden gem museum.

See the deer in Richmond Park

Richmond Park is situated in the southwest of London. There’s no other place to go deer watching than Richmond Park! Richmond Park was a recreational and hunting ground for the royal family for more than 1,000 years, but now everyone can visit.

Richmond Park is the second-largest of the royal parks in London, and it consists of 2,500 acres of green space with lots of paths for walkers and lanes for drivers. As you reach the Richmond area, you can feel a bit of a rural village vibe in London.

Although a busy and popular area for locals and tourists, by mixing with nature and wildlife, it’s a place that makes you feel at peace — as a bonus, all that green space boosts your immune system, a contrast to the stressful, a contrast to the sometimes stressful urban area of Central London.

While deer spotting, don’t get too close! They are not pets; they’re wild animals. People have been injured feeding them. If you go by car, if you’re lucky, you can see them close as you drive by (but be careful not to hit them!)

Check out the café and Isabella Plantation for beautiful walks among plants, trees, and flowers. You can go cycling, walking, picnics, dog walking and see a great view of the Thames in Richmond Hill from the hilltop. See if you can spot Mick Jagger’s house!

Secret Bars

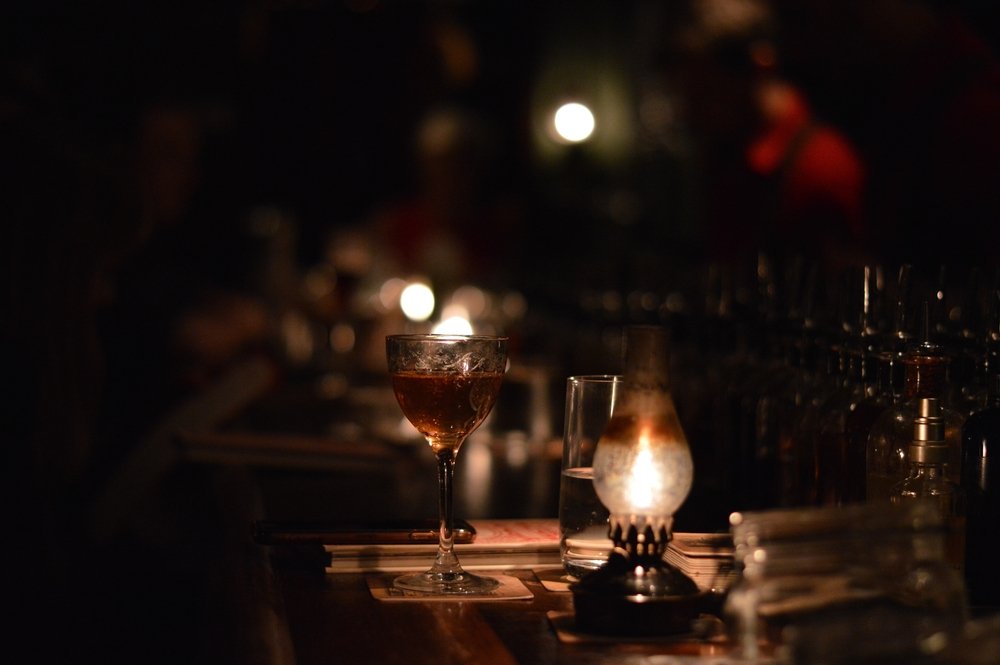
If you want to try out something different from the usual partying areas scattered in every corner of Soho, you must try out several secret bars, which London is well known for.

Hidden from the busy life of the city, this post wouldn’t be complete without acknowledging a few obscure secret cocktail bars around London. Here are 4 recommended secret bars in London to visit.

The Luggage Room

The luxurious, cozy, and dark cocktail bar has an intimate setting hidden in the aristocratic area of Mayfair. The Luggage Room offers 19th century-inspired alcoholic drinks up to the current period. If you want to experience the lively atmosphere, make sure you check in during the weekends by 10 PM to get in.

The simple black door has a silver lion knocker. It can easily be missed and be mistaken for an abandoned house. However, as you reach the basement, you’ll feel like you’re on the set of the Great Gatsby movie.

The afternoon tea cakes and sandwiches taste the same as the afternoon teas served around London, but the sweets and savories taste so different from the other restaurants and cafes in London.

Check out the marble fireplace, the leather menu imprinted with the club’s initials, a selection of cocktails that used to be served in the medieval times down to the peanuts. These small details are what make the place memorable, especially when you’re spending time with your family and friends!

The Little Yellow Door

The Little Yellow Door Cocktail bar is situated in the colorful and fashionable area of Notting Hill. This bar has a 19th-century Victorian feel to it, and its theme makes you feel that you stepped into someone’s flat as you get that cozy feeling of being at home.

Here, you can have dinner parties, Sunday roasts, bottomless brunches, and house parties. Although the food is average and tastes similar to other pubs around London, the atmosphere is unique and the theme of feeling like you’ve stepped into someone’s flat is such a good idea.

Lunch ends at 5 PM, and if you like R&B and hip hop, head downstairs to dance a while downstairs. Take advantage of the DJ booth, a vinyl station, a fancy-dress box, poker, and backgammon tables if you’re hiring the place for a private event. You can play Jenga and other board games in the bar area as well.

Evans Peel Detective Agency

Situated in Earl’s Court, Evans Peel Detective Agency is a speakeasy bar hidden in Central London. Like the Luggage Room, Evans Peel Detective Agency will make people feel like they’ve stepped into the set of the Great Gatsby!

The great thing about this speakeasy bar is that once you arrive in front of the door, a waiter playing a detective will tell you they’ve solved your case. Be prepared to have a story ready and play along with the dialogue as they guide you to your table.

The professional mixologists have excellent knowledge of modern classic cocktails. As for the decor, you will see many detective themed items in the 1920s, including maps, magnifying glass, and many more to add to the ambiance.

The Mayor of Scaredy Cat Town

Situated in Bishopsgate, you can visit this London hidden gem before or after visiting Spitalfields Market, a retro vintage and antiques market like Portobello Market. Like Evans Peel Detective Agency, it’s also a speakeasy bar.

When you arrive at the Breakfast Club bar, tell them that you’re there to see the mayor. They’ll escort you to what looks like a large fridge that will lead you down to a cozy, dark, and lively underground pub!

Try the Basic Kitsch cocktail for their signature vanilla, raspberry syrup, and lemon sweet and sour cocktail. It’s an average price for the atmosphere; I’ve seen many bars that are more expensive. I recommend it!

 The Hardy Tree

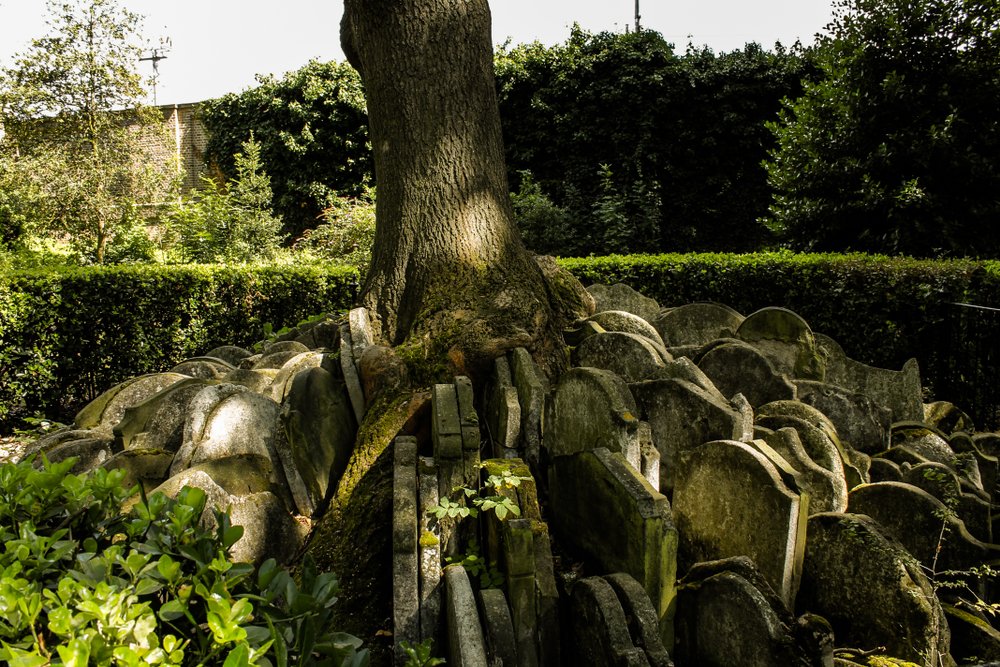
The Hardy Tree consists of hundreds of 18th century tombstones which were placed close together around a large ash tree by novelist Sir Thomas Hardy.

It’s a bit bizarre, but in the mid-19th Century, London was in the middle of a great railway expansion, which they thought would affect the souls buried in the nearby graveyard.

Sir Thomas Hardy thought it was a good idea to pile the burials near the ash tree so they could rest in peace. However, it’s thought the people buried here aren’t resting in peace to this day.

Weeds and algae have grown between the tombstones and people have had bad luck here — some say the souls resting here can commit an act of “bodysnatching”. Visit this tree if you’re brave enough — good luck!

Cruise the Thames on an old paddle steamer

There are many companies that offer cruises on the River Thames. You can choose from exploring the city with live entertainment, fine dining with wine, and fireworks display if you choose to come for NYE and experience the Tower Bridge lift, a rare occurrence nowadays!

We went with Dixie Queen, and the service there was amazing. As you board the Dixie Queen, you feel like you’re stepping inside a mini-Titanic cruise ship. The wooden stairs with brass handles will take you to the second floor of the dining area. There were around fifty chairs and tables covered in white tablecloths. Large white candelabras are placed on each table.

We went to the lower deck; this deck consists of several intimate booths and blue couches complemented with dark wooden tables. The upper deck consists of a bar for alcoholic beverages, and you can also opt for buffet service if you prefer.

At the end of the boat, there is a great space for dancing, live entertainment, and a balcony for fresh air.

It’s recommended to take in these sights at night, since London can be rather dense and industrial around the Thames. During the day, the view isn’t as beautiful at night, when it’s all lit up!

Interesting landmarks covered include the former Battersea Power Station, Palace of Westminster (Big Ben), The London Eye, the Gherkin, Tower Bridge, Canary Wharf, Cutty Sark ship, Greenwich The O2 Arena, and the Thames Barrier to prevent from flooding.

Dixie Queen is the busiest, but you can choose from the Elizabethan, Edwardian, and Equity. Equity is for private tours of no more than 6 people.

Postman’s Park

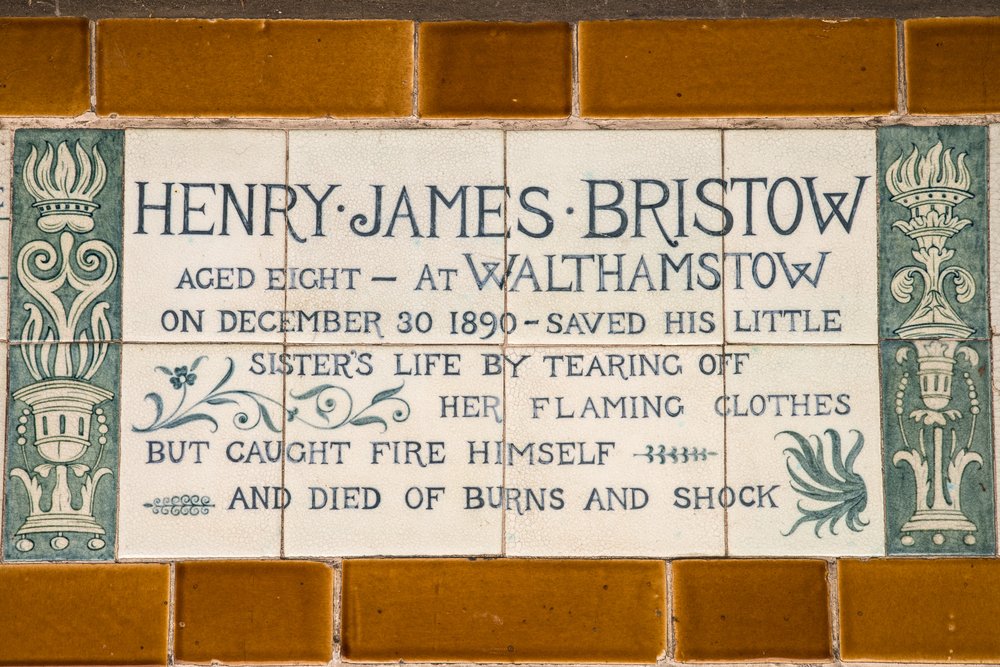
If you happen to be in St. Paul’s Cathedral, make sure to check out Postman’s Park, nestled behind. It’s a great place to get away from the busy atmosphere, and a great place to have your lunch. You’ll be surrounded by giant ash and oak trees, green plants, and tall 14th-century Tudor houses.

The special thing about this park is the Watt’s Memorial to Heroic Self. It consists of memorial plaques of over 40 people who have sacrificed their lives to save others. The memorial opened in 1900 and dates to the 19th Century. One plaque is above; two other plaques include:

Thomas Griffin, a laborer who died in a boiler explosion so he could search for his mate. Died 12 April 1899.

Alice Ayers, a daughter of a bricklayer, saved 3 children from a burning house. Died 24 April 1885.

It’s worth reading all the plaques and imagining what they had to go through risking their lives, taking a moment to honor their sacrifices.

Jack the Ripper Tour

For those who don’t know Jack the Ripper, he was a notorious criminal back in 1888 who targeted women. Nearly all of his victims died within the Highgate and Whitechapel area.

If you love true crime and a good mystery, this highly-reviewed walking tour will offer you just that. I enjoyed hearing the macabre stories, though it is definitely not for young ears!

The tour usually last about 2 hours, and they’re more than happy to answer any questions you may have about Jack the Ripper. You will see the various alleyways he used to lure in his victims, you will visit the Ten Bells pub where one of his victims used to work, and you will get to see the historic Spitalfields Market, a vintage and retro market near this area.

Before or after this tour, check out Wilton’s Music Hall, the oldest music hall in London dating back to the 19th century, another hidden gem of London. It kept its original décor including its pillars, balcony, and stages, and it’s well worth a visit.

About the Author

Hi, I’m Annisa, an Indonesian national living in London. I’ve been living here since 1991. My family and I packed our bags to pursue a better way of living.

Since living here, I noticed London is rich in history and culture and I had an idea of writing about it in a blog, London Travellers. As a resident here, I’ve learned the ins and outs of London and every time visitors see London, there’s always something new to see and do. It’s impossible to see everything in a short amount of time, so that’s why I made it my mission to write about London and give visitors tips and tricks for planning a great holiday.

For more tips, check my London guide and my London itinerary.

For more information on London Travellers, follow me on Instagram and Pinterest.

Pin This London Hidden Gems & Off the Beaten Path London Guide!

50 Essentials for Car Camping: Checklist & Packing List For Car Camping

There’s nothing better than classic smell of a warm campfire crackling under a blanket of twinkling stars and waking up to a soft glowing sunrise as dawn breaks the horizon.

Camping is all about those moments of peace and serenity. When your pace for the day is slow and peaceful, and you truly embrace what it means to be a part of nature.

But, as my fellow campers know, not all moments are pure bliss and comfort. Sometimes you wake up to powerful thunderstorms that wipe your camp out, or you come back from a long hike and find your campsite has been invaded by ants.

But one thing is for sure, every trip is an epic adventure with hidden lessons that bring memorable stories for years to come.

As a very seasoned car camper,  I want to share with you my ultimate guide to car camping: checklist, essentials, packing list, tips, and more.

My guide includes everything from the apps I use for discovering campsites, products that I feel enhance your car camping experience, and of course the car camping essentials like cookware and storage. I have learned nature’s lessons and developed a love for the chaos and order that comes along with wandering into the great unknown.

What is Car Camping?

Home, sweet car!

For the purposes of this article, I will be focusing primarily on car camping. Which means you will be living and sleeping IN your car.

Your car becomes a fully functioning home on wheels. No tent setups, no breaking down campsites, just you and your car exploring all of what the world has to offer!

However, car camping can also be thought of as driving up to your campsite and setting up shop with a traditional tent — and I’ll cover that briefly as well, while I’ll focus more on the logistics of car camping and sleeping in your car.

The thought of sprawling out in your car, protected from the elements sounds simple in theory, right? Hold up!

Logistically, there are a few things to consider if you want to make your car camping experience as comfortable and convenient as you dreamed in your head. With a little bit of knowledge and advanced planning, your dreams of easily escaping into nature can come true!

Car Camping Checklist #1: Finding a Campsite

Car camping should be treated just like any other vacation or getaway.

First, you dream of where you want to go and then second, seek out accommodations.

Finding accommodations, or in this case, a campsite, is not quite as easy as you may assume. Take it from me! I’ve been kicked off public land, asked to leave rest stops, and have even had campsite reservations stolen from me.

But over the years I’ve perfected my system and discovered the best apps and maps for making accommodations easy. Below I’ve provided the names of my favorite apps and links to websites that I use regularly to find my next camping destination.

Best Apps for Car Camping

1) iOverlander. This app is the best kept secret for free dispersed overlanding campsites. iOverlander uses a simple topical map setup, loaded with a database of campsites that are updated by the users. Details are listed for each campsite including coordinates, pictures and amenities.

2) HipCamp. This is another wonderful app and great alternative for discovering campsites. HipCamp allows you to book unique camping experiences on farms, vineyards, and public parks across the country. It’s essentially an Airb&b for land. Owners “rent out” their land for campers so it gives you a more private setting.

Car Camping Essential Website Resources

1) https://www.blm.gov The Bureau of Land Management (BLM)  is an agency within the United States that is responsible for public land. Campers can camp for free  on BLM land. This website is a great resource for finding maps that provide locations for public land.

2) https://www.fs.usda.gov Similar to BLM Land, National Forest Land is also public use land. Follow the link provided to download maps of National Forest Lands.

3) https://www.reserveamerica.com Reserve America is the Mecca for campground reservations in the states and federal lands. It’s packed with information including tips on outdoors adventures, searching for sites as well as reserving lodging.

Car Camping Checklist #2: Pack Your Essentials for Car Camping

Not sure what the most important parts of your car camping setup are? I’ll break down your car camping essentials section by section so you don’t forget a thing.

Here’s your complete car camping packing list!

Sleeping in Style

Now that you’ve got your dream location picked out and a sweet campsite to boot, let’s get into the list of gear you’ll need to have the perfect adventure.

We’ll start with the most important pieces of gear, sleeping! Sleep is often overlooked but it’s essential if you want to have a good time! Nothing ruins the next day like a bad night of rest. Here’s my list of essential bedding products that are tried and true.

I’ll present two options to my fellow campers. The first option is the traditional route of tent camping. Traditional tent camping still lets you enjoy all the necessities you have stashed in the car but also enjoy the novelty of sleeping in a tent.

The second option is for more of my “#vanlife”-ers, or the lucky few who have a truck or a large SUV that’s big enough to sleep in. I’d seriously advise those with a large car to fold down the backseats of your car or truck and turn it into a packable sleeping sanctuary!

 We’ll start with a tent set up for my novelty tent sleepers who want to drive into the campsite, unload and set up camp.

Tent

 For those who enjoy sleeping in the great outdoors, the REI Half Dome is a great starter tent.

It packs down small, weighs just under 5 pounds, and can lodge two people comfortably. It’s a great option that doesn’t take up much room and is very simple to construct.

Sleeping Pad

  If you chose to go the tent route, you’re going to need to invest in a good sleeping pad. A sleeping pad will act as your mattress and keep you off the cold, hard ground.

The NEMO Flyer is my favorite to use as it is easy to inflate, packs down nicely, and is relatively quiet if you’re the type that rolls around when you sleep.

Sleeping Bag

When sleeping in the car, most people overlook sleeping bags and opt for blankets. But I’ve learned that a sleeping bag is absolutely essential!

Despite being protected from the elements, your car can still get quite chilly and a good down sleeping bag will save you from a harsh, cold wake up. I personally use the Marmot Trestles Elite similar to this one. I love it because it’s super lightweight, comfortable, and keeps me warm.

Mattress

   If you’re one of the lucky few who has a truck or a large SUV, I’d seriously advise you to turn the back of your car or truck into a packable sleeping sanctuary. The best part about a large car is you can create a sleeping system that is more luxurious than your bed at home!

I’ve been through a plethora of air mattresses, sleeping pads, and foam rollouts. But I have finally settled on the ultimate camping mattress.

I LOVE this tri-fold memory foam mattress. I purchased the queen size for both my Ford Edge and F150. It fits perfectly in the back of both cars and folds up to a small enough size that’s perfect for road trips. It’s integrated with a bamboo covering for breathability and I’m able to easily take the cover off for washing.

Comforter

Yes, my sleeping arrangements are very luxurious for camping standards. Which is why I top my camping bed off with a good synthetic down comforter.

A comforter is the icing to my bed cake. I love cuddling up under a comforter and having that extra layer of warmth during the cold months. I use this simple comforter I got off Amazon. It’s an inexpensive option that provides the comfort and warmth that I need.

Pillows

 As for pillows, I just use regular bed pillows. I do have separate ‘camp pillows’ that are different from my home pillows.

The more of an established camper you become, you begin to realize that most articles of fabrics will begin to absorb a permanent campfire smell. So it’s best to have a designated camp bedding bin (below) to keep your linens at home fresh.

Bedding Storage

Bedding takes up the majority of space in my car. I’ve learned the best way to pack bedding is with these Ziploc totes. I throw my comforter, bedsheets, and pillows inside the Ziploc totes.

They are a good way to compact the bulkiness of bedding. They are sturdy, durable, and have a breathable mesh top so you’re able to air out your bedding as you travel.

Camp Kitchen

After a long restful night’s sleep, you’re going to want to wake up and enjoy the sunrise with a cup of camp coffee followed by a beautiful breakfast spread that’ll fuel your outdoor adventure for the day.

The beauty of car camping is that you’re not subjected to MRE meals or boring bologna sandwiches. When you car camp, the sky’s the limit when preparing food! If you’re worried about how to pack for camping and making magnificent meals, don’t worry! I have all the tips and tricks in the kitchen guide below.

Stovetop

Every good camp meal begins with a source of heat. Of course, the simplest answer to your source of heat would be a campfire. But sometimes you arrive at a campsite and find out there is a burn ban in place. That’s where the Coleman Signature Grill Stove comes in!

The Coleman Grill is the perfect answer to all your cooking needs. I love that one side of the Coleman is a grill and the other side serves as a stove. It’s the perfect combination for grilling bacon and eggs while using the stove to warm up your coffee. It’s one of the most necessary things for camping, so don’t forget it!

Cooler

 I can’t stress enough how important it is to have a well insulated cooler. A well insulated cooler is going to keep your food and drinks cold, thus in turn, keeping you safe and healthy from spoiled food. It’s no surprise that I’m a huge fan of the YETI coolers.

I own the Tundra 45 and it’s the perfect size for road trips and holds enough food and ice for at least a 4-day adventure. Plus, YETI coolers are bear-proof so you don’t need to worry about leaving it outside during your stay at the campsite.

Coffee Maker

Every camper knows there’s some magic in that morning cup of coffee. For some reason, being out in nature makes the taste of coffee significantly better. I’ve found that the easiest and fastest way to create a perfect cup of camp coffee is through a small device called a Jetboil like this one here.

The JetBoil is essentially a small cooking stove that can boil water in less than 3 minutes. It folds up to a size smaller than a deck of cards and only weighs .2 kg. I pair the JetBoil with a packet of instant coffee and I’m set for the day.

Utensils

So you’ve got your big ‘kitchen’ appliances out of the way.  Here’s a quick rundown of the small kitchen utensils that’ll make your camping experience more enjoyable.

Cast Iron Skillet. Cast iron skillets were made for the great outdoors! It’s the only material that I’ve found that can withstand the heat of a fire, stays warm after cooking, and requires little cleanup. Plus, it gets better with age! Lodge is the gold standard in cast iron cooking.

Spatula. I like using a metal spatula. If you’re cooking over a fire, it’s the best material to have as plastic spatulas tend to melt… plus, it’s easier to clean than wood. I prefer a fish spatula – perfect for flipping pancakes!

Trash bags. Don’t forget the trash bags! You’d be surprised by how much trash you accumulate during your time on the road. You’re responsible for leaving no trace and leaving campsites better than you’ve found them. Bring biodegradable trash bags if possible.

Reusable bowls and utensils. I like using reusable bowls and utensils as it saves space and decreases waste. I like this simple mess kit from REI. It’s the perfect size for two people, comes in a zippered pouch that’s perfect for packing for car camping and funky colors that make it exciting.

Cutting board and knife. I overlooked the use of a cutting board and knife for the longest time. I found myself cutting up food on random surfaces in nature. I’d advise against this and pack a small cutting board and camp knife, like this one.

Spices, oils and dressing. The best way I’ve found for packing and transporting spices, oils, and dressings is to use travel shampoo bottles. They are the perfect mini size and they have screw-top lids so they’re guaranteed not to leak. For a spice kit, this travel one is super cool for hardcore foodie campers.

Propane. If you opt to use a portable grill then you’ll need to pack propane. Always pack an extra bottle! Nothing is more disappointing than cooking your meal halfway and running out of propane. Buy in bulk to save.

Lighter. I can’t tell you how many times I’ve forgotten a lighter. Put one in the car, put one in your utensils bag, put one in your pocket. Anything you have to do to remember a lighter! If you forget a lighter, you’ll have no ignition source for your grill or a campfire. Buy a 4-pack and stash them around.

Lighter fluid. I love campfires but the actual act of building a fire is quite complicated and is a skill that takes time to acquire. Lighter fluid speeds this process up and keeps a weak fire burning all night long.

Bandana. Bandanas are the quintessential campers rag. I use my bandana for everything! It comes in handy as a dishrag, an oven mitt, napkin, the list goes on! It’s a great environmentally friendly alternative to paper towels and napkins.

Dish Soap. You’re going to want to bring some dish soap for washing up your dishes and utensils. I personally love CampSuds dish soap. It’s biodegradable, has a clean scent, and can also double as a laundry soap in a pinch!

Shovel. I always pack a mini shovel for clearing out overused fire pits or digging a new fire pit.

I keep all the kitchen utensils organized in a large 12-gallon plastic bin. Plastic bins will become your best friend as you get deeper and deeper into car camping. They are a great way to store all your necessities, they’re super easy to clean after a long trip and they last for ages! They also double as ‘coffee tables’ when you’re ready to sit down and eat.

Making Camp Feel like Home

 So you’ve staked out some land to call home. You’ve made your bed for the day, dinner is cooked and you’re ready to relax by the campfire.

I like to compare this stage of the camping experience to relaxing in your living room. You’ll want some chairs, maybe a hammock, some nice mood lights, and a place to sip that well-anticipated whiskey as you enjoy the sunset.

Chairs. There are a million different options when it comes to chairs. What it really comes down to is what is most comfortable for you. What I’ve found that works for me are these steal of a deal chairs from Ozark Trail. The mesh back allows for a bit of airflow, an insulated cooler on the side lets you stash some extra ‘cold ones,’ and a nifty bottle opener is attached to the side.

Hammock. A hammock is the perfect alternative or addition to chairs. Hammocks are the ultimate way to relax. A brand I’ve used and swear by is Wise Owl Outfitters. Wise Owl hammocks are lightweight, easy to set up, sturdy, and they come in so many different fun colors.

Hammock Straps. If you choose to use a hammock, please consider hammock straps much like these. Hammock straps help in preserving the health of trees by minimizing bark stripping that traditional hammock rope tends to leave behind.

Lanterns. When the sun begins to go down in nature, it gets dark fast! I love these little mini lanterns from REI. They’re the perfect size for stashing around the campsite. They emit a soft light that’s perfect for hanging around the campsite or they can also double as a powerful flashlight.

Toiletries and Cleanliness

As you begin to immerse yourself in the great outdoors, you realize how difficult it is to keep everything clean. Including yourself!

As an avid camper, I’ve come to embrace the dirt and the days without showers. But with that being said, I do have a few tips for keeping your body and campsite as clean as possible.

Wet Wipes. Wet wipes will become your best friend! There will be times where you are nowhere near a water source and you can’t stand the thought of getting into your sleeping bag dirty. That’s where these wet wipes save the day! These wipes are great for your face, hands, and body. Not only do these wipes clean, they also moisturize your skin with a clean cucumber aloe scent.

Toothbrush and toothpaste. I like to use dry toothpaste tabs when I’m out in nature. These tabs are a great option as they are made with all-natural ingredients that are safe to spit out on the ground with no damage to the environment.

Soap. If you’re lucky enough to have a campsite next to water you’ll want to take advantage of the free bath. Grab your CampSuds that I mentioned above and use this as your body wash. I know, I know, it’s a little weird washing your body with the same bottle as you washed your dishes with but trust me! It’s an all-in-one product that’ll leave you feeling better and cleaner!

Towel. Regular bath towels take up a lot of room and tend to take forever to dry out. I prefer to use microfiber towels like these as they dry faster, are easier to pack, and tend not to absorb smells.

Deodorant. Please, for everyone’s sake, pack your favorite deodorant (this is mine)

What about my hair? Okay ladies, embrace that second and third-day hair! I’ve found that camping is much easier when you let your locks do their own thing. I like to wet my hair during a bath, throw it in a braid for the night, and be done with it. As soon as you embrace the ‘no poo’ method, the easier your life becomes.

If you just can’t take it, throw your favorite dry shampoo in your bag and call it clean! PS. Your hair is going to smell like campfire every night anyway so just embrace not having to mess with it.

First Aid and Campsite Survival

As you become more accustomed to camping, you’ll learn that accidents happen. No matter how careful you are, you’ll find yourself digging through your backpack for a bandaid or searching for that precious piece of paracord that could double as a spare shoelace.

Chances are, most items in your first aid survival kit will never get used. But these extra items come in handy the one time you’re in a dire situation.

First Aid Kit. Everyone should keep a comprehensive first aid kit on hand when traveling away from home. It doesn’t have to be some sort of mega kit. This kit from Amazon is perfect. It’s a great comprehensive kit for minor cuts and burns and is small enough to stow away in the smallest crevice of your car.

Bug Spray. I live in Texas, so I camp in and around the southern states a lot, which means BUGS! Tons and tons of bugs. I consider bug spray an essential survival tool because without it, you’ll feel like you want to die. I prefer to use a bug spray with natural ingredients like this one from ClimbOn. It has a clean scent and doesn’t leave a greasy residue like most commercial bug sprays.

Paracord. Paracord is a multi-use tool that every camper should have in their survival kit. Paracord has unlimited uses from acting as a tourniquet to simply stitching up a broken hiking boot. If you’re unfamiliar with Paracord, this site has a great guide on the many uses of paracord.

Matches. Even though you should have packed multiple lighters, as mentioned above (hint hint) it’s still smart to throw some extra matches in your survival kit.

Sunscreen. I put sunscreen in the survival section because I believe it is an essential survival tool! A bad sunburn is not healthy and can really ruin a fun trip. My favorite brand is the SunBum Mineral Sunscreen. It’s all-natural, safe for the environment ingredients make it a great alternative to normal household sunscreens. Plus, it has the signature SunBum scent that makes me smile.

Headlamp. You can never have enough light sources after the sun goes down. A good headlamp like this one from Black Diamond is a great choice. It’s lightweight, compact, and powerful enough to navigate through whatever dark situation you find yourself in. Bring extra batteries, too!

Compass and map. A compass and map sound like such an old school tool for survival. But it’s an absolute essential to have in your survival kit. Chances are you will never use it, but it’s a great back up to have if your phone dies and you become lost.

Add some sass to your site!

Now for the fun stuff. Ladies… and some gentlemen, this is your time to shine!

Nothing is more fun than having the best looking campsite in the forest. This comes in the form of unnecessary but totally worth it accessories that add flair to your campsite. I like to add some sass through fun lights, flags that represent your home state, and subtle splashes of color.

String Lights. I love these string lights from REI: they add the perfect amount of accent lighting, plug in through a USB port, and have several different brightness settings to create the perfect illumination no matter what time of night.

Tap lights. These small tap lights are fun to have scattered around the campsite where you need a bit of extra light. A little tip is to put these lights near your shoes at night, so when nature calls and it’s dark outside, you can make a quick quiet escape without waking up the whole camp with a flashlight.

Flag. It’s fun to fly a flag representing your home state. It adds a little flair to your campsite and opens the door to conversations with fellow campers. I’ve sparked a lot of friendships through flying a Texas flag.

Bluetooth stereo. I like this Bluetooth stereo because it’s waterproof, durable, and has a subtle LED light that makes it easy to see after dark. Always remember to be considerate of your camp neighbors and keep your music to yourself.

Camp Games. It’s also important to bring some fun things to bring camping. Playing camp games is a fun, interactive way to pass time. Cards, Uno, and Jenga are some of my favorite games to pack. They are small and compact and can host a variety of people if you find yourself entertaining your fellow neighbor.

Clothes

I won’t go into much detail on clothes as it’s pretty diverse depending on the location you choose. But there are a couple of staple items that I refuse to leave home without no matter what the weather is forecast to be.

Flannel. Flannel is the OG material of outdoorsmen and women everywhere. And if you’ve seen my Instagram, you know I don’t leave home without my one and only flannel. I’ll make a confession, I’ve had this Eddie Bauer flannel for over 10 years. In short, these flannels are indestructible! They are so soft, comfortable and wash up like new. A good flannel will offer a layer of protection from the sun as well as protection from the cold. It’s a great versatile option that should always be packed.

Rain jacket. You never know when the weather’s going to change. Small rain showers can sweep through the mountains or desert on a moment’s notice and it’s best to be prepared. I love The North Face Resolve Wind and Rain jacket. It protects me from the wind and rain and fits like a glove. It’s full of features that are meant to be tested outdoors and it has a lifetime guarantee!

Hiking Boots. Hiking boots are a camping essential. Whether you’re hiking or not, you need a good pair of boots that protect your feet from the landscape of a campsite. Campsites are full of rocks, logs, and possibly snakes and it’s best to protect your feet from your surroundings. I use the Ahnu SugarPines to conquer the world around me. If possible, I suggest going to your local outdoor store and trying on a pair that best fit your feet.

Leggings and Shorts. I always pack both! The night time will always be more chilly than you think so it’s best to have the option of having an extra layer on your legs. I opt for compression spandex leggings and shorts as I find this material to be the most comfortable and moves well as I build fires and tend to the campsite.

Final Essentials for Car Camping

There are always small tips and tricks I learn after every trip I take. Here’s a miscellaneous list of my lessons I’ve learned to pass on so you don’t make the same mistakes!

Campsite Shoes. Campsite shoes are comparable to house slippers. These are the shoes you wear around the campsite that are comfortable and easy to slide on and off. After a long day of hiking or wandering around outside, you’re going to want a shoe that relaxes your feet. I use the Teva Original Sandals. The foam bottoms feel great on my feet and they’re super lightweight, a nice contrast to the heavy hiking boots I wear all day long.

Clothes Pins. A great camping hack is using clothespins to dry out and hang up any article of clothing they may be wet or sweaty.

Eggs. Eggs are pesky when it comes to packing in the cooler. I’ve found the pre cracking them into a large mason jar is the best way to transport them.

Warm Water Bottle. If you’re sleeping in a place that’s colder than you anticipated, JetBoil some water and transfer it into a heat-safe water bottle. Then, place that water bottle in the bottom of your sleeping bag and voilá you have a heated blanket that’ll stay warm for hours.

Cash. Always bring an extra stash of cash. Some campsites require a small cash fee, or you desperately need that last-minute firewood coming into a park. It’s always a great idea to have a little bit of backup.

Notebook. Bring a notebook to write down some highlights of each camping trip. It’s a fun and funny way to reminisce about memories that you may have otherwise forgotten.

Car Camping Checklist #3: Learn How to Pack for Car Camping

 That completes the list of all your car camping essentials. Now that you have an idea of what to pack for car camping, you’re probably asking yourself how all of this is going to fit into your car.

Nothing feels worse than rummaging through your car, searching for that sacred item that you swear you packed but can’t find. To avoid the stress and irritation of having an overwhelming amount of stuff in your car, I’ll give you a breakdown of the easiest methods to keep your car clean, functional, and fun.

 The easiest way to pack your car is to break everything down into stations. Much like a house has different rooms, your car will have different stations. This is where plastic bins become your best friend! Every station has a plastic bin of its own.  Here’s a breakdown of my stations and where I’ve found the easiest locations to store each ‘room’.

Station 1: Electronics. I keep all the electronics in the glove box as I’m constantly charging phones, watches and computers. It’s easy to be driving down the road, plug in your dying phone without having to pull over and dig through weeks worth of camping essentials.

Station 2: Toiletries and Clothes. I keep my toiletries and clothes together as they both are my ‘clean’ items. I store them in pull out style bins behind my front seat. I store them here because It’s easy to create a changing room when both car doors are open and allows a small amount of privacy when brushing your teeth or removing makeup.

Station 3. Survival Kit. I keep my survival kit under the back seat. The survival kit rarely gets used so I try to keep it out of the way. I don’t want one more thing to rummage through if it’s not necessary.

Station 4. Bedding. My bedding is kept in the middle of the car. As mentioned before, the Ziploc Totes hold and compress most of the bedding so it doesn’t take up too much space.

Station 5. Kitchen and food. I keep the grill, cooler, and utensils bin in the very back of the car. I do this because these are the items that tend to be used the most and become the dirtiest. It’s easiest to keep them in the very back as you’ll be unloading these items once to several times a day. This way, when it’s time to eat, you simply pull the specific items out without having to unload your entire car for one meal.

You’ll quickly begin to find that your car fills up fast and every nook and cranny soon has some piece of camping equipment living in it. The best thing you can do is embrace the organized mess! As you become more accustomed to your campsite routine, the easier it will be to pack and create stations of your own.

Car camping is becoming the new way to see the world. Don’t get left behind by being clueless as to what and how to pack. I hope this comprehensive car camping checklist helps you locate, furnish, and create the campsite of your dreams.

Pin This Guide to Car Camping Essentials & Packing List!         

5 Best Road Trips from Dallas

Dallas is a wonderland in and of itself, with places like the Perot Museum, the Dallas World Aquarium, and Klyde Warren Park but everyone needs to get out and stretch their legs, and their imaginations.

Here are some great quick road trips from Dallas if you’re looking for a few days to have a change of pace — all worthy of a spot on your Texas bucket list.

Pack up all your road trip necessities and prepare to hit the road!

Road Trips from Dallas

Grapevine, Texas

Distance from Dallas: 22.6 miles

Drive Time: 25 minutes

While a short drive, Grapevine is full of unique and interesting things to do. The name comes from the fact that there are many different wineries in the region but, thanks to this, it has become a tourist destination.

My two recommendations for hotels include Great Wolf Lodge and the Gaylord Texan. Up until 2016, they were the largest waterpark in their chain of hotels. In addition to the indoor “eighty degrees year round” waterpark, they also have a ropes course during the summer, a spa for both adults and children, several amazing restaurants, an arcade, and a game that covers the entire building and will make you feel like a wizard for the time of your stay!

As far as hotel stays, if you’re looking for something a bit more romantic, be sure to check out the Gaylord Texan across the street from Great Wolf Lodge. The atrium itself, located in the center, has four acres of gardens and waterways that make you forget where you are.

Although there is plenty to do year round, I recommend going during Grapefest in September and at Christmas time. Grapefest is a wine festival that is family friendly. They have the largest customer-based wine competition (that’s right- you get to judge!), a grape stomp competition where you can get your feet wet- literally, and KidsWorld where partnering places such as SeaWorld Aquarium and LegoLand have interactive events for the kids.

Hands down, though, my favorite time to go to Grapevine is Christmas. For good reason, too, since Grapevine is known as the “Christmas Capital of Texas”. Great Wolf Lodge is decorated to the max, and the Gaylord Texan has interactive event which includes ice sculptures, looking for Elves, snow tubing, and ice skating. Throughout town there are other events including the free nightly Christmas tree singing, and even a trip on the North Pole Express just like in the movie.

Frisco, Texas

Distance from Dallas: 20.5 miles

Drive Time: 26 minutes

This trip is especially good if you like museums because they have some pretty interesting one. Last summer I took my daughters and their friends to the National Videogame Museum where they got to play many different games hands-on.

When you pay to enter, they give you tokens you can use at the end of the museum to play videogames from many different eras. My favorite part was the spot where they taught about the invention of the internet and how long it took for people to log on when the internet was first given to the public.

Within the Frisco Discovery Center there are two more museums, the Sci-Tech Museum, which focuses on Math, Science, and Technology, and Traintopia, which has replicas of small railroads. The latter of the two is done in conjunction with the Museum of the American Railroads. Located less than a mile from the Discovery Center, the Museum of the American Railroad has guided tours through different era steam engines.

If you cannot get enough of gaming, after going to the museum, I highly recommend you go to Nerdvana. This is a restaurant that has a little something for everyone, from great lattes to happy hour and a different menu for both lunch and dinner. Naturally, this place has a ton of games to play for free, with a $10 purchase. Added bonus? You get a discount if you show them your National Videogame Museum wristband.

In addition to the museums, my girls and I really enjoy walking around Stonebriar Mall. If you decide to go, a stop at Lolli and Pops is a must. It takes you back into a vintage 1920s style candy store and, oftentimes, they sell cotton candy outside the store. I also recommend a stop at Williams-Sonoma. They have amazing kitchen wares and around the counter will be showing some of them off- including free delicious samples.

As if that wasn’t enough, there is Frisco Commons Park, with a wooden, castle-style playground, a pond, and plenty of concrete trails to enjoy.

Waco, Texas

Distance from Dallas: 96.5 miles

Drive Time: 1 hour, 32 minutes

I am grateful to Chip and Joanna Gaines for putting this city on the map. Located almost halfway from both Dallas and Austin, this is a great place to get out and about to. Going to the Silos should be on your list but not the only thing!

On your way down, I recommend stopping two places. The first is Overflow Coffee Company in Hillsboro. Located about thirty minutes north of Waco, the square is only a three mile detour and it is worth it. While you’re there, ask for Stacey and tell her Tiffany sent you. I recommend their caramel pecan latte with oatmilk.

For food, I recommend you continue your drive about fifteen minutes further to Waco and detour at the Chezch Stop gas station for some authentic kolaches. I will warn you, if you go at the right time there will be a, albeit fairly quick, line.

As far as things to do in Waco, I do recommend checking out the Silos, where the lawn is amazing to lounge on, the gardens are beautiful, and the cupcakes are to die for. It is truly a family-friendly, Joanna Gaines farmhouse-style kind of place. There is also Magnolia Table but be warned- it is first-come, first-serve. Still up for another cup of joe? Be sure to checkout Magnolia Press Coffee Company.

In addition to the entertainment provided by the Gaines’ family, there is still plenty of things to do. If you’re looking for something outdoors, I recommend starting at Cameron Park. There is a zoo, plenty of playgrounds, and, my favorite part, Jacob’s Ladder. Jacob’s Ladder is a steep, winding ladder that has a beautiful lookout, making the two-hundred and forty-four step trail worth it. 

My next two recommendations include owners who have amazing stories, so be sure to chat with them while you are there. Pure Vida Paddle is located underneath Buzzard Billy’s on the river. The owner is super sweet and, oftentimes, they have a dog down there that will be happy to greet you. The company has kayaks, Stand Up Paddleboards, and tons of great community events.

Next on this list comes highly recommended. Still located on the Brazos River, not too far down from Pure Vida Paddle is Mamaka Bowls, which serves smoothie bowls that are reminiscent of the owner’s childhood where she spent her summers in Orange County, California. They are by far the best smoothie bowls I’ve ever had.

There is more to check out, if you have the time, including Waco Mammouth National Monument, the Dr. Pepper Museum, the Texas Ranger Hall of Fame, and the Maybourne Museum.

Krause Springs located in Spicewood, Texas

Distance from Dallas: 221.2 miles

Travel Time: 3 hours, 31 minutes

What’s great about Krause Springs is that it is family owned. Located in Spicewood, Texas, this location is a great place to go during the dog days of summer where all you really want is some shade and some cool water.

Like many places in Texas Hill Country, this land is spring fed, meaning the water is about seventy-two degrees year round. It costs eight dollars to get in if you just want to go for the day and fifteen dollars if you want to camp. The benefit of camping is that you have access to the water areas after the larger crowds of the day have left.

My daughter’s favorite part of Krause Springs was the rope swing. Everyone was very friendly and helped each other get to the rope. My favorite part was the lush green waterfalls located throughout the creek. The main one had a rock you could swim to then sit on directly under the waterfall. The second one was nice because it was located along a hiking path and nobody else was around, giving us views that made me question if we were still in Texas or in a rainforest.

On your way home from Krause Springs, I recommend stopping for a sweet treat at the Yard Milkshake Bar. If you’ve ever seen those crazy milkshakes, this is one of those places. We got the unicorn, which had a cotton candy flavor and a fan curated special called the Rise and Grind which had a waffle on top and coffee with toffee bits inside.

Turner Falls, Oklahoma

Distance from Dallas: 128.8 miles

Travel Time: 2 hours, 6 minutes

This is a destination I cannot wait to get to. As a matter of fact, there is discussion of us going before it gets too cold this winter. The park features a seventy-seven foot waterfall that is located in a swimming hole. In addition, there is several man-made slides you can go down into the water.

I’m excited about doing the hikes, including one that takes you to a rock castle, which was built during the Great Depression for Ellsworth Collings, the Dean of Education at the University of Oklahoma. You can go in and explore the castle, inside and out, at no extra charge besides the original admission fee.

This wouldn’t be a proper review without giving you a recommendation for somewhere to stop along the way and get some food or drink. Aura Coffee House is located in the college town of Denton. I recommend their Kool Keith or Horchata Iced Coffee.

***

If you’re looking for a day, or weekend, out of Dallas, these are just a few of the great road trips from Dallas you can embark on.

What about you, though, what do you recommend? Be sure to let us know, Dallasites!

Pin These Road Trips from Dallas!

8 Best Weekend Getaways from Seattle

One of the greatest things about Seattle is how close to nature everywhere in the city is. It’s a place where the Pacific Northwest landscape seems to blend seamlessly with urban design, making Seattle feel more calm than many other large American cities.

But also, sometimes you just have to plan a brief weekend getaway from Seattle to explore all that the PNW has to offer and appreciate your home city.

I teamed up with fellow Washington-savvy travel bloggers to get their insight on what the best weekend trips from Seattle are.

I’ve divided this list for weekend getaways from Seattle into drives shorter than 3 hours and longer than 3 hours, so you can decide based on distance and how far you’re willing to drive for a short Seattle weekend getaway trip or even an overnight trip from Seattle.

From national parks to water parks like Great Wolf Lodge Grand Mound to wine countries to the Olympic Peninsula and even a dip into Canada, here are the best weekend getaways from Seattle for every type of traveler!

Weekend Getaways from Seattle (Under 3 Hours Drive)

Olympic National Park

Contributed by Adam Marland of We Dream of Travel

Located 2.5 hours from the bustle of Seattle’s city center is the entrance to one of the most eco-diverse National Parks in the US.  Within the Olympic National Park borders, you can explore glaciated mountains from Hurricane Ridge, watch crystal clear water plummet into the lush greenery of the Sol Duc forest, get lost in the vibrant green mosses of the Hoh Rainforest, and watch the sun set over the rugged Pacific coastline… and you can do it all in the same day!

Oh, and did I mention there are hot springs as well?!

Olympic NP is a natural treasure trove, but it is important to understand that the park is extremely large and spaced out.  While much can be seen in an overnight trip from Seattle, you will have to plan carefully, and may need to prioritize the destinations and hikes that interest you most.

There are numerous destinations for all types of visitors, each providing essential services such as food and accommodation. 

Coastal visitors will find “Second Beach” the most photogenic option, with the town of La Push offering services nearby.  Be sure to try the seafood at the River’s Edge Restaurant!

Mountain-lovers, meanwhile, should plan time for exploring the trails of Hurricane Ridge.  There is a visitor center at the top with facilities and a small cafe.  In addition to above-the-cloud views, expect numerous wildlife encounters!

Forest, waterfall, and nature lovers will have their hands full with options! Sol Duc Falls is my favorite destination, and it doesn’t hurt that the hot springs are located nearby.

A comprehensive guide to photographing Olympic National Park can be found on the We Dream of Travel website.

Leavenworth, WA

Contributed by Nathan of All About Glamping

Drive just two hours east from Seattle and you’ll find yourself transported to Bavaria. The charming town of Leavenworth, WA is surrounded by the Cascade Mountains and is modeled after an authentic Bavarian village complete with alpine chalets, german restaurants, beer gardens and Bavarian-style cultural events and festivals.

This is a year-round destination that’s perfect for an overnight or weekend getaway from Seattle. In the warmer months you can go hiking, cycling, or rafting or simply stay in the village and relax on the patios and in the main square. During the colder season there’s usually snow for winter activities and for the month leading up to Christmas the town of Leavenworth turns into a winter wonderland of Christmas lights and holiday events.

All year long you can shop in the lovely boutiques and galleries, enjoy a delicious meal at one of the many restaurants or sample wine at the local tasting rooms. There are also several festivals throughout the year including, of course, a hugely popular Oktoberfest. It seems there’s always something going on in Leavenworth.

As for accommodations there’s everything from romantic guest houses to full resorts and of course Bavarian-style chalets. You can even go cave glamping in Leavenworth for a really unique experience!

Bellingham, WA

Contributed by Hannah of That Adventurer

Only 1.5 hours away from Seattle, the town of Bellingham is the perfect place for an adventurous weekend accompanied by great food and drink. The town is made up of downtown Bellingham and the historic (and very pretty) Fairhaven district slightly to the south. 

The best things to do in Bellingham include driving the scenic Chuckanut drive which runs along the coast and has plenty of places to stop off at including antique stores, seafood restaurants and beaches. For an awesome short hike, try the Oyster Dome Trail along Chuckanut Drive. From the summit, you’ll get amazing views of Bellingham Bay and Lummi Island. Adrenaline seekers should take their mountain bike with them and hit the trails!  Galbraith Mountain and Chuckanut Mountain include mountain biking trails for all abilities.

You’re spoilt for choice when it comes to where to eat in Bellingham. A must-do is Taylor Fish Shellfish Farms. This restaurant right on the water serves up freshly caught, grilled seafood and oysters. You can buy the fish grilled, or grill it yourself as there are grills at each table. Tables fill up quickly so expect to wait! In town, be sure to check out Makeworth Market for delicious cakes, teas, coffee and a beautiful interior.

Weekend Getaways from Seattle (3+ Hours Drive)

Walla Walla, WA

Contributed by Sarah & Nathan of Discover the PNW

Just over 4 hours southeast of Seattle lies Walla Walla, Wa. The town and county with the funny name but amazingly good wine and food. Italian immigrants began making wine here in the 1800s and the region was designated as an American Viticultural Area in the mid 80s. But, it’s only fairly recently become known as a wine tourism destination.

If you’re driving in at the right time of year you’ll see the scenery change from golden fields of wheat with the Blue Mountains as a backdrop to multi-colored rolling hills and lush green vineyards before arriving at the quaint town of Walla Walla. The town itself is charming and peaceful with a downtown historic core lined with boutiques, cafes, restaurants and of course wine tasting rooms. The residential streets around the center are tree-lined with many lovely houses of Late Victorian Queen Anne style architecture. Spending an hour or more exploring the area on foot is highly recommended.

Drive out of town in any direction and you’ll be spoiled for choice when it comes to Walla Walla wineries and wine varietals. The more than 100 wineries are separated into districts such as Downtown, Southside, Westside, Eastside, and Airport and part of the wine region even lies within the Oregon border. Whichever districts you decide to visit you will find beautiful scenery and a refreshingly laid back and unpretentious vibe which is welcoming to all wine lovers.

As for food, there’s no lack of delicious options. You can find pretty much any type of cuisine in Walla Walla but be sure to try the funky and unique Andrae’s Kitchen: 5 star gourmet food served in a gas station. Also, you can’t go wrong with a meal at Saffron Meditteranean Kitchen or Passatempo Taverna.

Portland, OR

Contributed by Chrysoula of Travel Passionate

If you’re staying in Seattle and looking for other local destinations that you could visit for a day or two to get out of the city. Portland, Oregon is one such destination.

Lying just three hours from Seattle, Portland is a charming city that boasts an incredible food scene, some great street art, a bunch of weird and wonderful attractions, and some excellent outdoor activities. Whether you like brunching, biking, markets, music or simply strolling round parks and gardens, Portland most definitely has you covered.

Cycling is pretty standard practise in Portland, with most locals and lots of tourists choosing two wheels to get around. So, pick up a rental bike and start cycling along the waterfront down to the Portland Saturday Market. The sheer mix of goods on sale at the market represent the eclectic nature of the city, with everything from local handicrafts and souvenirs to jewellery, art and home interiors.

You can continue your day with tasty treats from around the city such as Saint Cupcakes, doughnuts from Voodoo and popcorn from Poplandia with every flavour imaginable. You certainly won’t go hungry here in Portland!

When you’re ready to walk off the calories, head over to Washington Park or the Portland Japanese Garden to witness creatively curated flowerbeds, tranquil tea gardens, and myriad other attractions.

And, when you’re done exploring the top city sights, you can consider visiting the Willamette Valley wineries, the nearby Hood River, or the small artistic town of Eugene.

Orcas Island, WA

Contributed by Kay of The Awkward Traveller

Orcas Island is part of the San Juan Islands off the coast of Washington, about 3 hours from Seattle (which includes a 1.5hr ferry ride). If you really want to immerse yourself in the nature of Orcas Island, consider setting up camp at one of the gorgeous sites inside Moran State Park.

During peak season, campsites can run ~$27-37USD a night. However, if you are looking for lodging on the less rugged side, grab a room at the Orcas Hotel which is right across from the ferry terminal and is also pet friendly!

There are tons of things to do on Orcas Island, though hiking is a must. Cascade Falls trail is one of the most beautiful hikes, but this short 1/4 trail is as steep as it is beautiful! For beginner hikers, the Cascade Lake Loop is relatively flat and is easily accessible!

After working up a sweat, indulge yourself in the locally run restaurants around town! Visit New Leaf Cafe for breakfast, Roses Bakery Cafe (Vegan options!) for lunch, and Island Hoppin’ Brewery for dinner! After all, you’re in the Pacific Northwest, you gotta sample the local microbrews! 

Orcas Island also has a surprisingly lively downtown area in the summer, so you can browse the rows of cute boutiques and shops selling handmade goods. However, you can’t leave Orcas Island without checking out Mt. Constitution, the highest point of all the San Juan Islands! At the summit, there is a stone tower offering 360 views of the island, and the perfect vista photo for your memory books!

Victoria, BC (Canada)

Contributed by Daisy of Beyond my Border

Despite being in two different countries, one of the best overnight trips from Seattle is Victoria, BC.

As the capital city of British Columbia, Victoria sits at the corner of Vancouver Island. Noted for its numerous historical architecture, diverse outdoor activities, and gorgeous seaside view, Victoria is one of the most popular destinations in Canada.

From Seattle, simply hop onto the Clipper ferry at Pier 69. This scenic 3-hour ride will bring you straight to the Belleville Terminal in downtown Victoria. It’s best to visit this city during the summer months as the weather will be more suitable for outings.

Known as “The Garden City”, Victoria is famous for its vast greenery and pleasant harbor life. There is no surprise that there are many things to do in Victoria BC.

Be it a visit to the Craigdarroch Castle, a stroll along the Inner-harbour pathway, or an excursion at the Beacon Hill Park, the city will captivate you with its charming entwinement of nature and modernity.

Some of the best places to cure your hunger are at the floating food stalls in the Fisherman’s Wharf Park. You can venture out to the nearby dockside restaurants and dine at the finer establishments such as the Fish Store or Pizza Pizza Co. Since you are right by the harbor, seafood is a must!

Vancouver, BC (Canada)

Contributed by Dhara from It’s Not About the Miles

Looking for a great overnight getaway from Seattle? Consider Vancouver BC! The vibrant cosmopolitan Canadian city is just 2.5 hours away by road, but border crossings will probably make it closer to 3+ hours.

There are tons of fun things to do in Vancouver that can keep you engaged for much longer than a couple of days. On a short visit, focus on a few iconic places. Stanley Park and the Seawall are great for a morning walk. Take in the beautiful boats and buildings as you walk.

For panoramic views of the city, head to the Vancouver Lookout. It is especially beautiful at sunset, and you can watch as the lights of the city come on. After dark, Canada Place is a must-stroll, to see the illuminations. Visit some of Vancouver’s quirky neighborhoods: Gastown is known for its fun vibe and nightlife, and it also has a quaint steam clock.

If you enjoy gardens, Vancouver’s botanical garden is famous, and Queen Elizabeth Park, nearby, has lots of gorgeous plantings as well as great views of the city skyline.

Take the Aquabus across False Creek to Granville Island, where you can browse all the food stalls in the public market and grab something delicious to eat. Nightingale, the casual eatery by Chef Hawksworth, is a great place for a special dinner.

Pin These Great Weekend Getaways from Seattle for Later!

8 Best Hikes Near Salt Lake City

Salt Lake City is the capital of the state of Utah, located in the western half of the United States.

The city was built upon an ancient lake bed in a desert ecosystem and sits at just over 4,000 feet in elevation.

The city experiences the extremes of the seasons: stifling heat in the summer months and snowy, chilly winters. 

Salt Lake City sits in the heart of Salt Lake Valley, surrounded almost 360° by the Oquirrh and Wasatch Mountains, the western edge of the mighty Rocky Mountain Range. 

One of the most unique aspects of Salt Lake City is the proximity to trails and canyons in the Wasatch mountains.

That means that even if you have just a weekend in SLC, you have plenty of time to get in a fantastic hike!

One minute you can be walking downtown amidst the skyscrapers and traffic, and then 15 minutes later you’re surrounded by nature, with nothing but birdsong breaking the silence.

No matter what your skill level, ability, or time frame is, you can guarantee there is a perfect hike for you close by.                                                                                                      

Want to hike to a waterfall? Along a riverbank? Reach some Insta-worthy viewpoints? You’ll have no problem finding a hike in Salt Lake City that ticks all of your boxes. 

While there are literally dozens of trails to discover in and around Salt Lake City, I’ve narrowed the list down to the 8 most popular among locals and visitors.

All of these hikes are heavily-trafficked and well established.

Grab your hiking boots and trekking poles… it’s time for an adventure!

Easy Hikes In & Around Salt Lake City

Ensign Peak

Highlights: sweeping and unobstructed views of the entire Salt Lake Valley, short, urban

Length: 0.8 miles

Elevation gain: 374 feet

Located directly behind the state capitol building lies the famous Ensign Peak, a local urban hike that is one of the most popular trails around Salt Lake City.

History tells us that on July 26, 1847, just 2 days after the Mormon Pioneers entered the Salt Lake Valley for the first time, their leader, Brigham Young, led a group of men to the top of Ensign Peak. From their vantage point, the men laid out plans for their future city, Salt Lake City.

The Ensign Peak trail is about 1 mile round trip, but has an extremely steep incline the entire way to the summit. Most of the trail is unshaded, but since the trail itself is so short, it shouldn’t be a big problem for most people to hike it at any time of day and year.

When you arrive at the trailhead, follow the paved path until it forks. Stay to the right and you’ll find yourself on the steep, dirt trail. The trail will wind its way up to the summit, which you can see for most of the hike. Once you summit, you’ll find a tall monument that was erected when the first settlers summited the peak. 

The Ensign Peak trail is popular with people of all ages and skill levels. When you hike it, you’ll be sure to find little kids running around, senior citizens with their hiking poles making their way up, and all sorts of family and youth groups. 

The best time to hike to Ensign Peak is right before sunset, where you can watch the sun dip below the Great Salt Lake to the west.

Donut Falls

Highlights: river, shaded, fun waterfall at the end of the trail

Length: 3 miles

Elevation gain: 531 feet

Who doesn’t love a good donut? And how about one that you can hike to and will last longer than an edible one? Donut Falls just might be the perfect hike for you. 

Donut Falls is a 3 mile out-and-back trail located in Big Cottonwood Canyon, just a brief drive from downtown Salt Lake City. While there is a parking lot directly at the trailhead, it becomes full pretty quickly. The Donut Falls trail is extremely popular, especially during the hot summer months.

For an unforgettable experience, wear good-fitting shoes that can get wet. Some of the trail is wet from the river and can be slick. Trekking poles for stability would also be advisable.

At the end of the shaded trail, hikers are rewarded with a beautiful waterfall cascading through a rock formation, creating the “donut” shape. If you’re wearing waterproof shoes with good grips, take care and scramble up and into the cavern for a truly unique experience.  

Cecret Lake

Highlights: abundant wildflowers, picturesque mountain lake

Length: 1.7 miles

Elevation gain: 459 feet

Cecret Lake (pronounced like “secret”) is a beautiful alpine lake located in Little Cottonwood Canyon, and is a wonderful family-friendly hike. 

One of the best reasons Cecret Lake is such a popular trail to hike is the abundance of wildflowers in the area. The trail itself is a popular spot for photographers, so it’s nothing out of the ordinary to be on a hike and pass a few photo shoots. 

The hike to Cecret Lake is only open for a few months during the later summer and fall. Since the hike is at such a high elevation, it’s common for snow to block the trail until July. This is not a hike that can be done during the snowy winter months.

Once you reach Cecret Lake, look but don’t touch. The water is part of a protected watershed for the Salt Lake Valley, so it needs to stay as uncontaminated as possible.

Hike around the lake and take in the sweeping views of the snow-capped mountains, vibrant wildflowers and some of the bluest sky you can find.

Moderate Hikes In & Around Salt Lake City

The Living Room Lookout

Highlights: epic views, rock furniture at the summit (explained below)

Length: 2.3 miles

Elevation gain: 980 feet

Depending on your level of skill and adventure, you could technically classify the Living Room Lookout hike as either easy or moderate. If you take a wrong turn and wind up scaling the face of the mountain, it could even be classified as difficult.

The trailhead for the Living Room Lookout hike is located on the University of Utah property, just southwest of the Utah Museum of Natural History. 

The trail leads up a pretty narrow path and actually follows a wash at some points. There are quite a few offshoots, but stay to the right and you’ll keep on the correct path. There is just under 1,000 feet elevation gain over a 2.3 mile steep round trip.

There is minimal to no shade, so plan accordingly. Bring plenty of water and consider the time of day that you’re hiking. The trail faces west, so early morning before the sun peaks in the sky is going to be the most ideal time.

The big draw for hiking up to the Living Room Lookout is the setup at the top. The rocks have been arranged to look like couches and lounge chairs, facing the valley lookout, creating an epic backdrop for photos. 

Even if you can’t make it to the top, you’re going to have an unbelievable view at every turn along the trail.

Dooly Knob Trail (Antelope Island)

Highlight: wildlife, island views

Length: 2.4 miles

Elevation gain: 705 feet

There’s just something special about hiking on an island, when the views constantly remind you how epic your location is.

Antelope Island is located in the Great Salt Lake, and offers multiple hikes for adventures of all skill levels. The Dooly Knob trail just happens to be the most popular.

The hike to Dooly Knob is best done in the cooler months. Antelope Island is known for having biting bugs during the spring and early summer months. If you want to hike during that time, keep in mind any exposed skin.

The first part of the trail is a little brutal for some inexperienced hikers. For 0.75 miles at the beginning, you’ll be hiking almost straight up at a steep incline. As you stop and catch your breath, take a look around and enjoy the views of the beach, the mountains, and the urban city skyline.

As you make your way to the summit, keep your eyes peeled for wildlife. Antelope Island is known for having antelope, coyote, a herd of buffalo, and a variety of smaller wildlife. 

Fifth Water Hot Springs Trail

Highlights: river, vegetation, hot springs, waterfall

Length: 4.5 miles

Elevation gain: 636 feet

The Fifth Water Hot Springs Trail is a beautifully shaded pathway in Diamond Fork Canyon, about an hour south of downtown Salt Lake City.

The path follows along a river, leading to milky blue hot spring pools. So when you hike this trail, make sure you have a swimsuit with you, or at least something that you don’t mind getting wet. 

From the trailhead, follow the trail southeast along the east bank of Sixth Water Creek. Do not cross the footbridge. After a mile, you will come to another foot bridge, which you should cross. This is the junction of Sixth Water Creek (from the left) and Fifth Water Creek (from the right). 

Stay to the right and continue your hike along the heavily-trafficked creek trail. After about a mile, you’ll begin to notice that the water turns a milky blue color. Your nose hairs will start to curl as well, because the smell of sulfur will only increase the closer you get to the hot springs.

Once you reach the hot springs, relax and soak it all in (see what I did there?). Scramble up to the top of the nearby waterfall. Set up a hammock. Take all the pictures. Truly enjoy your time before you make the hike back to the trailhead.

Difficult Hikes In & Around Salt Lake City

Mount Timpanogos via Timpooneke

Highlights: stunning view of the Wasatch mountain range, abundant wildflowers, wild animal sightings almost a guarantee, clout

Length: 12.8 miles

Elevation gain: 4,425 feet

Summiting Mount Timpanogos is one of the most popular hikes in the entire state of Utah. While there are two options for you to take to the summit, the Timpooneke trail is the more desirable of the two routes. The trailhead is located about 50 miles southeast of downtown Salt Lake City.

The hike up Mount Timpanogos is extremely arduous and many of the switchbacks can be strenuous. You’ll want to make sure that you’re in decent shape before attempting the hike. Some locals even choose to run this trail, but I wouldn’t recommend it unless you’re an experienced trail runner at high elevations.

If you choose to do this hike during the day, keep in mind that it gets extremely hot. Bring plenty of water. Even if you do this hike in the middle of the summer, keep in mind that there is a great chance of ice/snow once you reach the saddle. 

One of the best things about hiking up Mount Timpanogos is reaching the summit for the sunrise. Depending on your ability, you’ll want to begin your hike around midnight to ensure you reach the summit by the 6am sunrise.

Although you might work up a sweat on the way up, you’ll need to bring warm clothing. If you reach the summit before sunrise and have to wait for it, it’ll get cold, especially since you’ve worked up a sweat getting there. We arrived about an hour before the sunrise and huddled together, taking in the views.

Mount Olympus

Highlights: city views, wildflowers, clout

Length: 8 miles

Elevation gain: 4,192 feet

Zeus was the king of the gods and reigned from Mount Olympus, ruling the world and imposing his will on mortals. While you won’t find Zeus atop this particular Mount Olympus, you can still feel as powerful as he did, knowing that you have summited one of the hardest hikes in the state of Utah.

Before you begin the hike, keep in mind that the trail isn’t very well-marked. I recommend downloading an offline map to keep you on the correct path, especially since cellular reception can be hit-or-miss.

The hike up to Mount Olympus is unforgiving and exposed most of the trail. Bring plenty of water and opt to hike early in the morning. Take your time and ask for directions if you need it.

Looking at the length to elevation gain ratio, you should be able to tell right away that this hike is quite steep. Trekking poles or a walking stick are highly recommended to assist with your ascent. Because the trail ascends so quickly, you’ll be amazed at how abruptly you’ll find yourself in alpine terrain, leaving behind the hustle and bustle of the city below.

The last section of the hike is almost like a mountaineering scramble, so take care to stretch well before you begin. You’ll also want to take plenty of time after the hike to cool off and stretch out your muscles, particularly your calves. If you skip this step, there’s a great chance you’ll have dead legs for a few days.

Hiking to the top of Mount Olympus is not for the faint of heart. Prepare yourself mentally for the scramble to the summit and take your time. Once you reach the top, your reward will be simply stunning. And you’ll have bragging rights for life!

About the Author

Rachelle is the writer and creator behind the website Adventure is Never Far Away. After moving to Utah in 2009, Rachelle was finally bitten by the travel bug and started to travel around the world and in her own backyard. She has been determined to prove that adventures can be found anywhere. You don’t have to go far to find an adventure!

You can find her blog at Adventure is Never Far Away, and you can follow along with her adventures on Instagram, Pinterest, and Facebook.

Pin These Salt Lake City Hikes!

150 Gorgeous Road Trip Quotes & Captions to Inspire You to Hit the Road

One of my favorite ways to travel is on a road trip.

There’s something about having the windows rolled down with your hair blowing about, great music blasting, company by your side, and a sense of adventure and open-mindedness.

I’ve road tripped all over the world, from the ruby-rocked American Southwest to the emerald green mountains of the Faroe Islands to the fjords of western Iceland to the windswept Atlantic volcanic landscape of the Azores to the interior of Bulgaria to the lush landscapes of the interior of Brazil.

Road tripping is truly my favorite way to experience a destination, and I think if you’re on this page, you probably feel the same!

I’ve gathered a whopping 150 quotes about road trips, perfect for every occasion. There are quotes about road tripping with friends, detour quotes, road trip song lyrics, short and sweet road trip quotes, long and lyrical road trip quotes… truly the list goes on!

Feel free to use these road trip quotes for whatever purpose (crediting the original author) for using in road trip Instagram captions, writing, or whatever you like!

Inspiring Road Trip Quotes

“Road trips are the equivalent of human wings. Ask me to go on one, anywhere. We’ll stop in every small town and learn the history and stories, feel the ground, and capture the spirit. Then we’ll turn it into our own story that will live inside our history to carry with us, always.” 

– Victoria Erickson

“One’s destination is never a place, but rather a new way of seeing things.”

— Henry Miller (this quote is the inspiration for this blog’s name!)

“Because the greatest part of a road trip isn’t arriving at your destination. It’s all the wild stuff that happens along the way.”

— Emma Chase

“I may not have gone where I intended to go, but I think I have ended up where I intended to be.”

– Douglas Adams

“She wasn’t where she had been. She wasn’t where she was going, but she was on her way.”

― Jodi Hills

“A good traveler has no fixed plans, and is not intent on arriving.”

– Lao Tzu

“Our battered suitcases were piled on the sidewalk again; we had longer ways to go. But no matter, the road is life.”

– Jack Kerouac

“Real adventure is defined best as a journey from which you may not come back alive, and certainly not as the same person.

– Yvon Chouinard

“Look for chances to take the less-traveled roads. There are no wrong turns.”

— Susan Magsamen

“We shall not cease from exploration and the end of all our exploring will be to arrive where we started and know the place for the first time.”

– T.S. Eliot

“Look on every exit being an entrance somewhere else.”

– Tom Stoppard

“Because he had no place he could stay in without getting tired of it and because there was nowhere to go but everywhere, keep rolling under the stars…”

– Jack Kerouac

“Travel isn’t always pretty. It isn’t always comfortable. Sometimes it hurts, it even breaks your heart. But that’s okay. The journey changes you; it should change you. It leaves marks on your memory, on your consciousness, on your heart, and on your body. You take something with you. Hopefully, you leave something good behind.”

– Anthony Bourdain

“The pleasure we derive from journeys is perhaps dependent more on the mindset with which we travel than on the destination we travel to.”

— Alain de Botton

“To move, to breathe, to fly, to float, To gain all while you give, To roam the roads of lands remote, To travel is to live.”

– Hans Christian Andersen

“I climb behind the steering wheel… I drive off immediately without once looking back; it’s a long journey, but it leads to freedom.”

– Corinne Hofmann

“The open road is a beckoning, a strangeness, a place where a man can lose himself.”

– William Least Heat-Moon

“Now, on this road trip, my mind seemed to uncrinkle, to breathe, to present to itself a cure for a disease it had not, until now, known it had.”

– Elizabeth Berg

“Attitude is the difference between an ordeal and an adventure”

– Bob Bitchin

“It’s a dangerous business, Frodo, going out your door. You step onto the road, and if you don’t keep your feet, there’s no knowing where you might be swept off to.”

“Map out your future – but do it in pencil. The road ahead is as long as you make it. Make it worth the trip.”

– Jon Bon Jovi

“We keep moving forward, opening new doors, and doing new things, because we’re curious and curiosity keeps leading us down new paths.”

– Walt Disney

“The freedom of the open road is seductive, serendipitous, and absolutely liberating.”

– Aaron Lauritsen

“When all’s said and done, all roads lead to the same end. So it’s not so much which road you take, as how you take it.”

– Charles de Lint

“Do not follow where the path may lead. Go instead, where there is no path and leave a trail.”

– Ralph Waldo Emerson

“A journey is a person in itself; no two are alike. And all plans, safeguards, policing, and coercion are fruitless.”

– John Steinbeck

“No one you have been and no place you have gone ever leaves you. The new parts of you simply jump in the car and go along for the rest of the ride. The success of your journey and your destination all depends on who’s driving.”

 – Bruce Springsteen

“I travel not to go anywhere but to go. I travel for travel’s sake. The great affair is to move.”

– Robert Louis Stevenson

“Every journey is simultaneously a beginning and an ending: I was leaving my old life behind and starting on a road trip to find a new me.”

– Debi Tolbert Duggar

“I see my path, but I don’t know where it leads. Not knowing where I’m going is what inspires me to travel it.”

– Rosalia de Castro

“If you make the mistake of looking back too much, you aren’t focused enough on the road in front of you.”

– Brad Paisley

Quotes about Road Tripping with Friends

“Good company in a journey makes the way seem shorter.”

– Izaak Walton

“Road trips aren’t measured by mile markers, but by moments.”

— Source unknown

“It’s in those quiet little towns, at the edge of the world, that you will find the salt of the earth people who make you feel right at home.” 

– Aaron Lauritsen

“We all have that one friend who is either on a road trip or planning a road-trip or thinking about a road-trip or talking to people who are on road-trip or posting quotes about road-trip.”

 – Crestless Wave

“Happiness is planning a trip somewhere new with someone you love.”

– Saadiyat Rotana

“No road is long with good company.”

– Turkish Proverb

“Some roads aren’t meant to be travelled alone.”

– Chinese Proverb

“You will never be completely at home again, because part of your heart always will be elsewhere. That is the price you pay for the richness of loving and knowing people in more than one place.”

– Miriam Adeney

“People don’t take trips, trips take people.”

– John Steinbeck

“At the end of the day, your feet should be dirty, your hair messy and your eyes sparkling.” 

– Shanti

“The road goes on forever and the party never ends.”

– Robert Earl Keen

“A journey is best measured in friends, rather than miles.”

 – Tim Cahill

Long Drive Quotes

“I love road trips. You get into this Zen rhythm; throw the sense of time out the window.” 

– Miriam Toews

“I just go with the flow, I follow the yellow brick road. I don’t know where it’s going to lead me, but I follow it.”

– Grace Jones

“I climb behind the steering wheel… I drive off immediately without once looking back; it’s a long journey but it leads to freedom.”

– Corinne Hofmann

“You know more of a road by having traveled it than by all the conjectures and descriptions in the world.”

– William Hazlitt

“The road must eventually lead to the whole world.” 

– Jack Kerouac

“If you don’t know where you are going, any road will get you there.”

– Lewis Carroll

Detour Quotes

“Dead-end roads don’t mean you’ve come to your end, just means you need to take a different detour.”

― Anthony Liccione

“Sometimes the most scenic roads in life are the detours you didn’t mean to take.”

― Angela N. Blount

“The really happy person is the one who can enjoy the scenery, even when they have to take a detour.”

― Sir James Jeans

“Never view obstacles in your path as the enemy. Rather, view any obstacles as detour signs to avoid pitfalls.”

― Donald L. Hicks

“A detour didn’t have to alter the destination, it merely changed the path.”

― Kathy Harris

“Take a detour.
Discover small towns
and friendly faces
that don’t grow along the highway.”

― Khang Kijarro Nguyen

“Life is a journey with almost limitless detours.”

― Ken Poirot

“Without struggle, success has no value.”

― Aaron Lauritsen

Short Quotes About Road Trips

“Life is either a daring adventure or nothing at all.”

– Helen Keller

 “Look at life through the windshield, not the rearview mirror.”

— Byrd Baggett

“And just like that, we’re on our way to everywhere.” 

– Emery Lord

“I don’t know where I’m going from here but I promise it won’t be boring.”

– David Bowie

“All he needed was a wheel in his hand and four on the road.”

– Jack Kerouac

“Afoot and light-hearted I take to the open road.”

– Walt Whitman

“The struggles we endure today will be the ‘good old days’ we laugh about tomorrow.” 

– Aaron Lauritsen

“The real home of man is not his house but the road.”

— Bruce Chitin

“Life is beautiful if you are on the road to somewhere.” 

– Orhan Pamuk

“Live your life by a compass, not a clock.” 

– Stephen Covey

“There are no mistakes. Only new paths to explore.” 

– Gregory David Roberts

“Two roads diverged in a wood and I – I took the one less traveled by.”

– Robert Frost

“I can speak to my soul only when the two of us are off exploring deserts or cities or mountains or roads.”

– Paulo Coelho

“There is something about the momentum of travel that makes you want to just keep moving, to never stop.”

– Bill Bryson

“No yesterdays on the road.”

– William Least Heat-Moon

“When you go on a road trip, the trip itself becomes part of the story.”

– Steve Rushin

“Nothing behind me, everything ahead of me, as is ever so on the road.”

– Jack Kerouac

“Happiness is not a state to arrive at, but a manner of traveling.”

– Margaret Lee Runbeck

“And just like that, we’re on our way to everywhere”

– Emery Lord

“Still, round the corner, there may wait, A new road or a secret gate.”

– J. R. R. Tolkien

“Roads were made for journeys, not destinations.”

– Confucius

“I take to the open road, Healthy, free, the world before me.”

– Walt Whitman“

“It’s a road trip! It’s about adventure! . . . It’s not like we have somewhere to go.” 

— John Green

“Only those who risk going too far can possibly find out how far they can go.” –

T.S. Eliot

“My favorite thing to do is to go where I’ve never been.”

– Diane Arbus

“If we were meant to stay in one place, we’d have roots instead of feet.”

– Rachel Wolchin

“Some beautiful paths can’t be discovered without getting lost.”

– Erol Ozan

“All journeys have secret destinations of which the traveler is unaware.”

— Martin Buber

“Stop worrying about the potholes in the road and celebrate the journey.”

– Fitzhugh Mullan

“The road is there, it will always be there. You just have to decide when to take it.”

– Chris Humphrey

“You may not find a path, but you will find a way.”

– Tom Wolfe

“Travel far enough, you meet yourself.”

– David Mitchell

“If you’re on a road trip, you need driving music.”

– Edgar Wright

“God made the world round so we would never be able to see too far down the road.”

– Isak Dinesen

Funny Quotes about Road Trips

“A road trip is a way for the whole family to spend time together and annoy each other in interesting new places.”

– Tom Lichtenheld

“The journey is part of the experience – an expression of the seriousness of one’s intent. One doesn’t take the A train to Mecca.”

– Anthony Bourdain

“Kilometers are shorter than miles. Save gas, take your next trip in kilometers.”

– George Carlin

“If you come to a fork in the road, take it.” 

– Yogi Berra

“It was a practical trip, straight across the country. No pit stops at canned meat museums, no national parks. Just a whole lot of Wynebraskowa.”

― Kari Martindale

“Sometimes the road less traveled is less traveled for a reason.”

– Jerry Seinfeld

“My therapist and I even have a joke about it: s***is truly f***ed up when I start threatening to take a road trip.”

― Chris Gethard

“I guess the lesson is you can’t go everywhere. You should still go everywhere you can.” 

– Charles Finch

“The Americans have found the healing of God in a variety of things, the most pleasant of which is probably automobile drives.”

― William Saroyan

“Never go on trips with anyone you do not love.” 

– Ernest Hemingway

“A journey is like marriage. The certain way to be wrong is to think you control it.”

 – John Steinbeck

 “I wonder why it is that when I plan a route too carefully, it goes to pieces, whereas if I blunder along in blissful ignorance aimed in a fancied direction I get through with no trouble.” 

— John Steinbeck

“That’s why I love road trips, dude. It’s like doing something without actually doing anything.”

― John Green

“The concept of time, as it’s commonly understood by normal people with normal jobs and normal goddamn lives, doesn’t exist on the road. The nights spread out like the dark, godforsaken highways that distinguish them, and the days run together like Thanksgiving dinner smothered in gravy. You never really know where you are or what time it is, and the outside world starts to fade away. It’s cool.”

― Tiffanie DeBartolo

“If you’re not lost, you’re not much of an explorer.”

– John Perry Barlow

“It doesn’t matter how old you get, buying snacks for a road trip should always look like an unsupervised 9 year old was given $100.”

— Source unknown

“Road trips required a couple of things: a well-balanced diet of caffeine, salt, and sugar and an excellent selection of tunes—oh, and directions.”

–Jenn McKinlay

“The entire road trip could be summed up as one giant attempt to keep from crashing the car during fits of rage and fits of hysteria.”

– Kari Martindale

“According to the map, we’ve only gone four inches.”

Dumb & Dumber

“In 1903 the Wright brothers invented airplanes, because in 1902 they took a road trip across the country with their family.”

– Bill Engvall

“I haven’t been everywhere, but it’s on my list.” – Susan Sontag

Road Trip Captions From Songs

“On the road again / Goin’ places that I’ve never been / Seein’ things that I may never see again / And I can’t wait to get on the road again”

– Willie Nelson, “On The Road Again”

“So, remember when we were driving, driving in your car / Speed so fast felt like I was drunk / City lights lay out before us / and your arms felt nice wrapped around my shoulders / and I had a feeling that I belonged / and I had a feeling I could be someone.” 

— Tracy Chapman, “Fast Car”

“Life is a highway, I wanna ride it all night long / If you’re going my way, I wanna drive it all night long.”

 — Rascal Flatts, “Life Is a Highway”

“I got a blacked out Chevrolet / You don’t have a destination / Traveling where the wind will take us. That might be from place to place.” 

— Khalid, “Let’s Go”

“Road trippin’ with my two favorite allies / Fully loaded we got snacks and supplies / It’s time to leave this town, it’s time to steal away. /Let’s go get lost anywhere in the U.S.A.”

– Red Hot Chilli Peppers, Road Trippin’

“Bobbin’ to the music / This is how we do it, all night (all night) / Breezin’ down the freeway / Just me and my baby, in our ride / Just me and my boss / No worries at all / Listening to the Aston Martin music, music.” 

— Rick Ross, “Aston Martin Music”

“I drove all night to get to you.”

— Cyndi Lauper, “I Drove All Night”

“I’ve never been there but the brochure looks nice / Jump in, let’s go / Lay back, enjoy the show.”

— Sheryl Crow, “Everyday Is A Winding Road”

“Baby, you got the keys / Now shut up and drive”

— Rihanna, “Shut Up and Drive”

“Get your motor runnin’ / Head out on the highway / Lookin’ for adventure…”

– Steppenwolf, “Born to be Wild”

“If you ever plan to motor west / Travel my way, take the highway that is best / Get your kicks on Route sixty six.”

 — Natalie Cole, “Route 66”

Road Trip Caption Ideas

“Always take the scenic route.” – Unknown

“It feels good to be lost in the right direction.” – Unknown

“Happiness is a road trip.” — Unknown

“I’m not lost. I’m exploring.” – Jana Stanfield

“There’s nowhere to go but everywhere…” – Jack Kerouac

It doesn’t matter where you’re going. It’s who you have beside you.” — Unknown

“Let’s travel where the wifi is weak.” – Unknown

“Wherever you go, go with all your heart!” – Confucius

“It is better to travel well than to arrive.” – Buddha

“The mountains are calling and I must go.” — John Muir

“Fill your life with adventures, not things.” — Unknown

“Not all those who wander are lost.” – J. R. R. Tolkien

“Little by little, one travels far.” – J.R.R. Tolkien

“To the tourist, travel is a means to an end; to the traveller, it’s an end in itself.” — Marty Rubin

“The high road of grace will get you somewhere a whole lot faster then the freeway of spite.” ― Aaron Lauritsen

 “Good friends follow you anywhere.” – Winnie the Pooh

“We take photos as a return ticket to a moment otherwise gone.” – Katie Thurmes

“Don’t tell me the sky’s the limit when there are footprints on the moon.” – Paul Brandt

“A journey of a thousand miles begins with a single step.” – Lao Tzu

“Travel makes one modest. You see what a tiny place you occupy in the world.” – Gustave Flaubert

“If you think adventure is dangerous, try routine; it’s lethal.” – Paulo Coelho

Pin These Road Trip Quotes & Captions

10 Creative Ways to Make Money While Living Out Your Travel Dreams

If you’re like most working people, the moment you go on vacation, you don’t want it to ever end. The end of vacation means that you’re ultimately having to return back to the reality of work… a reality that was hard for me to accept each time I returned to school as a teacher!

There’s nothing wrong with work… After all, it’s what funded your lavish vacation, but wouldn’t it be nice if you could work in an environment that felt like a vacation? Well, the truth of the matter is that you actually can do that. In fact, people do it all the time… myself included.

You can live a life of travel and make money while doing it. The key is to find the right job. Once you find the right job, you’ll be able to travel and make money during your travels. But the real question is that if you were presented with that unique opportunity, would you take it?

The ten jobs listed below all allow you to work from anywhere in the world, requiring nothing but good internet access, a computer, and possibly a headset. To finally start living your travel dreams, take a look at some of the most unique and lucrative ways to fund your travels.

10 Creative Ways to Start Living Your Travel Dreams

1.   Teach English Online

There are many countries in the world eager to learn the English language, and you could be the very person to help students in achieving that goal.

A lot of the online teaching jobs are focused in Asia, such as VIPKid which pairs teachers with Chinese students, but you can look at other countries of interest too.

Depending on the company you go with, they may require you to have a TOEFL, ESL, OR TEFL certificate and degree but not all companies require it.

2.   Rent Your House Out

Renting your house is a very popular way to make money while traveling the world.

It will require some work from you on the front-end with making home improvements and repairs and finding the perfect tenant or management company if you plan to be an Airbnb host, but once you’ve handled that, you can start living your dreams with monthly recurring income from rent payments.

3.   Copyedit

Copyediting is a position that’s perfect for the detail-oriented person. This line of work will require reviewing written materials and checking it for readability, grammatical errors, and factual information.

This is what I did before my travel blog started making money! (I wrote about how I did it here.)

Working as a copyeditor can be done in many areas including magazines and newsletters, as well as web copy, textbook editing, and marketing.

4.   Start an Online Retail Business

Starting an online business might be one of the easiest ways to make money while traveling the world. The key to success here starts in the very beginning stages of your business. The parts you absolutely need to get right first are the following:

  • Choosing the right industry to start a business
  • Setting up your online store
  • Marketing your business

Those three areas are the biggest areas to get right the first time to give you the best chance at success as an entrepreneur. The good news is that there are services that can help you with all three areas.

Maybe you know the niche you want but need help setting up your store… Shopify.com has a marketplace where you can shop experts by industry. This will ensure you get your entrepreneurial journey off on the right start.

5.   Work Locally

To be able to work locally during your travels will all depend on the destination you’re visiting.

Certain destinations have stricter working and immigration laws than others. Australia and New Zealand have great work visas available for younger people from a handful of countries.

If you can snag one of these working holiday visas, immersing yourself in local work will certainly give you a huge dose of the culture of your destination.

Whether you’re working on a farm or in a hostel, it’s important you know that it will most likely involve physical labor and little pay, but it’s the experience you’ll get that’s priceless.

6.   Become a Translator

Working as a translator is a skill-based position that many businesses have a demand for.

As a translator, you’ll be translating everything from audio recordings and videos to written documents, it just depends on the industry and setting you’re working in.

7.   Work As a Customer Service Representative

Working in customer service means your sole focus is to solve customer problems. If you’ve never worked in customer service before, you’ll quickly find out that there’s never a dull moment.

Everything from handling complaints and taking payments to fixing billing discrepancies and cross-selling products and services, this is the perfect job to help you with interpersonal skills.

Many customer service jobs are now remote, meaning all you need is an reliable internet connection, a headset, and the ability to keep to your schedule.

8.   Become a Social Media Manager

As you probably know, since the emergence of social media, everyone has been glued to their phones, businesses included. Social media has become a powerful tool in the world of marketing by increasing sales, building brand loyalty, and growing customer bases.

For many businesses, something as simple as asking a poll question about a new product or simply thanking a customer for their feedback can undoubtedly increase brand loyalty in an instant. According to entrepreneur.com, social media is the most powerful source of marketing – so harness it!

So if you have a large following, know how to influence and inspire people, or are just creative and have a clever way with words, you may have a strong future as a social media manager.

9.   Start Writing

As a writer, you, of course, will need good writing, research, and grammar skills, but in addition to that, you need to determine how you can get jobs as a writer.

There are lots of writing positions out there, but there are also lots of people out there claiming to be writers when their skill level is mediocre. To stand out from writing “posers,” determine your skill level and industry niche and build an expertise there.

Once you’ve determined your area of expertise, sites like Upwork is a great platform to land writing gigs specific to your industry — it’s what I used to get writing gigs back before this blog made money, and it’s what I use now to hire local writers for this site!

10. Start a blog!

Blogging is not a get rich quick scheme. It’s a marathon, not a sprint. But one of the best things about blogging is that the sky is limit. You can scale your business nearly infinitely with some creativity and goal setting.

However, keep in mind that starting a blog takes years and requires a large time investment in order to gain the expertise required to become an authority on the topic.

I often compare starting a blog to “doing an unpaid internship for yourself” for a year. It’s possible, though difficult, to monetize earlier, but it will depend on how quickly you build an audience, your niche authority, and your monetization strategy.

You may think that you need to blog about travel to start a blog while traveling, but the reality and beauty of blogging is that you can blog about whatever you want from wherever you want!

***

In your efforts to live a life of travel, these are ten creative jobs that will earn you a sizable income to fund all your travel adventures.

Combined with saving money to travel before you leave, you can fund your travels for months or even years at a time.

Let me know in the comments — which one seems like a better fit for you?

Pin This Post on Creative Ways to Make Money While Traveling!

Want to earn money while traveling? This post is full of ideas to save money to travel as well as remote jobs for travelers. remote work | travel jobs | travel friendly jobs | travel while working | work while traveling | traveling jobs | remote working jobs | creative ways to make money | writing and blogging jobs


Best Time to Visit the Empire State Building: Insider Tips For Your First Visit!

Neon lights flashing a beautiful symphony, cascading light over the city streets.

The orange glow of the sun as it rises over the wire-wrought architecture of the Brooklyn Bridge.

The proud spires of impossibly high buildings, a few jutting prominently over the rest to make the skyline irrefutably New York.

These are the images that make a trip to New York City a trip of a lifetime, just as memorable as any other trip you could conjure up.

I’ll always urge you to get out and explore the off the beaten path side to the city: the brownstones of Brooklyn, the food trucks of Queens, the street art of the Bronx.

But I’ll also always tell you you shouldn’t miss New York’s most classic sights: the Empire State Building, the icon of the city, being one of them.

Disclosure: This post is written in partnership with GetYourGuide, my trusted tour company partner, who is encouraging people to explore their own backyards this summer. Book memorable tours, activities, and attractions all in one spot on GetYourGuide.com

But First: Why New York?

As a former New Yorker who called the city home for nearly a decade, I often contend that traveling around New York is like traveling internationally, just between neighborhoods rather than countries — and you can do it by foot, without needing a plane or even a train.

One minute you can be scarfing down Greek souvlaki in Astoria and walk down to admiring the skyline from Gantry Plaza State Park; the next, you can be crossing the Pulaski Bridge for authentic Polish pierogis in Greenpoint, then heading to Bushwick for street art and a wide variety of food from vegan Ethiopian to Venezuelan arepas to Nepalese momos.

And that’s just one walk of millions upon millions you can do in New York City.

New York is a city with a million different stories, and I urge you to take trips both on and off the beaten path while you’re in New York.

Manhattan is incredible, but it’s not the be-all, end-all of New York. In fact, it’s the smallest borough in terms of area and the third-smallest in terms of population.

However, Manhattan is certainly home to no shortage of New York iconic sights, which is why you simply must dedicate at least one day — or even more — to exploring Manhattan and all it has to offer, from beautiful Battery Park all the way up to Harlem.

And while you’re traversing Manhattan, you’ll likely see so many of those iconic sights that make Manhattan synonymous with New York City in the eyes of all who visit. And one of those images, the Empire State Building, stands head and shoulders above the rest.

If you’re planning a trip to New York City, a few things likely figure at the top of your bucket list.

The Empire State Building, Broadway, Times Square: these things are so quintessentially New York that they simply must be a part of any New York itinerary.

But while it may be quite obvious when to visit Broadway (uh, showtime) and Times Square (any time after dark to best see those neon lights shimmering) — the Empire State Building, with its fabled queues, is a little more difficult to decide when to visit.

As someone who lived in New York for nine years, I’ve guided many of my friends around their first trips to the city and to the Empire State Building. Through their (and my) many trials and errors, I’ve been able to determine the best time to visit the Empire State Building for any type of traveler.

Quick Caveat: There is No “One” Best Time to Visit the Empire State Building

Keep in mind that as with anything, there is no one-size-fits-all answer.

Photographers always say that the best camera is the one you have on you. In a similar vein, I will say that the best time to visit the Empire State Building will always be when you are best equipped to enjoy it.

For example, while there may be no lines first thing in the morning when the Empire State Building opens, if you can’t stand waking up early in the morning and forgoing your hotel breakfast in order to beat the queues — you simply won’t enjoy yourself, and that’s no way to vacation!

Similarly, if you’re traveling with young kids who can’t stay up late or risk getting crankier by the minute, visiting the Empire State Building late at night won’t do much to improve your experience!

So keep in mind your personal tastes combined with my advice in order to find the best time to visit the Empire State Building for your particular group of travelers — or just yourself if you’re on a solo adventure!

So I’ll give a few possible ‘best times to visit’ the Empire State, and you can use your discretion to pick which one is actually the best for you!

Best Time to Visit the Empire State Building #1: When It Opens

Unless you’re an early bird, you’re probably dreading hearing this… but hear me out!

Early morning light in New York is the stuff of magic, and by visiting the Empire State Building in the morning when it first opens, you’ll have a front row seat to some of the most beautiful colors dancing over the city — without as much of a line, to make things even better.

Luckily for us mere mortals who don’t love waking up before the sun, the Empire State Building has a reasonable opening hour — 8 AM. I suggest you arrive 30 minutes beforehand to wait in line if you want to beat most of the lines.

To make that waiting painless, I strongly suggest getting a bagel to-go from my favorite Manhattan bagel shop, Ess-a-Bagel, and eating it in line. Lines and bagels, two quintessentially New York experiences! Ess-a-Bagel offers contactless pickup via Seamless — order ahead, grab your bagel (everything with schmear and lox — trust me on this), and enjoy it with a cup of coffee while you wait for an energizing New York morning.

Due to Covid-19 safety measures put in place, the ticket office at the Empire State Building is no longer open, so you must order your tickets online. There is no buying at the door!

Be sure to book with an authorized ticket seller! I use GetYourGuide as my trusted ticket seller wherever in the world I go.

>>>
Book your Empire State Building tickets online before you go!
<<<

If you want to go early-ish in the morning (but not necessarily when it opens) without the line-up, I strongly recommend going with a skip-the-line ticket.

Visiting the Empire State Building at peak times (roughly 10 AM-2PM and again around 6PM-10PM) can mean wait times in excess of 2 hours, up to 3 even!

Unless you plan to follow my Empire State Building tips to the letter and get there at one of the prime visiting times when the Empire State Building is quietest, you’re probably better off with a skip-all-lines ticket, which you can also book via GetYourGuide.

The skip-all-lines ticket means you can skip to the front of the security line and elevator lines, whereas the standard ticket just lets you skip the ticket line (which, at time of writing, is not open anyway!). This can save you 2-3 hours on your vacation, so if you can swing it, I highly recommend it!

>>>
Buy your skip-all-lines ticket today!
<<<

As an added benefit, going to the Empire Sate Building early in the morning means you’re in a prime position to enjoy the rest of your day in Manhattan.

Walk up to Bryant Park and Rockefeller Center, stop into St. Patrick’s Cathedral, marvel at the ceilings of Grand Central Terminal, see the New York Public Library, and choose between Murray Hill for Indian food or Koreatown for a delicious Korean lunch.

Best Time to Visit the Empire State Building #2: Late

A common nugget of New Yorker wisdom is that the Empire State has the best nighttime views of Manhattan.

Straddling both uptown and downtown, you can see all the incredible architecture of the Financial District and the impressive One World Observatory from one side of the observation deck, whereas from the other, you can see Rockefeller Plaza and the Chrysler building all lit up and sparkling like gems.

However, most people hear this and assume to go for sunset…. which I’d have to say is not at all the best time to visit the Empire State Building, unless you are armed with either a saint’s measure of patience or skip-the-line tickets for your whole party.

Here’s instead what I suggest.

Get a delicious meal to take-away from one of New York’s many delicious Manhattan restaurants and have a picnic at nearby Bryant Park or Madison Square Park, or if you don’t have a picnic blanket with you, grab a bench at Greeley Square Park.

There are a range of options from extremely budget-friendly to higher-end. For budget-friendly, get a burger from the original Shake Shake at Madison Square Park (which has some limited outdoor seating as well).

You could also go to the original Halal Guys cart near Columbus Circle and go sit in Central Park for a delicious picnic there (snap a photo of the iconic LOVE sign on the way!)

For a higher-end option, why not try a takeaway experience from a Michelin star restaurant at prices you’d normally only dream about? Here are 20 of New York’s 76 Michelin star restaurants offering deeply discounted but no-less-delicious takeaway Michelin-starred meals.

After eating, wander around the city enjoying the lights — whether it’s a romantic walk through a lit-up Central Park or the neon lights of Times Square — trying to push it until at least 9 PM (last entrance is currently 10:15 PM) when you can visit the Empire State building without the lines, virtually guaranteed!

You’ll still need to book your tickets online (remember: no ticket booth at the moment!) but you can get away with not needing the skip-all-lines ticket at this time, as the queueing will be incredibly minimal at the time, as this is one of the quietest times to visit the Empire State Building.

Best Time to Visit the Empire State Building #3: Between 3 and 4 PM

If you’re not a morning person or a night owl, you may be wondering if there’s a time you can enjoy the best of the Empire State building without the crowds.

I have to admit that anytime during the middle of the day will be more busy than others and you may have to wait, but generally speaking, the time between 3 PM and 4 PM is definitely less busy, as people are usually finishing up their morning visits or preparing to wait for a sunset visit.

The light at this time won’t be quite as spectacular as morning or golden hour light, but you won’t have to battle the crowds!

Best Time to Visit the Empire State Building #4: Both Morning And Night!

Can’t decide whether it is better to visit the Empire State Building at morning or at night?

As the classic meme says: why not both?

For people who just can’t choose, you can get the AM/PM Experience Ticket which offers a 27% discount off of buying two separate tickets!

Go first thing in the morning and again after 9 PM for two beautiful experiences, seeing the city as it ‘wakes up’ and again as the lights sparkle around the city like magical candles.

Note that if you get this ticket, both visits must be in the same day.

Best Time To Visit the Empire State #5: On a Clear Day!

Of course, all this is to say that the time you visit the Empire State building matters quite a bit, but nothing matters more than the weather!

If the weather is raining buckets, it doesn’t matter whether you show up at 8 AM or sunset — your views won’t be what you expect.

Keep an eye on your weather app and plan to visit the Empire State Building as early in your trip as possible, so you can reschedule for another day if you need to.

Remember, GetYourGuide has a flexible cancellation policy so if you book and then rain seems inevitable, you can cancel for free and schedule for another day within 24 hours.

Safety Matters

Traveling this year comes with some uncertainties, so it’s important to come equipped with knowledge when making travel plans.

One thing I really appreciate about GetYourGuide is how they’re making very transparent every attraction and tour’s specific Covid-19 safety plan.

At the time of writing, here are the safety measures in place for visiting the Empire State Building. However, feel free to check here for any updated safety measures.

– All customer touchpoints are frequently cleaned

– To reduce crowds, the number of visitors is limited

– Masks are required, please bring your own

– Temperature checks are mandatory

Since there is a cap on the number of visitors, it’s extra important to book your tickets well ahead of time as the Empire State Building is operating at reduced capacity to keep all its visitors safe.

>>>
Don’t miss out — pre-book your ticket today!
<<<

Finally, GetYourGuide realizes that this is an uncertain time for travelers and as such, they’ve loosened their already flexible cancellation policy.

Tickets canceled within 24 hours receive a full refund; tickets canceled within a 24 hour period receive a full refund issued in the form of a voucher for another GetYourGuide activity in the future.

***

So if you’re planning a trip to New York sometime soon — please let me know in the comments if this post has helped you plan an epic trip to the Empire State Building!

And if you’ve used any of these Empire State Building tips for when to visit, let us know how it went for you!

Pin This Guide to When to Visit the Empire State Building!

7 Best Day Hikes Near Los Angeles: Hiking Trails You Can’t Miss!

Los Angeles is a mecca for many things: the entertainment business and celebrity sightings, all the green juice and avocado toast your heart could fancy, and miles of sandy beaches, just to name a few.

Sunny nearly year-round, in LA you can head west and hit the beach or head inland and get your fill of mountains all in one day.

It’s just one of the many things to love about La La Land (the traffic being on the list of things not to love, but hey, there are many other reasons why LA is worth visiting!).

You won’t be lacking for great hikes in LA, which offers everything from breathtaking views of Malibu to trails through film shoots from bygone days.

All of these LA hiking trails can be used as a jumping-off point to explore other trails in the area, and range from well-known to lesser-known. Either way, you’ll get to soak up the LA sunshine one way or another.

And the best thing? LA is so dog-friendly, so many of these hikes can be done with your favorite four-legged friend.

Los Liones Trail to Parker Mesa Overlook, Malibu

Distance: 7.3 miles

Time Required: 4 hours

Difficulty: Moderate

Parking: Free, available on Los Liones Drive

Directions: At the end of the cul-de-sac of Los Liones Drive, follow the Los Liones Trail. At the overlook, make a left at the East Topanga Fire Road junction, continue to Parker Mesa Overlook

With sweeping ocean views and the Malibu breeze against your face, this is a classic LA hike for those looking to admire the Pacific coastline.

The trail goes through some of the best scenery of the Santa Monica Mountains: you’ll wind your way through vegetation in the canyon and then into the chaparral.

As you climb the trail upward, you’ll be rewarded with views of the Santa Monica Bay and Pacific Palisades. On a clear day, you can see out to Catalina Island.

Once you’re on the trail to Parker Mesa Overlook, the path will be mostly unshaded and goes up at a steady incline, so pack your hat and sunglasses and lots of water. The LA sunshine is great, but you know what they say about too much of a good thing! At the end of the hike, you’ll get more endless views of the Pacific.

Plan B: This trail is only moderately difficult, but it does take time – especially if you’re going to stop to soak in the views. If you want to take it easy or are pressed for time, skip the hike to Parker Mesa and just do the Los Liones Trail, which is a 2.6-mile loop.

This is also a great place to watch the sunset in LA as it sinks into the Pacific! Be sure to bring a headlamp if doing a sunset hike to make the hike back safe.

Insider Tip: Malibu may be synonymous in many people’s heads with the rich and the famous, but did you know it’s also home to one of the US’s best RV parks?

Bronson Caves to the Hollywood Sign, Griffith Park

Distance: 6.6 miles

Time Required: 4 hours

Difficulty: Moderate

Parking: Free, two parking areas on Canyon Drive

Directions: Turn right off Canyon Drive to follow Bronson Caves Access Road to Brush Canyon Trail and continue left on Mulholland Trail. Make a left onto Mt. Lee Drive Viewpoint for a view of the sign (which will add 0.5 miles onto the trail), or make a right to climb to the back of the sign

The start of this hike is more a walk to the Bronson Caves, famously known as the Bat Cave in the 1960’s Batman TV series. From there, you’ll catch a glimpse of the Hollywood sign, your destination for this quintessential Los Angeles hike.

As you continue onward, you will climb upward through brush canyon, but from Mulholland Trail onward, the trail levels off more. Once you get to the back of the Hollywood sign, the closest you can get is from behind the gate. There is a little hill behind the sign as well, which has panoramic views all the way to downtown.

This LA hiking trail is quite popular with locals and out-of-towners, or locals bringing out-of-towners, but it’s hard to resist getting such an epic dose of LA, what with the iconic Hollywood sign before you and the LA skyline beyond.

Bridge to Nowhere, Angeles National Forest, Azusa

Distance: 10 miles

Time Required: 7 hours

Difficulty: Difficult

Parking: $5, available at the end of East Fork Road. If the lot is full, park on the street. This hike can be crowded, especially on the weekends, and the trailhead can be especially crowded with picnicking groups.

Other: You’ll need a wilderness permit to access the trail. You can self-register for one at the trailhead or get one at any ranger center or visitor center in Angeles National Forest.

Directions: Start at Coyote Flat and down to the Heaton Flats Campground. Stay on the main trail; do not go on the Heaton Flats Trail. Follow the trail to the East Fork Trail. The trail is not always well-marked, so stick to the eastern right side of the valley and the remnants of the old road and spot returning hikers to stay oriented.

Further inland in the Los Angeles metro area are the San Gabriel Mountains, the mountainous backdrop to LA’s beaches and city sprawl.

The Bridge to Nowhere was originally supposed to be just a bridge, constructed in the 1930s over the East Fork of the San Gabriel River. A massive flood washed out the road leading to the bridge and construction was ultimately abandoned.

Nowadays, it makes for quite the hiking destination and on the weekends, bungee jumpers go to the bridge for a bit of thrill-seeking ($120 if you’re interested). Full of river crossings (some waist-deep) and swimming opportunities, this challenging hike to reach the bridge isn’t for the faint of heart.

Note: Bring water shoes for river crossings and a change of socks. If you are going in the winter and there have been heavy rains, the river may be flooded and there is also the potential for flash flooding, which are particularly dangerous. Postponing your hike is the best bet.

Portuguese Canyon Trail, Portuguese Bend Reserve, Palos Verdes

Distance: 5 miles

Time: 2 hours

Difficulty: Moderate

Parking: Street parking available on Crenshaw Blvd., check the signs for parking restrictions.

Directions:  At the end of Crenshaw Blvd, the park entrance is at Burma Road and make a left onto Eagle’s Nest Trail

About 30 minutes south of downtown, Palos Verdes is a hidden coastal gem of LA.

Often overlooked and slightly out of the usual way for most LA destinations, Palos Verdes refers to both the peninsula and a cluster of neighborhoods.

Along with some pretty amazing scenic drives, there are some great LA hiking trails with views of the bluffs and coves. This particular trail is inverse, meaning it goes downhill towards the ocean and you’ll get most of your workout as you make the trek back up.

In the spring, the hills are covered in a blanket of bright yellow flowers. Plenty of side trails mean you can take detours along the way if you want to log in a few more steps or explore other paths.

City View and Walnut Forest Trail, Ernest E. Debs Regional Park, Arroyo Seco

Distance: 2.5 miles

Time Required: 1 hour

Difficulty: Easy

Parking: Free parking in the lot by Audubon Center, enter on Griffin Ave.

Directions: From the parking lot, follow onto the Scrub Jay Trail. Take a right to connect to City View Trail. Make a left on Summit Ridge Trail, make a left on Walnut Forest Trail. Make a right to connect back to Scrub Jay and back down.

Just a short drive from downtown, Ernest E. Debs Regional Park sits on what used to be ranch land in the Arroyo Seco neighborhood.

Most Angelenos have driven by this park going to and from downtown LA without realizing this park is full of hiking trails and views!

This loop is ideal for a quick hike or late afternoon walk if you’re looking for some views of downtown LA, but be prepared for some uphill climbs.

Bird watchers, from seasoned to amateur, love this park for the variety of birdsong you can hear as you’re hiking. If you’re looking for a longer LA hike, feel free to hop onto any of the trails crisscrossing the park. Not only will you get views of different cities within LA from different sides of the park, but there are areas throughout the park that are great for a picnic.

The Audubon Center is currently closed because of Covid-19; otherwise, it’s worth checking out, especially if you’re going with kids.

Ferndell Trail to West Observatory Trail, Griffith Observatory

Distance: 2.5 miles

Time Required: 1 hour

Difficulty: Easy

Parking: Free street parking on Fern Dell Drive.

Directions: Trailhead at Fern Dell Drive

This small gem of a LA hike is right on the border of the famous Griffith Park and Observatory.

While most trails in LA are dry – the city is located in a desert, after all – the short and relatively easy trail through Ferndell doesn’t fit the mold. Even when other parts of Griffith Park are dry and dusty, especially during a drought or the scorching summer months, Ferndell stays lush and cool.

Enjoy the many varieties of both native and non-native fern, which form a shaded canopy for some respite from the sun. Along with its diverse plants, Ferndell also has many insects, birds, reptiles, and mammals to spy. Once you get to the West Observatory Trail, the hike will start to go uphill. This trail is great for a short hike, or as an oasis-like starting point to jump onto Griffith’s more challenging hikes.

Note: Fern Dell Museum, which is located at the start of the hike, is temporarily closed because of Covid-19.

Pin These LA Hikes for Later!