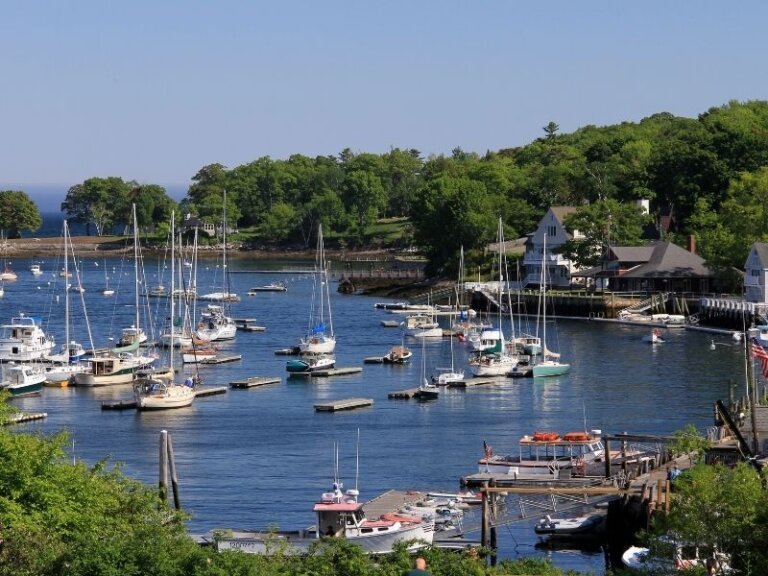
40 Cheapest Countries to Travel to on $40 a Day or Less!

cheap places to travel

Travel doesn’t have to be expensive. In fact, I’ve found that I often spend less when I travel than when I spend a month at home in the US. 

When thinking of the world’s cheapest countries to travel to, destinations in Southeast Asia probably immediately come to mind first.

While that’s a great place to start, I wanted to go a step further and create a definitive list of the cheapest countries to travel beyond the usual spots.

To get the very best and most complete list possible, I asked travel bloggers to help me come up with some of the cheapest countries to visit in the world.

fancy gate to an imperial city in vietnam with a bridge with green water and lily pads in the water
Note: This prices in this post are from 2018. While I’ve updated this post to reflect safety information and other significant changes, I have not been able to personally verify the costs of traveling to these destinations in 2023.

Due to global events since 2018, including inflation, pandemic changes, and ever-fluctuating currencies, this update doesn’t attempt to correct all the prices.

Instead, I’ve changed the “floor” for “cheap countries” to be those where it is possible to backpack on a $40/day budget, instead of a prior $30/day budget.

Spending $40 in a day in Vietnam will look very different than spending $40 for a day in, say, Spain — but both are possible with careful budgeting.

The answers I got span five continents and a multitude of regions, topographies, and cultures.

And as commenters have noted — I still have yet to scratch the surface of some other amazingly affordable countries.

So before you go saying you can’t afford to travel, take a look through this post and have another think

Cheapest Countries to Travel in Asia

Thailand

Blond woman in shorts in front of a blue sea in Thailand

By Hannah & Adam of Getting Stamped

Travel in Thailand can be super cheap or you can even get a 5 star hotels for under $100.

If you prefer to spend less and travel longer, then Thailand is definitely one of the cheapest countries to visit.

You can easily find a really nice hostel in Bangkok for $10, or even much cheaper for a more basic hostel.

If you are looking to go to the beaches you’ll realize fast accommodation can be pricey BUT did you know some islands have camping?

On Koh Adang you can rent a tent complete with bedding for 2 people for 200 baht a day — that’s less than $3 a person a night and it’s even cheaper if you have your own tent at 30 baht (0.85 cents).

The only accommodation on the island is in the National Park which offers a few chalets for 600 baht ($16.50) or camping.

three famous thai longtail boats with the cliffside rock formations against the striking blue water

Here’s a breakdown of traveling to Koh Adang, Thailand: $3 a night camping in a 2 person tent, $1 rent snorkel gear, $5.50 round trip long tail boat from Koh Lipe island, $8 for three meals at the restaurant on the island, and $5-10 snacks and beers bought at 7/11.

You could spend as little as $10 a day exploring Koh Adang. There are several waterfalls to hike, beaches with amazing snorkeling, and epic viewpoints.

You could even spend less than $30 and stay in the really nice chalets on the island.

There aren’t many other islands in Thailand where there are very few tourists and you can basically have the beach to yourself!

Laos

A view of a temple in Laos with stone carvings and white buildings

By Gabor of Surfing the Planet

Laos is definitely not one of the most popular destinations in Southeast Asia.

This is the only country in the region without beaches, and hence tourists prefer to visit the neighboring countries.

Nevertheless, partly due to the lack of tourist hordes, Laos is a very authentic destination with beautiful landscape, inspiring culture and very friendly people.

In the North of Laos you can explore the dense rainforest and visit several communities with different ethnic groups.

In Luang Prabang, the ancient capital of Laos, you can admire the mixture of French colonial architecture and ancient Buddhist temples.

beautiful golden colors of a temple in laos, in the former capital city of luang prabang

Vientiane is surely the calmest capital of the region, where you can visit the national monument of the country.

In the South you can get lost between coffee plantations and picture perfect waterfalls in the Bolaven Plateau, and then take a rest on one of the 4000 islands on the River Mekong.

In Laos we spent as little as $20 per person per day.

We spent around $7 on food, $6 on transport and $8 on average for double rooms ($4 per person), and the rest on other stuff.

Laos is one of the cheapest destinations in the world, perfect for backpackers on a tight budget.

Vietnam

View of mountains and rivers and terraces landscapes in the mountainous part of Vietnam

By Alesha and Jarryd of NOMADasaurus

Besides being one of the most beautiful, captivating, and cultural countries in all of Southeast Asia, Vietnam is also one of the cheapest!

Even without checking your budget every day it’s easy to live on less than $30 a day!

It is completely normal to find private, ensuite rooms in modern hotels for around $10 a night, even in the major destinations of Ho Chi Minh City, Hoi An and Hanoi.

A typical meal can cost anywhere from $0.50 to $2, and in some places we were even buying banh mi (Vietnamese sandwiches) for as little as $0.20!

A bia hoi (draft beer) is about $0.10-0.20 on the streets of Hanoi, and transport ranges from $0.25 for public transport up to $15 for overnight tourist buses.

the temple of literature in hanoi with a pagoda and gold circle insignia

One of the most popular ways to travel in Vietnam is by motorbike, and this can bring your costs down even lower.

We were living on about $10 a day each with our own transport, as fuel was so cheap and we could avoid getting taxis and buses everywhere.

You can buy a motorbike in Vietnam for about $250, and sell it for the same price when you are finished with it.

Some activities can be quite expensive, such as Halong Bay cruises, or trekking to Hang Son Doong, the largest cave in the world (which costs $3,000 USD!).

Despite some luxury outliers, in general, Vietnam is one of the cheapest countries to travel to in the world!

China

View of the rooftops of the Forbidden city in China with foggy sky and other pagodas visible

By Margherita of The Crowded Planet

To be honest, I thought China was going to be much more expensive than it actually was.

We travelled around the country for one month in 2014 and our budget was an average of $30 per day.

Our trip started in Inner Mongolia, and then we moved on to Datong, Pingyao, Xi’an, Shanghai, Suzhou and Beijing, where we spent the final week visiting friends.

view of the skyline in xian with old city walls and an ancient tower on the wall, red lanterns, around sunset

We loved the Chinese capital – there are so many unusual places to see in Beijing that we never got bored!

There are many hostels in China – accommodation ranges between $8-10 for a dorm and around $20 for a double away from the main cities.

Simple street food like noodles or dumplings can be had for as cheap as $1, or even less, while a sit-down dinner would probably be around $5-10 in a simple restaurant.

Overnight buses and trains were also a huge help to keep our budget down, as they were usually comfortable.

On the other hand, entrance tickets are quite expensive, usually around $15 or so – so be careful!

TIP: Transit can be expensive, so minimize stops to save when planning your China itinerary!

Malaysia

View over the landscape in Malayisa with a lookout tower and mountains in the distance


By Jub of Tiki Touring Kiwi

Peninsula Malaysia is often overlooked as a destination for long term backpackers in Southeast Asia.

Malaysia may not quite be as cheap as ‘the big four’, but still definitely possible to travel well under $30/day.

The majority of hostels range from 20 – 30 RM ($5 – 7). The quality of these will range from city to city, but the popular tourist destinations will have something for your comfort.

The food, wow! Malaysia is known for its food scene with a heavy influence of Chinese, Indian and Malay cultures ensuring you can try new dishes for weeks.

different kinds of foods on skewers for sale in malaysia

Street food can be found for $1 – 2, and meals at local restaurants will go for $1 – 4. Each city has its own specialties to enjoy.

Getting around Malaysia is best done by the affordable buses that can connect you to everywhere on the Peninsula. Prices vary; for example, Ipoh to Penang (4 hours) is ~$6.

Alcohol is where the trickiest part of backpacking in Malaysia for less than $30/day comes into play.

As a (mainly) Muslim country, alcohol is highly taxed, especially in bars and restaurants.

There are a couple of exceptions. Langkawi is duty free and in Penang, look to head to the shop ‘Cheapest Beer In Penang’ where you can get three cans of Singha for $3 and meet new friends in front of the shop.

India

View of palm trees and clear water with a wooden boat in India

By Nicole of Wee Gypsy Girl

For budget backpackers, it is difficult to find a country that offers as much as India.

Due to the vast size of the subcontinent, you could spend months there and still feel like you’ve not scratched the surface.

Plus, you’ll probably find you’ve not skimmed much off your bank balance, either.  

To experience the laidback, tropical vibes of India, head South to Kerala.

Here you can hike for miles through tea fields, cruise the iconic backwaters and spot wildlife at one of the many vast, unspoiled national parks.

A view of all the different houseboats on the backwaters of Kerala with lily pads in water and lush trees above

As a backpacker, you can live comfortably on a budget of between 1,000 INR and 1,500 INR ($15 to $22).

Double rooms can be found in local guesthouses for as little as 300 INR ($4).

Dorm rooms in hostels are usually around 500 INR ($7.50), as this is a relatively new concept in India.

However, the facilities are usually outstanding with air con, breakfast and luxurious hot showers included in the price

One of the best things about traveling in India is the food.

Expect to pay around 100 INR ($1.50) for a “veg thali”- an Indian set meal consisting of rice, several curries, yoghurt and flatbreads.

You’ll never go hungry with such amazing food this cheap!

Cambodia

View of Angkor Wat at sunrise with the temple skyline reflected in the pond

By Claudia of My Adventures Across the World

Cambodia must be one of the cheapest places I have ever visited.

Siem Reap, despite being the ultimate tourist destination in the country due to its proximity to the complex of Angkor Wat, is very budget friendly.

A boutique hotel is as cheap as $15 USD per night, and a meal in an exclusive restaurant costs no more than $10.

But it is Battambang, which is a bit less explored, that is truly budget friendly.

During my time there, I paid $3 for a bed in a 6 beds mixed dorm – and I even had air conditioning in the room.

I added around $2 for breakfast, and $4 for a full meal.

temple in cambodia with green moss and trees growing over the old temple

When I took the Bamboo Train I paid $5 – I waited for someone I could share the train with.

A full day tour around the city and to the nearby villages and archeological sites costed me no more than $15.

Depending on one’s expectations and style of travel, the average daily costs for a backpacker are between $10 and $30 per day.

That’s what I call being budget friendly!

Taiwan

long exposure photograph of the shifen waterfall, a horseshoe waterfall in taiwan

By Kirk of Taiwan’s Waterfalls

Taiwan might get confused with a popular Southeast Asian country by many, but it is more similar to Japan in many ways.

Taiwan is one of the world’s most densely populated countries, but its high mountains and lush valleys are practically unknown to many that haven’t visited.

Southeast Asia is easier to travel on a $30/day budget, but here are three ways to explore Taiwan’s lush valleys and incredible mountains relatively inexpensively.

The easiest option is to use mass transit from the major cities to access incredibly lush places that unbelievably exist near the big city.

one of the temples in taroko gorge with waterfall cascading below it

You’ll pay on average $10 USD per night for a nice hostel and $15-20 per night for the more stylish hostels.

A meal will cost from $2-5, and transit will run you about $2-5 per day for MRT/bus fares. Luckily, most hikes and national parks are free.

There are two other great options for exploring Taiwan on a budget.

The more adventurous (with international driver’s licenses) can rent scooters and others can get mountain permits and backpack to the numerous 3,000 meter peaks.

Philippines

Margherita sitting in a hammock on the beach looking at the sunset with boats in the water

By Margherita of The Crowded Planet

The Philippines are one of the cheapest countries to visit, and it’s definitely affordable on $30 USD a day.

A dorm bed usually costs under $10, and a simple roadside meal will only be a few dollars.

As long as you don’t fly too much, or arrange your flights well in advance, transport won’t break the bank either.

The El Nido part of Palawan, Philippines with an aerial view of beautiful turquoise lagoon and limestone cliffs covered in greenery.

As an example, a 2-hour ferry booked on the day of travel will usually cost less than $10.

The Philippines are a perfect place to treat yourself – we paid less than $30 for a stunning beachside bungalow on Siquijor Island!

Even adventure activities are quite affordable – a dive can be as cheap as $25!

To make matters even better, the stunning nature, beaches and sunsets of the Philippines are free for everyone to enjoy.

Pakistan

A pinkish red mosque in Pakistan with minarets and arches and domes

By Alex of Lost with Purpose

How does cheap transport, endless street food, and plentiful cheap sleeps (less than $7 a night) sound?

How about all of that, plus a country filled with people so excited to see you, you wouldn’t have to pay for anything anyway?

Easily traveled for less than $15 a day, backpacking in Pakistan is a dream.

It’s an offbeat country filled with the friendliest people you’ll ever meet in your travels.

mountains in pakistan with snow cap in the fall and all sorts of autumn trees in shades of orange and yellow

The chance you’ll meet someone wanting to host you — and show you around and pay for everything— is 110%. Though of course, that’s not something to take advantage of or expect.

Beyond being a cheap travel destination, Pakistan has something for everyone.

Whether you want to camp in the presence of the tallest mountains in the world, have entire Mughal-era wonders to yourself, or drown yourself in spicy delectables day in and day out for less than $3 per day, Pakistan is sure to be worth your while.

Armenia

cheapest places to visit

By Nellie of Wild Junket

2023 Update: While traveling to Armenia in general is safe, there are occasional violent flare-ups in the contested region of Artsakh/Nagorno Karabakh due to the Armenia-Azerbaijan border crisis. Avoid this region and the rest of Armenia is safe.

Armenia isn’t usually an instant hit with travelers, but I fell in love with Armenia at first sight.

Perhaps because of my propensity for unconventional places or my interest for places with a tragic past.

Regardless, Armenia won my heart despite the short amount of time I spent there.

In comparison to its Caucasian neighbors, Armenia is truly unique in its culture and history.

temple of garni in armenia with beautiful landscape of armenian countryside behind it

The country has its own alphabets and language family, own ethnicity, and cultural identity.

At times it feels like Asia and at times it’s very much European. The charming blend of East and West is very evident in this intriguing country.

What’s more, it’s cheap and safe to travel, and easily accessible from most parts of Europe.

Some expected costs are as follows. The cost of hotel/hostel starts from $15 USD per night.

An average meal costs $5 in a simple diner. A marshrutka, or mini bus, ride in the city is less than $1, and a day tour is around $15.

Oman

Dan walking on a dune in Oman as seen from afar

By Dan of Dan Flying Solo

Oman is packed full of incredible nature!

You can wake up in the morning on a beach, watching turtles laying their eggs, and by sunrise be walking through a desert surrounded by camels.

Hospitality is a big deal here, so expect to be invited, fed, and spoilt by any locals you make a connection with.

Whilst most people think Oman is not doable on a budget, and with traditional accommodation and tours it wouldn’t be, there are a few ways to keep your costs low.

Wild camping is possible in most of the country, whether you are in the desert, on a beach, or high upon a mountain range – grab your tent and sleeping bag and you get nature’s best bedrooms for free.

Most attractions also cost nada, from beautiful wadis of crystal clear water, incredible beaches, desert treks, or exploring magnificent mosques; as of yet, tourism hasn’t attached a price.

Wadi Bani Khalid in Oman, with beautiful blue water in this desert oasis and palm trees

Your biggest expense will be a car, 2WD start around $25 a day and 4WD $60.

A 4WD is essential if you plan on driving deep into the desert or true off roading. For those less adventurous a 2WD will suffice.

So, grab a few mates to split the costs, stock up on affordable food at a supermarket or enjoy cafe meals for a few bucks.

Then you can easily do Oman for under $30 a day, and trust me, it will be a trip like no other!

Bangladesh

Alice on a motorbike with people in Bangladesh also posing with her

By Alice of Teacake Travels

Bangladesh is not everyone’s first choice. It’s dangerous there, right? Women shouldn’t go there, right?

Well, I backpacked Bangladesh for a month straight, met other women who were doing it too, and if you’re looking for cheap, you’re going to the right place!

This is one of the poorest countries in the world but I cannot stress enough how kind and generous the locals are to make up for it. Their generosity is endless.

There are so many reasons to come here but the most famous are that Bangladesh has the largest mangrove forest in the world and the longest beach in the world. Cool huh?

Plus, it has a hot pink palace!

the hot pink palace of Ahsan Manzil, former residential palace of the Nawab of Dhaka, which you can find in Bangladesh's capital

To whet your appetite, literally, Bangladesh has some of the most amazing food I’ve ever tasted.

Their curries are just so delectable and varied, starting from just $1 USD in a local restaurant.

Don’t even get me started on the tea! For just 7 cents you can have the most glorious milky sugary cup of chai ever. Watch out… you will get addicted to it.

Hostels/hotels can be as cheap as $4.50 USD for the night and taking a bus from one end of the country to the other (admittedly dangerous in terms of crashes, but the best way to mix with the locals) costs as little as $1 USD.

Unless you’re staying in the crème de la crème of hotels, spending $30 a day is going to be very difficult!

Russia

Gold domes on the church in Russia with white marble

By Rohan of Travels of A Bookpacker

2023 Update: Due to the ongoing Russo-Ukrainian war, travel to Russia is not recommended, as it has a level 4 Do Not Travel advisory from the US State Department and several other foreign agencies. I am leaving this in the post in hopes of better days for Ukrainians and Russians alike, when citizens are safe and tourism can return to both their countries.

The biggest expense in Russia is the visa. Once you are in, it is very affordable to get around, eat, and enjoy the sights.

I have only spent time in Moscow and St. Petersburg but can only assume that the other parts are even cheaper.

Dorm room accommodation starts from $5 USD and is of a decent standard. Couchsurfing is also active and accommodating in Russia.

The Moscow metro is a tourist attraction in itself as the stations look more like museums and a ride will cost you just 50 cents for as long as you like.

There are also great free walking tours in both cities which will allow you to orientate yourself and see some of the major sights.

We loved the Space Museum in Moscow and then wandering around the parks surrounding it which are filled with impressive statues and buildings.

Food in Russia varies and, despite the large scale of just about everything else in this country, portions can be small.

We applied the rules of budget travel (eat away from main attractions, check the prices before going in, ask locals for recommendations) and ate decent food for around $3-5 USD per meal.

Russia’s main cities are incredibly beautiful and impressive and can easily be enjoyed for under $30 USD a day. 

Myanmar (Burma)

cheapest countries to visit - Myanmar

By Becki of Borders of Adventure

2023 Update: Due to the ongoing Myanmar civil war, I do not recommend traveling here at this time. Out of hope for the future, I’m keeping this on the list for better times.

Myanmar still falls under Southeast Asia travel budgets, but just tips the daily average price slightly while it still adjusts to a tourism level on par with its neighbors.

But not by much – and by that I mean $5-$10 more per day, depending on if you are sharing a room and what activities you choose.

Myanmar costs on average of $35 per day, though it can be done for less, including food, drink and accommodation. Buses are between $10-$15, which is your only extra expense.

This is adaptable according to your type of travel. I shared rooms with fellow solo female travelers I met on buses, or other travelers in a small group.

If solo, your main cost will be on accommodation, where a single room can cost around $25+ per night when you can’t find a $10 dorm.

You can choose to eat street food or head to local eateries, rather than dine in bigger restaurants. Nightlife is limited which lowers spend on alcohol.

However, most highlights of travel here are free or very cheap – Myanmar is one of the cheapest countries to visit in the world.

My top two budget activities? Riding the Yangon circle line train – a commuter route through the countryside, which for a few hours will count as the best $1 you’ve ever spent.

And crossing the Goteik Viaduct – the highest railway bridge in Myanmar you ride from Hsipaw to Pyin Oo Lwin – is a hell-raising ride for $3.

Cheapest Countries to Travel in the Americas

Mexico

cheapest countries to travel in the americas

By Crystal of Castaway with Crystal

Mexico is the ultimate destination for traveling cheap! And it has everything! Mountains, waterfalls, beaches, surfing, diving, deserts.

If you’ve never been to a cenote – that’s something you definitely need to try out.

Even in the most expensive tourist areas you can get street food for cheap as chips and hostels for a steal.

If you want it to be cheap, easy, if you want to do something luxurious, well that’s easy too!

The average street food stall will cost you around $2 USD for a decent bit of food.

In the restaurants you’ll be looking at between $7 to $20 for food and drinks. Beers bought in the Oxxo general stores are around $1 USD a bottle and sometimes they even have lime to put in your Corona!

When drinking at the bars you’re looking at about $5 USD per drink.

For backpacker hostels you can find some good ones for around $10 a night. If flashpacking you’ll be looking at about $20-30.

As for getting around you have a couple of options… You can take taxi collectivos (shared taxis) between cities for really cheap (Playa del Carmen to Tulum, 2 hours is $4 USD) or catch buses.

If you can speak Spanish you’ll be able to catch the local buses, which are ridiculously cheap (Mexico City to San Cristóbal de las Casas, 12 hours is $15).

Alternatively you’ll be able to grab a tourist bus around most of the popular spots (same trip as above, $40).

Obviously the longer you stay somewhere, the easier it is to save money since traveling between places costs a bit. I spent around $10 USD a day while living on an island.

But including travel and attraction expenses you’ll be able to do it on $30 a day as long as you’re budgeting.

Nicaragua

cheap countries to travel

By Ben and Jazzy of Road Affair

There is way too much fun to be had when backpacking Nicaragua!

The best part is it won’t empty out your wallet, as Nicaragua is one of the cheapest countries to travel to in the Americas.

That is, if you do it right, of course. Doing it right would be on a budget of $25-30 USD a day with activities included.

Nicaragua has so many cool things to do, like boarding down a volcano or riding a motorbike on Isla Ometepe.

You can also go diving on the Corn Islands, partying until you drop in San Juan del Sur, or catching sweet waves at Maderas Beach.

Whatever tickles your fancy, I am sure you will find something cool to do there.

To give you an idea of what things cost in Nicaragua, a dorm bed can cost as low as approximately $6, and you can get a single room for $10 USD.

Public transportation within the city (chicken bus) costs $0.30-0.50 USD.

A full meal can be had for $2 – 4 USD. A local beer will set you back $1.30, and a mojito costs about $2.50 USD.

Guatemala

cheapest countries to travel

By Ben and Jazzy of Road Affair

Backpacking Guatemala is exciting, memorable, and of course cheap.

The country’s vibrant and colorful culture and rich history draws thousands of backpackers each year.

After all, you can climb active volcanoes and walk the cobblestone streets of the UNESCO World Heritage city all from Antigua.

Alternately, you can enjoy a boat ride on one of the world’s most beautiful lakes (Lake Atitlan), take a Spanish speaking course, or visit the most breathtaking Mayan ruins (Tikal) in the world on a budget of just $20 USD a day.

The amount of cheap things you can do in Guatemala is endless.

On $20 USD a day, a budget backpacker can drink a few beers, sleep in a decent budget hotel, eat out twice a day, take local transport to and from their hotel and still have some change left over in their pocket.

It’s a backpackers’ paradise!

To give you an idea of what things cost in Guatemala, here are the average prices.

A dorm bed will cost about $6-8 USD. Taking public transport within the city on a chicken bus will cost $0.40-1 USD.

A full meal is about $2-4 USD. The average attraction fee is about $13. A local beer will cost you $2, and bottled water will run you 50 cents.

A one week Spanish course for five hours a day will cost $120 USD. No wonder Guatemala is one of the cheapest countries to backpack in the Americas!

If the “cheapness” of Guatemala doesn’t make you want to fly there now, we are pretty confident the vibrant culture, rich history, gorgeous landscapes, and unique attractions will.

Panama

cheapest places to visit

By Claudia of My Adventures Across the World

Panama is one of the most interesting places to visit in Central America, and it is quickly getting an increasing flow of tourists.

From the Caribbean beaches with fine white sand and clear waters to the Pacific ones with waves galore; from the hiking trails of the Boquete region to the jazz festival and the beautiful sights of Panama City, there is something for just about anybody.

Panama isn’t the cheapest country to visit in Central America, and the fact that the US dollar is the official currency may have something to do with it.

But it can be done on a backpacker’s budget, even in the most touristy places such as Bocas del Toro.

Here, a bed in a dorm costs around $10 USD, and a meal in a local eatery between $3 and $5 USD.

Using public transportation to get to the beaches helps keep the costs down, while organized tours that go around the archipelago to the places that are a bit more difficult to reach is a bit more expensive.

The most expensive thing to do in Panama is by all means the sailing trip to San Blas that then continues to Colombia.

It costs an average of $550 USD for around 5 days, and includes everything from transportation to food (but not drinks).

Many backpackers opt for the sailing trip to cross the border as there is no land crossing between Panama and Colombia and it is a good way to visit the San Blas islands.

However, flying is by far the cheapest option.

Peru

cheap travel places

By Jordan of Inspired by Maps

Peru in Quechuan (the language of the Incas) means abundance and that’s what you will find on a trip here.

Abundant nature, culture, food, and warm weather.

There are gorgeous coastlines, vast deserts, picturesque mountains, the AMAZON (and its Amazon jungle hotels!) – really, they have everything!

One of the cradles of civilization – this exotic destination is just being re-discovered by tourism and the prices everywhere outside of Machu Picchu reflect this!

Peru is one of the cheapest countries to visit in South America. Dorm beds are around $6 USD per night and private rooms at $12 including basic breakfasts.

Set menu lunch and dinners – common everywhere, look out for the blackboards – cost $2-4 USD including a drink!

An overnight bus for 8 hours is around $10 USD and about half the price during the day, and a taxi trip in most towns is around $2 USD.

Traveling here for under $30 USD per day is easy.

For those on a true budget you could get by on $15 USD per day but $20 – $25 would be more comfortable with a few luxuries!

Chile

cheapest countries to travel to

By Viktoria of Chronic Wanderlust

Before I travelled to Chile I heard from many, many travelers that Chile would be very expensive compared to other Latin American countries.

Therefore, I gave myself a higher budget for my month in Chile.

When I arrived I was surprised that it was not so expensive as I’ve had heard.

It isn’t the cheapest country to travel to in South America, but it can be done.

Dorms in hostels are found for $10 USD per night. Of course it’s cheaper to buy food in a supermarket and cook it in the hostel, but there are also cheap and tasty empanadas (but there are awful ones too, so be prepared!) for little money.

If you use long distance buses and take night buses you can save a night at a hostel.

The bus from San Pedro de Atacama to La Serena took about 15 hours and cost me $22 USD.

Getting around for $30 USD is definitely possible in Chile, but you won’t make it for that money on Easter Island unless you camp somewhere (food is quite expensive there).

On the mainland, on the other hand, if you wish to do some of the adventurous stuff such as skydiving, rafting or volcano hiking, $30 USD a day won’t be enough.

To save, you can still go hiking on the many other paths and enjoy the gorgeous landscape on your own. 

Bolivia

cheapest countries in the world

By Raphael of Journey Wonders

Out of all the South American countries I have visited, Bolivia is definitely one of the cheapest countries to visit when it comes to value travel.

Usually, when you hear the word cheap you imagine something of low quality.

Trust me, hotels and hostels in Bolivia are so comfy that you won’t believe that a night in a private room can cost less than $10 USD sometimes.

Did I mention the $1 USD awesome huge meals? For less than $20 USD a day, you can enjoy Bolivia as much as I did.

Some of my best suggestions for Bolivia include the awesome Titicaca Lake which it shares with Peru, the photo-worthy Uyuni Salt Desert, and the isolated archeological ruins of Tiwanaku located just outside the capital La Paz.

Ecuador

cheap places to backpack

By Taylor of Travel Outlandish

While many people skip out on Ecuador for lack of a Galapagos budget, those who take the time to explore the mainland are in for a time.

With a jungle full of wildlife, a coastline blessed with perfect waves, modern cities, and culturally rich mountain towns, it seems there’s something perfect for any type of traveler.

So what makes Ecuador one of the cheapest countries to travel to in South America? A backpacker can get by on just $20/day without cutting too many corners!

With dorm rooms costing as little as $5 and private rooms starting at $12, it’s easy to stay as long as you want in the smaller towns, and easy enough to navigate the cities.

Menu del dia — the set lunch menu — will only run you $2-$3, and beer is even cheaper at $1 per big bottle.

While the busses aren’t the comfiest we’ve ever used, tickets come in cheap at about $1-2 per hour of travel. Adventures are easy to find with lots of free treks, cheap bike rentals, and full day trips starting at $20.

Even the most costly of endeavors (like a trip to the Amazon) can be had for as little as $60/day.

If you’re looking for amazing nature and an altogether wonderful place to travel in South America, be sure to take the time to experience all the unique things to do in Ecuador!

Colombia

budget friendly countries

By me

Colombia is full of beauty, from the lush countryside full of coffee plantations to the Caribbean coastline.

Cartagena in particular is especially beautiful with its colonial charm. Hostels are cheap as can be in Colombia, typically about $10 for a dorm, and around $20 for a private room.

It isn’t the cheapest country to travel in the world, but you get a lot for your money, making it excellent value.

Meals are similarly affordable, with delicious soups like ajiaco, the national dish, only costing around $4 or so for a delicious and fulfilling meal.

Bogotá is a fun and young city, with cheap nightlife and plentiful street art. It’s definitely worth a visit, and easily done at $25 to $30 per day!

Cheapest Countries to Visit in Africa

Ethiopia

cheap places to visit

By Nicole of Travelgal Nicole

Ethiopia has something for everyone. It’s a diverse country with something for everyone such as culture, history, food and wildlife.

One of my favorite cities in Ethiopia is Gondar in the north near the Simien Mountains.

It is often called the Camelot of Africa for what it used to be – the home of the Emperor and the Royal Enclosure and Castles. Entrance to the Enclosure is 100 birr ($4.50).

While generally Africa is not home to the cheapest countries to travel to, Ethiopia is a pleasant exception.

Traveling through Ethiopia is fairly cheap with accommodation in a two star hotel for around $10/night for two people.

Local food is especially cheap. I would start my mornings with a proper Ethiopian Coffee for 9 Birr (40 cents) and then move onto a healthy breakfast smoothie of mango and avocado with a splash of lime for 10 birr (50 cents).

Ethiopia also has fasting days which are fasting from meat so the vegetarian options are amazing.

Most meals with meat cost about $4 and those without meat were less than $3. Most meals start with injera which is an Ethiopian bread which you will find has a slightly sour taste!

Morocco

cheap places to travel

by João Leitão of Nomad Revelations

Halfway between Europe and Africa, Morocco is one of the most exotic destinations around the world.

A tangle of Berber, Arab, African, and European influences give this country a certain “je ne sais quoi” that makes people want to visit.

Apart from a great and vast history, Morocco offers unspoiled coastline with fabulous beaches, endless cedar wood forests, stunning waterfalls, desert landscapes with dunes as far as the eye can see, and high snowy mountain peaks above 13,000 feet.

What I love most about Morocco is the optimism, generosity, and friendliness of its population. Lively markets, everlasting blue skies, and a wide variety of fresh fruits and veggies also get my attention.

Some expected costs for Morocco are as follows. A single room in a major city will cost $10-15 USD per night. Breakfast, such as a bowl of fava bean soup or an omelet with bread and tea, can be for 70 cents to $1 USD.

Lunch and dinner can be 60 cents to $3 USD, for options such as a fish sandwich, harira soup and pastry, or a meat tagine.

Transportation is cheap as well; a 4-hour train ride from Rabat to Marrakech is about $13 USD and a 4-hour bus ride would cost you about $8 USD. A backpacker can easily do Morocco ranging from $15 to $30 per day.

Egypt

best places to travel on a budget

By Rohan of Travels of a Bookpacker

Despite recent civil unrest, Egypt remains an amazing travel destination and is very easy for budget travel even in major cities.

Hostels in Cairo start at around $4 USD in a dorm room and are even cheaper in the rest of the country.

The easiest and most efficient way to get around is using Uber as it is cheaper than taxis and there are no language issues as you input your pick up and drop off locations.

There is no shortage of amazing activities to do in Egypt and almost all of them cost $5-10, including the Pyramids of Giza!

In Luxor there are a number of affordable tours which include the Valley of the Kings, the Temple of Hatshepsut and the Temple of Karnak.

Every price is negotiable which makes it easier to find a bargain, especially with the low numbers of tourists in Egypt at the moment.

We felt completely safe travelling in Egypt and used the local trains and buses to travel between cities.

An overnight train from Cairo to Aswan cost us around $10 and, although it was seats only, it was comfortable enough to get some sleep.

Food is incredibly cheap both on the street and at local and more Western style restaurants.

Overall a backpacker could be very comfortable on $20 a day including an attraction, making it easily one of the cheapest countries to travel to in Africa.

South Africa

places to visit on a budget

By Emma of Luxury Backpacking

We LOVE South Africa — without a doubt, it’s in our top 3 favorite countries, just because it never fails to impress us no matter how many times we visit.

It’s full of so much diversity: you can go on safari, go wine tasting, or even ski in winter!

There are SO many unique and amazing activities you can partake in, cage diving, sky diving, or canyon swinging.

For the more tame witnessing the third largest canyon in the world, which is absolutely breathtaking!

Plus, due to the currency exchange rate, South Africa is still super cheap for outside travelers!

You can hire a car for under $20 USD a day including insurance, and stay in a rest camp in Kruger for around $10 USD a day.

You can have a BBQ on site from the local shops to save a ton of money, and take in the local surroundings.

If you’re not into hiring a car, public transport is very cheap and easily accessible in cities such as Johannesburg and Cape Town.

You can certainly get a lot for your buck in South Africa, and as long as you use common sense, South Africa is no more dangerous than most American cities!

Cheapest Countries to Visit in Europe

Estonia

cheapest countries to visit in europe

By Natalia of My Trip Hack

Estonia – the best value destination for 2016 according to Lonely Planet. I have to admit, this country has exceeded my expectations by the quality of experience it offers.

In addition to fascinating scenic nature, the mix of architecture, and nice people, I love Estonia for its connectivity.

As Wi-Fi access plays an important role in choosing a destination nowadays, in e-Estonia you will find free Wi-Fi almost everywhere: from intercity buses to the streets of the cities.

Here’s a breakdown of expected travel costs. A hostel costs about 9-13€. The common price is 10€ even during the peak season.

My daily food budget was around 10€ (1-2€ breakfast, 4-5€ lunch, 3€ cooked dinner).

The 2 course lunch in canteen-restaurants (e.g. LIDO) can come around 4€.

You can also find nice business lunch deals within the price range of 4-6€  (outside Tallinn it will be a bit cheaper).

There are also ready cooked meals in supermarkets if you wish to decrease the price further.

In terms of transportation, in Tallinn you can buy a card for 1, 3, or 5 days. A 5 day card costs around 6€, so it comes to around 1.20€ per day.

In Parnu, Tartu, Viljandi and other small cities everything is within a walking distance.

As for sightseeing, it starts from free up to 5€ per site entry with few exceptions. If you are a student, sightseeing and transportation fees will be discounted.

To sum up, accommodation, food and transportation can come around $20-22€/day (about $21-23 USD).

Further on, you can add sightseeing according to your taste. Read this Estonia travel guide to better plan your journey.

Lithuania

cheapest countries to travel in europe

By Ruben of Gamin Traveler

Lithuania is a special destination to visit when in the Baltic countries. There are various plans to do in Lithuania.

Visiting Vilnius the capital is a nice first contact with the country. There are amazing beaches with white sand and warm water like Klaipeda.

That said, my favorite place to visit is Trakai. It’s a quiet town with a castle inside an island, which is very nice and picturesque.

Lithuania can be visited on a budget for around $15-25 USD per day.

You can sleep in a hostel for $6-8 and you can get transportation for even less than a dollar. You can get a local meal for $3-4.

And if you want to hang out for beers, prices start from $1-2. The beer in Lithuania tastes so good! 

On top of being able to travel on a budget, Lithuanian people are also very friendly. The landscapes are great and it’s very easy to meet locals.

Latvia

places to visit in europe on a budget

By Skye of Skye Travels

If you’re a budget traveler headed to Europe, you might want to consider heading to the Baltic States.

Lithuania, Latvia, and Estonia are usually overlooked as holiday destinations. However, they happen to be some of the most beautiful locations in Europe.

A particularly key city to visit is Riga, Latvia. With a perfect climate, beautiful Old Town and plenty of culture, you’ll never want to leave.

Making your dollar (or $30) last is a piece of cake. There are dozens of hostels, all charging from $5-10 USD a night.

Tourist restaurants will charge $10 for a plate, but the local shops and street food are more like $3 a meal.

Make sure to make it to the Riga Central Market. Or if you have a stable place to stay, you can get groceries for a whole week for $30.

Attractions are $5-10, although the best attraction – the free walking tour – is, well, free (though you should tip!).

There isn’t as much to do in Riga as some of the capitals in Europe, but realize that the Old Town is less than 1% of the city’s total size.

You could easily spend a week there and not run out of things to do.

North Macedonia

cheap places to visit in the world

By Lance and Laura of Travel Addicts

One of the most affordable places we’ve ever been is North Macedonia.

Most of the Balkans are cheap by European standards, but North Macedonia is particularly cheap.

It is easily possible to travel in North Macedonia on less than $25 or $30 USD per day.

In both Skopje (the capital) and the Lake Ohrid region, hostels range from $8-14 on a shared basis. You can find budget hotels for $20 per night with private bathrooms.

Meals are where your budget can go further!

An average meal, including a glass of beer, can run around $4. You can get a 3-course meal for two people for less than $15.

We also found that many attractions are free or nearly free.

North Macedonia is a beautiful country with lots of mountains, an amazing wine region and absolutely delicious food!

Bosnia & Herzegovina

cheapest places to visit

By Evan Kristine of Pretty Wild World

You’d be surprised to know that it is highly possible to visit Europe without breaking the bank.

I know it is a well-known fact that Europe is expensive but trust me, it is big with tons of places unknown to the masses which you can visit and stretch your budget that will truly blow your mind

Sarajevo, the capital of Bosnia and Herzegovina, did blow my mind!

I was not so sure how cheap or expensive the city would be as I did not previously research what to expect and boy, was I surprised.

A basic hostel will cost you between 9-15€ per night, depending on the location and the quality of the hostel, of course.

However, I must say that the one I stayed at ran at a pretty good price of 10€ a night, and it was a good hostel!

Also, food is cheap, and you can buy a cevapi with beer for 5€ – what a steal I must say. Also, other activities such as visiting the bobsled site and the tunnels will cost you about 15€ for a private tour.

If you’re too cool for private tours, hiking to the bobsled track will take you about an hour or two and it is free, and the entrance to the tunnels are about a few euros.

If you’re interested in nightlife, Sarajevo won’t disappoint either, and you can go knock yourselves out with local brews for a euro a pop.

You have to see for yourself but all backpackers I’ve met were amazed at how they managed to stretch out their budget whilst in Bosnia. It is quite amazing.

Albania

albania is one of the cheapest countries in europe

By Dave of Jones Around the World

I spent around 10 days exploring Albania this past summer, and I was completely in awe about how amazing of a country it is.

The people were some of the friendliest I’ve encountered, and every destination I went to was absolutely stunning!

Whether you’re looking for gorgeous lakes, massive mountains, or pristine beaches — Albania has got you covered.

The most important aspect about traveling Albania, is renting a car and exploring it on your own!

You can rent a car for pretty cheap, especially if you travel during the shoulder seasons.

While I did enjoy the entire country, I’d say you definitely can not miss Sarande and the Albanian Riviera.

The average costs of hotels is only $20-$30 USD per night, and you can get a nice meal for less than $10!

If you’re a backpacker, there are plenty of budget hostels to meet fellow travelers for only $8-$15 USD per night!

It’s one of the cheapest places to travel in Europe. It’s a gorgeous country with tons to do, and you definitely won’t be spending too much!

Ukraine

cheapest countries to travel in europe

By Kami of Kami & The Rest of the World

NOTE: Traveling in Ukraine is currently not recommended due to the ongoing war; this was a recommendation from 2018.

Due to the recent political situation and economic crisis, Ukraine is probably the cheapest country to travel to in Europe, or even the world.

The local currency – hryvnia – is worth three times less than in 2013! During my latest visit there for the first time ever I felt bad for paying so little for just about everything.

A double room in the oldest hotel in Lviv (with hearty breakfast included) was just $20 USD/night, while the spacious apartment in the center of Kiev, enough for up to 4 people, was $30/night!

Eating out is very cheap, you can get a decent meal for as little as $5 and even if you choose upscale restaurants it still will be a price you wouldn’t find anywhere else.

Cities in Western Ukraine have an amazing cafe culture, you can spend the whole day cafe hopping and your bill will be maybe $10 at the end of the day!

Traveling around is even a bigger bargain. An overnight train from Kiev to Odessa on the Black Sea costs can be just $5 in the cheapest class (yet you still get a bed with a linen!).

Ukraine is a safe country to visit as long as you stay away from the Donets area in the East and visiting it now is the best idea ever!

Portugal

where to travel on a budget

By Hugo of Breathe with Us

Portugal is one of the hottest travel destinations of the moment.

For a relatively small country, it has a vast and rich history of almost 900 years, interesting culture, countless beaches, and food to die for.

Plus, on top of all this, it’s one of the best value countries in Europe for travelers.

The hotspots are Lisbon, Porto, and the South coast.

But if you’re looking for more there are plenty of places worth checking out such as Évora, Coimbra, Aveiro, Guimarães, Braga or the archipelagos of Madeira and the Açores.

And this just to name a few!

Portugal is a perfect destination and one of the best places to backpack.

Food is of excellent quality, diverse, and not very expensive, with a pretty decent meal costing between 5 and 10€.

Groceries are also budget-friendly. Lodging starts at 10/15€ for a hostel bed and 35/50€ for a basic yet decent hotel, depending on the location.

Transportation, namely trains and buses, is punctual and not on the expensive side.

Spain

cheap places to go

By Tom of The Travelling Tom

Spain is famous as the land of sun and sangria, but it’s actually much more diverse than that.

You can find rugged mountains and deserts in the South; it’s a big country, with great contrasts.

Contrary to belief, Spain can be one of the cheapest places in Europe, especially in off-season!

A bed in a hostel can be as cheap as 8 euros, while a 2 course lunch, can cost as little as 7.90 in places such as Valencia!

If you’re savvy, you can travel around Spain quite comfortably on a budget!

Kosovo

cheap places to visit

By Stefania from Every Steph – Green & Glamorous Travel

Kosovo might be the most underrated country in Europe, and it certainly should be on your bucket list.

From chasing waterfalls to visiting mosques and sipping the best espresso outside of Italy, there’s so much to do in this tiny country.

Don’t forget to include Prizren in your Balkans itinerary.

This little gem of a city is filled with UNESCO-listed monuments and mosques, friendly locals, and a young vibe.

Try and visit the city during the month of August, when Prizren hosts the DokuFest which brings thousands of people to the city.

If you are on a tight budget, you will soon find out that you can spend less than $25 a day in Kosovo.

Eating out will set you back $3-5, and a night in a hostel dorm will cost you about $10-12.

If you are traveling in a couple, sharing a double room will cost you approximately the same.

Public transportation is super cheap as well compared to the rest of Europe: the ride from Pristina-Prizren costs about $5, for example.

Greece

cheap places to visit

By Cristina of LookNWalk Greece

Greece has always ranked high among the destinations loved by budget travelers.

The capital, Athens, is an excellent place to explore during the low season, specifically between November and March.

The tourists are almost non-existent and thus the prices for everything are affordable.

The wealth of historical sites will keep you busy for a good while (days!).

Make sure not to miss exploring the Acropolis. There’s a combined ticket (costing 30 EUR or $31.40 USD) which allows you to visit six archeological sites.

Book your hotel in advance you will pay about 20 EUR / $21 per night in a double, in a hotel located close to the heart of Athens (Plaka and Acropolis).

If you don’t mind dorms, then you can find beds starting at 8 EUR.

Food wise, the cheapest option is the gyro (from 2 EUR), which is meat grilled on a spit and served in a pita bread, together with some veggies. Coffee starts at 1.5 EUR.

Don’t be afraid to ask for recommendations; your best bet is to go in tavernas with no menu in English.

Serbia

cheap places to visit in europe

By me

Serbia is one of the cheapest destinations in the Balkans!

Even Belgrade, one of the most developed cities in the whole region, is ridiculously affordable to travel.

I stayed at the awesome Sun Hostel within walking distance of downtown, where I treated myself to a private room for around $18 a night in peak season.

Meals are incredibly cheap, at about $1-3 for “Serbian fast food” which includes tasty options like pljeskavica, which is essentially a Balkan burger.

I even went crazy and got a fancy sushi dinner after having serious Asian food withdrawal syndrome (it’s a real thing, guys) – for two delicious, fresh rolls and a beer I paid about $11!

Bus transit is about 50 cents a ride within the city, and buses between cities are usually $10-15.

Be sure to check out cute, colorful Novi Sad an hour north of Belgrade — your buck will stretch even further there!

Have a unique hostel experience at Varad Inn for luxury on a budget. For a European experience on a Southeast Asia budget, you can’t beat the Balkans.

Note: All prices in this article are approximate and will likely vary in the future, as exchange rates and average costs change over time. 

Vietnam Packing List: What to Wear & Pack for Vietnam in All Seasons

Vietnam can be a bit tricky to pack for. As a long, thin country with both mountains and beaches, the weather is quite different in the North and South, and on the beach versus in the highlands.

It’s worth remembering that the North of Vietnam borders China, which has downright frigid winters.

Add altitude to that and you may be shocked at how cold Vietnam can get at times compared to other Southeast Asian countries, which are pretty much perpetual summer.

I visited Sa Pa in August a few years ago, and even in the middle of summer, it was freezing cold at night and I found myself seriously wishing that my hotel had heating.

If traveling in the North or in the mountains, throw in a few more long layers – Sa Pa is cool even in the summer!

Central Vietnam does not get so cold in the winter like Hanoi and Sapa do, so if you’re planning on cities like Hue, Da Nang and Hoi An, you’ll be spared somewhat of the winter cold. Generally, the temperatures in Central Vietnam are somewhat in between North and South. Generally, it will be hot year-round in Central Vietnam, with a rainy season from September to January.

Meanwhile, Saigon (aka Ho Chi Minh City) is pretty much hot and sweltering at any time of year, with the only fluctuations being the likeliness of rain and just how ungodly the humidity levels are (hint: they’re the worst in April, but it’s humid all year round).

So if you’re traveling through a large swath of Vietnam, such as if you’re going from Hanoi to Ho Chi Minh City, in the colder seasons — you’ll want to pack clothing for a variety of temperatures as you might be quite surprised by how much variance there is!

Rainy season runs, roughly, from May to October with drier weather from November to April. However, having just come back from a trip to Vietnam in November, there were definitely quite a few thunderstorms and downpours even in the purported “dry season” – so you’re going to want to be prepared for rain no matter what.

Don’t freak out if you see that it’s supposed to rain for every day of your Vietnam trip. Typically, rain storms in Vietnam last about 1-2 hours and feel like a dam is bursting in the sky… and then the sun comes out to dry everything up freakishly fast and the humidity level is actually lovely for a few wonderful hours before it gets soupy again. That said, you never know – when I was in Sa Pa it was raining buckets every day in August, which made for some fun hiking experiences. Plot twist: It was not fun.

Basically, I would advise packing for as many contingencies as you can without overburdening your bag. This packing list is assuming you’re spending at least a week in Vietnam, traveling North to South.

If you are spending the majority of your trip up North in the winter, throw in a few more long sleeve T-shirts and maybe an extra pair of pants. On a similar token, if you’re only visiting South and Central Vietnam, you can skip some of the layers I recommend, though do bring at least a cardigan or something as the air conditioning in a lot of Vietnam can be… aggressive.

If traveling in the North, mountains, or winter months, be sure to throw in a few extra lightweight layers – and waterproof the hell out of everything.

What to Pack for Vietnam

What to Pack Everything In

I’ve been traveling for the better part of three years and my packing gear is always the same – a carry-on sized backpack from Tortuga organized with packing cubes, as well as a daypack with all my electronics and smaller items. However, I know that for some people, carrying a backpack is neither desirable nor practical, so if that applies to you, feel free to skip past my backpack recommendation.

However, let me just say that a backpack is ideal for Vietnam for a few reasons. For one, sidewalks in Vietnam are not always a given. If you try to walk with your luggage in Vietnam, you may find yourself dragging a rolling suitcase through a street as motorbikes zoom past you. The streets can also be a bit dirty because of litter and bike exhaust, so I don’t know that I’d love to roll my bag with all my clothes through it, especially if it is raining and the streets get particularly grimy.

However, most of these issues can be avoided by just taking a cheap taxi – just make sure you ask your hotel to call you a taxi or learn the reputable companies and how to spot a fake so that you don’t get taken for a fool. I got scammed a few times my first time in Vietnam and not at all my second, so partly it’s knowing what to look for and partly it’s luck of the draw.

Supposedly, Hanoi is the worst for taxi scams and my experience certainly supports that. I took Mai Linh taxis in Hanoi with no problems, and Vinasun Taxi in Saigon (and the occasional Mai Linh), and had good experiences. Grab is an app that works like Uber and is also great for avoiding scams – just hire a Grab Car instead of a Grab Bike if you are traveling with luggage, obviously.

Trust me – you don’t want to try crossing a street in Vietnam with a suitcase!
  • Travel backpack (carry on size or check-in size): I always use my Tortuga Setout Backpack so that I can avoid checking in my luggage, both to avoid fees and long waits for my luggage after a flight when I’m antsy as hell and just want to get to my destination/bowl of noodles. I’ve had this bag of a version thereof for several years and absolutely recommend them – they’re the only backpack I’ve used over the last 3 years of extremely frequent travel, including several month-long backpacking trips.
    • Why do I recommend Tortuga so much? Here’s why: this bag is 45L and has got three main compartments: one for a laptop and other flat objects, one giant rectangular compartment perfect for packing cubes stuffed with clothing, and one smaller compartment with pockets for passports, pens, odds and ends, etc. that I stash all my extras in – plus one small outer zipper pocket for anything you want quick access to. It also has a water bottle holder on the outside as well as buckles so that you can strap something like a yoga mat to the outside. Plus, it’s quite comfortable to wear, with a padded hip belt and comfort-molding shoulder straps complete with a chest strap so that you can distribute weight perfectly across your body in the event that you need to wear your backpack for longer than usual. Check out more specs and details here.
    • However, if you are planning a longer trip and want a bigger backpack, I’ve heard only positive things about the Osprey backpack , so if I were going to upgrade my backpack capacity, that’s the brand I would go with. Of course, you could always just bring a suitcase as well. I don’t travel with a suitcase anymore for the reasons I listed above, but I have on occasion used hard sided luggage with spinners and I much prefer that to the older two-wheel suitcases that you have to drag behind you.
  • A rain cover for your backpack: I’ll be honest, I actually don’t have one of these because I am a horribly irresponsible person, but every single time I see a person with a backpack proudly trudging through the rain with a rain cover on, clearly not frantically panicking about the state of their electronics the way that I am, I vow to get one. Be like them, not like me. I’m a failure of an adult. This rain cover looks to have good reviews but again, terrible at adulting, 1/10 barely remember to feed myself, so do your own research if you’re so inclined. Alternately, the Outbreaker Tortuga Backpack is water-resistant, so that’d also be a good choice for rainy Vietnam.
  • Packing cubes: Whether you pack for Vietnam with a suitcase or a backpack, I definitely recommend packing cubes. Most people who visit Vietnam visit several cities during their trip or make their way from North to South via the excellent train system (seriously, guys, their trains are the best) or vice versa. Since you’ll need to pack and repack your bag several times if you do this, packing cubes make the organization so much easier. Plus, as it keeps your clothes rolled neatly, it prevents wrinkles and makes sure you’re utilizing your space the best way possible.  I use these packing cubes and love them, but packing cubes are pretty much idiot-proof – they are just a bag with a zipper, really – so anything will do.
  • Laundry bag: In addition to packing cubes, I also like to bring a laundry bag to separate out my dirty clothing from my clean clothes. Laundry in Vietnam is insanely cheap – about $1 USD per kilo – so do it and do it often, and save yourself some room in your suitcase or backpack. While you could certainly just reuse a plastic bag for this purpose, I do like having a cute one like this travel-themed one from Kikkerland though, because I’m impractical.
  • Hanging Toiletry Bag: I tend to pack a lot of toiletries with me because this is one area where I find it hard to claim my “light traveler” status. I can’t help it, I’m vain. I use a hanging toiletry bag to pack them in an organized way that takes up minimal space. It has the perfect number of separators, organizers, and pockets without taking up any excess space. It’s kind of a magical Mary Poppins bag – you’d be amazed at how many travel-sized toiletries you can fit in it and unlike other bags, it zips up flat like a bulky manila envelope, so it is really easy to slide into your backpack or suitcase without being a weird bulky shape that makes bags annoyingly hard to close. Love!
  • Backpack with locking zippers: To me, this is a non-negotiable for Vietnam, as my daypack was nearly pickpocketed in broad daylight walking around the popular Turtle Lake in Hanoi – luckily, my friend caught the would-be thief and slapped his prying hand away!! In a funny plot twist, the thwarted thief then walked briskly in front of us, whipped out his junk, and peed on a tree, because I guess that’s a way to make it seem like you had no intentions of pickpocketing someone? Sigh. Anyway, I bought this exact backpack after my trip and I’ve brought it to 30+ countries ever since because it is the best thing ever. I used it again on my most recent trip to Vietnam and was so thankful I had it. While I didn’t have any close calls in Saigon like I did in Hanoi last time, I think it’s because my backpack’s locking zippers make it clear to a potential thief that I am not a target to be f#*&ed with. It’s visibly quite difficult to get into this backpack with its double-locking zipper (the zippers interlock, and then you can place them through a gold clasp that is not only super cute but also insanely secure). Plus, it’s slashproof and since it’s worn on your back, it’s not as susceptible to the dreaded motorbike snatch-and-grab tactic that unfortunately is quite common in Vietnam. I swear by PacSafe for the combination of functionality and cute aesthetics, and I love their PacSafe Citysafe backpack. It’s actually cute in addition to having all the baller security features that make you feel pretty much impervious to theft (though still, you should definitely be careful with your belongings everywhere!). If you’re curious to learn more, I have a full review here – not sponsored, just irrationally obsessed.
Me and my lovable travel daypack in the Faroe Islands

Essential Things to Pack for Vietnam

I find Vietnam a bit more difficult to shop in than other countries. While there are certainly malls and convenience stores, the majority of shopping takes place on the street and in informal markets. While this is a cool cultural experience, it also makes simple things like restocking a shampoo you forgot to buy a little more difficult. Other things, like lightweight clothing (long live elephant pants?) and accessories like bags and sunglasses, are much easier to stock up on.

  • Travel insurance: Travel insurance isn’t mandatory for Vietnam, but in my book, it is. My friend got a particularly bad strain of food poisoning in Sa Pa when we visited several years back and ended up checking herself into a private hospital to rehydrate and check that it wasn’t anything more serious. Without insurance, that would have been a $500+ bill, but as she had travel insurance she was entirely covered. Road safety is also not fantastic in Vietnam, with 45 million motorbikes in the country all vying for space on busy streets and overnight buses with questionable safety standards. Crossing the stret in Vietnam is a Frogger-esque mission and I’m always glad to have insurance for peace of mind. While I haven’t had any problems in Vietnam personally, I would never travel there without insurance. I used World Nomads on my most recent trip to Vietnam, as I do with all my trips, and highly recommend them. You can get a free quote here.

What to Wear in Vietnam (For Women)

This part of my Vietnam packing list is specific to women, so men, feel free to skip this part and go on to the next section, where I attempt to guess what you should bring.

Vietnam is culturally a bit conservative, despite the heat, so I try to wear slightly longer dresses and skirts in general and nothing too skimpy. Leave your tiny tank tops, short shorts, and minidresses at home and opt for cool fabrics that are slightly longer but still thin and breathable. I actually find that I feel cooler when I am wearing longer, loose skirts and

Saigon is a little less conservative than Hanoi, but still, people tend to cover up even in the heat.
  • 3-5 lightweight summer dresses: Dresses are great for Vietnamese weather, plus they pack up small, so bring as many as you can get away with. Aim for something that hits around the knee (a few inches shorter is fine, but avoid tiny mini dresses). I love maxis and midi dresses for this climate.
  • 5+ tees & tanks: You will sweat a lot, so opt for black, navy, and other dark colors. Yes, they attract heat, but they also avoid the telltale yellow pit stains that seem to be my constant vibe whenever I attempt to wear white.
  • 1 pair jeans: If you travel in northern Vietnam in the winter months (November to February, roughly) you may want jeans for cooler days and nights. And if you visit the highlands (Da Lat, Sa Pa) at all, jeans will come in handy. I also recommend picking up a few pairs of loose cotton pants when you arrive in Vietnam, which can be bought for around $5 USD a pair or less.
  • 1-2 pairs thin cotton leggings: Great for making yourself less appetizing to mosquitos at night and also for cooler nights up north or in the mountains
  • 1-2 long-sleeve tees or thermals, if traveling in the north’s winter, or in the mountains.
  • 2-3 skirts: I suggest bringing one black skirt and one printed skirt for flexibility. I especially love having midi or maxi length skirts, which feel great and coincidentally look nice in photos! As a bonus, the extra fabric around your legs traps some cool air, making you feel less hot.
  • 1 pair sneakers: Vietnamese streets are generally quite dusty and dirty, so I found that I liked having a pair of lightweight closed-toe shoes that were comfortable to wear for long stretches when I planned to walk a lot. I usually wear a pair of black Nikes as I find they look cute even worn with my dresses and I’m all about having options.
  • Moisture-wicking socks, preferably made of wool or something that is odor-absorbent like these ones from Smartwool
  • 1-2 pairs sandals: I suggest bringing one pair of rubber flip flops like these Havaianas and another pair of more stylish or dressy sandals. I’m obsessed with my Birkenstocks and will never go back. These are great for when it’s just too hot to put on sneakers, and rubber flip flops are great for days when rain is in the forecast.
  • 1 rain jacket: Even if you don’t plan on traveling in the rainy season, trust me, the rain in Vietnam often has other plans – namely, ruining yours. I love my Marmot rain jacket and bring it with me on every trip because it packs up small and offers pretty much complete waterproofing. Plus the underarms have zippers underneath which you can open, making the jacket more breathable, which is a must in humid Vietnam.
  • 1 cardigan: Great for if you travel in the winter months in the North or anywhere in the highlands, and also good for buses with overzealous air conditioning in summer. Trust me, even though it seems like the weather in Vietnam would make a cardigan ridiculous, you’ll use it at least once on your trip. And in a pinch, it makes an awesome travel pillow.
  • 1-2 bras: I personally brought 1 regular bra and 1 sports bra and switched between the two, but the cleaner people amongst us may object to that and want to bring more. You do you.
  • 7+ pairs of underwear: Laundry is so cheap in Vietnam that it’s silly to bring too much, but I like having about a week’s worth of underwear so I don’t always have to plan out my laundry days.
  • Bathing suit: If you plan on going to Da Nang, Nha Trang, the islands, or anywhere beachy or with a pool, you’ll definitely want a bathing suit. If a lot of your trip is on the beach, you should bring two bathing suits so one can dry overnight and you can use the other the next day. High humidity means that wet things often take a while to dry out, and nothing is grosser feeling to me than putting on a wet swimsuit, so having 2 is key.

What to Wear in Vietnam (For Men)

Full disclosure, I am not a dude. But if I was, this is what I would bring, I guess.

  • 1 pair jeans
  • 1-2 pairs thin, lightweight travel-friendy men’s pants
  • 2-3 pairs shorts
  • 7+ pairs underwear
  • flip flops
  • comfortable walking sandals
  • sneakers
  • a few pairs of moisture-wicking socks
  • sturdy waterproof rain jacket
  • swim trunks
  • sweater for colder weather + too much AC

What to Pack for a Hostel in Vietnam

If you’re backpacking through Vietnam, there are a few extra things that you should bring that you might not need if you were staying in hotels.

  • 1 pair flip flops: For communal bathrooms, you’re definitely going to want a pair of flip flops to avoid funky foot issues!
  • 1 travel towel: Some hostels will provide a towel, but it’s not always a given. You can usually rent one for a small fee, but I find it handy to carry my own XL quick-dry travel towel – they fold up quite small, are great for beach days, and are generally just a nice thing to have.
  • 1 eye mask: Great for when you want to sleep but your roommates don’t!
  • Some earplugs or good noise-canceling headphones: Vietnam is a LOUD country, even – especially – in the mornings, when the motorbikes start to roar to life around 5 AM. I love Hearos — they’re the gold standard for ear plugs.

What Toiletries to Pack for Vietnam

Basically, anything you use on a daily/weekly basis you will need to bring with you, as Vietnam is not the easiest country to stock up on familiar brands in. I went into a little more detail above in the “essentials section,” but here are a few more ideas.

Hand sanitizer is always a good idea when you travel, especially in Vietnam!
  • Hand sanitizer: I sometimes found that bathrooms in restaurants or cafés didn’t have soap, so I was glad to have hand sanitizer.
  • Kleenex packets: Like above — public restrooms may be lacking in the toilet paper department, so having some Kleenex in a portable sleeve is always a good move. Vietnam is also land of the “bum gum” – aka, a water gun that you use to er, hose yourself down, rather than use toilet paper. While this is definitely more eco-friendly, I find it hard to go without toilet paper, having grown up with it. For that reason, I bring some Kleenex with me as a replacement for TP if I need it.
  • LUSH solid shampoo: Life-changing. Just trust me.
  • Sunscreen: Vietnam is sunny AF and sunscreen without whitening agents can be hard to find. My skin is really sensitive on my face, so I use this fancy Japanese sunscreen to prevent acne, and a general sunscreen for my body.
  • Travel medications: I listed them above, but just to reiterate — stomach medicine, motion sickness pills, and some sort of painkiller are my standards.

Electronics to Pack for Vietnam

Vietnam is generally safe for travelers, but you’ll want to really mind your smartphone if you bring it. Motorbike thieves who target tourists using their smartphones on the street are a big problem in the major cities. At the guesthouse that I stayed at in Saigon recently, a girl had her phone snatched from her hand two days prior.

Never get out your phone to use while facing the street! Instead, walk back from the curb quite a bit so that it’d be hard for anyone on a bike coming through to snag it, and just keep your wits about you. Yet another reason to have travel insurance.

World Nomad (the company I use) has two levels of coverage, one which protects you at up to $500 per item and one at up to $1500 per item, so if you have an especially pricey smartphone or camera you may want to go for the upper tier of coverage due to the relatively increased threat of theft. Again, you can get a free quote here.

Never get out your phone on a busy street, especially night, unless you are a few feet away from the bike traffic!
  • Laptop, if necessary: I bring my Macbook Air everywhere but other people may prefer a tablet or an inexpensive netbook. I work on the road so a user-friendly, lightweight laptop is a must.
  • Unlocked smartphone: Despite my warnings about phone snatching, I still think that’s no reason to leave your phone at home. I loved having a SIM card in Vietnam – they are insanely cheap (I paid about $5 USD for a month of basically unlimited data, 4 gigs of data per day!) and allow you to look things up on the road, hire a cheap taxi via Grab, order delivery, etc.
  • Kindle Paperwhite: Books are heavy and often hard to find exactly what you want on the road. I love the Kindle Paperwhite because the screen is glare-free, making it easy to read at the beach or in direct sunlight.
  • Travel camera: I use a Sony A6000 because it’s lightweight for a blogger quality camera, inexpensive, and a HUGE step up from a smartphone. You may want to replace this or add a GoPro if you are doing adventurous activities on your trip.
  • Portable charger: I like to carry a portable charger everywhere I travel and Vietnam is no exception.
  • Adaptor, if necessary: Vietnam is super convenient for plugs, actually, as their outlets accept both US + European prongs – I tested both as my electronics are a mix, and both worked fine. If you are from the UK you’ll need adaptors. If you have an adaptor, bring one anyway, just in case!

***

Well, nearly 5,000 words later, I think I’ve finally exhausted all the things you need to bring for Vietnam. While this sounds like a lot, I was able to fit it all into a 44L backpack (carry-on size) and daypack because I chose lightweight fabrics and packed carefully.

Is there anything I’ve forgotten? Is there anything else you’re wondering if you should bring to Vietnam? Let me know in the comments!

15 Interesting Things to Do in Saigon (AKA Ho Chi Minh City)

Saigon (also called Ho Chi Minh City) is a vibramt, dynamic city that is the heart of Southern Vietnam.

While Hanoi is the capital of Vietnam and the most important city of the north, Saigon is the largest city in all of Vietnam and also the busiest and most bustling.

Saigon is a city people either love or hate.

There’s a lot going on there – the constant motorbike traffic and the ever-present smog accompanying them, the litter on the streets and the general loudness of the city, especially in the morning.

But in spite of Saigon’s flaws, I found myself loving the city, enthralled by its constant hum and rhythms.

In Saigon, I loved how sunset didn’t mark a time of quiet and people hurrying indoors off the streets but rather a time of renewed energy and focus.

saigon street blurry motorbike and still buildings

The punishing sun finally down, the humidity slackening just a bit, Vietnamese people of all ages would grab a plastic chair, sit in an alley, and laugh and drink into the late night hours.

Contrast this with the winter in Bulgaria that I was escaping, and you’ll see why I found Saigon such a treasure.

Meanwhile, the people of Saigon are in my opinion its greatest asset. I had some challenges on my first visit to Vietnam, particularly in Hanoi.

I was nearly pickpocketed in broad daylight walking in a city park – mere hours after I was scammed by a taxi driver, overcharged nearly 20 times the amount the ride should have been.

While of course you can’t judge a city of millions by the actions of a few, I did find Saigon’s people to be far more pleasant to tourists – less bent on fleecing tourists, more friendly and free with their smiles, more honest.

I spent three weeks solely in Saigon with not one issue, taking a few minor precautions which I’ll go into detail on shortly. 

One quick word on the city’s name: The city is officially known as Ho Chi Minh City, but many people still call it Saigon, and locals typically still call it Sài Gòn when speaking about their city.

For stylistic purposes, I’ve primarily chosen to use the word Saigon, but I call the city by its official name (Ho Chi Minh City) at times in this post, in order to respect both points of view. Thanks for your understanding.

Get acquainted with the city on motorbike

Getting thrown headfirst into the crazy flow of Saigon traffic on the back of a motorbike is hands down one of the most fun things to do in Saigon! I booked a combination sightseeing and street food tour by motorbike, and it was a fantastic experience.

We tried bun bo hue (a spicier and more flavorful take on Vietnamese soup), visited the oldest apartment block in Saigon, ate banh xeo (an enormous savory Vietnamese coconut pancake), visited a flower market and the Cambodian market, tasted a banh mi (Vietnamese sandwich) and headed to District 4 for some seafood BBQ.

It was a fantastic evening and despite the complete madness of Saigon traffic, I felt very safe with my experienced and very funny, friendly driver.

Seriously, these guys drive in this traffic every day – you are in good hands! If you don’t have the money to spend on a street food/sightseeing tour, you can always just do as the locals do and hire a motorbike taxi for as little as 50 cents using Grab Bike!

It was my primary way of getting around the city and while some of my drivers were a little less cautious than my driver was on my motorbike tour, it was always a lot of fun!

Take a cooking class at M.O.M. Cooking School

Salty, sweet, sour, full of umami, and a hint of spice:  it’s no wonder that Vietnamese food is some of my favorite in the world.

So obviously, one of the top items on my list of things to do in Saigon was to take a cooking class!

I took a class with M.O.M. Cooking School and had a fantastic experience –

I’d highly recommend taking a class with them if you have any interest in cooking or bringing home some Vietnamese recipes, or just learning about Vietnamese culture in a hands-on way and getting a break from the relentless Saigon heat in an air-conditioned and comfortable kitchen.

Each cooking class lasts about 3 hours and covers 3 dishes.

I learned to make pork and shrimp summer rolls (goi cuon) with a hoisin-peanut dipping sauce, fish-stuffed pumpkin blossoms with a fiery fish sauce-infused nuoc mam cham sauce, and the most delicious lemongrass and chili chicken stir-fried to be impossibly soft with the addition of coconut water.

Most of the prep work was done for us, so we were able to focus on technique – so the fun stuff, basically!

The menu changes daily so if you have any dietary preferences or restrictions (or just want to know what you’ll cook in advance!) be sure to check on Klook. 

They’ll give you a sample menu of what dishes will be prepared on each day. If you’re a huge fan of Vietnamese cooking you could even go for more than one day and learn even more dishes as all 3 dishes you prepare change daily.

Pay your respects at the War Remnants Museum

While not an easy or light thing to do in Saigon, visiting this museum about the Vietnam war is essential viewing in my opinion — especially if you are American or are from a country that was allied with the Americans in the war.

No matter what side of the ideological divide you fall on, you can respect the senseless loss of human life and the ongoing tragic impact this war has had on generations of Vietnamese, Cambodians, Laotians, Americans, and other victims of this brutal war.

The War Remnants Museum in Ho Chi Minh City is an excellently laid-out museum, full of photographs and articles documenting the worst abuses of the Vietnam War.

As an American, visiting this museum was hard, knowing the pain that my country inflicted on this country that is now welcoming me.

I know that the pain I felt in bearing witness to the awful acts my country committed is nothing compared to the pain of those who lost their limbs, their homes, their livelihoods, and their loved one as collateral during this war.

For me, it was particularly heartbreaking to see the effects of Agent Orange and dioxin on the population of Vietnam, and the effects it continues to have, causing birth defects and severe illnesses even in the fourth generation of survivors.

There’s no doubt that the U.S. committed serious war crimes in Vietnam and that the war here was one of the biggest tragedies of the 20th century. It’s hard; it’s heavy; it’s essential to see in Ho Chi Minh City.

Seeing this museum then going into the streets of Ho Chi Minh City – where the locals welcome guests openly and proudly – can be a bit of a shock to the system, making you wonder if you deserve their kindness.

It’s a dose of humility and an important reminder of the power of forgiveness and the human ability to survive.

Get lost in beautiful smells at the Ho Thi Ky Flower Market

Another stop on my motorbike tour, I loved visiting the Ho Thi Ky Flower Market in District 10.

Our stop here was brief but definitely worth it, and if you’re a huge fan of flowers or want to bring something home to decorate your hotel room, it’s definitely worth a visit all on its own.

I learned that white and purple flowers together symbolize death and are the appropriate gift for a funeral – so don’t make that mistake when buying flowers if you’re trying to woo a Vietnamese girl or make a good impression on a host family!

My guide explained to me that many of the flowers come in daily from Da Lat, a mountainous region about 6-8 hours away by truck.

Seeing the effort that these markets put in to constantly have fresh flowers, despite the punishing Saigon humidity, is really beautiful.

Walk over to the Cambodian Market

Just a short distance from the Ho Thi Ky Flower Market, you can find a local Cambodian market (Le Hong Phong Market), which is a little different than all the other markets in Saigon.

This was also a stop on the motorbike tour I did as it’s literally right next to the Cambodian Market – we walked over from the flower market. So if you’re traveling by Grab Bike or taxi, this is a great way to see two outer-district sights in one if you’re not going as part of a tour.

There’s a ton of delicious Cambodian food offerings here, as there is large Cambodian population living in Saigon, who fled the country during the genocidal reign of Pol Pot and the Khmer Rouge in the 1970s.

The market has been here since not long after, as the heart of the Cambodian refugee community, and it is now a spot for Vietnamese, Cambodians, and curious tourists who make the trek out to District 10 to explore.

Explore the vibrant craft beer scene

When I first visited Vietnam 4 years ago, craft beer wasn’t even a thing – it was pretty much just Tiger or Saigon everywhere you went.

Now, there’s a number of excellent craft beer bars and even microbreweries located in the heart of Saigon.

I got the chance to visit three during my stay in Ho Chi Minh City – East West Brewing Company, BiaCraft, and Pasteur Street Brewing.

While all were lovely and had different vibes and atmospheres, my favorite by far was Pasteur Street Brewing – don’t miss their jasmine beer, it’s so fantastic and delicious.

I wanted to write a guide to craft beer in Saigon… but my low alcohol tolerance, especially in the hot humid weather, meant this was a job better left for professionals!

Check this post out for a complete guide to craft beer in Saigon.

Walk around Ben Thanh Market

This is the most popular market in Vietnam, and while it is touristy and slightly more expensive than other markets in Ho Chi Minh City, I think it’s still worth walking around.

That’s mostly because it’s so close to many of the other sights that you will see in the center of Ho Chi Minh City, rather than of itself being essential viewing.

It’s a great place to buy Vietnamese souvenirs, if you have friends or family back home who you’re thinking of shopping for.

Rather than get a kitschy T-shirt or, god forbid, a pair of elephant pants, here are a few authentic Vietnamese souvenirs that I recommend as good souvenirs to bring back from backpacking Ho Chi Minh City.

I love Vietnamese drip coffee pots and Vietnamese coffee from the highlands (Da Lat), any sort of specialty cookware or non-perishable goods if you have a friend back home who loves cooking (or for yourself!), and an ao dai, a beautiful Vietnamese traditional dress-like garment typically worn over trousers.

See a piece of history at Independence Palace

Independence Palace is also called Reunification Palace – you’ll find that like Saigon itself, many things in this city have two names, an indicator that the North-South divide is not merely a thing of the past.

Whatever you call it, Independence/Reunification Palace is a must-see in Saigon, as one of the most famous buildings in the city. Tickets cost 40,000 dong, less than $2 USD.

I visited right after it reopened at 1 PM and thought that was perfect, as it was pretty peaceful when I was there and easy to snap photos without massive groups of people crowding it. By the time I left, huge groups were arriving, so I think I had good timing.

The building looks as if it is standing still in time – its 1960s architecture along with its kitschy vintage furnishings have barely changed since the tanks from the North arrived in 1975, when the city of Saigon officially fell. 

Personally, I regret not having an audio guide as I didn’t really know what I was looking at, even though it was visually interesting.

I thought there might be more signage about why each room was important, and what was the general history of the place, but I didn’t find this to be true, so if I came back I’d spend the extra 50,000 or so dong on the audio guide.

Alternately, you could visit it (alongside a lot of the other sights on this list, such as the Post Office Building and the Opera House, on a guided walking tour).

Admire the Notre Dame Basilica

Unfortunately under construction during my visit, I still think Notre Dame Basilica is well-worth a visit while in Ho Chi Minh City, especially given its prime location near Independence Palace and the beautiful Post Office building.

In fact, it’d almost be harder to not visit Notre Dame than not!

Notre Dame has its roots in the French colonial period which is responsible for a lot of the architecture that you see in southern Vietnam, and it’s well worth making a small circuit when downtown to see the other French colonial buildings.

I’ve included the Central Post office across the street, as well as the City Hall and Opera House in this post, but there are others – this can be done easily independently or with more context on a guided walking tour.

Visit the Saigon Central Post Office

I found this to be the most beautiful building in Ho Chi Minh City – but maybe it’s because my favorite color is yellow.

Located right across the street from Notre Dame Cathedral and truly in the heart of Saigon, Buu Dien (aka the Central Post Office) is so central that it’s almost impossible to miss.

Unfortunately, this gorgeous building has been thoroughly converted into a tourist mecca, with endless rows of booths selling tours and two souvenir shops.

However, if you can look past the touristic angle and appreciate the beautiful architecture, I think it’s still worth visiting.

Admire the lovely Ho Chi Minh City Hall

Another colonial-era building from the early 1900s, it’s unfortunately not possible to go inside the City Hall as a tourist.

While it’s still in use, it is strictly for civil servants and staff of the Peoples Committee in Ho Chi Minh City.

It was another one of my favorite buildings in Saigon and since it’s just a short walk from the Saigon Opera House it’s easy to tack on to your Saigon to do list.

See a show at the Saigon Opera House

One of the most essential places to visit in Saigon is the Saigon Opera House, which is both a prime example of the French colonial architecture but also one of the few colonial buildings still in use for its original function (or close to it) today.

The Saigon Opera House is home to the AO Show, a performance which combines elements of dance, circus arts, and a distinctly Vietnamese twist, as folk instruments, costumes, and bamboo are all utilized during the performance.

Shows run just about daily at 6 PM so it’s a must-see in Saigon if you’re a lover of the arts.

You can see just a performance of the show or you can combine a showing with a dinner for an even more special night out! Whichever you pick, it’s a recipe for an incredibly memorable night out.

Drink some fantastic Vietnamese coffee

One of the most unmissable things to do in Ho Chi Minh City is indulge in the city’s coffee culture (though I have no idea if $nob Coffee pictured above is any good – I just thought it was hilarious).

The traditional way to drink coffee in Vietnam is over condensed milk either hot or cold – and in Saigon, you’re probably going to prefer cold.

I warn you, there’s nothing quite like the double-whammy of a shot of extremely concentrated coffee plus the sugar rush of all that condensed milk, so drink with caution or prepare to stay up all night!

Check out Saigon’s hidden Hindu temples

Vietnam is often associated with their own syncretic blend of religions that include Buddhism, Confucianism, and Taoism, with elements of folk religions mixed in.

But naturally, as Saigon is the most diverse city in Vietnam, there are plenty of religious buildings that don’t fall under the pagoda umbrella, such as Hindu Temples, Catholic churches, and even Islamic mosques.

There are actually a handful of Hindu temples right downtown. I particularly liked visiting Temple Goddess Mariamma, but Sri Thenday Yuttha Pani Temple is not far away, either.

Check out the Saigon City Museum (Gia Long Palace)

This museum traces the development of Saigon as a city, but in my opinion, the museum doesn’t quite reach its full potential.

This is a city with so much history that it should be hard to tell a boring story about it – but the collection of artifacts inside don’t do justice to the tumult and changes that have marked Saigon since its early days.

So why am I even including this on a list of things to do in Ho Chi Minh City? Well, the building itself is absolutely gorgeous, and it’s super cheap to enter.

The building was designed in 1887 by the very same French architect who designed the beautiful post office that’s now iconic of Saigon’s colonial style. However, its intended purpose (an exhibition hall) never came into fruition.

Instead, it was, at times, a lieutenant governor’s residence, the residence of Japanese occupiers, and then it was the residence of Emperor Bao Dai…. which promptly ended when the revolutionary Viet Minh, Ho Chi Minh’s crew, came in.

Later, the British held it, then the French, and then eventually the South Vietnamese president…. before finally being part of the North’s sweep of the city during the fall of Saigon, and eventually being turned into a museum post-reunification.

Indulge in a spa day

Vietnam is one of my favorite places to indulge in a day of R&R and I took advantage of their affordable spa prices several times during my 3 weeks in Saigon.

One word of warning: many massage centers and spas offer insanely low prices when inviting you in (around $6-8 per hour for a foot massage, say) – then, after your massage, which may or may not have been satisfactory, demand tips of up to nearly 100%, therefore doubling the price!

I have no problem with tipping masseuses – they do hard work for little pay or security – but I do have a problem with being duped into paying double the expected cost disguised as a “tip,” when I generally tip 20%.

Instead, I recommend going to a more reputable and slightly more expensive spa where you can be guaranteed you won’t get the tip hustle.

I went to Cat Moc Spa several times during my stay in Saigon and loved it each time. The massages are reasonably priced, around $15-20 USD for an hour, and there is no tip hustle (though of course you are free to tip and tip well!).

I highly recommend them, as the atmosphere is a step above what you’ll usually find in Saigon and the quality of masseuses is extremely high.

They’re very friendly and experienced, so it’s worth the extra expense in my mind (which doesn’t actually end up being that much extra when you consider that you are getting an honest price from the get-go).

Where to Stay in London: First Time Guide to London Neighborhoods & Hotels

One of the most overwhelming parts of planning your first trip to London is deciding where to stay in London for the first time – and better yet, finding the best area to stay in London that won’t break the bank.

London is not an affordable city by any stretch of the imagination, and that is even truer when it comes to finding a hotel in London.

London is composed of 32 boroughs which make up Greater London, and many of those boroughs break down further to be divided into neighborhoods as well.

I’ve been to London three times and I’ve stayed in three different London neighborhoods: Bloomsbury, Shoreditch, and Stratford.

While I loved staying in Central London and Shoreditch, I don’t think I’d stay in Stratford again, as the neighborhood didn’t feel safe as a solo female traveler.

So if you want to know where to stay in London – for a first time or repeat visitor – keep reading! Also, check out my 4 day itinerary for a London first-timer.

Best Areas to Stay in London, by Neighborhood & Budget

London is not a cheap city and as a result, it’s hard to recommend places that fit squarely into what I personally consider “budget.”

This post is about hotels in London, so I’ve excluded hostels unless they have private rooms available as well. However, if you’re a solo traveler on a budget, you may want to look into different hostels in London – I usually use Hostelworld to do all my hostel searches.

Here is a rough breakdown of what I mean by the different budget categories.

Budget: Under $100 (low season) / under $150 (mid to high season)

Mid-range: Under $200 (low season) / under $300 (mid to high season)

Luxury: Upwards of $300 regardless of season

Bloomsbury

This is where I stayed in London the first time and I’d definitely recommend it to fellow London first-timers.

It’s in central London, but it’s a bit away from some of the most touristic spots (London Eye, Big Ben, etc.) but still walking distance from them.

There are plenty of Tube stations nearby as well as King’s Cross station which is super useful if you plan to travel around England by train or do some day trips from London which are just a quick train ride away.

But far and away my favorite thing about Bloomsbury is that it’s home to the world-class British Museum, which is free (though it welcomes donations).

This meant that every time I was coming home, I’d pop into the British Museum for literally just 30 or 40 minutes at a time to check out a new section without getting overwhelmed and feeling like I needed to try to see everything.

It’s also home to London University and as a result, there are plenty of restaurants that cater to more student-friendly budgets.

I was able to find some truly budget-friendly meals here, such at Bibimbap Café just across from the British Museum, where you can get a delightful Korean meal for about 5 pounds.

Close to Bloomsbury is Soho, a thriving LGBT friendly London neighborhood, which is another great choice for where to stay in London for first-timers.

Budget: The best-reviewed budget hotel in Bloomsbury is Alhambra Hotel, located right across from King’s Cross. With very budget friendly double rooms with a shared bathroom (and rooms with a private bathroom for slightly more) this is a great place to stay if you don’t want to sacrifice location but you are also on a tight budget.

The design is quite simple and stripped down, but rooms are comfortable, a full English breakfast is included in the room price (very helpful considering how much food costs in London!), and the staff is friendly — plus, that location!  Check prices, reviews, and availability here.

Mid-Range: This gorgeous Georgian townhouse is nearly 200 years old and used to be the home of the famous artist, Sir John Everett Millais. The highly-rated Arosfa Hotel in historic Bloomsbury is stylish yet central, just a short jaunt from the British Museum.

The rooms are beautifully decorated with different themes. Some are more classic, with wood paneling and warm earth-toned curtains and even a fireplace, whereas others have more personality, like funky wallpaper and black-tiled bathrooms. Either way, all rooms can enjoy the lovely lobby, the garden with a small glass gazebo, and a hearty continental and cooked breakfast. Check prices, reviews, and availability here.

Luxury: Right on lovely and quiet Russell Square (across the street from the most rad London phone booth of all, incidentally, decked out with parrot-themed wallpaper!), I first noticed and photographed the building that the Kimpton Fitzroy is in before even knowing what it was. The exterior is gorgeous, with a beautiful rich terra cotta exterior, but the inside is even more lovely.

The Kimpton Fitzroy is a Grade II-listed landmark building rich with historical details, making you feel like you’re staying in a palace more than a hotel. Inside, the interiors are luxe with a contemporary edge, designed with an eye towards classic modernity. There are several dining options within the Kimpton – from a casual coffeehouse slash wine bar to a more luxurious hotel bar to an upscale restaurant to afternoon tea in a courtyard.

A short walk away from the British Museum, several theaters on the West End, and the National Gallery, the Kimpton Fitzroy is luxurious yet surprisingly affordable for a London 5-star hotel in the heart of town (I’ve seen rooms for under $300 in the off-season). Check prices, reviews, and availability here.

City of London

Technically, the actual “City” of London is quite small and encompasses only one small part of what we commonly think of as, well, London.

The “City of London” excludes several of its most known places, such as Westminster Abbey, Big Ben, and the London Eye. Rather, the City of London includes the Tower of London, Tower Bridge (mistakenly known as London Bridge), the Bank of England, and St. Paul’s Cathedral.

Its proximity to so many sites makes it a great choice for a family trip to London!

I haven’t stayed here but my friend Megan did when staying at the citizenM Tower of London. I went to visit her and cowork with her for a few hours in their gorgeous bar on the 8th floor with jaw-dropping views of the Tower of London.

I loved being in such a central location surrounded by history everywhere, from the Tower of London with its intense and often dark history to the beautiful Thames River to the gorgeous Tower Bridge and the historic Old Spitalfields Market. This is truly the heart of London and a great place to stay!

Budget: For such a central location you’d imagine that the prices would be outrageous but there are still a few deals to be found in City of London. Premier Inn London Bank near the London Monument is an excellent choice, close to London Bridge and the Shard. You can also cross the bridge and walk to Shakespeare’s Globe and the Tate Modern from here. Rooms at Premier Inn are simple, as befits a budget hotel, but well-equipped and private with basics you’d expect (plus some extras!).

Each room has a private bathroom, a hairdryer, tea/coffee maker, WiFi, a work desk, blackout curtains, and a TV. Despite being a budget hotel, each room has a king-size Hypnos bed with a pillow-top mattress and your choice of pillows, great for a cozy night’s sleep in the heart of London without breaking the bank. Check prices, reviews, and availability here.

Mid-Range: I didn’t stay at the citizenM Tower of London, but I did visit my friend there and then later stayed at the Shoreditch location for three nights on my next trip to London. For the price, this hotel is amazing. Every single common area is bursting with creativity and artisticness, with a touch of irreverence and a sense of not taking itself too seriously.

Every common area is inviting, and there is a general vibe that makes the hotel lobby and bar areas places to see and mingle rather than just rush through on your way to your room, which I really enjoy. The rooms are small and compact but exceedingly well-designed and modern. Every room has its own iPad with which you can control the lighting, movies/TV, etc. There are so many wonderful thoughtful touches for the modern traveler, from USB chargers everywhere to in-wall adaptors that fit plugs from not only the UK but the US and Europe as well. And for the price, it’s quite an amazing deal, especially if you’re in London on the weekdays (it tends to be more on the weekends). Check prices, reviews, and availability here.

Luxury: I’ve stayed at a number of Hilton hotels over the years (mostly because my mom is a Hilton Honors credit card holder – I don’t have that kind of money!) and always been impressed by the quality of their hotels, and it seems like Hilton Tower Bridge is no exception based on the reviews! The rooms are massive and there are excellent views of both Tower Bridge and the Shard (which is it just opposite from), one of London’s most iconic new skyscrapers, from the hotel.

It has all the amenities you’d expect from the Hilton name – massive luxe bathrooms with showers and bathtubs, great city views, enormous rooms with king-size beds and working desks, that sort of thing. There’s a world-class bar – TwoRuba – where you can get inventive cocktails. And while it’s certainly not cheap, it’s actually quite a good value for the Hilton name in one of the most expensive cities to sleep in in the world. Check prices, reviews, and availability here.

Kensington

Bordered on the east side by Hyde Park and the north side by the colorful Notting Hill, Kensington is one of the best places to stay in London for the first time if you want to be in the center of the action. The architecture is predominately gorgeous Victorian buildings and beautiful embassy buildings with true London charm.

Kensington and the immediate area around it is home to some of London’s best museums, such as the Natural History Museum and the Victoria and Albert Museum.

The beautiful Royal Albert Hall is here, which is one of the most photogenic buildings in London, as well as the eponymous Kensington Palace.

It’s also quite close to Harrod’s, London’s most famous department store and a must-visit for those looking for London souvenirs, as well as Buckingham Palace and St. James’ Palace.

If you want a typical London experience in the heart of it, and you’re willing to pay a little more for it, Kensington is a fantastic choice.

Budget: There aren’t a ton of budget options in this neighborhood, but there are a few. The best-rated yet still affordable option I could find was Ravna Gora Guesthouse, which has small but well-designed rooms in the heart of Kensington. The cheaper options here have a shared bathroom; however, it is still possible to find a room with a private bathroom for under $100 for a double given the time of year.

They also have some of the more affordable family-sized rooms on offer in London, so if you are traveling with children on a budget it may be a great choice. Breakfast is not included but can be added for an additional price, about 7 pounds. Overall, the guesthouse isn’t anything particularly special, but it is affordable, friendly, central, and clean, which is about all you can really ask for for a budget hotel in central London. Check prices, reviews, and availability here.

Mid-Range: It’s hard to find an affordable hotel in a neighborhood as popular as Kensington, but there are still some better deals to be found such as Hotel Moonlight. With sumptuously decorated rooms that look far more sophisticated than the price tag would suggest, the rooms are small but have more than you’d expect – from a microwave to a coffee maker to a proper bathtub in each room, perfect for soaking your sore muscles after a long day of hitting the pavement.

One major bonus is that they have smart TVs that hook up to Netflix (assuming you have a subscription) which is a lovely touch when traveling. Even better, each guest receives complimentary snacks upon check and free use of a mobile smartphone that is GPS-enabled so you can use maps, etc. while walking around London in case you don’t have an unlocked smartphone with a British SIM. Check prices, reviews, and availability here.

Luxury: Of course, there are plenty of luxury options in Kensington given the general chicness of the neighborhood. Number Sixteen is the most stylish choice of them all, a gorgeous boutique hotel just a few steps from the Victoria and Albert Museum.

The interiors are chic and beautifully designed by Kit Kemp, one of the most renowned interior designers in the world. In her opinion, “there is nothing less cozy than a room that feels too formal” – and that’s exactly the philosophy behind Number Sixteen’s decor.

Each room is unique so that you feel more like a guest in a home than in a mass-produced luxury hotel. But my favorite feature of Number Sixteen is the zen private garden, complete with a pond with lotuses and a small gazebo, which is a real treat in a city as bustling as London. Check prices, reviews, and availability here.

Marylebone

For a lovely residential neighborhood with a small village feel rather than a big city buzz, while still being central London, look no further than Marylebone. Home to some seriously stylish boutiques (as well as the super-gaudy and definitely skippable Madame Tussaud’s, which decidedly does not fit into the neighborhood’s feel), this is one of the trendier yet calmer neighborhoods in London.

There is lovely Georgian architecture everywhere you look, the highlight of which for me is the Wallace Museum, which coincidentally is home to one of the most affordable afternoon teas in London – I had a fantastic tea there for around 15 pounds. Fans of Sherlocke Holmes shouldn’t miss the museum dedicated to him, naturally located at  221b Baker Street.

Sandwiched between two green spaces – Regent’s Park on the north corner and Hyde Park to the south – Marylebone is a delightful breath of fresh air, close to the hustle and bustle of Central London while feeling a world apart from it.

Budget: Marylebone is more affordable than its chic boutiques would suggest. Just a touch outside the confines of the budget category I outlined above, the Marylebone Inn is a fantastic choice if you have your heart set on Marylebone yet don’t want to pay a fortune. Set in a traditional London home, Marylebone Inn is just a short walk from Regent’s Park and the theaters of the West End. The rooms are simply decorated but spacious and offer a good value for money in this area.  Check out prices, reviews, and availability here.

Mid-Range: Stretch your budget just a tad and you’ll find even better options in Marylebone. Nottingham Place Hotel is one of the best-reviewed boutique hotels in the neighborhood with over 1,000 reviews. The interior is seriously stylish, with gray, gold, and black touches that bring the design together beautifully.

Rooms are sparsely yet elegantly decorated, ranging from studios to one- and even two-bedroom suites. Each suite has a separate workspace, so they’re a fantastic place to stay in London if you’re expecting to have to work at the same time as you travel. Breakfast is available, but not included in the price, so keep that in mind when booking. Check out prices, reviews, and availability here.

Luxury: For a beautiful yet unfussy luxury experience in Marylebone, The Arch is a fabulous option. A lush yet not overwrought boutique hotel with spacious, colorful rooms, it’s located in the heart of Marylebone close to Hyde Park.

But what guests say truly stands out about The Arch is the staff, who go above and beyond to provide an unforgettable experience for each guest (even four-legged ones, who are welcomed at the hotel, for the record!).

Composed of 7 Georgian townhouses which have been connected to make one luxury hotel with a handful of dining and drinking options, each room is well-appointed with TVs, working desks, tea/coffee facilities, EU/US adaptors, rain showers,  and more. The Arch is comfortable luxury at its finest, at prices that are reasonable given the quality of the experience and the location in London. Check prices, reviews, and availability here.

Shoreditch

Shoreditch is hands down one of my favorite places in all of London – after all, I have written a whole neighborhood guide to Shoreditch. This district of London is known for its street food and street art, and if you are looking for a hipster-y, slightly gritty neighborhood with plenty of amenities, Shoreditch is the place to go.

There are countless excellent restaurants in Shoreditch, including some delicious Indian food on Brick Lane (famous for its curries) and Vietnamese on Kingsland Road (aka Pho Mile). And don’t forget the legendary salt beef beigel, the 24/7 street food snack that made Brick Lane a can’t-miss destination in London.

There’s Boxpark, the world’s first “pop up mall” in a series of shipping containers, which is a great place to drink and dine in a casual setting, There are so many fantastic bars, cafés, and bakeries that it would truly take the better part of a year to explore the whole dining scene in Shoreditch.

While it’s not technically on the Tube but rather the Overground, it’s still quite easy to get to Shoreditch and I never felt like I was too far away from Central London when I stayed there. I also loved being around so much street art and creativity, plus it’s a great place to stay on a budget as the constant street food markets offer a delightful variety of international cuisines for well under 10 pounds.

I’ve gone from Ethiopian to Mexican to British food in a manner of minutes in Shoreditch, which is one of its greatest strengths. If you consider yourself a foodie – and don’t have a huge fine dining budget – stay in Shoreditch and you’ll be happy you did.

The citizenM in Shoreditch

Budget: An excellent budget option in a budget-friendly neighborhood, Point A is the place I’d tell someone to stay if they were trying to do a London trip on a tight budget. For a budget hotel, it has a bunch of personality, including a jukebox in the lobby where guests can play their tunes free of charge.

The design is modern and well-designed, if a little sterile for my personal taste and not quite as stylish as citizenM (pictured above). There are tons of modern perks – USB chargers, ability to change the lighting colors and ambiance, air and heating controlled by remote, etc.

However, many of the rooms do not have windows (you can check on Booking.com to see whether or not the room you are looking at has a window – it’s well-marked so you won’t accidentally get a no window room), so just keep that in mind when looking. Still, prices are regularly under $100, so it’s a great choice in the heart of East London. Check prices, reviews, and availability here.

Mid-Range: I personally stayed at the citizenM Shoreditch on my recent March trip to London and absolutely loved it. The hotel itself captured the vibe and ambiance of the neighborhood itself so well, with the graffiti-esque explosion of art in the public spaces that mirrored the wonderful street art all around Shoreditch.

I felt like it was a lovely nod to the neighborhood while still creating a warm, cozy space to get away from the busy London streets. The rooms themselves are on the small side but they’re very well laid out. For example, underneath the bed is an expansive area to stash your luggage, and the bathroom is well-placed to make the room feel as big as possible.

The staff is incredibly friendly and welcoming and I enjoyed snacking and drinking at the bar when I was too lazy (and cold) to go outside. But what I love best about citizenM is the modern technology that makes me feel like I’m living in the future, like the remote-controlled blackout curtains to the iPad that knew my name upon arrival to the easy self-check-in process.

It’s fantastically priced (for the record, I stayed one night complimentary and paid for two nights out of pocket) and I’d happily stay there again. Check out prices, reviews, and availability here.

Luxury: For a trendy yet luxe experience in the heart of Shoreditch, look no further than Ace Hotel. This maverick brand of hotels specializes in creating design-focused, trendy hotels that appeal to travelers who prefer unfussy luxury.

The rooms are music-themed as befits Shoreditch’s grungy DIY vibe – expect touches like record players with expansive record catalogs to listen to and acoustic guitars in the rooms. There’s a buzzy hotel bar serving up inventive and delicious cocktails and a lovely, lively rooftop area for guests to hang out on and gets views of the skyline from Shoreditch’s unique vantage point.

If you want a faceless and typical luxury experience, this isn’t the place, but if you want something that fits the vibe of Shoreditch, this is the perfect luxury choice for the neighborhood. Check out prices, reviews, and availability here.

9 Stylish & Comfortable Women’s Travel Shoes You’ll Love

Before donating and selling basically my entire life to travel the world like the clichéd blogger that I am, I had some 40 or 50-odd pairs of shoes cluttering up my New York City apartment closet.

You could say that I had a bit of a problem.

Since I was a teacher before I was a traveler, I often spent 6+ hours of my day actively on my feet, and so finding shoes that were comfortable yet not dowdy was one of my favorite treasure hunts. I may have had an obsession with shoes, but I was not about to sacrifice comfort for style points.

When I started traveling full-time, I had the problem of condensing my massive shoe collection down to just a few travel-friendly shoes. I’ve gone through a few iterations of my shoes – cycling some out and adding some new ones to my collection. Here are my top favorite women’s travel shoes broken down by category.

Best Women’s Travel Sandals

#1 Pick: Birkenstock Gizeh Sandals

Birkenstock Gizeh Sandals

I was resistant to Birkenstocks for so long. I thought they were a clichéd stereotype, perfect for people who smell like patchouli and make their own granola. Turns out I was dead wrong. Birkenstocks simply makes one of the best women’s travel shoes — and one of the most comfortable walking shoes, period.

I can’t express enough how necessary it is for a women’s travel sandal to have appropriate arch support. I was driving myself miserable with flip flops that looked cute but offered no support. While my shoes didn’t actively hurt my feet the way heels do, after 5 hours of walking around I’d feel like I needed my feet amputated.

My friend suggested I borrow her pair — and I hated them. They felt insanely uncomfortable and I had no idea why people raved about Birkenstocks. Then she explained to me that Birkenstocks come stiff and the heat from your foot ends up “melting” the arch until it perfectly forms to your foot (I’m great at explaining science things, I know – can you believe I was a teacher?). So borrowing hers felt like trash, but if I owned my own, I’d fall in love.

https://www.instagram.com/p/BiWzWzdAqST/?taken-by=eternalarrival

After beating the pavement for 6 hours in a pair of shoddy flip flops in Budapest one summer afternoon, I decided I had had enough — it was time to invest and try out a pair of Birkenstocks. After a day or so of breaking them in, I was in love. And I’ll probably never go back. These shoes are so form-fitting and so comfortable, and they go with literally everything. I wear them with jeans, I wear them with dresses, I wear them with shorts. I have the taupe-brown color and they are just so versatile that I can’t think of a single thing I own that they actually look bad with.

And isn’t that the dream travel shoe?

To recap, here are the top perks of my Birks (sorry, I couldn’t help myself):

  • Form to fit your foot’s arch: Birkenstocks core warms up under the heat of your foot and “melts” to form the exact shape of your foot. Which basically means that you are getting a custom-quality fit for a mass-production price, which is pretty freaking awesome.
  • Insanely versatile and surprisingly stylish: Honestly, my Birks go with just about everything. I wear them with dresses with leggings, dresses without leggings, skirts or shorts, jeans or loose pants. Birks come in lots of fun colors but I prefer something in a neutral shade of brown if it’s your primary travel shoe. However, I do like the black and the silver pairs as well.
  • Hold up well in rain and bad weather: Birkenstocks aren’t technically waterproof but I’ve worn mine through some pretty gross surprising flash floods and they hold up well and don’t get messed up in the water. I bring mine to the beach and rinse them off afterward. I wouldn’t completely submerge them in water or like, walk through a river in them, but every surprise bit of water I’ve thrown at them – which has been a surprisingly high amount – they’ve taken in stride (HA)

Check out my favorite travel sandals, the Birkenstock Gizeh Sandals, on Amazon

Runner Up: Easy Spirit Ramanda Comfort Slingback Sandals

These aren’t the exact Easy Spirits I own because they have been discontinued but they are pretty damn close. The main difference is that the ones I had before had a complete back whereas these have a strap back, but the style is the same and it’s the same brand.

Basically, I like having a pair of shoes that I can dress up, but are still decidedly sandal-y and insanely comfortable. That’s where comfort brands like Teva, Aerosoles, Easy Spirit, Clarks, etc. come in. While 90% of their selection will be too orthopedic and ugly for my tastes, there’s always at least one or two surprisingly cute options that will offer supreme comfort and awesome arch support while also not being aesthetically hideous.

https://www.instagram.com/p/BdaGrT_DLfb/?taken-by=eternalarrival

Best Women’s Travel Boots

#1 Pick (Ankle): Dansko Maria Boots

Dansko Maria Boots

I discovered these ankle boots in 2015 and have worn them obsessively for the last three years. They were fantastic when I was teaching and running around on my feet all day. I could literally run in these – which was important in my past life as a special ed teacher who was always corralling hyperactive kids.

I wear these shoes nearly all winter long, alternating them with my other top pick, the Blondo waterproof riding boot below. They’re so comfortable and low-key cute that I actually get a bit excited at the end of summer each year because it means ankle boot season is back.

https://www.instagram.com/p/BpM5BnanrKA/?taken-by=eternalarrival

These shoes have a slight heel (2″) but it’s offset by the 1/2″ inch platform so it’s not really much of an incline. The cushioning in the Danskos is so comfortable however that I never get that feeling like I’m standing on my toes like I do with most heeled ankle boots.

I wear these with black tights or leggings and dresses, black or blue jeans and a sweater, or occasionally on their own with bare legs in the transition between summer and fall for a chunky ankle boot look. They are super versatile and I actually used to own the taupe pair as well but I gave those to a friend when I started traveling full-time.

My top favorite features of these boots:

  • They’re scuff-proof and super easy to clean: Nubuck leather is amazing, ultra-soft and nearly impossible to scuff. They’re treated with a stain resistant material so they hold up well over time. They do occasionally collect dust and particles from all the walking around, but I simply brush it off with a lightly damp paper towel and they are looking good as new.
  • Rubber sole with a wooden look: I wanted a pair of Swedish Hasbeen clogs for years but couldn’t justify the expense – especially since when I tried it on, I found the wooden sole really clunky and unforgiving. The Dansko sole is made of forgiving, cushy rubber but has the look of a wooden sole which I think is super cute.
  • Insanely comfortable: The Maria boots literally have the American Podiatric Seal of Acceptance for being good for foot health. There’s a reason why Dansko clogs are beloved by teachers and nurses everywhere — basically, they’re shoes designed for people who live on their feet. I really liked how these are stylish and polished too, whereas their standard clog design is a little too orthopedic/medical looking for my personal taste.

Check out my favorite travel ankle boots, the Dansko Maria Boots, on Amazon!

Runner Up: Lucky Brand Women’s Basel Ankle Bootie

Lucky Brand Basel Ankle Bootie

While not quite as cushiony and pillow-soft feeling as the Dansko Maria boots, I’m equally obsessed with my Lucky Brand Basel Ankle Booties. These are another pre-travel shoe that I loved enough to bring with me on my first backpacking trip, and I wore them countless times in the 5-odd months I spend traveling through Europe.

They are roomy which is good for me as my feet tend to be wide and I often find the toebox of shoes to feel too tight. If you have super narrow feet these may not be for you. They have a padded insole and a rubber flex sole, two important features that increase the comfort of these shoes while they are still quite cute.

https://www.instagram.com/p/BV93IHPj2sU/?taken-by=eternalarrival

One word of warning, though – these don’t hold up that well in rain unless you waterproof them, so either treat them with a waterproofing spray or only wear them on dry days.

Check out one of my favorite travel shoes, the Lucky Brand Basel Ankle Bootie, here on Amazon!

#1 Pick (Tall): Blondo Vassa Waterproof Riding Boot

Blondo Vassa Waterproof Boot

I don’t think I’ve ever loved any pair of shoes as much as my Blondo boots. I bought these for the first time in 2008, when I was new to New York City and desperately needed a stylish boot that was durable, waterproof, but sleek enough to not make me feel like a total loser in a city with a cruelly high number of models per capita.

I splurged on these Blondo boots in 2008 and it is probably one of my best clothing investments ever. I wore these boots nearly every day in winter for years and years, and despite all the abuse — all the long walks, all the rainy days, all the questionable slush puddles — I have only gotten the boots resoled once and they still are in fantastic condition. We’ve survived 10 years together and I imagine we’ll go another 5 or 10 more, easily.

The quality of the leather means that the boots age fantastically, weathering the leather without making it look scratchy or scuffed the way cheaper imitation leather often does.

These shoes are great for traveling in Europe in winter – I brought mine to the Arctic Circle, no joke, because I wasn’t about to invest in a brand new pair of snow boots for a weeklong trip.

https://www.instagram.com/p/BB5FTy-SIRo/?taken-by=eternalarrival

Yes, I even went dog-sledding in them (though you can’t see it well in this picture – this was taken before I was a dedicated Instagrammer).

Their waterproofing is excellent and the soles are really grippy, making them great for walking on slippy surfaces and through snow (to a reasonable degree). The lining is thin which I personally like because I can wear them in fall and spring as well, but in peak winter, I pair them with a pair of warm wool socks otherwise they can let a bit of cold in.

A few of the best perks of these boots:

  • They’re sleek and classic: I hate feeling like a garbage monster when I travel, so having cute black boots that will never go out of style
  • They go with everything: Black leather is a classic combination for a reason. These boots go great with leggings (thin cotton ones in spring, warm fuzzy fleece-lined ones in winter), jeans, or just socks and a dress for lighter spring and fall days.
  • They’re comfortable as hell: Blondo boots have a fancy activated carbon foam insole (yeah, I don’t know what that means either) and a gel pad heel, adding cushioning and comfort so that you really won’t notice that you’ve been walking all day long
  • They withstand basically everything: My boots have seen it all: giant salty, slushy ice puddles every New York winter, bog-shoeing in the Estonian wilderness, dog-sledding in the Arctic Circle. They’ve withstood pretty much everything I’ve thrown at them with almost no maintenance (I did get them re-soled as a preventative measure about 6 years into owning them – for $60, it’ll at least double the life of my favorite shoes, so it’s worth it)

Check out one of my favorite travel boots, the Blondo Vassa Waterproof Boot, on Amazon here!

Best Women’s Hiking Boots for Travel

#1 Pick: Ahnu Women’s Montara Waterproof Boot

Ahnu Montara Waterproof Hiking Boot

I used to hike in sneakers all the time and always had aching ankles and knees at the end of the day. I finally got a pair of hiking boots before my trip to Central America in 2017 and did a ton of research before settling on Ahnus.

I tested them pretty seriously with some volcano hikes in Nicaragua (one of the most annoying terrains to hike because of all the slippery gravel) and mountain hiking in the Balkans and they’ve always stood up well, basically eliminating my ankle pain and taking a lot of strain off my knees in the process.

https://www.instagram.com/p/BQBZs37h5uq/?taken-by=eternalarrival

If you do a lot of hiking, here are some of the perks of having these vs. another pair of shoes.

  • They’re waterproof: I’ve done too many slogs on what I thought would be dry hikes that end up being total mud pits. When your sneakers get wet and muddy, they become well and truly miserable to hike in and it pretty much ruins the rest of the hike for me. If you want to do outdoorsy things on your trip, it’s best to invest in a pair of waterproof boots, trust me.
  • The ankle support is clutch: I never knew that I needed ankle support until I tried it. It truly brings your hikin to the next level and makes you feel like a superhuman. I do a lot of hikes on loose scree and rocks that wobble under your feet – having your ankles be supported is a true gamechanger, trust me. Especially if you are doing volcano hikes like I did – you’ll want a pair of hiking boots, sneakers just won’t do the trick (plus it’s too easy for rocks to get stuck inside your sneakers, which is no fun)
  • Ahnus come in some fun colors: This is silly but I really love my combination of navy blue and magenta details – they make my hiking boots feel less “serious” and more fun and even perhaps a tad bit cute?
  • Ahnus are owned by Teva: Teva is one of the #1 travel shoe companies in the world, so you know they take comfort serious. Ahnu is a Teva brand so the same comfort you can expect in your sandals you can expect from these! They use Vibram soles which are some of the most comfortable in the hiking world (yes, Vibram makes those creepy toe-shoes, but truly, the soles they produce for hiking boots are awesome)

Check out my top pick for travel hiking boots, the Ahnu Montara Waterproof Hiking Boot, here on Amazon

Runner Up: KEEN Women’s Targhee II Hiking Boot

I usually don’t recommend products I haven’t personally tried but as I’ve only had one pair of hiking boots in my life –  I’m going to borrow a recommendation from a friend. I’ve traveled with two friends who swear by Keen for their hiking boots, so I feel comfortable suggesting these as a runner-up with the caveat that I haven’t personally used them!

Best Women’s Travel Sneakers

#1 Pick: Nike Women’s Flex Experience Running Shoe

Nike Flex Experience Sneakers

I love having a pair of black Nikes with me at all times – they’re great for light hikes where I don’t need my proper running boots, but they’re also just great city shoes. On any given day, there’s a 90% chance I’m wearing either my Birkenstocks or my Nikes when I’m traipsing around the city.

https://www.instagram.com/p/Bd5QMgAjD55/?taken-by=eternalarrival

They’re so comfortable that I can wear them for hours upon hours while walking around a city and never once think about my feet. And my favorite thing about these sneakers is just how well they go with everything. I have a lot of dresses and skirts in my travel wardrobe and these sneakers actually play surprisingly nicely even with my girlier outfits.

Top perks of these shoes:

  • Super lightweight and easy to pack: These sneakers take up barely any space – they squash up to fit super well in my backpack without ruining their structure
  • Insanely comfortable and go with everything: These shoes can be worn for hours with just about anything – I even pair these with dresses, skirts, etc. because they’re just that versatile and give a nice city/urban vibe to girlier clothing.
  • Hiking-friendly: I summited a 2,600-meter mountain in these so they’re pretty badass. While they don’t have any ankle support, they’re great on your arches and lightweight so they’re actually a pretty good choice for light day hikes if you don’t have room in your bag for a traditional hiking shoe

Check out my favorite travel sneakesr, the Nike Flex Experience Sneakers, here on Amazon!

Runner Up: Red Skechers You-Shine Sneaker

Skechers You-Shine Sneakers

So, funny story with these shoes. Greyhound had lost my luggage with my black Nikes inside it, and I had just come from the Nike store in Vegas where I had bought basically an exact replacement for the above shoes.

I then wandered into a Skechers with my friend Janet, not feeling particularly hopeful – I remember Skechers from my 13-year-old wandering around the mall with a flip phone days. But then I found these adorable red sneakers and pretty much fell in love immediately with how cute they were.

I tried them on and instantly fell in love – it was like I was wearing a sock, not a sneaker. The fabric was super soft and breathable and it hugged my foot in a super comfortable way. The sole is thick and sturdy but super bendy (again, how great at words am I? #crushingit), which makes it actually surprisingly great for hiking – and I should know as I took these shoes on quite a few surprise hikes, as I was road tripping around the Southwest at the time. They even took me up Angel’s Landing, one of the most notorious hikes in the U.S.

Sadly, I have since lost these shoes on a trip around Ireland – RIP – but they performed so well while I had them that I’m quite tempted to replace them. Also, I found that red shoes worked surprisingly well as a ‘neutral’ and I actually didn’t have that much trouble working my red shoes into my outfits, and I really liked the pop of color they gave my travel photos.

https://www.instagram.com/p/BVyjfssDeYo/?taken-by=eternalarrival

So, to recap, here’s why these shoes are the freaking greatest.

  • Colorful yet surprisingly neutral: I had underestimated how well red integrates with most wardrobes. It played nicely with maroon, purple, black, brown, navy – pretty much every color I threw at it.
  • Sock-like comfort: As someone whose favorite feeling at the end of the day is peeling off her shoes and throwing them dramatically across the room, having ultra-comfortable shoes that feel like socks while I’m wearing them was a delight.
  • Surprisingly ready for hikes: I did a handful of hikes in Bryce Canyon and Zion National Parks while wearing these sneakers and they held up to the challenge. While they are not hiking shoes in any way, shape, or form, they did the trick when Greyhound lost my proper hiking shoes and I needed to stock up on the road, and I never had any issues walking in these even on longer hike days.
  • Flexible and sturdy sole: These shoes can bend like crazy which means that they go with your foot,  not against it. It’s pretty great.

Check out my other favorite travel sneakers, the Skechers You-Shine Sneakers, here on Amazon!

What to Wear in London in Winter: Your Easy London Packing List

London in winter is lovely, especially in the period right before Christmas.

The Atlantic jet stream keeps the winter weather rather mild compared to the rest of Europe which regularly drops below freezing, yet it’s still cold and crisp enough that you want to bundle up in all of your coziest clothing.

If you’re planning an upcoming wintry UK trip, you’re probably wearing what to wear in London in winter – I’ve been to London in winter twice and early spring once, and each time I’ve been able to refine my London packing list bit by bit.

Whether you’re planning to spend 4 days in London this winter or even longer exploring the UK in the cold, this wintry London packing list will keep you warm and toasty through all of it.

Since shopping in London is so expensive thanks to that dastardly strong British pound, I recommend you buy what you need to pack for London in winter beforehand, as it’ll save you money and time on your London trip.

How to Dress in London in Winter

I lived in New York for nearly a decade. When I first arrived in New York from California, I remember feeling a weird sort of pressure to look ridiculously fashionable all year round, even when the temperatures were low. I tried and failed to look cute in wool pea coats before realizing that those were made for people with warmer blood than mine.

You don’t need the warmest ever clothing for London in winter, since the average winter temperatures range between 2 °C and 10 °C (that’ll be 35 °F and 50 °F, for my fellow Americans out there who are confused by the metric system). It rarely snows, though it is possible.

However, I do find London winter to be colder-feeling than the temperature suggests because of all the humidity in the air from the Atlantic jet stream, so you may want to take the actual temperature reading with a grain of salt.

If you’re planning on walking around London a lot, you will want to dress warmly so that you stay comfortable and motivated to see as much of this beautiful city as you can, especially around Christmastime in London when the city is at its prettiest!

You also don’t need to dress impossibly posh. Newsflash: not everyone in London is as stylishly dressed as Kate Middleton. Dress neatly but comfortably and you will fit in fine in London.

Generally, Londoners don’t wear extremely bright colors in the winter: think mostly shades of tan, gray, and black, with a few stylishly colorful accessories.

That said, if you want to punch up your wintry London outfits with your usual colorful clothing, no one will bat an eye – London is a city where locals frequently express themselves and their personalities through their clothing.

Warm coats everywhere! You don’t have to dress like a street style model to look appropriate for winter in London.

London in Winter Packing Basics

There’s no need to buy an entirely new wardrobe to pack for a winter trip to London, especially if you come from a place that already has cold winters.

This list may seem silly for people who live in, say, New York or Central Europe who are used to cold winters. But for me, I needed help to understand what to pack for London in the winter.

I’ve outlined a few of my favorite London winter clothing necessities below, in case you need some cold weather clothing recommendations coming from a warmer climate.

However, if you already have all the cold weather gear you need, feel free to skip below, where you’ll find a more general London winter packing list.

Best Outerwear for London in Winter

What coat to pack for London in winter depends on how warm you like to be. I personally run cold and come from a place where winter barely exists: where people freak out and pull on the Uggs and jackets as soon as temperatures drop below 50 °F/10 °C.

Two years after I moved to New York, I finally invested in a North Face down jacket and it made my quality infinitely better than when I arrived and kept trying make flimsy wool pea coats work. This is the North Face parka that I bought. I love that it comes down to mid-thigh, which makes a world of difference over a jacket that ends at the hip. You have no idea how much heat you lose in that area!

Me and my beloved North Face on a winter trip to Istanbul, which has similar winter weather to London

However, I do think that jacket may be a bit overkill if you’re planning to just visit London in winter and nowhere colder. Instead, I’d probably recommend a version with inner layers that you can remove, like this 3-in-1 Thermoball Triclimate jacket from North Face which includes a small down layer, a waterproof shell, and the ability to combine them both into one.

While North Face gear is pricy, it will last you a lifetime, as North Face quite literally has a lifetime guarantee (hold onto your receipt though just in case). This isn’t sponsored – I’ve paid out of pocket for every piece of North Face gear, just for the record! I tested this guarantee when my zipper came unstitched after two years of heavy use, wearing it every day including when I was biking to work in the winter. North Face promptly fixed it up and sent it back as good as new.

If you can’t afford to invest in a warmer jacket at the moment, I’ve also had success pairing a small down liner underneath a less-warm jacket or coat to create a ‘hack’ of the above jacket. I’ve used a small down jacket from UNIQLO – the Ultralight Down. (You can buy a knock-off version here)

I do this when it’s not too cold (read: around 40°F / 5 °C  but no colder) and I want to get away with wearing a cute coat that isn’t exactly winter-approved, like my leather jacket. I simply add it as a layer between my sweater and my cute jacket. It’s not the most streamlined look, but it is good if you don’t want to spend a lot on a winter coat or are packing the light the way I was for this winter trip.

My typical London outfit: Black leather jacket + down liner, hat, jeans with leggings underneath, and ankle boots.

Best Shoes for London Winters

London gets very little snow in the winter, so there’s definitely no need to pack snow boots. What you do need, however, is something waterproof, as London is quite rainy all winter.

One of the most classic shoes to wear in London in winter are wellies, aka rain boots. I’ve worn my Hunter rain boots during New York rainy days quite often and they’ve always held up nicely, but I don’t typically travel with these as they’re hard to fit in a carry-on and uncomfortable to wear on the plane. However, if you’re traveling with a larger suitcase and you can fit a pair of rain boots, these would do quite nicely for London.

For me, the winter boot I can’t live without are my Blondo waterproof leather boots. I bought this pair in 2008… which means I’m celebrating my 10-year anniversary with them this year, which is longer than most of my friendships and definitely every relationship I’ve been in. In 10 years of heavy use, I’ve only had to get them resoled once, which set me back about $60 in NYC. However, for a pair of shoes I wear on average 3 months per year, it was 100% worth it. It’s no wonder it made the cut for my favorite travel shoes!

It’s been literally a decade since I bought these boots, so the exact original version I bought is no longer available, but these look exactly like the ones I have. 

One of precious few full-length photos I have of me wearing them – back in 2012! They’re still in fantastic shape.

However, sometimes I don’t want to pack heavy boots, and for those trips I’ve opted for my lovely Dansko ankle boots. They have a faux-wooden sole so they’re super stylish and the black nubuck leather is basically scuff-proof. They’re not technically waterproof, but I have waterproofed them and they now hold up great in all types of weather. They’re also super comfortable for long walks. You can see them in the photo of me in the staircase above.

One last not: Be sure to pair your winter boots with proper wool socks. No matter how insulated your shoe is, it won’t do much good if you are wearing thin, crappy cotton socks (another thing that took me several years to learn… why do I suck at winter so badly? Oh yeah, California). I invested in these Smartwool socks after much hemming and hawing about the price and I’m so glad I did. You don’t need that many pairs because you can actually re-wear them a few times before they get smelly because wool is so odor-absorbent and magical.

Accessories for London in Winter

This is really what makes or breaks whatever you decide to wear in London. As long as you have a hat, gloves, and scarf, you can almost get away with wearing whatever you want – as long as you have the right jacket and shoes.

In terms of a hat, I recommend wearing a tightly-knit hat that fits firmly on your head, covering your ears completely. Bonus points if it is lined with fleece! I lose my hats constantly so I go through several each winter, but I do recommend a beanie-style knit hat kind of like this one.

In winter, you can’t tear me away from a hat!

When it comes to gloves, you’re going to want something that is touchscreen compatible and warm, but you don’t need something waterproof or crazy high-tech. I recommend a simple pair of gloves like these ones. You’ll have your hands in your pockets most of the time anyway!

For scarves, I recommend the biggest, most wrappable scarf you can find. If you can tolerate wool (I can’t, except for socks, because of my ultra-sensitive skin), then get the wooliest monstrosity you can find. I tend to go for something huge, chunky, and made of acrylic which is easier on my skin. I prefer an infinity style knit scarf for winter that I can wear super tight around my neck to keep in as much warmth as possible.

Now, I’m going to let you in on my #1 secret weapon when it comes to what to wear in London in winter… fleece lined leggings. These leggings are magic when it comes to surviving just about any winter. If you can tolerate wool, you’ll probably be even warmer with something like these merino wool leggings. But since I can’t, I substitute fleece-lined leggings like these ones. On a cold day, I typically wear them underneath a pair of jeans and I am toasty warm all day long. I prefer the ones without feet because they sag less during the day, and then I can wear my own warm wool socks with them.

I think that’s pretty much it in terms of accessories. If you get cold really easily, you may want to throw in some thermal tops to wear as a base layer as well. 32 Degrees (my preference) and UNIQLO make good ones.

Clothes to Wear in London in Winter

If you’ve followed my advice up to this point — warm jacket preferably with down, fleece-lined leggings, all the winter accessories — you can actually get away with wearing pretty much whatever you want with them. I tend to choose a lot of sweater dresses because I am lazy when I travel and don’t like to pack a lot of different things that I have to mix and match. But you can also just wear jeans and sweaters on your trip so long as you have the appropriate winter accessories, shoes, and outerwear.

My cozy sweater dress in London (I obviously added layers before leaving!)

Here’s my basic London packing list, winter edition (enough for 1 week – feel free to add or subtract depending on the length of your trip!)

  • several pairs of fleece-lined leggings, such as these. 3 pairs should do you well for 1 week.
  • 1-2 base layer thermal tops (I run cold!)
  • 1-2 sweater dresses
  • 1-2 pairs of jeans or pants, to wear over leggings if especially cold
  • 2-4 warm sweaters, wool if you can tolerate it. 100% cashmere sweaters tend to be everyone’s favorite but I wear synthetic or acrylic sweaters with a base layer underneath.
  • 1 thick jacket (optional if you run cold!)
  • 1 thin down jacket (better for people who are used to the cold or don’t want to pack a lot) + other jacket to layer with, preferably waterproof
  • 3-5 pairs wool socks
  • 1 pair waterproof leather boots or similar
  • optional rain boots
  • 1-2 knit hats
  • 1 pair gloves that you can use with your smartphone
  • 1-2 enormous warm scarves, especially infinity style wrap scarves
  • 1 large-ish cross-body purse or backpack for day use

What Else Should Be On Your Winter in London List?

Once you’ve figured out what to wear in London in winter, you can focus on the details of your London packing list. Nothing is really that London specific but are related to how you’d normally travel, anyway. London has basically everything you need, so don’t be worried if you forget anything. There is a Boots or pound shop on nearly every other corner that should have what you need.

Toiletries

  • Lip balm: I tend to get dry lips in winter from the cold air and overheated buildings. Be sure to bring a good quality lip balm with you – I love this Aquaphor.
  • High-quality moisturizer: For the same reason as above – the combination of winter weather plus heat will do a number on your skin. I use Shiseido moisturizer on my face most of the winter.
  • Sunscreen: Don’t discount the need for sunscreen even in the winter! While London is cloudy, you can still get harmful UV rays on cloudy days. I like  Biore sunscreen for my face as my skin is quite sensitive and acne-prone and this is really gentle on my skin.
  • Hand sanitizer: Perfect to use after getting off the Tube or any place with less than sanitary conditions. I carry a mini bottle of Purell like this one.
  • Kleenex
  • Everyday make-up
  • Basics like shampoo, body wash, etc.
  • Deodorant (please)
  • Prescription medicine, if you need it

Electronics

  • High-powered portable battery pack: Your phone battery will get run down very quickly on a cold winter day in London, so be sure to pack a portable battery charger like an Anker battery pack (this is what I swear by as a blogger who needs fully charged electronics at all times!)
  • Camera: I personally use a Sony A6000 mirrorless camera, which is the perfect travel camera for producing professional-quality photos without taking up much space or weighing too much. I have several lenses for it but most people will be fine with the kit lens. Be sure to pack several extra batteries as well, for the same reason as above (winter weather = zapped electronics)
  • Adaptor, if visiting internationally: If you are visiting from continental Europe, North America, South America, most of Asia – basically, anywhere that doesn’t use UK plugs – you’ll want an international adaptor for sure.
  • Phone and charger
  • Laptop or tablet and charger
  • Kindle, if you use one
  • Noise-canceling headphones, if you have them

Random

  • Reusable water bottle: London tap water is good quality. Save money and the environment with a reusable metal water bottle. Pretty much any café or restaurant will be happy to refill yours as London is pretty zero-waste savvy.
  • Reusable bags: There is a 5 pence charge per plastic bag, which isn’t a lot money but you still should bring your own reusable tote bags anyway to do your part to reduce plastic use
  • Whatever else you’d normally pack for some time away from home!

An Insanely Useful Iceland Packing List: Summer Edition

By now, I should know how to pack for pretty much anything. After all, I’ve been traveling more or less full-time for the better part of the last two years, from climates as diverse as the tropical beaches of Bali to the arid summer deserts of Morocco to the far Arctic north of Sweden in the middle of winter.

And yet somehow, nothing had me spinning my wheels in confusion than figuring out what to pack for Iceland in summer.

I had packed pretty carefully for a 6-week summer trip that would encompass Eastern Europe (warm but rainy), the Faroe Islands and Iceland (cool, windy, and occasionally stormy), and Portugal (hot AF). But still, the day before I left Kiev for Copenhagen to begin my Iceland and Faroe Islands trip, I found myself tearing through the city’s malls hunting for extra clothing.

Spoiler: my summer Iceland packing list that I originally made sucked. I had to pick up some emergency leggings in Denmark at a premium, right before heading north. And I spent my first two days in Iceland freezing my ass off as a freak wind storm made the normal-seeming temperatures feel like ice cold daggers. Luckily, the weather picked back up and I didn’t succumb to hypothermia in Iceland in the middle of summer.

A moody summer day in Iceland

The Dumbest Mistakes I Made When Packing for Iceland in Summer

Since I screwed up so royally on packing for Icelandic summer, I thought I’d outline a few of the most bone-headed mistakes I made so you don’t do the same.

Underestimating the wind

The enemy in Iceland in summer is not the cold, but the wind. I made one of the worst jokes of my life when I joked to a friend that Iceland should be called Windland, not Iceland. I know, I cringed too. The first two days I spent in Iceland were some of the windiest days I’ve ever experienced.

Not packing a hat

I remember wondering if I should bring my hat with me to Iceland and then apparently deciding against it. Well, I surely regret that on my first days in Iceland which I spent with my flimsy hood of my rain jacket drawn as tightly as I could aroound my head. If there is any wind or cool weather, it will feel even colder because the combination of high humidity and low temperatures can get nasty quickly.

Iceland can be way colder than you might think in summer!

Not bringing enough layers

Despite the wind my first two days in Iceland, I had objectively good weather for the rest of my time. Daytime temperatures in August were pretty stable around 10 °C / 50 °F, with a few days even exceeding that. Mornings and evening were a little chillier but not by much. Still, like I said about the humidity, 50 °F in Iceland feels a lot colder than it will somewhere else. I had packed a nice rain jacket and some long sleeve Ts but I was often cold on top. Meanwhile, had I not packed some last-minute leggings to layer under my jeans on the colder and windier days I would have been quite unhappy. So, even though the weather report in the week before packing may seem warmer than expected, it doesn’t mean that you should suddenly bring a bunch of light clothing. The wind and humidity from being surrounded by ocean will make everything feel much chillier, even in summer.

What to Pack Everything In

Most people who travel to Iceland do a road trip around the country, which is by far one of the best ways to experience Iceland. This is what I did, embarking on a 7-day road trip through Western Iceland. If you are doing a road trip, you’ll want to be sure you have an organized packing system, because you’ll be changing hotels every night or every few nights, and packing and repacking your bag will get annoying.

Meanwhile, I usually swear by having a backpack for travel, but if you are doing a road trip I think having a suitcase isn’t a big deal as you’ll never really have to take your suitcase much further from the parking lot to the hotel. Still, I’ve included my best backpack recommendation below, which is carry-on friendly.

Beautiful basalt columns in Arnarstapi, Iceland
    • Travel Backpack (carry on size or check-in size): Iceland is actually pretty friendly for people with rolling suitcases, because most people end up road tripping through the country. I don’t really like using rolling suitcases so I am team backpack all the way. Since I am a light packer, I end up using my Tortuga Backpack for this 6-week, multi-climate trip.
      • Why do I recommend Tortuga so much? Here’s why: this bag is 45L and has got three main compartments: one for a laptop and other flat objects, one giant rectangular compartment perfect for packing cubes stuffed with clothing, and one smaller compartment with pockets for passports, pens, odds and ends, etc. that I stash all my extras in – plus one small outer zipper pocket for anything you want quick access to. It also has a water bottle holder on the outside as well as buckles so that you can strap something like a yoga mat to the outside. Plus, it’s quite comfortable to wear, with a padded hip belt and comfort-molding shoulder straps complete with a chest strap so that you can distribute weight perfectly across your body in the event that you need to wear your backpack for longer than usual. Check out more specs and details here.
      • Does it pass budget airline requirements?  For WOW Air – it will work as a cabin item (PAID), not a personal item (free). I haven’t flown WOW before. However, on other budget airlines, I’ve never once had to check it in, and I’ve taken probably 50+ Ryanair and Wizzair flights at this point. I just buy priority boarding so that I have a guaranteed spot on board for my bag (plus a second personal item bag), which adds about $5 onto my total flight cost instead of the $20-40 or so that a heavy checked suitcase or backpack would. This adds up massively over time – with a bigger bag, I would have paid $1,000+ extra in baggage fees over the past few years. That’s massive savings.
      • I’ve also seen lots of recommendations for Osprey backpacks, so if I ever needed a larger travel backpack, I’d probably opt for one of those.
    • Packing Cubes: I mentioned above how indispensible quality packing cubes are for travel, especially on road trips where you are often moving from night to night. These useful zipping pouches help organize your luggage, so that you can easily find what you need without getting stressed every time you open your backpack or suitcase. I  use these packing cubes for every trip I take.
    • Laundry bag: In addition to packing cubes, I like having a separate laundry bag to keep my dirty stuff separate. I do like having a cute one like this travel-themed bag from Kikkerland though, because I’m impractical and like cute stuff.
    • Hanging Toiletry Bag:  If you’re moving around a lot you’ll want a way to keep your toiletries organized and tidy. I like to keep my toiletries in a simple hanging toiletry bag. This toiletry organizer has the most insane ability to fit a ton of stuff while keeping it ultra-organized: perfect for the organizationally obsessed packers amongst us. It fits a ton without taking up space – I swear I feel like it manages to compress things. The shape is perfect for travel because it’s flat so it’s easy to squeeze into an outer pocket of your backpack or lay it on top of your clothes in your suitcase.
    • Comfortable daypack : My everyday backpack is this awesome PacSafe Citysafe backpack – it has a lot of awesome security features that make it insanely useful for city travel. While Iceland is insanely safe (as in, people leave their keys in their cars and leave it running in the winter) and you don’t really need these security features, I find them useful for other trips. I still used this bag in Iceland because it’s great at fitting all the things I need for my day (mine can fit my camera and lenses, my drone, a bottle of water, some snacks, and a few other odds and ends).

Most Essential Things to Pack for Summer in Iceland

When packing for Iceland, I actually recommend to overpack rather than underpack. Things in Iceland are so expensive that it’s better to pay for extra baggage than to go shopping once you arrive. I needed to buy a hat in Iceland and the cheapest one I could find was $40 – until I got lucky and stopped in a gas station and found one for around $10. So, better to pack well beforehand and avoid any surprise expenses.

Views in the Westfjords
    • First, travel insurance. While this isn’t something you pack, it is indispensible and should be part of the packing and planning process. Iceland is an unpredictable place: weather can change quickly and dramatically, and I only need to remind you of the Eyjafjallajökull volcanic eruptions in 2010 that caused havoc on air travel for more than 6 days, stranding travelers in Iceland and beyond, to convince you that being protected against flight delays and cancellation is ultra-important. I have been a paying customer of World Nomads for years and recommend them highly for travel in Iceland. The contract is very clear as to what it covers, the prices are affordable, and the deductible is low if you find yourself needing to make a claim.
    • Reusable water bottle: The tap water in Iceland is drinkable everywhere and of the highest quality. If you don’t carry a reusable bottle, you will spend a ton of unnecessary money on bottled water, and you’ll waste a lot of plastic in the process as well. While in the past I’ve carried a water bottle with a filtration system, for traveling in Europe where the tap water is drinkable, I like a simple streamlined metal bottle, like this one from Klean Kanteen. If you want to further reduce your footprint, I recommend bringing along a reusable tote bags as well if you plan on doing any grocery shopping during your Iceland trip.
    • Basic medicine: I like having a few basic medicines on hand because I hate having to deal with pharmacies abroad. I carry Pepto-Bismol tablets for standard stomach troubles as I find it can be difficult to find in some countries. I also carry some sort of painkiller like ibuprofen for headaches and minor pains, and also some sort of motion sickness tablets for boat or long car rides as I am prone to travel sickness. I also suggest bringing some kind of cold medicine as Iceland summer can really wreak havoc on your immune system – I left Iceland with a bad cold.
    • Travel towel: You’ll want a lightweight, packable microfiber travel towel for impromptu hot springs dips!
    • Bathing suit: For aforementioned hot springs dips and the Blue Lagoon – you won’t be doing any ocean swimming in Iceland in summer (unless you’re well and truly crazy)
    • Granola bars and other snacks: Eating out at restaurants in Iceland is extremely expensive, and I was so glad that I brought a ton of granola bars for my trip to minimize my expenses.
    • Waterproof and warm layers: I’ll go into more detail on this in the section below, but make sure you pack for the worst and hope for the best!

What to Wear in Iceland in Summer (Women)

Like I said above, I found it surprisingly hard to pack for Iceland in summer. I felt like I was getting mixed messages: the weather patterns suggested that Iceland would be warmish, but knowing Iceland, I felt like I’d need to dress even warmer than what I would normally wear in those temperatures.

I ended up underpacking for Iceland because I was trying to keep my backpack light and Iceland was but one small (cold) part of an otherwise warm, European summer trip. That was a mistake and as I checked the weather reports for Iceland in Kiev I ended up panicking and needing to buy a bunch of extra clothes as well as new hiking boots for Iceland a few days before my trip.

I ended up needing all of those things (and still could have done with some extra layers) so learn from my mistake and pack extra for Iceland.

This part of the packing list is for women but for men, just bring plenty of layers and a waterproof jacket and waterproof boots and you’ll be good!

You’ll definitely want warm layers if you do a whale watching cruise – I was freezing!
    • 1 rain and windproof jacket: Trust me, if there is one thing you simply can’t forget for Iceland travel, it’s a durable jacket that will keep you warm against wind and dry against rain. I love my Marmot PreCip rain jacket and wore it every single day in Iceland. Just bring a nice sweater or fleece layer underneath as it isn’t exactly super warm on its own
    • 1 warm hat: I love tight-knit beanies in colorful colors or with pom poms for keeping my ears warm and adding a bit of color and cuteness to my photos. I forgot to bring one and had to buy an ugly one in Iceland that I didn’t like much. Here’s a cute choice!
    • 1 pair touch-screen friendly gloves: In case it’s super cold but you still want to be able to touch your phone and use your camera.
    • 3-5 sweaters: Thin but warm is your best bet. Pullover style acrylic or wool sweaters would be ideal. You can wear your chunkiest, coziest sweater on the plane.
    • 3-5 tees: I often layered a thin cotton T-shirt under my pullover so that I could wear the same pullover multiple times before it got funky.
    • 1-2 hoodies or fleeces: Having a hoodie or fleece as an additional layer between your sweater/long-sleeve and your rain jacket or outer layer will come in handy. This simple fleece jacket would be a good addition.
    • 2-3 pair jeans: In summer in Iceland, it’s too cool to want to wear anything but jeans.
    • 2-3 pairs leggings: I needed to layer leggings under my jeans for some of the trip. On some of the other days, I just wore my thicker, more structured “jegging”-like leggings as pants.
    • 1 pair hiking boots: Hiking boots will serve you. well in Iceland: I was glad to have them for hikes, caves, beaches, waterfall walks, etc. They keep your feet nice and toasty and the right pair can look quite cute. I love my Ahnu boots but if you have a pair at home already bring those so you don’t have to break them in. Sneakers could work in a pinch but I much prefer boots for the added warmth and ankle stability (volcanic gravel is not the most steady surface).
    • 1 pair sneakers: For days when you spend a lot of time on your feet, but aren’t necessarily traversing difficult ground, these will do the trick. I usually wear a pair of black Nikes which are good for warmer days.
    • 1 pair flip flops or sandals: If you are staying in a hostel or hotel and just want something quick to put on your feet, I find it helpful to have slip-on sandals even if the weather is too cold to put them on. I’m obsessed with my Birkenstocks but rubber flip flops will do, especially if you are staying in a hostel and need to use communal showers.
    • 1 thin down jacket: Nights can get cold so a small packable down like the UNIQLO ultra-light down (cheaper knockoff available here) would be a great but tiny addition to your Iceland summer packing list.
    • 1-2 bras: I trust you’re all big girls and you know what you need when it comes to bras!
    • 1 pair of underwear for each day of travel: Bring one for every day you’ll be on the road
    • Bathing suit: Visiting a hot spring in Iceland is a must, so don’t forget a cute bathing suit!

What to Pack for Staying in Hostels in Iceland

If you plan to stay in a hostel in Iceland, there are a few extra things you should be sure you have on your Iceland packing list.

Historic Isafjordur, Iceland
 
    • 1 pair flip flops: Athlete’s foot is not an urban legend and it’s miserable to get rid of. I’ve had ringworm before (which is basically athlete’s foot on any part of your body that’s not your foot – I got it by touching a street cat) and I can readily confirm that it is absolutely miserable to get rid of. Save yourself the trouble, trust me. Buy a pair of cheap waterproof rubber flip flops if you don’t already have a pair. /end PSA
    • 1 travel towelYou’ll want to bring this anyway for hot springs in Iceland, but be doubly sure to have one if you are staying in a hostel as many hostels do not provide towels and will charge you extra to rent one!
    • 1 eye maskGreat for inconsiderate bunk mates AND that pesky midnight sun!
    • Some earplugs or good noise-canceling headphones: I bring Hearos ear plugs when I stay in hostels, but if you like to listen to music while you sleep, I recommend some noise-canceling headphones.
    • Combination locks: In ultra-safe Iceland, you’re probably at the greatest risk of theft from your fellow travelers. Prevent crimes of opportunity with simple measures like having a combination lock and keeping your valuables locked away. When I stay in hostels, I always check hostels on Hostelworld to ensure they have lockers available because I travel with so many valuable electronic that it’d be idiotic to leave them unlocked.

What Toiletries to Pack for Iceland

You should bring pretty much everything you need so you can avoid high Icelandic prices. Here’s a quick cheat sheet, but bring whatever you would for your normal trip but pay extra close attention that you have facial sunscreen and a moisturizer, my two biggest travel essentials for Iceland in summer.

You’ll want to bring a travel towel for visiting Icelandic hot springs!
    • Sunscreen: My skin is really sensitive on my face, so I use this fancy Japanese sunscreen to prevent acne on my face. Don’t forget this – I actually got a really bad sunburn in Iceland one day because the sun is at its closest to the earth in the far north in summer.
    • Moisturizer: The wind and the sun did a number on my skin in Iceland and I felt like my skin was always insanely dry there. Do your skin a favor and pack something ultra-moisturizing for your time in Iceland. I love a moisturizer with SPF for day like this one from Aveeno and then I use a thicker moisturizer like this Olay night cream for replenishing moisture over night.
    • Hand sanitizer: In case of a lack of soap in gas stations or restaurant bathrooms, I like having hand sanitizer just in case.
    • Kleenex packets: In case of a surprise cold or lack of toilet paper in public restrooms.
    • LUSH solid shampoo: Life-changing. Just trust me. Buy online or in store from LUSH and you’ll save serious money over Amazon, but you can also source it on Amazon for convenience. My favorite is the Seanik seaweed shampoo – it makes my hair gorgeous and it also doesn’t take up any space in my liquid toiletry allowance.
    • Face wipesGreat for nights when you’re too exhausted to take your make-up off properly or for a quick face clean up  after a  dusty hike.
    • Menstrual cup or your favorite tampon/pad brand (if applicable): If you have a specific brand allegiance, you may not find it in Iceland. I switched to a Diva Cup for travel and love it!
    • Deodorant: I can’t rant enough about how much European deodorant sucks, plus I absolutely hate the smell of the aerosol deodorants that are so popular in Europe. Do yourself, everyone around you, and the planet a favor and buy some decent deodorant from home. I love Secret Clinical Strength and stash up on it every time I’m home in the US, but then again, I am sweatier than most people are.
    • Travel-sized liquid toiletries: If you want to bring your favorite toiletries from home, I recommend these awesome reusable silicone GoToobs.
    • Razor
    • Lip balm with SPF

What Electronics to Pack for Iceland

Obviously, you’re going to want to bring plenty of photography gear! I highly recommend having a professional-grade camera as opposed to your smartphone if you are serious about getting the best photos. A tripod and some ND filters will also come in handy if you want to step up your photography and get good waterfall photos, high quality selfies, and sunset/sunrise shots.

Of course, what you will want to bring on your trip will depend on how seriously you take photography and how much you want to “unplug” on your trip. As a travel blogger, I bring my entire life with me on the road, which includes a laptop, camera, multiple lenses, smartphone, GoPro, and more.

For pretty streaky water photos, you should bring a tripod + ND filters!
  • Laptop, if necessary: I bring my 13″ MacBook Air everywhere but other people may prefer a tablet or an inexpensive netbook. I work on the road so a user-friendly, lightweight laptop is a must for me.
  • Kindle PaperwhiteI love having a Kindle for travel but if you don’t think you’ll be doing much reading on your Iecland trip or your flight over than you can give this a pass. You might want to load it up with some books about Iceland to get you excited on the plane over!
  • Travel camera: I use a Sony A6000 because it’s lightweight for a professional caliber camera, inexpensive, and a HUGE step up from a smartphone.
  • Extra camera batteries: Trust me, you’ll use plenty of battery taking photos in Iceland!
  • Portable hard drive: You’ll want to back up your photos to keep your memory cards uncluttered and protect your precious photos. After my previous hard drive failed even though I never damaged it (never rely on WD My Passport) I am extra paranoid with my hard drives. I recommend Transcend hard drives instead – they are drop resistant and super sturdy.
  • Travel tripod: If you are serious about your photography you should invest in a sturdier tripod as wind in Iceland is no joke. There were several days I didn’t use my tripod because it didn’t feel steady enough in the gusts. I have a cheap tripod from Amazon but a sturdy tripod with a hook so that you can use that to hang your camera bag on and balance the camera would be your friend on windy days.
  • ND filters: The size of ND filter you will need depends on the size of the lens you’ll be using so check it before buying. I use these ND filters.
  • GoPro or similar camera for video: If you plan on doing anything adventurous like snorkeling in Silfra or if you want video of your trip then I recommend bringing something like a GoPro
  • Portable charger: You’ll use your phone battery more than you thought in Iceland – whether it’s using it to take photos or videos, or to navigate as you drive around the country. Bring a portable charger to save yourself many headaches! Anker is a reliable brand and what I personally use – make sure you get one that can hold several charges at once so you don’t have to charge it every single night.
  • Adaptor, if necessary: Iceland uses the standard EU adaptor so purchase an adaptor beforehand if necessary.

***

While this sounds like a lot, I was able to fit it everything on this summer Iceland packing list into my 44L backpack and my daypack  – mostly because of packing cubes, picking multi-purpose clothing, and wearing my heaviest layer on the plane!

Is there anything I’ve forgotten? Is there anything else you’re wondering if you should bring? Let me know in the comments!

Iceland Off the Beaten Path: 19 Unusual Places to Visit In Iceland

It’s no secret that Iceland has some issues with overtourism. The beautiful Nordic island was mobbed by nearly 2.2 million people in 2017, and tourism has increased by a factor of 5 over the last decade. Tourism in Iceland doesn’t seem to be likely to decrease, either, with WOW air looking to increase its transatlantic presence and offering flights so cheap they nearly seem economically impossible.

When I recently spent a week in Iceland, I admit I was a little nervous to come – afraid I was contributing to their massive overtourism with my mere presence. As I spent 8 days road-tripping through some of the lesser-known parts of Iceland, covering the Westfjords extensively, I was surprised to find that Iceland isn’t as crowded as it appears by the numbers.

The real problem is that many tourists in Iceland never stray off the beaten track of tourist musts.

They go to the same 5 or 10 places: the plane wreck on the black sand beach, Skogafoss, the glacier lagoon, and repeat. People begin to think this is the only way to experience Iceland.

And while Iceland’s top 10 sights are certainly gorgeous, unless you are waking up at the very crack of dawn you are likely to share them with at least a few hundred other people.

Planning an Iceland road trip? Bookmark this page with this handy mobile-responsive map for your trip.

[wpgmza id=”6″]

However, what I quickly discovered when traveling Iceland’s west is that tourism is hyper-concentrated in a few places, namely all along Iceland’s South Coast. But there are several smaller towns, lesser-known waterfalls, and other Iceland hidden gems that are also well-worth exploring. They may take a little more effort or time to get to, but the rare feeling of having a place in Iceland all to yourself is worth it, no?

I can only cover so much ground, so I asked travel bloggers who have visited Iceland to recommend their favorite off the beaten track and unusual places to visit in Iceland. Check them out below!

Landeyjahöfn

Contributed by Julianna of The Discoveries Of

When people think of a black sand beach in Iceland, they tend to think of Vik or Diamond Beach – but Iceland actually has a number of black sand beaches to explore. My favorite was the one at Landeyjahöfn.

Extending for several miles from the Landeyjahöfn port, the beach is like something out of another world. A seemingly endless view of black sand, battered by powerful waves – the contrast between the seafoam and the sand is pretty incredible.

Landeyjahöfn stands across from the Vestmannaeyjar Islands. In the day I visited, they hovered on the horizon in a cloud of mist, which only added to the appeal.

Sea birds, seals – if you keep your eyes open, there are enough wildlife spotting opportunities at Landeyjahöfn to make it worth the trip alone.

Landeyjahöfn is pretty under-the-radar, and if you visit, the chances are that you will have it to yourself. But this solitude comes at a price… it’s a bit of an adventure to get there – bumping over small sand dunes and into puddles of water in a super-jeep. The journey was half of the thrill.

As a much tamer alternative, you can park up at the port and walk down onto the beach from there. But where’s the fun in that?

Hraunfossar

Contributed by Natasha and Cameron of The World Pursuit

One of my favorite waterfalls in Iceland is far off the beaten path and less heard about than many others. It’s not the beautiful Skogafoss or Dettifoss though. Located near the small town of Husafell is a beautiful series of cascading waterfalls called Hraunfossar.

Hraunfossar translates to “Lava Waterfalls.” Hraunfossar is a combination of creeks and large and small cascades streaming out of lava over a full distance of 900 meters. Cascading waterfalls flow over the Hallmundarhraun lava field and finally pour into the river Hvíta below. The spectacle is peaceful and quiet and reminds me of the famous Plitvice lakes in Croatia. The became my favorite waterfalls in Iceland because they were so different and unique.

If you can I would highly recommend traveling to Iceland in the fall season so you can see the falls surrounded by yellow, orange, and red trees. The autumn sight is simply stunning!

After checking out Hraunfossar make your way to Husafell. The surrounding area is great for hiking around. There is also a fantastic pool at Hotel Husafell nearby.

Fjaðrárgljúfur Canyon

Canyon in Iceland - off the beaten path

Contributed by Sam and Natalia of Something Of Freedom

It’s perhaps surprising that Fjaðrárgljúfur canyon isn’t found more commonly on people’s Iceland itineraries. The canyon is home to some of the country’s most spectacular and dramatic landscape, which promises to stay etched in the memory of those who do choose to visit.

Formed over 9,000 years ago, the Fjaðrárgljúfur canyon meanders for around 2 kilometers reaching a depth of 100 meters. Carved out by glacial waters, the steep canyon walls are covered with a distinctive moss, which only adds to the beauty of the landscape.

A trail runs along the top of the canyon, with multiple magnificent viewpoints along the way, allowing you to stop and truly appreciate this natural wonder. At the end of the trail, a viewing platform offers even more brilliant views and the chance to see the waterfall, which feeds into the Fjaðrá river below. If you want to walk within the canyon itself, you’ll have to wade through the river – although thankfully the water levels are generally quite low!

The canyon is just over 3 hours away from Reykjavik by car, and is far less busy than tourist hotspots like Gulfoss and the Blue Lagoon. That doesn’t mean it’s not worth a visit though, as the impressive landscape make it one of the must see places in Iceland.

Aldeyjarfoss

Contributed by Laurence of Finding the Universe

Whilst Iceland’s ring road has many attractions that are easy to visit without much of a diversion, there are a few stops that warrant getting a bit into the backcountry.

We’d suggest that one of these stops that is worth the detour is Aldeyjarfoss, found in northern Iceland in the Lake Myvatn area. Aldeyjarfoss is an impressive waterfall which requires around an hours drive each way along dirt roads.

The reward if you make the effort is a waterfall with far fewer visitors than many of the others in Iceland, with a fast flowing rush of water squeezing between multi-colored basalt pillars into a large pool of water. The hard basalt restricts the water into a relatively narrow jet, making it a very impressive and quite unique sight to see.

The surrounding landscape is also impressive, as the river carves its way through the rock and flows out to the distance.

Access to Aldeyjarfoss is via a dirt track that is in relatively good condition, but access in winter in particular can be more challenging. You don’t specifically need a high clearance 4×4 vehicle to come out here, but you might find it to be more comfortable a journey if you do.

Westman Islands

Westman Islands - Iceland off the beaten path

Contributed by Wanderlust Crew

Several miles off the south coast of Iceland lies the Westman Islands, or Vestmannaeyjar in Icelandic. The most inhabited island, Heimaey is home to the now dormant Eldfel Volcano, which famously erupted in 1973, causing all of the inhabitants to quickly evacuate the island and resulted in the loss of many homes and the expansion of the island as well as a downsizing of the harbor, which was the lifeblood of the fishing community.

The Westman Islands are now home to several hundred inhabitants with a unique way of life. The islands are easily accessible by a ferry from the south coast of Iceland that leaves several times a day during good weather.

On Heimaey Island visitors can hike the dormant volcano Eldfel, take boat trips around the island, visit puffin colonies, play a round at the golf course, eat fresh fish at one of the local restaurants, and play at the playground in the shadow of a volcano.

Don’t miss the Eldheimar Museum where you’ll learn about the Eldfel eruption and its lasting effects on the community. The museum is literally built around an excavated house that was buried by the eruption where you can see artifacts from every day life preserved just as they were left in 1973.

Reyðarfjörður

Contributed by Christine of Christine Abroad

Reyðarfjörður is a beautiful small village in East Iceland. It’s not the typical tourist place, but if you’re driving around the ring road, I highly recommend it as a stop along the way.

The beauty of the mountains with reflections, the small fishing boats and the fact that you feel like in the middle of nowhere. We were there for 2 hours, and in that time, we barely saw a person. The total population of this little town is about 1000.

You can also go hiking here and walk up the mountains for some spectacular views. Make sure to bring good shoes though as the walk up is quite steep, and there are no real trails.

In Reyðarfjörður you get the chance to see a real and untouched side of the Icelandic beauty and tranquility. This is definitely one of the best places to visit in East Iceland if you want to get away from crowds and experience something unique outside of the ordinary Iceland itinerary.

Nearby, you can also visit 2 quaint villages called Fáskrúðsfjörður and Eskifjörður. These are also worth a visit and make an interesting stop if you want to experience the authentic daily life of East Icelanders.”

Krossneslaug

Contributed by Inma of A World To Travel

This open-air geothermal pool by Strandir in the Westfjords is far enough from the main ring road to be uncrowded. Yet, for anyone exploring this peninsula, it should be a mandatory stop. With 38ºC water, a nearby 42ºC jacuzzi and shower facilities, the turquoise paint of the pool surely balances the dark blue of the sea in front of it, near the Arctic circle.

I visited it while doing my EVS (European Volunteer Service) in Djupavik, a tiny village less than one hour away by car along with other volunteers. There was no one else there at the time, so we dropped a few coins in the donation box before jumping in.

It would have been great to watch the sunset from there but as it was June that would only happen around 1 am, so we left knowing that next time in Iceland, this gem would be again on our Iceland road trip itinerary. And as if we needed more reasons, soon after our micro adventure, we were told that sometimes it is possible to spot whales swimming in the ocean from Krossnes pool. I mean, what else do you need to make it happen?

Arnarstapi

Arnarstapi - Iceland off the beaten track

Contributed by Sonja of Migrating Miss

Arnarstapi is a small village located on the southern side of the Snæfellsnes Peninsula. It was once a busy port and commercial area but is now more popular with tourists and Icelandic people who own second homes here. 

Many travelers pass through Arnarstapi on their explorations of the area, but it is worth a stop and is a great place to stay to explore the area for longer. There are plenty of attractions on the Snæfellsnes Peninsula like Kirkjufell, the Gerðuberg cliffs, Lóndrangar basalt cliffs, Vatnshellir Cave, the black sand beaches of Djúpalónssandur and Dritvík just to name a few! 

In Arnarstapi itself you can walk along to Hellnar village across the Hellnahraun lava field. If you’re brave, there’s also Gatklettur, or Arch Rock, a natural rock bridge you can walk across, although there are no rails! There’s also a quaint Icelandic Church and a rock formation that is said to represent Bárður Snæfellsás, a half troll, half man who is the protector of the peninsula. 

The town is also overlooked by Mt. Stapafell and the Snæfellsjökull glacier which are covered in snow during the winter time in Iceland. It is also a fantastic place for keeping an eye out for the Northern Lights that appear across the skies in the darker and colder months. Another reason to stop and stay in Arnarstapi!

There are also some really cool Northern lights hotels near Arnarstapi!

Stykkishólmur

Contributed by Veronika of Travel Geekery

The cute town of Stykkishólmur is located on the Snaefellsness Peninsula in the West of Iceland. It’s an area just a few people venture out to, and thus it’s still void of crowds. Stykkishólmur is the most populous spot on the Peninsula and there’s more than a 1,000 inhabitants living there. When you visit, though, it won’t feel that way.

Stykkishólmur is known to travelers as a few scenes from the movie ‘The Secret Life of Walter Mitty” were filmed here. Some people just drive through, take a photo by the harbor and continue their way. I’d urge you, though, to stop at least for a few hours. Apart from walking around and admiring the typical Icelandic architecture, you can observe fishermen in the harbor or indulge in tasting some of local delicacies.

We visited a restaurant called Sjávarpakkhúsið located right by the harbor. The meals we had – fresh catch and veggie pasta, were delicious! My husband flushed them with the local ale and we went on with our journey.

It might not be apparent at first sight, but Stykkishólmur is a rare example of how a town can be 100% environmentally friendly. Not only do they sort the waste impeccably, they use the hot water from the ground for heating and then inject it back into the ground. The ecological approach has earned Stykkishólmur an environmentally conscious award every year since 2008.

Reykjadalur Valley

Contributed by Elisa from World in Paris

Reykjadalur Valley is a beautiful area located in the vicinity of Hveragerði town, in Southwest Iceland. This is a highly active geothermal area not far from the famous Geyser, and it is known for its lava fields and natural steaming vents. In Reykjadalur Valley there is a hot river where people can bathe in.

This unusual place is a very popular attraction among locals and tourists and we definitely recommend to have a look (and of course take a dip) if you are around. To reach the hot river there is a 3 km hike (one way) up to the valley. This is a beautiful and easy hike where you can see mud holes, hot springs, and a little waterfall.

It is also possible to reach the river by horse, as there is a place to rent the typical Icelandic horses not far from there. We decided to do the hike, starting at the car park in front of the restaurant called Dalakaffi.

Because this is an easy hike, and not really steep, there is no special equipment to take apart from the swimsuit and a light towel, of course! However, a pair of sturdy hiking shoes and a waterproof jacket are always a good idea, especially if it starts to rain. The river is long enough for everybody but we recommend going early in the morning to avoid the crowds.

Glaumbaer

Contributed by Emily of Kids and Compass

Glaumbaer Turf Farmhouse is a small open-air museum.  You’ll find it just off the ring road in the north of Iceland, near the town of Varmahlid.  The main turf farmhouse is a great example of traditional Icelandic life.  In addition to the large farmhouse, there are two other historical wooden houses on site at Glaumbaer, although they’ve both been moved from their original locations.

Glaumbaer is a historical site: it’s thought that there’s been a farmhouse here ever since Iceland was first settled, although the main turf farmhouse that you see today dates from the mid 18th century.  As you walk around the outside of the farm buildings you can easily see the herringbone pattern of the turf bricks – it’s surprisingly effective way to waterproof a home if built properly.  It’s definitely one of the finest and prettiest examples of turf buildings you’ll find in Iceland.

Inside the farmhouse, you can see how the farmers and their families would have lived.  The corridors are dark and gloomy but several of the rooms are lined with wood and brightly painted. Others, such as the storerooms, have bare earth walls and floors.  The rooms are filled with objects, tools, kitchen utensils and the like to give you the impression the farmhouse is still lived in.

Outside, make sure you find the statue of Gudridur Thorbjarnardottir whose son farmed on the Glaumbaer site – they were among the first westerners to visit the Americas and return to Iceland.  Their lives are recorded in some of Iceland’s Sagas.

Glaumbaer is open every day from May to September, during the week in April and October and by request only from November to March.

Arctic Henge

Contributed by Jess of How Dare She

Iceland’s Arctic Henge (Heimskautsgerðið) is one of the most remote and northernmost spots in the country. Raufarhöfn is a small village on a peninsula at the top of the island and Arctic Henge lies right on the coast. The roads to access it are quite nice, but if you’re going to Iceland in the winter, be sure to check conditions as it can be a very tough drive, located about 130km from the nearest larger village.

While it may look ancient and reminiscent of other pagan monuments, like Stonehenge, it’s actually modern. Construction started in 1996 and isn’t completed yet, but it’s still worth checking out. It is designed, like other henges and stone circles, as a large sundial. By using the chosen location, there is nothing blocking the horizon in any direction, meaning nothing blocking the light from a rising or setting sun, any time of year.

Arctic Henge is about 50 meters in diameter and consists of two main rings. In the outer ring, there are four, 6-meter-tall gates, facing each cardinal direction. The inner ring has a 10-meter-tall column, with four pillars. The column will eventually be topped with a prism to reflect light throughout the structure. In addition to the goal of attracting tourists, it is also designed to serve Iceland’s modern pagan population, approximately 1% of the population.

Hellulaug

Contributed by Patrick of Adventographer

Nestled deep in the often overlooked, yet spectacular, Westfjords are some of Iceland’s least trafficked but most beautiful places. Along this rugged, off the beaten track section of coastline you’ll find countless small towns full of Icelandic charm. Taking in that charm and talking with the locals provides a great insight into the history of the area and if you’re lucky they might just share with you the location of one of their favorite Icelandic hot springs.

That’s exactly how we found the stunning, seaside hotpot, Hellulaug. Tucked into a cliff, trapped between the road and sea, in a remote fjord, this naturally fed hot spring was a welcome reprieve from the road. With no amenities (aside from a short stone wall to change behind) this truly feels like the Iceland we all want to experience.

Dipping in the comfortably hot 40° water and listening to the waves crash just feet away it’s easy to get lost in your thoughts. If you keep your eyes open when you’re done and moving on you’ll find more than a few more amazing hot springs in the area!

Landbrotalaug

Contributed by Danni of Livein10countries
Although the Blue Lagoon is fun, I’d definitely recommend that anyone keen to explore Iceland off the beaten path to try the country’s free hot pools as well. It’s a glorious experience, and part of the culture!
Landbrotalaug is special because it’s only an hour to an hour and a half from Reykjavik. Admittedly, that doesn’t mean it’s easy to find, so take a look at my guide to this hot pool in West Iceland  for detailed directions, especially as there’s quite a walk from where you can park.

This thermal spot has pools at varying temperatures since only one end is fed by the hot springs, so you can position yourself to feel like you’re in a delicious bath or in cool waters – depending on what you like.

It even has natural places to sit, thanks to ridges formed in the volcanic rocks around it. Handy!

Unlike your average spa sesh, however, this trip will require some prep. You might not have signal, so download Google Maps offline. The route to the pool is marshy, so bring wellies (or rubber boots, as the rest of the world calls them) and an anorak, You’ll be toasty in the pool but it’s cold when you get out, so take some warmish dry clothes to change into – and a towel of course!

Dimmuborgir


Contributed by Constance of The Adventures of Panda Bear

Dimmuborgir is not only unusual, but also one of the most unique landscapes to visit in Iceland. Its eerie and haunting landscape is one in a million. The area is located in northern Iceland, at the eastern end of Lake Myvatn. It is one of the most unusual places, not only in terms of looks, but also due to its Icelandic folklore and its creation.

The name Dimmuborgir translates to “dark castles” in English and is a great description for the unusually shaped lava field formations. The area consists of varying shapes of lava rocks as well as volcanic caves.

Its ominous appearance lends itself to lots of folklore from traditional Icelandic to the Christian. Prior to Christianity, there were legends of mischievous Icelandic trolls called The Yule Lads terrorizing Icelanders. These stories were probably told to keep children from leaving the home during cold, dark Icelandic winter nights.

After Christianity was brought to the country, new folktales were told. Many came to believe that Dimmuborgir was where Satan landed when he was exiled from heaven and the area became the gates to Hell.

Dimmuborgir’s landscape was formed when lava flowed over a lake, boiling the water underneath. The steam from the hot water pushed up the lava forming the large lava pillars. As the lava continued to flow, the crust collapsed, forming the hollowed-out pillars you see today.

There are several hiking trails that take visitors around Dimmuborgir some can take as little as 30 minutes, others can take hours to wind around the tall pillars of lava. Don’t forget to explore some of the caves!

Lóndrangar Cliffs

Contributed by Nina of Where in the World is Nina?

As if every corner of Iceland isn’t beautiful, here’s another one that makes your mouth gape… Lóndrangar Cliffs are certainly a sight to behold but they are very easily missed if you don’t purposefully visit them.

Located on the Snæfellsnes Peninsula, most people drive by without a second glance. They are certainly worth the stopover though. As you get closer and closer to the cliffs you can feel and hear the waves crashing against its fragile volcanic rock and then you see its bizarre peaks that define the cliffs and make you wonder if you stepped onto another planet.

These cliffs were one of my favorite spots in Iceland and I spent a good few hours pondering thoughts as the wind chapped my lips and the mist from the waves blew on my face, luckily I packed well for Iceland and my jacket prevented me from getting wet. The cliffs are a stunning sight but after all, this is Iceland, and quite literally the entire island is breathtaking.

Hafnarfjörður

Contributed by Shobha of Just Go Places

Traditional Icelandic folklore says that there are hidden people (huldufolk) living in the country alongside everyday Icelanders. These hidden people engage in traditional work like farming and fishing. Most people in Iceland may no longer believe in these hidden folk but they are happy to take a you-never-know approach.

One of the hot spots in Iceland for these magical people is the town of Hafnarfjörður which is about a 10 minute drive from Reyjkavik.  In this fishing town, there is an Elf Garden in a local park, Hellisgerdi Park, which is supposed to be inhabited by the hidden people. The park also has a center for learning about Iceland’s hidden people which serves Elf Tea! There are guided tours twice a week from the Hafnarfjörður tourist office which explains about the Icelandic folklore traditions of magical creatures while also visiting the Elf Garden

When we went to the Elf Garden, we did not see any elves much to my children’s disappointment. The park itself felt magical with woodlands, waterfalls and mossy steps. There were a lot of hidden nooks and crannies for my kids to explore and use their imagination. A beautiful place without many people, it’s hard to believe that we were only a short walk from the town centre of Hafnarfjörður because it really did feel a world away.

If you haven’t had your fill of elves and hidden people in Hafnarfjörður, there’s also an Elf School in the capital of Reyjkavik. We missed out on Elf School because my kids weren’t going anywhere near anything with the word ‘school’ in it – not even to learn about magical people!

Rauðasandur

Contributed by Greta of Greta’s Travels

If you’re looking for a truly unique place in Iceland you need to visit Rauðasandur, the Red Sand Beach. Beaches in Iceland are characterized by black sand due to high volcanic activity, however, Rauðasandur distinguishes itself from its neighbors, thanks to its red sand. The Red Sand Beach is 10km long and surrounded by the cliffs of the Westfjords, which make for a very pretty backdrop as you walk along the beach. There are parking lots and camping grounds on both ends of the beach so you can access the beach from either end.

Rauðasandur is in the Westfjords, Iceland’s most rural region also known as Iceland’s “best-kept secret”. Most of the roads in this part of Iceland aren’t paved, and the one that leads to the Red Sand Beach is one of them. It’s an extremely winding gravel road that some people have labeled as the most frightening road in the Westfjords. I can’t comment from a drivers point of view since I don’t drive, however from a passenger point of view it’s not scary at all, in fact, it’s pretty spectacular. At every turn of the winding road, you get a view of Rauðasandur from a different perspective.

Rauðasandur is also a popular location where seals come to bask in the sun, if you’re lucky enough you might spot them chilling on the beach! Couple your trip to Rauðasandur with other natural wonders in the Westfjords and you’ll have an epic off the beaten track itinerary!

Heydalur

Contributed by me

Located 12 kilometers off any main road, Heydalur is not a place to “stumble upon” – but it is a true Iceland hidden gem. To call Heydalur a village is to be generous – really, it’s a cluster of a few small farms, centered around one main guesthouse and restaurant, Heydalur Guesthouse.

This is your hub for all things in the area, including hiking in the beautiful nearby fjords, relaxing in one of the geothermal hot pots, swimming laps in their heated greenhouse pool, going horseback riding on beautiful Icelandic horses, or sea kayaking with arctic seals and puffins if you’re lucky.

I loved my day at Heydalur and it was the highlight of my Westfjords trip for sure.

***

Enjoy this post? Pin it for later!

Want to see a non-touristy side of Iceland? Check out these suggestions for Iceland off the beaten path

Got any off the beaten path Iceland hidden gems to share with us? Drop your suggestions below in the comments!

An Epic Week in Iceland’s West: An Itinerary for 7 Days in Iceland

Iceland tops many people’s bucket lists, and with good reason. This country has natural beauty nearly everywhere you look, and the variety of landscapes you’ll see on a trip to Iceland simply boggle the mind.

In a small package, you can see everything from glaciers to volcanoes to continental rifts to fjords to lava formations and those classic Icelandic black sand beaches – and I could go on and on.

Iceland is a bit like the world in miniature – very miniature, in fact, as it’s roughly the same size as the state of Ohio.

Still, despite the small size of Iceland, you do need to dedicate a good bit of time to truly see the country’s magnificence. I think 7 days in Iceland is a good start: one week in Iceland will give you enough time to get away from the crowds surrounding Reykjavik who don’t stray far from the capital on their short trip to Iceland.

While many Iceland itineraries will have you heading south, I wasn’t interested in rehashing everyone’s Iceland bucket list, but instead checking off my own. In partnership with Iceland Travel, I rented a car with their companion app to help me travel around the country smoothly.

The benefit of booking a rental car with Iceland Travel (who partner with Hertz) is that they help with the itinerary planning and hotel booking part of your trip, so that all you have to do is use their companion app to help you decide what stops you want to make that day. It’s got the convenience of a guided tour in terms of planning but with all the benefits of traveling independently with your own rental car.

You can make your own booking here, or you can replicate my 7-day Iceland itinerary below to get off Iceland’s beaten path and explore beautiful Western Iceland.

I should note that I traveled solo during my trip to Iceland, and Iceland is a great country for first-time solo female travelers. This itinerary for Iceland was created with solo travelers in mind, focusing on nature and incredible scenery, but it’d be great for groups or families as well.

Day 1: Arrive and pick up your car (Overnight in Reykjavik)

It’s inevitable that you’ll start and end your week in Iceland in Reykjavik. Most flights get into Keflavik International Airport (KEF), which is located about 45 minutes away from Reykjavik proper.

I actually was the rare exception to this rule, arriving at the teeny tiny Reykjavik International Airport in the city center because I was flying in from the Faroe Islands on Atlantic Air, one of the few airlines that serve REK. Most airlines, however, will fly into Keflavik, so you’ll want to double check that your rental car is reserved at the proper airport.

Some people skip Reykjavik entirely, but I think that’s a mistake. Nearly one-third of Iceland’s population lives here, so understanding Reykjavik is crucial to understanding Iceland as a country.

Luckily, Reykjavik is more like a big small town, so it’s pretty easy to see the highlights of Reykjavik in just a day’s sightseeing. However, keep in mind Reykjavik is the most expensive part of Iceland, so limit your time here if you’re visiting Iceland on a budget.

I recommend starting at the beautiful cathedral in the center of Reykjavik, Hallgrímskirkja. Whereas many capital cities have incredibly old and historic churches, Reykjavik does it a bit differently with an ultra-modern expressionist church which was completed in 1945. I recommend splurging on buying entrance to the top of the tower, where you can get the best view of Reykjavik for 900 ISK (about $9 USD).

Be sure to walk around the church a bit, as it looks super different from different angles. It’s a lot of fun to photograph – each side gives you a totally different idea of its shape and size.

After checking out the church, walk through the center of town, admiring all the cute shops along the way. Head over to the Harpa concert hall on the waterfront, which is Reykjavik’s other most iconic piece of architecture.

I love how the structure seems to blend into the harbor behind it during the day time (then puts on a light show at night!). Be sure to go inside (entrance is free, unless there is a private event happening) – the interior is even more interesting than the exterior, in my opinion. It’s a great place to get some unique Instagram shots!

After checking out the concert hall, you’ll want to walk along the waterfront a little bit. Keep in mind that it can be insanely windy along the waterfront, especially if you’re in the middle of a wind storm (not uncommon, even in the summer!).

When I was in Reykjavik, the wind was gusting up to what felt like 50 mph. No matter what time of year you visit, you’ll want to wear a strong, wind-proof jacket (I brought my Marmot PreCip as my outer layer in the summer).

When you’re walking the waterfront, be sure not to miss the Sun Voyager sculpture just a few minutes’ walk from Harpa. While the sculpture looks like a Viking ship and is widely interpreted that way by tourists, in actuality, the sculpture is supposed to represent a “dream boat”, oriented towards the sun.

(I still see Vikings, though).

For dinner, there are a ton of options – it really depends on your budget. Unfortunately, everything you’ve heard about Reykjavik is true – it is insanely expensive, probably the most expensive city I’ve ever been to outside of Switzerland. Restaurants will eat up your Iceland budget quickly. If you’re curious about Icelandic cuisine, you could do a food walk through Reykjavik to get a lot of tastes of different things all at once.

I ate at Block Burger, which served up super tasty hamburgers for a relatively reasonable price. A small burger is about 1200 ISK ($12) and around 1900 ISK ($19) for a complete meal with fries and a soda. While this isn’t a good ‘deal’ in the global sense, it is one of the cheaper options in Reykjavik.

Other people will recommend you eat at the place that serves up “Iceland’s best hot dogs” if you’re on a budget, but I honestly don’t recommend you do that – trust me, by the end of your week in Iceland, you’ll have eaten so many hot dogs on the go that you’ll never want to even see another hot dog again!

There are plenty of other nice restaurants to eat at in Reykjavik but be prepared to spend at least $30-50 USD per person for a simple meal without alcohol.

Hotel to Stay At: I stayed at Centerhotel Arnarhvoll just across the street from Harpa Concert Hall and highly recommend it! The location in the center of Reykjavik is fantastic: the Harpa concert hall (and its nightly light displays) are literally right outside your window, and you are just a few minutes’ walk from some of Reykjavik’s best attractions and restaurants. The room is spacious and modern, and I loved the bathroom which had a great tub to soak in and relax before starting my week in Iceland. The breakfast in the morning was fantastic as well!

Day 2: The Snæfellsnes Peninsula (Overnight in Hellnar)

Nicknamed “Iceland in Miniature,” you’d be foolish to skip the stunning Snæfellsnes peninsula on your Iceland itinerary. In this small 90-kilometer-long finger of Iceland, you’ll find black sand beaches, stunning sea cliffs, ancient glaciers, gushing waterfalls, and natural hot springs all in one beautiful package that can easily be seen in a single day.

Get an early start when departing from Reykjavik and start driving towards the Snæfellsnes peninsula, which should take about two hours if you don’t keep pulling over every 5 minutes to photograph random waterfalls like I was. (Note: Only pull off on roads and designated stopping points and never in the middle of the road. You’d think that’d be a given, but it needs to be said.)

This is a whistle-stop tour of the highlights of this peninsula, but Iceland Travel also has a road trip itinerary for a more in-depth 4-night tour of the Snæfellsnes peninsula, which you can check out here.

Kirkjufellsfoss

To maximize your Iceland itinerary, I recommend starting at Kirkjufellsfoss and then working counter-clockwise through the peninsula to avoid doubling back and to get better light at Kirkjufellsfoss. However, if you chose to stay somewhere closer to Kirkjufellsfoss, such as Grundarfjörður, Olafsvik, or Rif, then you could do this day’s itinerary in reverse.

Kirkjufellsfoss is truly spectacular and it’s one of those waterfalls that likely influenced you to buy a ticket to Iceland in the future. It’s rather popular and unless you show up at sunrise you’re likely to share your view of Kirkjufellsfoss with quite a few of your closest tourist friends — it is one of Iceland’s most recognizable Game of Thrones filming locations, after all.

Kirkjufellsfoss can be a bit difficult to photograph. If you go there in the evening, there will be a big shadow cast on Kirkjufell (the mountain in the photo) by the mountain behind you, leading to unevenly lit photos.

To get the best possible photo, you’ll want to use a wide angle lens, a tripod, and some ND filters which will block light from streaming into your camera so you can get a nice long exposure to smooth out the water. On the day that I was visiting the Snaefellsness, there was a massive windstorm (continuing from the previous day in Reykjavik) and the wind was too strong to set up my flimsy tripod. You may want to consider investing in a sturdier tripod for photographing in Iceland as the wind gusts can be really strong.

If you want, you could make a small detour while you’re here to Grundarfjörður to do a puffin tour, where you go out on a boat to see one of their favorite nesting spots, Melrakkey Island. However, this tour only runs if you are visiting during puffin season, between early June and early August. Check out and pre-book a tour here.

Ólafsvík and Hellissandur

After admiring Kirkjufellsfoss, start driving towards the coastline, passing through Ólafsvík. This is a “big town” by Icelandic standards; in fact, it is the westernmost town of more than 1,000 people in Europe!

If you’re a fan of modern architecture, check out the beautiful, eclectic Ólafsvíkurkirkja (and be sure to turn around and gawk at the beautiful waterfall behind you, which I believe is called Bæjarfoss). If you have a nice zoom lens, you’ll be able to photograph this from the church parking lot! Yup, waterfalls and churches all in one panorama – that’s Iceland in a nutshell for you.

Betweens Olafsvik and Hellissandur you can make a brief stop at Svöðufoss, another one of Iceland’s beautiful waterfalls — y’know, just in case you haven’t gotten your waterfall fix yet today.

In Hellissandur, many people enjoy visiting the Maritime Museum there, which is housed in traditional turf roof houses. If you’re a history geek curious to learn about the region’s former significance as a fishing hub, it’s a can’t-miss.

Djúpalónssandur

Next up, you’ll pass by a beautiful black sand beach at Djúpalónssandur, which is nicknamed a “black lava pearl beach” for its sand made of tiny, rounded pebbles of ancient lava rock. This is due to the uniquely strong tide, which churns the chunks of lava into perfectly polished stones, like rocks in a tumbler.

That said – please do not take any rocks from the beach, as lovely as they are, as you can disturb the habitats and ecosystems of the tiny creatures who call Djúpalónssandur home.

There are signs everywhere warning you not to go in the water, which you should heed. Again, the tide is extraordinarily strong here, so now is not the time for a ‘polar plunge’ – there are plenty of other beaches in Iceland that are safer for swimming. Just look at the scraps of metal left from shipwrecked boats and you’ll understand why this isn’t a place to dip your toes in.

As a result of this extreme tide and the unique rock formations that result, several legends have arisen about this area. Some Icelandic people claim that the rock formations of the beach are actually the work of trolls and elves. I’d put my money on time and erosion – but who’s to say?

Vatnshellir Lava Tubes

A little further down the peninsula in Snæfellsjökull National Park, you’ll find Vatnshellir Cave, which is made of a series of lava tubes that erupted 8,000 years ago. You can only visit on a tour for safety purposes: the lava tubes are pitch black and you’ll need a strong flashlight and guide to know what to look for. I recommend pre-booking your lava tube tour here.

My friend Stephanie always teases me for being a cave nerd but I truly find geology fascinating. It was amazing to learn how this cave formed nearly instantly as a result of a lava flow. Whereas in a typical cave, stalagmites and stalactites may have taken centuries upon centuries to form, the rock formations in this lava tube took mere days to shape and cool.

You can go quite deep into the cave — so deep that there is absolutely no external light — and experience true pitch blackness when your entire group turns off their flash lights. It made me realize that true, impenetrable darkness is actually quite rare: the feeling of pure darkness is disorienting, almost like floating. It was quite the experience.

Be sure to keep an eye on the ground when walking in the cave, as the rock is not level and is quite craggy. You’ll definitely want a pair of closed-toe shoes for it. (These are the hiking boots I brought to Iceland).

Lóndrangar Cliffs

I had wanted to visit the Lóndrangar cliffs for ages, since I watched one of my favorite landscape photographers do a photography tutorial featuring the cliffs. It’s quite a close drive from the Vatnshellir lava tubes, so it’s definitely worth visiting.

This pair of marvelous basalt sea stacks (the taller one is 75 meters; the other, 61) were once part of a crater. But time and the elements have eroded them to this marvelous cliffside vista that is a popular hike today. Along the hike, if the time of year is right, you may even spot a few puffins!

There’s a big parking lot just off the highway, and from there you can get this excellent viewpoint, or you can hike through an old lava field to the Lóndrangar sea stacks, which takes about 45 minutes to an hour roundtrip.

Arnarstapi

At the base of the beautiful, imposing Mt. Stapafell is the quaint fishing town of Arnarstapi, which is famous for its beautiful sea cliffs.

This was one of my favorite stops in the Snæfellsnes peninsula – I loved the seeing the basalt columns against the sea, which was an especially lovely vibrant shade of turquoise.

The Arnarstapi visitor center is also the meeting place for the Snæfellsjökull glacier excursion, which takes place daily in the summer months – weather permitting. Unfortunately, there was a wind storm when I was in the Snæfellsnes peninsula, so my glacier tour was cancelled.

However, it’s hard to miss the beautiful Snæfellsjökull looming nearly everywhere on the peninsula.

Búðir

In a country famous for its churches, perhaps one of the most famous is Búðakirkja. Located in the tiny village Búðir, which is home only to a hotel, a desolate lava field, and a lone black church, Búðakirkja is one of those places that attracts people from all over the world.

If you have time, there are some hiking trails in the Búðahraun lava field around this church, which is a truly otherwordly landscape.

It’s also worth making a brief stop for a coffee in the marvelous lobby of the Hotel Búðir, which looks out onto an amazing bay which is also a nature reserve. The restaurant is supposed to be world-class as well, so definitely make a reservation for dinner here if you are looking for a memorable meal.

Hellnar

Finally, head back towards Arnarstapi and continue a few kilometers onwards to the cute little seaside town of Hellnar, the ideal resting point for the night.

Don’t miss photographing the picture-perfect church near Fosshotel Hellnar, which looks amazing at the pre-sunset golden hour, especially how the red roof juts against the backdrop of the beautiful Atlantic.

Where to Stay: Fosshotel Hellnar is a fantastic base in the Snæfellsnes peninsula due to its central location – within 20 minutes, you can be at the black church, the Vatnshellir caves, Arnarstapi, or the Lóndrangar cliffs. The restaurant is supposed to be excellent and offers beautiful views over the coast – and if you’re lucky, you may spot a whale from the restaurant as you’re dining.

I stayed at a number of Fosshotel properties during my time in Iceland and always found them to be great options: clean, modern rooms with plenty of space to spread out, delicious (and included) breakfasts, speedy WiFi, plentiful parking, and central locations. Check out ratings, reviews, photos, and availability here.

Day 3: Flatey Island and the beginning of the Westfjords (overnight in Patreksfjörður)

Ready to start heading towards the Westfjords? There are two ways to get to the Westfjords: several hours of driving along Highway 60 or taking the beautiful Baldur ferry to cut off 200 kilometers of driving distance between you and the Westfjords.

Considering how much driving is still yet to come on your 7 days in Iceland, I highly recommend taking the ferry, not least because it offers you the unique opportunity to stop off on the picture-perfect Flatey Island in the middle of Breiðafjörður Bay.

Stykkishólmur

Start your day with a drive to Stykkishólmur, which is about one hour away from Hellnar. This peaceful harbor town is where you can catch the ferry over to Brjánslækur, cutting your driving distance by several hundred kilometers.

While the 9 AM ferry requires an early morning, try giving yourself at least an extra 30 minutes and try to get there early in the morning so you have time to photograph the beautiful harbor town before boarding the ferry.

Of course, the ferry isn’t the cheapest option at 4,460 ISK (about ~$40) per adult, plus an additional 4,460 ISK for the car. However, considering the high price of fuel, that will offset the price a bit. A stopover in Flatey comes with no additional charge.

Flatey Island

I highly recommend taking advantage of the stop in Flatey option on your way to Brjánslækur. Flatey Island is a cute, off the beaten path island about halfway in between Stykkishólmur and Brjánslækur, in the middle of the beautiful Breiðafjörður Bay. Flatey Island is the only inhabited island of the 3,000 or so islands and islets that dot Breiðafjörður Bay. This bay separates the Snæfellsnes Peninsula from the beginning of the Westfjords region and cuts down the drive time between the two regions of Iceland significantly while offering stunning views to boot.

Should you choose to stop in Flatey Island, they will give you a small envelope where you write your name and license plate number and place your keys in. Go down to the bottom level of the ferry, where the restaurant is, and drop off your keys with the restaurant. This is because no cars are allowed on Flatey Island. They will drive your car off the boat for you and leave it at the ferry dock in Brjánslækur. When you get back on the ferry when you leave Flatey Island, you can pick your keys back up at the restaurant, and when you disembark you’ll see your car waiting for your in Brjánslækur – it’s super easy.

Should you choose to make the stop in Flatey, you will have about 7 hours to explore the island, which is more than enough (it’s a small island!). I recommend starting your day in Flatey by walking into town and photographing the colorful houses, traditional of a 19th-century Icelandic village. Flatey used to be a major commercial fishing hub around the turn of the 20th century, but like many fishing villages of Iceland, its fortunes have waned considerably. It’s now more of a spot for tourism in the summer – albeit a quiet one.

After strolling around the ‘town center’, visit the church and the world’s smallest library, where you can see a copy of the Book of Flatey, an ancient manuscript with one of the famous Icelandic sagas.

The library is super cute and it’s pretty amazing that this island with only 2 (!!!) year-round inhabitants has a library all of its own. Of course, being so small, there is no need for a librarian to check out your books. It’s all based on the honor system. There’s also a small, peaceful graveyard where you can walk amongst the graves of those who once called Flatey home.

Stop back in town for lunch at the only option in town before you go on your walk around the perimeter of Flatey. I had delicious fresh fish tacos that were surprisingly spicy for Iceland (in a good way!).

Afterwards, I made my way around the perimeter of Flatey Island, stopping to photograph errant sheep snacking on seaweed on rugged beaches. The path isn’t super clear, but just walk along the edge of the beach – there’s pretty much no way to get lost on an island like Flatey.

I was having a lovely and peaceful walk along the beach when I was startled to stumble across a strange statue.

A statue that seemed strangely excited to see me.

Unbeknownst to me, I had stumbled across “the Penis Man,” a Flatey Island legend. I thought it was a crude, creepy joke by locals – turns out I was dead wrong, and this was a planned statue by the famous sculptor Jón Gunnar Árnason — yup, that same guy whose Sun Voyager statue is emblematic of the Reykjavik waterfront’s “skyline.”

I’ll admit that when I wasn’t suspecting it, it gave me a creepy, Castaway-ish vibe — not at all helped by the fish skeleton being swarmed by flies at its base.

I headed back into town from there to wait for my ferry.

Hellulaug

Once you arrive in Brjánslækur, you’re not far from the town of Flókalundur, outside of which you’ll find the Hellulaug hot springs. After my day on Flatey I was feeling exhausted and just wanted to head to my hotel in Patreksfjörður so I gave it a pass.

But looking at this photo, I think I may have been wrong:

Photo credit: Visit Westfjords Media Gallery

If you have the energy, this looks like one of the better natural geothermal pools in Iceland. A lot of the geothermal pools I’d see later would be more akin to actual hot tubs, just fed with geothermal water. I like that Helluaug is actually a natural formation, which gives it a more rugged, otherwordly feel in my opinion.

Patreksfjörður

Even with a population of 660, Patreksfjörður is actually the largest city in the southern Westfjords – that’s how off the beaten path this part of your Iceland itinerary is.

I didn’t spend too much time in Patreksfjörður, mostly using it as a convenient crash pad for the next day’s activities. Patreksfjörður is a great place to stop and rest your head, as it’s in between several highlights of the Westfjords, namely the Látrabjarg bird cliffs, the Rauðasandur red sand beach, and the world-famous Dynjandi waterfall.

But that’s tomorrow’s adventure!

Where to Stay: I stayed at another Fosshotel, Fosshotel Westfjords in Patreksfjörður. As with my previous Fosshotel experience, it was excellent: spacious and clean rooms with gorgeous views over Patreksfjörður, which is beautiful even by the insanely high Westfjords standards. There’s a hotel restaurant (always super convenient after a long day of driving!), rooms with gorgeous fjord views, friendly staff, and ultra-generous included breakfasts. Check out photos, rates, availability, and reviews here.

Day 4: Highlights of the Westfjords (overnight in Þingeyri)

On your first full day in the Westfjords, get ready for beautiful places — and terrifying drives. I’m not going to sugarcoat it – nearly every single place on this list had roads that had me nearly in tears. If you’re not a pansy American like I am who is used to driving on monstrous 8-lane highways, you’ll probably be fine. But I had spent 4 days in the Faroe Islands prior to my Iceland trip, and I found these roads even more terrifying than anything I encountered in the Faroes.

Still, the rough roads will be worth it – these are some of the most beautiful places in the entire Westfjords. Just drive slowly and take it easy – you’re in no rush. There isn’t much driving distance in pure kilometers between these places, but it will take you some time just due to the poor quality of the roads. Still, the outstanding views everywhere you look will egg you on, so be brave and put your car to use!

Note: I had a 4 wheel drive during my time in Iceland, but I don’t think it’s entirely necessary – none of these roads are 4×4 mandatory, and renting a 4×4 can incur a lot of extra rental fees. However, when you rent a car, you will want a car that is not super low to the ground. I was in a Toyota RAV4, and it was perfect. There are lots of potholes in the gravel roads, and no matter how careful you are, you’ll inevitably hit one or two a little faster than you were intending. Having a car with high suspension will help immensely.

Látrabjarg Cliffs

I had been looking forward to the Látrabjarg Cliffs since I began planning my Iceland trip. I knew I’d be in Iceland at the beginning of August, which is technically still puffin season. However — I missed the puffins by a few weeks. I was pretty devastated to be honest, especially because the drive to Látrabjarg is neither easy, on the way, nor quick.

To be sure you see the puffins, visit in June or July, when they are far more likely to be nesting. Otherwise, in early August they may have already left for their seasonal migration, like they did in my case. Climate change affects several things – bird migration patterns being one of them – so give yourself an extra buffer and go right in the middle of puffin season if you are dead-set on seeing puffins while you are in Iceland.

That said, even though I didn’t spot even one puffin at Látrabjarg, I don’t regret going. The landscape is remarkable. The Látrabjarg cliffs are the westernmost point in Iceland, and with the exception of the Azores islands, they are the westernmost point in all of Europe. The road out there feels every bit the end of the world. And the water there was stunningly blue, despite the clouds overhead.

Be sure to stop in Breiðavík on your way to Látrabjarg. The views of the bay are absolutely stunning, plus the setting of the small town church against the backdrop of the bird cliffs is one of the most beautiful views in all of Iceland.

Rauðasandur

Iceland was forged in fire, the result of volcanic activity over the span of many millennia. As a result, most of Iceland’s beaches are made of black sand – which is beautiful. But that means that a red sand beach like you’ll find at Rauðasandur is especially rare. I’ll be frank, though – while it’s called ‘red sand,’ I think in reality, it’s more of a Sahara-ish orange, and even that depends on the light. If you are there on a moody dark day, the sand won’t have its distinctive orange hue that separates it from other beaches in Iceland.

With that in mind, and the fact that this beach is located 10 kilometers (each way) from the main road, down a crappy gravel road with some of the scariest hairpin turns I’ve ever seen, I’d only really recommend going to this beach on a day with excellent weather, or all the effort may be for nothing. The day I went was pretty gray, so the sand wasn’t that amazingly vibrant, but in photos I’ve seen of it in the sunshine it is extremely beautiful!

If you’re lucky on a sunny day, there are some hundred-odd seals who like to sunbathe on the beach – but bring a zoom lens, as they aren’t known for being friendly! You can do a seal-watching tour of Rauðasandur which also includes transportation from Patreksfjörður, so if you’re terrified of the drive this is a great option!

Dynjandi

If there is one photograph that emblematizes the Westfjords, it’s Dynjandi. Literally meaning “thunderous” in Icelandic, never has a name been more apt. This is one powerful waterfall.

Dynjandi is actually a composite of seven waterfalls,  but the main waterfall is the real show-stealer. With a total height of 100 meters, it spans out like a bridal veil, starting at a width of 30 meters and spanning outwards to 60 meters at the bottom of the ‘veil’.

There are several angles where you can get amazing photos, and despite being the most photogenic place in the Westfjords, when I went there actually weren’t very many tourists – maybe some 20 or 30 or so, who are easy to avoid given the massive size of this waterfall.

Þingeyri

After the wonderful Dynjandi, you’ll end up in the peaceful village of Þingeyri, a driving distance of about 30 more minutes past Dynjandi.

If you’re hungry – and I’d be surprised if you weren’t after so much driving – stop by Simbahöllin café for their incredible authentic Belgian waffles (one of the owners is from Belgium!). They also serve soups and a delicious-looking lamb tagine for dinner.

Rest up because tomorrow you’ll start the day early with a horse ride in the lovely valley of Þingeyri.

Where to Stay: I stayed in Hótel Sandafell in the small town of Þingeyri – which, in a town as tiny as Þingeyri, is literally your only option. The in-house restaurant is excellent and served up delicious pizza at surprisingly affordable prices for Iceland. My room was small but comfortable, with everything I needed for a short stay. The staff was lovely and the breakfast, as usual in Iceland, was super generous and got me fueled up for a big day of adventure ahead. Check out reviews, photos, rates, and availability here.

Day 5: Horses, Old Towns & “The Big City”  (overnight in Isafjordur)

After many days with tons of driving, you’re in for a treat – the next two days are low on the driving and high on the relaxing and enjoying. Today’s Iceland itinerary brings you to the tiny towns of Flateyri and Bolungarvík before settling down in the “capital” of the Westfjords, Ísafjörður. Ísafjörður has only 2,000 or so residents, but it feels properly huge after all the tiny towns that you will have seen elsewhere in the Westfjords!

Horse ride in Þingeyri

Simbahöllin is not just a café but also a horse stable – and they have some of the sweetest horses in Iceland, against some of the most beautiful backdrops in the country.

While I have a lot of experience riding horses, my last horse experience was, quite frankly, terrifying — I ended up riding a nearly feral horse around the island of Gili Air while it spooked and bucked at everything, all without proper protective gear.

I shared my reservations with my guide at Simbahöllin and she kindly made sure I got a horse who wouldn’t give me too much trouble – a beginner-friendly horse without a lot of attitude, whose only character flaw is stopping too much to eat grass (same, dude, same).  I wish I could pronounce his name without butchering it to give him the credit he deserves — but I will always remember that little dude.

Icelandic horses are amazing and unique in the world, the result of 1,000 years of isolated breeding. They’re a bit squat and short, a little chunky but super muscular – all the better for surviving those harsh Icelandic winters. And they have super cool mohawks and a hell of a lot of swag.

With my guide, we went on a ride for about an hour and a half through the beautiful valley in Þingeyri, from the stables, across a few rivers, and nearly to the beach before heading back. We even tried tölting, a special gait that only Icelandic horses have (they have 5 gaits; most horses have only 4). Tölting is somewhere between a trot and a run, way smoother than a trot, but also way sillier looking — like an insanely fast walk. It’s super smooth and super fun, and something you can only experience with an Icelandic horse.

I was sad to leave my horse friends (not to mention the lovely dogs who kept them company) but soon it was time for the next stop on my Iceland itinerary!

Flateyri

After tearing yourself away from your beautiful horse friends and promising to never forget them, make your way over to the cute town of Flateyri.

It’s about 30 minutes of driving along some of the most scenic parts of the Westfjords, Önundarfjörður.

I  mean, this is literally what the drive to Flateyri looks like. It’s insane.

Flateyri is an interesting place.  Established as a trading post in 1792, the town thrived during the 1800s as it was the base for several fisheries, particularly shark-hunting and whaling. The town once numbered some 500 or so people, but the population has been trickling away from Flateyri slowly. A massive avalanche in 1995 killed 20 people and destroyed much of the town, causing many people to move away; the subsequent financial crisis in the 2000s ended up encouraging even more people to leave Flateyri as employment opportunities diminished. Tourism is one of the few remaining industries left in Flateyri.

The town of Flateyri is tiny and quiet, but the town packs a lot for tourists to see in its diminutive size of just a few blocks. Be sure to check out the bookstore in Flateyri, its most important attraction. It’s the oldest original store in the entire country, and much of it has been preserved in perfect condition since its old days, like an ant trapped in amber.

There are a number of other quirky museums in this small town of about 200, including a Nonsense Museum, which has a collection of random bits and bobs such as teaspoons, Pez dispensers, matchbooks, and other random odds and ends.

I was in Þingeyri around 11 AM and the museum is only open from 1 PM onwards (and only open in mid-May to mid-September, like much of the Westfjords — the area is almost entirely closed down in the winter due to the harsh weather). There’s also an International Doll Museum with collections of dolls from around the globe, so if you’re a fan of niche museums — Flateyri will be a paradise.

Besides the Old Bookstore, I found the town church to be well worth a visit (although it was locked when I was there so I wasn’t able to see inside) with its gorgeous fjord backdrop. I also just enjoyed strolling up and down the main street, Hafnarstræti, and checking out the harbor and other cute sights in town. Flateyri is just adorable – I mean, look at it.


Bolungarvík

After checking out Flateyri, head on over to the town of Bolungarvík, which with its population of some 900-odd people seems positively bustling after quiet little Flateyri and Þingeyri.

It’s worth checking out the Ósvör, which replicates an old fishing post, which were common in the region around Bolungarvík for much of the 18th and 19th centuries but have since fallen out of fashion with industrialization.

There’s also a beautiful beach in the town which is worth a quick visit, though of course this being Iceland you probably won’t want to go for a dip.

Ísafjörður

Finally, you’ll want to finish your day in the honorary capital of the Westfjords, Ísafjörður. After seeing all these tiny Westfjords villages, Ísafjörður has a real “city” feel – even though it has a population of just 2,600 or so people.

While by my standards that’s a small city – more of a town, really – it’s Iceland’s 13th largest, and the largest city in the Westfjords by a long shot.

There are quite a few excellent restaurants in Ísafjörður, including the beloved Tjöruhúsið, which supposedly has some of the best seafood in Iceland. But after several days of seafood, I was craving something a little different, and when I discovered there was a small, authentic Thai restaurant in Ísafjörður — I was sold instantly.

What is authentic Thai food doing in Iceland, you may be wondering? The fishing industry has been falling out of favor with native Icelanders for the last few decades, due to tough working conditions, depopulating seaside villages, and better economic opportunity in Reykjavik. As a result, Eastern European and Southeast Asian immigrants have been filling the gaps in the labor market – and some have brought their cuisines with them.

The food I had at Thai Koon was delicious, flavorful and authentic without being overly spicy, but that was easily remedied with a few dashes of the Sriracha on every table. The food was so good – I was able to choose 3 different curries plus a rice for 1500 kronor, about $15 USD – and I had so much leftover that I ended up taking a good half of it home.

Where to Stay: I stayed at Hotel Edda Ísafjörður and thought it was a great base. My room was cozy and clean and just a short 10-minute walk from central Ísafjörður. The room and bathroom were both quite spacious and I had a nice view of the city. The building lacked a little charm but it was a fine place to rest my head for the evening. Check rates, reviews, availability, and photos here.

Day 6: Sudavik, Heydalur (overnight in Heydalur)

Start your day in Ísafjörður with a leisurely morning walk through the town.

I did a guided walking tour where I learned about the 19th-century history of the town, when it was one of the biggest fishing posts in the prosperous Westfjords. It was helpful to understanding the changing role of cities and towns in the Westfjords throughout the past few hundred years.

There’s quite a bit to see in Ísafjörður, including the Gamla Bakaríið – the old bakery – and the Culture House, which used to be the local hospital and is often referred to just that way – Gamla Sjúkrahúsið.

I recommend doing a walking tour so that the history of Ísafjörður isn’t lost on you, but in lieu of that, you can do a self-guided walk down some of the main streets ofÍsafjörður. Aðalstræti is one of the most scenic and bustling streets in town, where you’ll find bakeries, museums, cafés, clothing stores, and cute historic houses.

I spent a morning doing some work in the cozy Café Edinborg, which had delicious coffees and a great view over the fjord and harbor.

Besides checking out the main street, there are plenty of outdoorsy things to do in Ísafjörður during the summer, such as hiking to Naustahvilft, a depression in the earth in the middle of one of the fjords overlooking the city. Naustahvilft means “The Troll Seat,” as the legend goes that a troll passing by got tired and sat on the mountain, forever leaving behind a huge ‘seat’ in the earth. This hike gives you one of the best views over Ísafjörður.

You could also take a boat to Vigur from Ísafjörður, where it’s possible to see tons of native birdlife, including – if you’re lucky – puffins.

If you don’t have so much time for a hike, simply strolling around the hills around the town itself is really beautiful. Going up in the hills behind the main ‘highway’, where you can get a scenic view of the city of Ísafjörður sandwiched in between two beautiful fjords. Walking in the hills, you’ll notice the avalanche-prevention mechanisms that have been installed in Ísafjörður and several other villages in the Westfjords such as Flateyri.

Alternately, you could go calm water kayaking in the fjord, although I went kayaking in Heydalur later on and highly recommend that as well.

Walking in these hills, looking down on these fjords, it was amazing for me to remember that for two whole months in the winter, the town of Ísafjörður gets zero sun, as even when the sun rises it rises too close to the horizon to ever make it above the fjord-line. It isn’t until the end of January that this true, dark winter starts to end for Ísafjörður, and residents celebrate with pancakes and coffee to celebrate the return of the sun.

Being in a land of such extremes, amongst people who have made these extremes, is humbling.

Súðavík

After leaving Ísafjörður, the town of Súðavík feels incredibly small. But it’s not even the smallest town on today’s itinerary!

Súðavík is best known for the Arctic Fox Center, which tells the history and present-day reality of Iceland’s only – yes, only – native land mammal. You see, even Iceland’s horses and sheep were imported, and the only native land mammal is the arctic fox, who scientists believe became trapped on Iceland after the last Ice Age, when the frozen-over ocean began to thaw.

As a result, the arctic fox has thrived for over 10,000 years,  surviving winters where temperatures drop lower than -70 C with relative ease. In fact, the arctic fox doesn’t so much as shiver until the weather drops below -50 C. With no natural predators in Iceland, hunting arctic foxes is permitted and has been an important part of the economy for centuries. Controlling the population of arctic foxes is crucial to ensuring Iceland’s bird life and domestic animals have a chance at survival.

There are two arctic foxes who live at the Arctic Fox Center. Their mother was killed by a hunter, who didn’t know she had just had two babies. They rescued the babies, but because they were raised by humans, the foxes were never fit to return to the wild, so now they live in Súðavík at the fox center. They’re pretty ridiculously cute, even if they seemed a bit tired in their warm coats in the freakishly warm summer sun that day.

Heydalur

Heydalur was one of the highlights of the Westfjords for me. This small ‘town’ isn’t even really a town, but more of a farm turned guesthouse out in the rural countryside, about 12 kilometers off the main road.

They offer several activities at Heydalur so it’s perfect for a longer stay if you have time. You can take a horse ride through the scenic landscape or go sea kayaking (which I did the following morning and highly recommend, but more on that later!). You can also hike in the hills, go birdwatching, or simply relax in the geothermal hot springs on the property.

Where to Stay: Heydalur Guesthouse is pretty much the only option in the area, but it is a wonderful one! You can camp here or stay in one of their cozy guesthouses. Staying at the guesthouse or camping grounds gives you access to their heated swimming pool and hot pots and they are also able to organize any activities in the area for you. Waking up in quiet Heydalur is definitely the among the highlights of my time in the Westfjords, so I definitely recommend an overnight here. Check reviews, prices, photos, and availability here.

There is also a restaurant on the property that served one of the best meals I had in Iceland at a reasonable price for the country. If you have been saving money by cooking for yourself, I’d suggest treating yourself to a meal at the restaurant at Heydalur tonight – it was delicious! They have a greenhouse on the property where they grow a lot of their own vegetables so the food is really local and fresh.

Day 7: Seals, whales, & waterfalls on the way back to Keflavík

It felt like all my Icelandic luck came at once on my final day! The thing about any Iceland itinerary is that so much depends on luck. Whether that’s luck with the weather or luck with spotting certain animals or luck with the Northern lights, you simply can’t plan for everything on your Iceland trip.

As my week in Iceland drew to a close, I finally go to tick off several bucket list items all in one go: I saw puffins, arctic seals, humpback whales, and epic waterfalls all in one day.

I went sea kayaking in the fjords by Heydalur in the morning and it was probably my favorite thing I did in my entire 7 days in Iceland. The feeling of kayaking through glassy calm waters just meters from sunbathing seals, as a few errant puffins bobbed on the water or flew past — it was pretty amazing.

I don’t know what I was more excited to see, the puffins or the seals, but I was giddy as a child by the end of it.

Hólmavík

After seeing the arctic seals and puffins in the waters by Heydalur, I thought I had had all the luck I could have for the day. Little did I know how my day would pick up even more after. I went with Láki Tours, who have been offering whale watching tours in the Snæfellsnes peninsula of Iceland for years but just recently opened a new outpost of their tours in the Westfjords, in Hólmavík. Check out their tour availability here.

Their expertise in whale watching was clear – we were able to track humpback whales nearly our entire two-hour boat ride. Láki Tours does an excellent job of tracking whales without chasing them or getting too close, following ethical whale watching protocol. We were lucky to see several humpbacks during our ride, but most special was that we got to see two whales swimming together. While normally, humpback whales are solitary animals, occasionally two will swim side by side for a few hours. It’s rare to see, so it was pretty special to see these two hanging out!

After you’ve finished your whale-watching tour, you could stop back in town for the Museum of Icelandic Sorcery and Witchcraft, which is unique in the region. An interesting fact about Iceland is that Hólmavík’s region, Strandir, has historically been one of the most shrouded in mystery in all of Iceland, and where the first execution for sorcery took place in 1652. A witch hunt then swept the region for the rest of the 17th century, taking the lives of 16 men and 1 woman.

But easily the most famous (and grossest) part of this museum is the replica of the “Necropants,” made of a dead man’s skin and guaranteed to give the wearer an unending flow of money so long as he wears them!

There is also a modern church overlooking the harbor and near the Museum there is a highly-rated seafood restaurant called Galdur if you want to have lunch before the long drive back to Reykjavik!

Glanni Waterfall

On your way back to Reykavik, you can make several stops for waterfalls and views. I recommend definitely making a stop at Glanni Waterfall, as it’s just off the main road you’ll be using to go back, but it is quite under the radar and not a lot of people know about it so it is quiet compared to a lot of the other waterfalls.

It’s nothing particularly spectacular compared to Iceland’s other waterfalls but it is rather scenic and under the radar, so it’s worth the 10 minute stop!

Barnafoss & Hraunfossar

To see Barnafoss and Hraunfossar involves adding on an extra hour of driving (30 minutes there and another 30 on the way back) on your way to Keflavík, but I think it’s well worth it, even on a long driving day like this.

It is quite popular because it’s only 100 kilometers from Reykjavik, but it’s well worth braving the crowds for. Hraunfossar is a series of gorgeous turquoise waterfalls that began flowing out of a massive lava plain called Hallmundarhraun. The combination of the lava field plus the waterfalls of Hraunfossar is truly spectacular.

Barnafoss is just a few minutes’ walk past Hraunfossar so you can’t miss it. Barnafoss is an insanely powerful torrent of water that has an incredibly milky blue color, and it’s insanely photogenic.

Blue Lagoon

Finally, why not end your offbeat Iceland itinerary with one of Iceland’s most beloved attractions? The Blue Lagoon in Iceland is beloved for its geothermally heated, water, enriched with minerals like silica and sulfur that make amazing skin treatments.

Contrary to popular belief, the Blue Lagoon is not natural, but rather supplied by water used in the nearby Svartsengi geothermal power station. That doesn’t mean it’s dirty – anything but! It’s pure, mineral-rich water that is renewed every two days.

It is pricey, and it is popular, but for many people it’s an Iceland must, so consult your budget and decide.

Where to Stay: If you are leaving from Keflavik the next day, I recommend staying in a hotel near the airport and not in Reykjavik. Hotels are cheaper out by the airport plus it is really convenient to just be able to do a short 5 or 10-minute drive to the airport rather than going all the way from Reykjavik, which takes nearly an hour.

I stayed at Hotel Berg and thought it was an excellent place to end my Iceland stay. The hotel has a heated roof pool overlooking the harbor which is a great way to end your time in Iceland. The rooms are cozy and spacious, with really lovely design details that made everything feel extra special. I was delighted that breakfast was available from 3 AM on, so if you had an early morning flight (as many WOW air and Icelandair flights depart early) you wouldn’t miss out on getting breakfast before heading to the airport. Check reviews, prices, and availability here.

***

Well, that wraps up an epic 7 days in Iceland’s beautiful West! Is there any place I missed? Have you visited this beautiful part of the country? Let me know in the comments.

Note: Thank you to Iceland Travel for sponsoring my stay in the country and providing me with a car, tours, and accommodations during my stay. All opinions remain my own!