Your Ultimate 2 Day Everglades National Park Itinerary

everglades with an airboat tour

Rich with diverse wildlife and vegetation, Everglades National Park is a must-see destination for anyone fond of birding, hiking, paddling, or being surrounded by salty ocean air.

Here, the Atlantic Ocean meets the dense mangrove forests of southern Florida to form this spectacular environment, which is home to 36 protected species.

This 1.5 million-acre subtropical wilderness is habitat to over 360 species of migratory and nesting birds!

In addition to the plethora of avian species, the area is also home to the Florida panther, manatee, American crocodile, and some species that can only be found in Everglades National Park.

Grab your camera, sunblock, bug spray, and sense of adventure because a lot is waiting to be explored in America’s third-largest and one of the best national parks!

PLANNING FOR EVERGLADES AT A GLANCE:  

When to Go: Everglades might be an all-year-round destination but the best time to visit is between December and April which is the park's dry season. At this time of the year, mosquitoes and other biting flies are almost non-existent plus there is an increase in the number of wild animals as they gather to drink from the remaining water holes — this makes wildlife viewing a breeze.

Where to Stay: There are no lodges inside the park but you can find lots of accommodation in the nearby cities. But if you want to stay inside the park, you can opt for tent camping or rent an RV.

However, if camping is not your thing, there are various accommodation types in the nearby cities and towns but I recommend basing yourself in Homestead since the park is huge and this Everglades itinerary is written with an assumption that you'll be staying on the east side of the park.

In that case, I recommend staying at Floridian Hotel for a comfortable and affordable stay, Courtyard by Marriott Homestead for an upscale and luxurious stay, Hilton Garden Inn at Homestead for a cozy and familiar stay in a hotel chain. And if you prefer a homey feel, I suggest staying at this lovely home.

How to Get Around: A car is essential for visiting Everglades National Park as there is no public transportation to or from the park, and without a car, you'd have to rely on tours. If you're renting a car, compare car rentals and prices from here. Alternately, you can rent an RV or campervan via RVShare and save on accommodations. 

Don't want to drive or plan? You can book this full-day Everglades tour from Miami.  

3 Things Not to Forget to Pack: Binoculars are key for spotting wildlife like Alligators, Flamingos, and bison-- I suggest these Nikon binoculars. For hikes, you'll want a sturdy pair of hiking boots -- I love my Ahnu boots -- and some bug spray to keep away mosquitoes and biting flies. 

Know Before You Go: If you plan to visit multiple national parks in a year, the America the Beautiful Pass will save you a bundle! It costs $80 for an annual pass (for an entire vehicle traveling together) to all US national parks and federally managed sites. 

Where to Stay in the Everglades

airboats in the everglades national park

For the purpose of this Everglades itinerary, we’re going to suggest you stay in Homestead, as the park is really large and we’ve opted to cover the park as if you were based on the east side of the park, as many people visit the Everglades from Miami or as a side trip on their way driving to Key West, as opposed to coming from Western Florida.

COMFORT | For a cozy stay in a familiar chain hotel known for classic comfort, opt for the Hilton Garden Inn at Homestead. I’ve stayed at many Hilton Garden Inns over the years and I’m always impressed by the high-quality amenities and spacious rooms at a reasonable price.
Perks here include an outdoor swimming pool, a fitness center, and a 24/7 front desk.
>> Check prices, reviews, and availability here

UPSCALE | For a slightly more luxe stay, opt for the Courtyard by Marriott Homestead, which has a gorgeous outdoor pool area with plenty of sun lounger seating, a beautiful indoor/outdoor lobby, and spacious rooms with all the standard creature comforts. Other amenities include a fitness center, on-site restaurant, and dry cleaning and laundry services.
>> Check prices, reviews, and availability here

BUDGET | For a comfortable yet affordable stay, check the Floridian Hotel. It’s not quite as highly rated as the two above properties, but at about half the price of the other two choices, it’s not at all hard on the budget. There’s still an outdoor pool (and a shuffleboard court), but rooms and amenities are more modest, particularly the fitness center is a big downgrade from the above two options. If you just want to have a place to lay your head at night, though, this will do the trick!
>> Check prices, reviews, and availability here

What to Pack for 2 Days in Everglades

swamp in the everglades with lily pads and reeds

I have a complete road trip packing list here but below is an overview of the essentials you’ll need in Everglades.

Travel guides: While I’ve packed this Everglades itinerary with all the useful information you might need, sometimes guide books provide more details as they have more time to do all the research needed! Combine my first-hand experience with this Everglades National Park guide book and I guarantee you’ll have an amazing time in the park.

Layered Clothing: Depending on the time of the year you visit, you’ll want at least 2 shirts (synthetic or wool, long and/or short sleeve depending on the season), 2 pairs of leggings or pants, 2 pairs of shorts, 1 fleece outer layer, a waterproof jacket, beanie, gloves, and 3 pairs of socks.

Comfortable Footwear: There are many exciting trails to hike but you’ll need comfortable hiking boots or even sneakers. I never go hiking without my Ahnu Sugarpine boots for women, and for men, I suggest the KEEN Durand boot. If you opt to go with sneakers, make sure they have good traction and are comfortable enough to hike in for several 2-4 miles.

Sunscreen: Being in the dry season, you can be assured of sunburns if you don’t wear sunscreen. But don’t just take any random sunscreen — I suggest this chemical-free organic sunscreen. Wear it all the time and keep reapplying it every few hours for maximum protection.

Sunhat: A sunhat will not only accentuate your wildlife look but also protect you from the sun. I recommend this packable hat with a strap to avoid being blown away by the wind. And the best part is that you can wear it on your back if you get tired of wearing it on the head.

Day pack: A lightweight day pack is essential when visiting Everglades to put in all your travel essentials. I like this inexpensive and compact Osprey day pack. Apart from being durable and lightweight, I like that it has mesh panels on the back to allow for airflow — no more sweaty backs, even in the heat of Florida!

Snacks: Make or pick up a picnic lunch or pack a few snacks to eat in case you get hungry. I suggest things like protein bars (I love CLIF bars), nuts, or other high-density snacks that give you a lot of caloric energy for their weight!

Bug Spray: Everglades is like the breeding home for mosquitoes and biting flies so it would be a mistake to leave bug spray behind. Throw this bug spray in your day pack for maximum protection.

Camera: While my phone camera takes some nice photos, it just doesn’t cut it when it comes to taking good quality wildlife and landscape photos — that’s why I always take my Sony A6000 along, I love it! It’s a mirrorless camera, not a D-SLR, so it doesn’t weigh me down like other larger cameras yet I get the same or even better quality photos with it. But since it’s just the body, you’ll need to carry along a zoom lens for wildlife and a wide-angle lens for landscapes.

First aid kit: Don’t let little things like blisters ruin your Everglades trip! I suggest taking this HART Weekend First Aid kit with you. It’s lightweight and unobtrusive, but if you ever need it, you’ll be glad you packed it.

Water filter bottle: Stay hydrated by packing a water filter bottle that you can refill every time it runs dry! There are a wide variety of water filtration systems and treatments, but I love the GRAYL Geopress. It’s compact and easy to use and filters out 99.99% of microplastics, viruses, bacteria, and other nasty particles, making water instantly safe to drink without plastic waste.

Binoculars: Everglades is a perfect place for birdwatching on top of other wild animals and these Nikon Binoculars will make the experience even more exciting.

Camping essentials: If you plan to camp inside the park, take this camping tent, a sleeping bag, a sleeping pad, and a camping stove if you’ll be preparing your meals.

Day 1 of Your Everglades Itinerary

Welcome to Everglades National Park!

If you stayed outside the park in Miami or Homestead, plan for your drive time to the entrance station. Miami is about one hour from the park boundary, while Homestead is the gateway community.

If you’re flying into Miami or Fort Lauderdale, it’s a good idea to rent a car — it’ll be really tricky to navigate a self-guided Everglades itinerary without one.

Not sure where to get the best deal on your rental? I’ve rented cars dozens of times through various search engines and have settled on Discover Cars as the best car rental search aggregator – it sifts through dozens of trusted rental companies to find the cheapest price for your rental! Compare prices for your car rental here!

It’s a good idea to stock up on food and drinks before entering Everglades, especially if you’re planning to camp. Services are quite limited within the park.

Start the day at the Ernest F. Coe Visitors Center

Road to the Visitor Center in Everglades National Park, a road passing through a forest with trees on either side.

The first stop for many visitors when entering the park near Homestead is the Ernest Coe Visitors Center. This is the perfect stop to use the restroom, purchase souvenirs, and pick up a park map.

With a variety of well-designed interpretive displays, the Ernest Coe Visitors Center is also a great place to educate yourself on the park’s history and natural resources.

Don’t forget to watch the park’s orientation film, so that you can learn how to be a good steward of the fragile environment in Everglades National Park.

Although open 365 days per year, check the center’s hours before arriving as they do fluctuate with seasonality.

Walk the scenic Anhinga Trail

A scenic wooden boardwalk winding through a marsh with lots of plant life on the surface of the water, the Anhinga trail is a must on any Everglades itinerary.

Now that you’re fully educated on all that Everglades National Park has to offer, it’s time to hit the trails!

The Anhinga Trail is a perfect place to start. At less than a mile round trip, this trail offers opportunities to spot alligators, turtles, fish, and anhingas.

This is a popular trail in the wintertime because of the excellent birding! A variety of migratory birds flock to this pristine sawgrass marsh beginning in November.

The trailhead is conveniently located at the Royal Palm Visitor Center, which is only a 4-mile drive from the Ernest Coe Visitors Center.

 Walk the Pahayokee Trail

Swamp with vibrant autumn foliage, tan marsh grass and still water, on the Pahayokee Trail.

Continue back onto Main Park Road and head deeper into the Everglades. Stop in the turnouts along the way to take in the landscape!

After about 10 miles, turn right onto Pahayokee Road and continue toward the trailhead parking.

Once you arrive at the trail, hike above the grassy marsh on the raised boardwalk.

The short 0.16-mile scenic trail takes hikers to an overlook platform offering views of the surrounding area. Bring your binoculars along to scout for birds from the overlook.

Check out the wildlife at Eco Pond

The still water of the swamp at Eco Pond mirroring the cloudy sky perfectly in the water.

After a nice scenic drive through the park, you have arrived in the Flamingo Area on the coast.

There are plenty of short walking and hiking trails in this area, but one of the most highly recommended is Eco Lake.

It’s not far past the Flamingo Visitor Center. Look for the trailhead parking on the right.

This leisurely half-mile loop will take you around Eco Pond with chances to spot plenty of wading birds and songbirds.

If you’re observant, you may be able to spot Florida soft shell turtles or American alligators.

Although rewarding in beauty, this trail is famous for its intimidating mosquito population. Bug spray and bug nets are highly recommended!

Try to spot a manatee at the Flamingo Marina and Visitor Center

A manatee taking a breath at the surface of turquoise blue water near the Flamingo Marina in Everglades National Park: an itinerary must!

A fun hike around Eco Pond should be celebrated with an ice cream bar from the Flamingo Marina Store and scouting for manatee around the docks — spotting manatees is one of the top things to do in Florida, so it’s an Everglades itinerary must!

It is common to see these magnificent animals peacefully floating around the marina in the wintertime!

Beginning in November, Florida manatees begin to seek a warm hideout for the colder months ahead. Manatees are unable to withstand exposure to water under 68F for long!

See the Everglades from another perspective

Nose of the red kayak against the background of a man rowing in a kayak and water lilies

The Flamingo Marina is a great basecamp for exploring the open ocean and mangrove canals.

Here, you can rent canoes or kayaks to explore the coastline in search of more manatees, otters, alligators, birds, and even dolphins! This is one of the best places for kayaking in Florida, so be sure to take advantage.

You can also take a mangrove kayaking tour where you enjoy an easy paddle through the unique mangrove forests of the Everglades in a ‘sit-on-top’ style kayak — great for first-time kayakers.

Book a mangrove kayaking tour here!

Find a place to stay near the park

Tent sites placed along the beach in Everglades National Park in Flamingo Campground

As you wrap up your exciting first day in Everglades National Park, there are a few options for lodging accommodations.

Flamingo Campground is right on the beach near the marina, however, staying in Flamingo will leave you with some extra car time the next day.

Staying at Long Pine Key Campground, which is closer to the park entrance, or at a hotel in Florida City are the best options for splitting up the drive.

Wherever you choose to spend the night, plan to get some good rest for another fun (but full) day on your Everglades National Park itinerary!

Day 2 of your Everglades Itinerary

There’s a lot of fun waiting for you on the final day of your Everglades National Park 2 day itinerary, including embarking on one of the best Everglades airboat tours, walking on scenic boardwalks, and learning about the Indigenous history of the Everglades.

Breakfast is best sought in Florida City before hitting the road on Route 41 to another section of the park!

Take an airboat tour at Everglades Safari Park

A man standing on an airboat in a swamp with lots of water lilies floating on the water in Everglades national park

Have you ever been on an airboat? There’s no better place to take your first airboat tour than in the Florida Everglades!

On an Everglades airboat tour, guests coast through the River of Grass with an experienced and knowledgeable guide while searching for wildlife such as American alligators and migratory birds.

In addition to a scenic airboat ride, visitors get to experience alligator wildlife watching paired with an educational talk and the opportunity to explore the crocodilian exhibits along the park’s walking trail.

Book your Everglades airboat tour online here!

If you’re a serious wildlife enthusiast, you may prefer a longer boat ride with a focus on wildlife photography.

In this case, an airboat is not the best option as it can be noisy and unstable. If photography and wildlife spotting is the name of the game, opt for this large boat tour of the Everglades led by a Florida-certified Master Naturalist.

If you’re concerned about keeping social distance, don’t worry — the boat is limited in size to six guests, and there is plenty of room to spread out, set up your tripod, and photograph away to your heart’s content!

On the tour you’ll have the chance to see all sorts of birdlife — from spoonbills to ibises to herons to egrets to bald eagles — as well as marine life like manatees, turtles, and dolphins.

Book your wildlife photography tour in the Everglades here!

This is one of the best ways to have family fun in Florida on a budget!

Visit the Miccosukee Indian Village

Traditional Miccosukee wooden totem shaped like a bird in a wetland scenery in Everglades, Florida

After spending the morning exploring Everglades Safari Park, it’s back on the road toward the Miccosukee Indian Village.

The Miccosukee Native Americans were part of the larger Seminole nation until 1962, when their independent tribe was given formal federal recognition.

The Village graciously welcomes Everglades National Park visitors to learn more about the Tribe’s traditional culture, history, and artisanship.

Explore the village gift shop for handmade crafts or attend one of the world-famous alligator “wrestling” demonstrations.

You might be getting a little hungry by now! Luckily, there is a casual place here called Our Little Eatery.

With a classic menu including burgers and fries, there is something for everyone to enjoy. If you haven’t tried alligator bites yet, now is your chance. Tastes just like chicken!

Head to Shark Valley Visitor Center for a tram or bike tour

The trail through Shark Valley with a large structure that is an observation tower which offers views over the national park

Now that you’re fully fueled up on gator bites, backtrack on the road less than half a mile to the Shark Valley Visitor Center.

The Shark Valley Visitor Center has informational videos, bike rentals, brochures, and souvenirs for purchase in the gift shop.

If time allows, hop on one of the Shark Valley Tram Tours. These fun guided tours take passengers on a scenic ride through the everglades unlike any other.

Halfway through the excursion, passengers can get off the tram to explore the Shark Valley Observation Tower. The tower has the highest observation platform in Everglades National Park.

If you want to get a good workout in, rent bikes at the Shark Valley Visitor Center to explore the 14-mile tram road loop on your own time. Remember, bikes must stay on the designated trail.

Stroll the Bobcat Boardwalk Trail

Boardwalk leading through a swampy landscape with lots of lilies and native swamp plants surrounding the boardwalk trail

Explore Shark Valley’s tropical hardwood forest on the Bobcat Boardwalk Trail. Appropriately named, the trail is made entirely of boardwalk!

Follow the trail as it meanders through the forest and sawgrass slough. This easy walk is a half-mile loop that begins behind the Shark Valley Visitor Center.

Keep your eyes peeled for fish, migratory and nesting birds, and even alligators!

Continue your sightseeing on the Otter Cave Hammock Trail

Woman in a white t-shirt, long light blue pants, and sneakers walking on the boardwalk of Hammock Trail in Everglades National Park

There’s even more to see in Shark Valley on foot! The Otter Cave Hammock Trail is about a mile round trip and wanders farther into the tropical hardwood forest.

This trail is perfect for anyone hoping to see more wildlife after walking the Bobcat Boardwalk.

This trail is easy to follow, but watch your step because it’s primarily composed of rough limestone! Along the way, you’ll cross over a small stream using the sturdy footbridge.

The trailhead for the Otter Cave Hammock Trail is located a half-mile behind the Shark Valley Visitor Center.

During the summer months, the trail can become flooded. Always check on trail conditions at the visitor center before setting out!

***

This is where we leave you to discover your next Florida adventure.

Continue along Tamiami Trail to explore the Gulf Coast and popular ocean cities like Naples and Fort Meyers or rent a canoe to venture deeper into the Everglade’s pristine wilderness.

Wherever you go from here,  you’re sure to bring wonderful stories about your visit to Everglades National Park!

Pin This Guide to Everglades National Park!

10 Best Things to Do in Mount Rainier National Park

Mt. Rainier is the iconic mountain seen from downtown Seattle, the largest mountain in Washington State.

Its large presence over Western Washington means that Seattleites simply call it “The Mountain.”

In fact, you’ll often hear them use the popular saying “The Mountain is out” – meaning that the skies are clear (a rare occurrence through the grey Northwest winters!) – and you can see Mt. Rainier looming over the landscape.

Although Mt. Rainier can be seen from Seattle, a visit to Mt. Rainier National Park is well worth the trip to truly take in the alpine wonderland.

There are plenty of things to keep you busy during your visit, but here are the 10 best things to do in Mount Rainier National Park, easily one of America’s most beautiful National Parks:

What to Do in Mount Rainier National Park

Enjoy the drive!

Tunnel in Mt. Rainier National Park leading to interior of park

As with many National Parks, the roads through Mount Rainier National Park are lined with breathtaking views, but also wind along cliff-sides, making them nerve-wracking if you’re not into that (no worries, there are plenty of roadside barriers).

The abundance of pull-outs along the road offer many places to stop to take in the views. There are a few different roads that offer entry into the park, depending on which direction you come from.

If you want to take a nice long drive, drive towards Paradise in Mount Rainier National Park, where the road winds around trees and corners to give you stunning views.

If you enter the park from Seattle, you can drive from the Nisqually Entrance up to Paradise, and can continue on past to the Stevens Canyon Entrance, and up to Sunrise.

The Carbon River entrance is a side trip and you’ll have to leave the park and re-enter to access this area, but this also means there’ll be fewer people here too.

Hug some big trees

Tall cedar trees on a shady hiking path in the middle of the forest in Mt. Rainier National Park.

Stopping at the Grove of the Patriarchs is quite a treat, and one of my personal favorite things to do in Mt. Rainier National Park.

Here you’ll find huge cedar trees along an easy path through the woods. Although you may be in the park to see the mountain, take advantage of your trip into the Cascades to explore the forest landscapes.

On this walk you’ll be immersed in old-growth forest, full of lots of green and huge trees. Isn’t it crazy how old these trees are? There is a short hiking loop that will take you through trees older than the state of Washington.

My favorite way to enjoy the trees is to sit on one of the park benches and look up at the canopy. If your neck gets too sore, another option is to lie on the ground (off to the side of the path, of course!) and gaze up at these massive giants from the perspective of the forest floor.

This path is a flat and accessible loop, allowing you to experience the wonder of old-growth northwest forests without a long hike.

Spend a night at Mowich Lake Campground

A calm lake reflecting mountains and clouds and trees in Mt. Rainier National Park, called Mowich Lake.

Camping within the park gives you the luxury of falling asleep and waking up to an alpine glow on the mountain.

Sunset on the mountain is always a beautiful sight, and on a nice summer evening, you’ll be immersed in the light pinks and oranges surrounding the snow-capped mountain during golden hour, the best time for pictures.

There are several campsites within the park that allow advance reservations and offer more amenities, but if you’re up for a more rugged and spontaneous adventure, head out on the gravel road to Mowich Lake Campground.

Here, campsites are available first-come first-serve, so be sure to arrive early during summer, especially on the weekend, but if you manage to get one, you are afforded with unparalleled access to the beautiful Mowich Lake and a base camp for the surrounding adventures – including Tolmie Peak, Spray Falls and Spray Park hikes.

Be sure to bring enough water for your group or a filter for lake water, as there is no potable water at this campsite.

Bask in the fields of flowers at Spray Park

Purple, white, and pink wildflowers in the spring in Spray Park. Hiking here is one of the best things to do in Mt. Rainier National Park!

Spray Park in mid-summer is a wonderful place, with meadows full of multi-colored wildflowers blanketing the hills in front of Mt. Rainier.

Access to this trail is from the Mowich Lake trailhead on a gravel road, but if you make it to the trailhead you’ll be rewarded with a less-crowded hike than others in the park.

Two miles into the hike you can take a short detour to Spray Falls and then continue up the switchbacks to find meadows and a view of Rainier.

A good place to end this hike is at the viewpoint at Mist Park. From this endpoint, you can return the way you came for a total distance of 8 miles.

Climb to the top of an old fire lookout

A woman wearing a plaid shirt and black pants looking off into the distance of the mountains with a fire lookout (a small wooden hut) in the background.

Fire lookouts dotted the mountainous landscape of the Western U.S. before cell towers and satellites took off, allowing summer employees to live in the lookouts (small, one-room cabins) keeping watch for fires, and alert authorities when they spotted a fire.

No longer in use for this fire watching, these locations offer spectacular viewpoints, and many of these lookouts are preserved for visitors. There are several hikes within MRNP featuring old fire lookouts, but the most accessible hike is at Mt Fremont.

If you make it to the top of this 5.6 mile hike, you’ll be rewarded with a fantastic view of Mount Rainier and the shimmering Frozen Lake below, and a piece of history (the lookout).

The hike begins at Sunrise, then wanders past Frozen Lake, and up the final stretch to the lookout. Frozen Lake is a wonderful stopping point if you’d prefer a shorter hike (3 miles), and is surrounded by alpine meadows. Just make sure you stay on the trail to avoid trampling the plants!

Soak up the mist from Narada Falls

A narrow but tall waterfall cascading down a cliff-edge with trees and rocks framing it and a small rainbow prism in the waterfall.

Named from the Hindu word ‘Narada’, meaning uncontaminated, Narada Falls is an energetic waterfall that does not require a long hike to view.

The waterfall is located just off the park road between Longmire and Paradise. In fact, you can look down on the waterfall from the parking lot.

If this leaves you wanting more, there is a short trail that leads you down to a lower viewpoint, where you can stand in the mist.

Make sure to watch your step on the way down though, since the mist dampens the path and it can get slippery.

Spot mountain climbers from the visitor center 

The view of Mount Rainier from the window of the Mt. Rainier National Park Visitor Center with pine trees in foreground.

The Henry M. Jackson visitor center in the Paradise area of the National Park offers spectacular views of the mountain.

The visitor center looks over the popular climbing route to the summit and makes use of this viewpoint by offering telescopes for park visitors hoping to spot a climber making their way up or down the mountain.

Although the route to the summit is challenging and inaccessible to most park visitors, it is inspiring to gaze up at the route and imagine the perils and adventures of a summit trip.

At the visitor center, browse the information on the displays to learn about the formation of this volcano and the history of the region.

You can also chat with the friendly park rangers who love answering visitor questions, and browse the gift shop for souvenirs to bring home from your adventure.

Visit the Longmire historic district

A view of Mt. Rainier from Longmire, with rock-strewn landscape, green trees in foreground and the mountain in the background.

The Longmire area of the park has several hiking trails, a replica of a homestead on the park from the 1890s, and hot springs.

Longmire is named after James Longmire, whose homestead and hot springs resort was the park’s headquarters when it was established in 1899.

The park headquarters are no longer located at Longmire, but the 1916 park headquarters here now feature a museum with the early history of the national park.

In this location is also the National Park Inn and the Longmire Wilderness Center.

Watch marmots along the Skyline Trail

A well-trodden trail with wildflowers dotted on either side of the path and a patch of pine trees in Mt. Rainier National Park.

Marmots are a large, cute ground squirrel that live among the rocks and dirt in high alpine environments.

Although they live in many places in the park, a good place to find these cute creatures is along the Skyline Trail, a trail that goes from Paradise up the steps with the John Muir quote and onward.

If you don’t manage to see one, you may see their burrows along the dirt or hear their whistles across the meadows.

The Skyline Trail is the main hiking route from Paradise and can be done as a 5.5 mile loop or made shorter, depending on how you’re feeling.

Picnic at Tipsoo Lake

A perfectly snow-covered Mt. Rainier reflected in Tipsoo Lake with trees and grass around the lake edges.

Tipsoo Lake has a picnic area close to the parking area where you can eat with a view of the lake, creeks, flowers, and mountains.

After your picnic, you can continue to sit and enjoy the views or you can take advantage of the short and flat trail that meanders around the lake.

On this trail you can continue to enjoy the sparkling blue lake, views of Mt Rainier, and fun small wooden bridges over the little creeks that criss-cross the meadow.

Although there are plenty of hiking options at Mt Rainier National Park, the lake around Tipsoo Lake is a great stroll if you’re looking for a short and flat, but rewarding walk, and a great location for a picnic.

Pin This Guide to Things to Do in Mount Rainier National Park

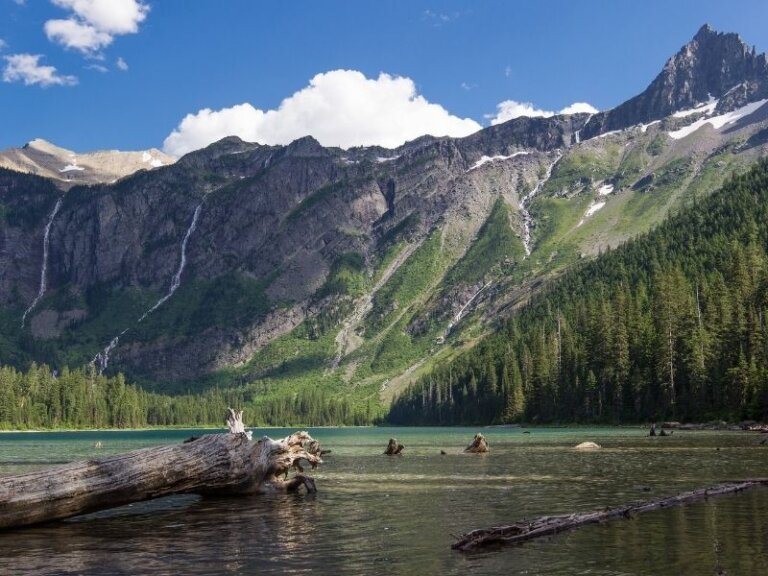
7 of the Best Day Hikes in North Cascades National Park

North Cascades National Park encompasses some of the most remote mountains in the lower 48 states…. and some of the best views

Known for the lack of roads, meaning long hiking distances to reach destinations, there are enough trails and hikes in North Cascades National Park to last a lifetime.

However, there are thankfully also plenty of beautiful hikes for a day’s walk.  Here are a few of my favorite day hikes in North Cascades.

The Best Hikes in North Cascades National Park

Cascade Pass

Mountain pass with pine trees and a few snow-covered peaks and a slightly cloudy sky.

Total Length: 7 miles
Hike Type: Out and Back
Elevation Gain: 1800 ft
Difficulty: Moderate

Driving Directions: Take highway 20 to Marblemount and then continue onto Cascade River Road (proceed straight when highway 20 takes a left). Follow Cascade River Road 23 miles to the end of the road, where you will find the trailhead.

The Cascade Pass trail is a moderate-level hike, but it is the most popular hike in North Cascades National Park for a reason: it’s worth the climb!

A hike up this trail will grant you with fields of heather, snow-capped mountains vistas, and glacial carved valleys. 

You may also find a marmot or two and some chipmunks along the way. Take care not to feed the chipmunks — they are already chubby enough.

Diablo Lake

Turquoise-blue lake with pine trees and peaks in the mountains with a few clouds.

Total Length: 7.6 miles
Hike Type: Out and Back
Elevation Gain: 1400 ft
Difficulty: Moderate

Driving Directions: Drive east along highway 20 from Marblemount. After crossing the Gorge Lake bridge, drive another 1.5 miles, then turn left on Diablo Dam Road toward the North Cascades Environmental Learning Center. Cross the dam and drive to the end of the road, where you will find the trailhead

Diablo Lake is a brilliant blue lake featured in many pictures from people hiking North Cascades National Park. Views like this are what make many people say the North Cascades is one of the best hiking destinations in the USA.

Smaller than the nearby Ross Lake, but equally as beautiful (or more), this trail features islands, deep gorges, waterfalls, and the stunning mountain peaks of the North Cascades. 

This trail offers views of Diablo Lake throughout the hike and ends at a viewpoint overlooking Ross Lake and a picturesque bridge.

The trail begins with a beautiful walk through old-growth forest. When the trail emerges from the forest and crosses Deer Creek, there is a short side trail that offers a view of the lake.

From here, the trail reaches views of a waterfall and the surrounding peaks. The trail then reaches an overlook of Ross Lake and its Dam. You can continue down the steep trail to the suspension bridge or stop here and soak up the views. 

If you want a change of pace on the return trip, you can enjoy a ride on the Diablo Lake Ferry back to the trailhead to experience the lake from a different perspective (and save some walking!). The ferry is operated by Seattle City Light from June to October.

Sourdough Mountain

Sourdough Mountain, a gray and green mountain, on a foggy day with pine trees.

Total Length: 10.4 miles
Hike Type: Out and Back
Elevation Gain: 4870 ft
Difficulty: Hard

Driving Directions: Drive east along highway 20 from Marblemount for 22 miles. When you reach Diablo Dam Road, take a left. In 0.7 miles at cross the Stetattle River bridge, stay to the right, and reach the trailhead in 0.25 miles from the road split.

Sourdough Mountain is the site of one of the first fire lookouts established by the U.S. Forest Service, and the historic lookout building still stands at its peak.

To reach the lookout, you first begin with steep switchbacks in the forest. The first two miles of the trail gains 3000 ft of elevation with grueling switchbacks.

However, this effort will become worthwhile once you make it out of the forest, where you will be greeted with wildflower meadows and expansive views that get better as you go.

Although beautiful, this is not a beginner-friendly hike in North Cascades, and there are a few considerations to keep in mind.

Since this is a steep trail, occasionally narrow and loose, the trail will be easier with a pair of hiking poles. In addition, the trail is steep and there is no water access until a potential stream 4 miles from the trailhead. 

Stehekin River Trail

A view of Lake Chelan, a still lake with a small beachy area and dock, part of the hike in Stehekin.

Total Length: 7.6 miles
Hike Type: Out and Back
Elevation Gain: 100 ft
Difficulty: Beginner

Driving Directions: This trail begins in the remote town of Stehekin, and to access this town you’ll need to take the Lady of the Lake ferry from Chelan. From the ferry dock in Stehekin, take a bus up the Stehekin Valley Road for 4.5 miles. You will find the trailhead after crossing Harlequin Bridge, following Company Creek Road to the airport, and walking to the end of the airport runway.

Explore the Southern side of the North Cascades National Park Complex with a visit to the town of Stehekin on Lake Chelan.

There are plenty of trails from town, but this shaded trail along the river is ideal for the warm summer day.

Better yet, the trail ends at Weaver Point at Lake Chelan, a campground with a bit of a sandy beach and view of the town.

The trail begins by wandering through the valley floor, giving you views of the neighboring mountains. About a mile into the hike, you will be greeted with your first view of the river and surrounding meadows.

Continue on from here until you reach Lake Chelan and enjoy the peaceful walk through the beautiful landscape.

Cutthroat Pass

A fall hike in Cutthroat Pass, one of the best day hikes in North Cascades National Park, with yellow trees and fall colors.

Total Length: 10 miles
Hike Type: Out and Back
Elevation Gain: 2,000 feet
Difficulty: Hard

Driving Directions: Drive approximately 50 miles east on Highway 20 past Marblemount to Rainy Pass. Turn left (across from the road to Lake Ann), and drive down the road half a mile to the parking lot and trailhead for the Pacific Crest Trail.

You can’t go wrong with any hike on the Pacific Crest Trail (PCT), a 2,650 mile trail that extends from the Mexican border in California to the Canadian border in Washington, but this hike to Cutthroat Pass is on one of the best sections.

To reach Cutthroat Pass, you will follow the PCT from its Highway 20 crossing, 5 miles north towards Canada.

The trail begins with small creek crossings that may be running high, so be sure to cross carefully. As the trail continues, the forest thins, and you can see the mountains across the valley, before crossing through the granite-filled, heather meadows of the alpine.

Upon reaching the pass, there are 360-degree views of the surrounding mountains to enjoy with your summit treats. This is also an excellent fall hike, as the larches will turn a brilliant yellow before winter comes.

Sauk Mountain

A view from Sauk Mountain with green grass mountain sides and a tiny brilliant turquoise glacial lake.

Total Length: 4.2 miles
Hike Type: Out and Back
Elevation Gain: 1200 ft
Difficulty: Moderate

Driving Directions: Take exit 232 off of I-5 to Highway 20, then after 35 miles, turn left onto Sauk Mountain Road (FS 1030). The trailhead is 8 miles down this steep, but generally passable road. It is worth reading recent trail reports on wta.com for an updated road report before you head out for this hike, as conditions vary throughout the season.

Sauk Mountain is one of my favorite hikes in the area because of the great variety you find along the trail.

Although outside the boundary of the national park, it showcases the best the region has to offer. It is never a slog, offering excitement throughout the entire trail, with views that grow continuously more impressive.

With the multitude of peaks that you can see from the trail, it is the perfect trail to bring along a map of the area for peak identification, or try out the PeakFinder app, an app that identifies visible peaks as you point your phone out on the horizon.

When you are not looking at the views, or if the clouds roll in, spend some time admiring the variety of wildflowers adorning the slopes, or listening for marmots squeaking as they run around the rocks.

Lake Ann

A small brilliant blue lake, Lake Ann, surrounded by wildflowers and mountain peaks at the base of a mountain valley.

Total Length: 3.4 miles
Hike Type: Out & Back
Elevation Gain: 700 ft
Difficulty: Beginner

Driving Directions: Drive approximately 50 miles east on highway 20 past Marblemount. Stop at the Rainy Pass trailhead on the right side of the road.

Not to be confused with Lake Ann near Mt. Shuksan, which is also a beautiful hike in the area, this Lake Ann is near Rainy Pass and the Maple Pass Loop.

Lake Ann is a crowd-pleaser for any season (besides winter, when the road closes), offering wildflowers in summer, larches in fall, and majestic snow-sprinkled mountains in early winter.

To find the trail from the parking lot, follow the “Lake Trail” signs. When you find a junction between a paved trail and a dirt trail, take the dirt trail to the right.

A mild hike through forest and wildflower meadows, this is a great stroll for any day.  Lake Ann is the perfect alpine lake, with beautiful blue water lined by talus fields.

From the lake, you can return back the way you came or continue up to Maple Pass for a longer hike. It is possible to do a loop hike on the Maple Pass Trail, but prepare for double the distance and double the elevation gain.

Pin This Guide to Best Hikes in North Cascades National Park!

Yellowstone in Winter: 30 Useful Things to Know Before Visiting

Yellowstone National Park becomes a wintery wonderland by mid-fall. The peaks are heavy with snowpack, bear hunker down with their full bellies, and the rivers steam at the touch of the frosty air.

As the temperatures begin to drop, the summer crowds disperse and Yellowstone in winter quiets down.

While normally you have to go back-country to get away from the crowds, in winter, Yellowstone front-country becomes a place to seek solitude and silence.

Yellowstone in Winter FAQs

View of Mammoth Hot Springs in sunrise light with lots of mist and steam and pastel colors from morning sun.
What is there to do in Yellowstone in winter?

Quite a lot! While most of the park is closed to private vehicles, snowmobiles and snowcoaches will take you to many of the most scenic parts of Yellowstone without the crowds. Cross-country skiing and snowshoeing are two of the most popular winter activities in Yellowstone, as well as wildlife spotting and wildlife photography.

Where should I stay in Yellowstone in winter?

Many of the lodges in the park itself are closed, with the exception of the Old Faithful Lodge.

Instead, I recommend staying in Jackson Hole or West Yellowstone.

For Jackson Hole, I suggest Wyoming Inn. This cozy inn features Western-style decor complete with a roaring fireplace, warm woodsy colors, rustic design touches, and large, modern rooms. Check photos and reviews here.

For West Yellowstone, I suggest the hip The Adventure Inn. This stylish spot has a minimalist style, with a Scandinavian sensibility mashed up against a woodsy edge. It’s like a Brooklyn loft and a mountain cabin had a baby: it’s beautiful. Check photos and reviews here.

Can I drive through Yellowstone in winter?

Only through the North Entrance in Gardiner, MT leading to the Northeast Entrance — otherwise a snowcoach or snowmobile transit must be booked. More on that below.

Road Conditions and Seasonal Closures in Yellowstone in Winter

Road leading into Yosemite National Park in winter

As Yellowstone National Park transitions into winter season activities, there are some important dates to keep in mind!

While certain roads close to private vehicles, others begin to open to over-snow transportation such as snowmobile and snowcoach – We’ll talk about these more in a bit.

Yellowstone Entry Price in Winter

Sun low on the horizon showing through a puff of steam from hydrothermal area of boardwalk

The price to enter Yellowstone National Park in winter is the same as at any other time of year: $35 for private vehicles and $30 for snowmobiles, each granting 7 days of admission.

However, if you like National Parks, I highly recommend investing in an America the Beautiful pass! It gives you one year of free entry to all National Parks and other federally-administered protected areas (National Forests, National Seashores, etc. — over 2,000 sites!) for the low price of $79.99.

Plus, 10% of that goes back into the National Park Foundation to keep the land pure, beautiful, and accessible for all.

>> Buy your America the Beautiful annual pass online here! <<

Yellowstone Winter Opening Dates

Paved road with snow covered trees in Yellowstone National Park

These opening dates apply to over-snow travel only. Over-snow travel includes snowmobiling, cross country skiing, snowcoach tours, and snowshoeing. It does not include personal private vehicles.

If you would like to drive your own vehicle into the park, you will need to use the North Entrance in Gardiner, MT — the only open road.

The road between the North Entrance and the Northeast Entrance remains open for private vehicles all year.

The following sections of road open mid-December for over-snow travel:

  • West Entrance to Old Faithful
  • Mammoth Hot Springs to Old Faithful
  • Canyon Village to Norris
  • Canyon Village to Yellowstone Lake
  • Old Faithful to West Thumb of Yellowstone Lake
  • South Entrance to Yellowstone Lake
  • Yellowstone Lake to Lake Butte Overlook

Yellowstone Winter Closing Dates

Yellowstone geyser in winter showing blue turquoise water with orange rim in white snow

If you are planning to make a late winter trip to Yellowstone National Park, you will want to be aware of the winter closing dates for over-snow use.

The following roads close to over-snow travel in early March:

  • Sylvan Pass
  • Mammoth Hot Springs to Norris
  • Norris to Madison Junction
  • Norris to Canyon Village

All remaining roads close for over-snow travel, with the exception of the road between the North Entrance and Northeast Entrance, in mid-March.

Winter Road Conditions in Yellowstone

Curving paved road leading to Yellowstone in winter with snow-covered trees.

Always check on Yellowstone National Park’s official website for updated road conditions before traveling to the park. The weather can change quickly, and you’ll want to be prepared.

That means snow chains if you are driving the North-Northeast Entrance route, safety flares or triangles in case of a breakdown, and warm clothing / emergency blankets in case you are stranded for a while waiting for a tow.

When to Visit Yellowstone in Winter

Frozen Lower Yellowstone falls with trees on the landscape.

The best time to visit Yellowstone National Park for winter activities is between the end of December and the end of February. It’s one of my favorite National Parks to visit in December for good reason!

This is because it falls into the over-snow travel period but before the period ends, and it has the fewest crowds while also having some of the most stunning snow-covered landscapes you can imagine: white snow broken only by the beautiful kaleidoscope of the rainbow-hued geothermal pools in the ground!

Weather in Yellowstone in Winter

Misty foggy landscape of Yellowstone in winter with trees and mountains.

Yellowstone in winter can be summed up in one word: FREEZING.

Fun fact: The West Entrance recorded the park’s record low of -66°F in 1933. BRRR!

Here are the breakdowns for winter weather in Yellowstone and what to expect on a month-by-month basis from November through February.

November: Average high of 34° F and an average low of 13° F, with 12 days of rain/snow

December: Average high of 26° F and an average low of 4° F, with 13 days of rain/snow.

January: Average high of 28° F and an average low of 3° F, with 13 days of snow/rain.

February: Average high of 31° F and an average low of 4° F, with 11 days of snow/rain.

Getting Around Yellowstone in Winter

View from behind of a man on snowmobile with another snowmobile ahead on a sunny winter day.

Traveling in Yellowstone National Park is a little different in the wintertime.

Some pre-trip planning is in order if you plan to visit Old Faithful, Canyon Village, Yellowstone Lake, or any other area of the park that is inaccessible by private vehicle.

If you want to explore these areas of the park during the wintertime, you will want to schedule a snowcoach or snowmobile tour well in advance of your trip date! These excursions are popular among wintertime visitors!

Booking an Over-Snow Tour

A yellow snowcoach plowing through snow in Yellowstone National Park

You have two options for over-snow travel in Yellowstone in winter: snowcoach and snowmobile. And they are very different!

A snowcoach is an enclosed vehicle with large tires capable of driving on the park’s snow-covered roads with ease. They have comfortable seats and large windows for viewing the snowy landscape.

Snowcoach tours are great for families or visitors who want to sit back and relax while exploring the park with a knowledgeable professional.

For those with an adventurous spirit, a snowmobile tour will offer a thrilling Yellowstone winter experience!

Although driving speeds are limited to 25 mph in the park, riding a snowmobile past herds of bison and elk is exhilarating and unlike any other scenic tour. The best part is, the professional outfitters will make sure you are geared up to stay warm throughout the entire ride!

Now, let’s talk about what kind of fun winter activities there are in Yellowstone!

Overwhelmed by Visiting Yellowstone National Park in Winter?

Pack of elk with horns with one standing in the river and others in background

Admittedly, Yellowstone is not the easiest national park to visit in the winter if you are used to being able to drive to different points and not have to worry about over-snow transportation.

If reading this far into the post has gotten you feeling a bit anxious and overwhelmed by all the planning that needs to go into a successful Yellowstone winter trip, I strongly recommend opting for a 4- or 5-day guided tour which will handle all the logistics.

This 4-day tour includes transportation from Jackson, Wyoming on the beginning and end of the tour as well as 3 nights of accommodation in West Yellowstone, ending in Jackson Hole.

It includes the following: wildlife sighting opportunities in Grand Teton National Park (keeping an eye out for wolves, elk, bison, moose, elk, bison, foxes, eagles, deer and more!), a snowcoach trip to see Old Faithful and other hydrothermal areas in Yellowstone National Park, a horse-drawn sleigh ride into the National Elk Refuge, boardwalk hikes through Fountain Paint-Pots and Mud-Pots, and lots of stops for beautiful winter photography opportunities.

Check the itinerary and more details of this 4-day Yellowstone and Grand Teton winter trip!

Pack of four wolves walking through snow in Yellowstone National Park in winter

Another option is this 5-day wildlife-focused tour which covers Yellowstone extensively. It starts in Bozeman, Montana (a wonderful place to stay in winter!) and includes 4 nights of accommodation, dropping you off in Bozeman on the return.

It includes the following winter activities: a day of wildlife sightings (keeping an eye out for both bald and golden eagles, white-tailed deer, coyotes, elk, bison, bighorn sheep, pronghorn antelope, and more), visiting Old Faithful via chartered snowcoach and also seeing Fountain Paint Pots along the way, Cooke City for the best place on earth to see wolves (located in the northern range of Yellowstone), and wolf winter safaris in Lamar Canyon with experienced wildlife guides and wolf researchers.

Check the itinerary and read more details about this 5-day Yellowstone wolf and wildlife focused tour!

Cross Country Skiing in Yellowstone

A white woman smiling and going cross-country skiing in Yellowstone national park

Yellowstone National Park is full of wonderful ski trails from groomed front country loops for beginners to remote backcountry routes for seasoned and highly-experienced skiers!

If you’re interested in getting out into nature on some cross country skis, these are our favorite beginner-friendly trail options for getting out into the nature of Yellowstone National Park in winter!

Upper Terrace Loop Ski Trail

View of Mammoth Hot Springs with orangey-pink sunrise sky and mist floating up from geyser.

A little spontaneous? This trail is great for last-minute trips into Yellowstone National Park in winter.

Since you can drive to the trailhead in your personal vehicle without booking over-snow transportation in advance, there’s often minimal planning involved.

The 1.5-mile loop is routinely groomed, but it can be considered difficult for beginners due to the few steep sections.

Enjoy this scenic trail around the upper terrace geysers and hot pots in Mammoth’s hydrothermal area. It takes about 1-hour to complete this loop, but leave time to take photos with the geysers, including Mammoth Hot Springs, Canary Spring, and Orange Spring Mound!

Black Sand Basin Trail

Steam rising from a geothermal feature with flowing river and snow on each side

The Black Sand Basin Trail is a great option for beginners or experienced cross country skiers!

This groomed ski trail begins at the Old Faithful Visitor Center and heads to the Upper Geyser Basin Trail. The 4-mile trail will take about 3-hours to complete as you glide past the many steaming hydrothermal features.

This ski trail is located near Old Faithful and is inaccessible to private vehicles during the wintertime.

Advanced planning is needed to accommodate for over-snow transportation.

Blacktail Plateau Ski Trail

Pack of elk with horns eating in the snow

Were you hoping to encounter some wildlife while skiing in Yellowstone in winter? Cover some ground on the Blacktail Plateau Ski Trail to spot bison, elk, and maybe a wolf pack in the distance!

This trail has a few challenging sections and stretches 8-miles with a trailhead on both ends.

It is common for skiers to park one vehicle on both ends of the tail or only ski in a few miles before turning around toward the trailhead. Either way, know your experience level and make a plan before hitting the trail.

Cross Country Ski Rental

A man on cross country skis with back turned heading towards a geothermal feature in Yellowstone in winter

Forgot to pack your cross country skis, or don’t know if you want to make the investment in your own pair just yet?

There are plenty of rental shops located in the towns of West Yellowstone, Gardiner, Big Sky, and Bozeman.

Stop by a rental shop or call ahead and they can outfit you with everything you need to experience Yellowstone National Park’s groomed cross country ski trails!

Snowshoeing in Yellowstone

A man with a red jacket and backpack snowshoeing on a misty day with snow

For those looking to take the trails a little slower, snowshoeing is a great option!

Snowshoes and trekking poles can be rented at many of the same outfitters offering cross country ski rentals, so no worries if you couldn’t bring your own along.

Many ski trails in the park are also snowshoe-friendly. Just avoid walking on top of ski tracks whenever possible, as this makes it difficult for cross-country skiers to return (as they trace their tracks!).

Here are a couple of trails to try out.

Observation Point Loop Snowshoe Trail

A blue sky day with snow on the ground and a view of Old Faithful geyser erupting steam high into the air

This trail is a must-do for anyone staying at the Old Faithful Lodge!

Conveniently located just past the Old Faithful Visitor Center, the Observation Point Loop Trail is a great way to watch the timely eruption of the world-famous geyser, Old Faithful!

Strap on your snowshoes because this 2 mile loop trail is closed to skiing. Along the way, you’ll catch views of other area geysers and maybe even some wildlife.

Tower Fall Ski Trail

For those looking for a longer snowshoe outing, the Tower Fall Ski Trail is a great choice.

Along this 5 mile trail, snowshoers will be rewarded with wintry views of Tower Fall and the Yellowstone River Canyon. Keep your eyes peeled, bison and wintering elk frequent these areas!

Winter users can park their personal vehicles in the parking area nearby Tower Junction and follow the unplowed road behind the gate.

The trail begins with a gradual uphill, which is great for warming up on chilly days! This trail is also popular for cross country skiing.

Winter Yellowstone Wildlife Viewing

A red fox looking towards the camera in the snow

A lot of Yellowstone National Park’s wildlife remains active throughout the winter season.

Although bear hibernate in their cozy dens during the snowy months, wildlife such as elk, bison, wolves, fox, coyote and bald eagle can still be spotted!

If you are taking a private tour in a snowcoach or on snowmobiles, your guide will be sure to point out any wildlife in view.

Wildlife Spotting Without a Tour

A grey wolf looking directly at the camera with snow-covered trees behind him

For those who are planning to take their own vehicles into Yellowstone, we have a few tips!

  1. Drive out toward the Lamar Valley with binoculars, hot beverages, and warm blankets. Find a nice spot where you can look out over the valley and start scanning! The Lamar Valley is famous for wolf sightings and a fresh blanket of snow often makes them easier to spot.
  2. In the wintertime, Mammoth Hot Springs becomes a popular spot for wintering elk to settle in. Spend some time in this area and count how many elk you can find!
  3. Bison can often be viewed along the drive to the Lamar Valley. If you see Bison as you drive along, be sure to only stop in designated pullouts for safety.

What to Pack for Yellowstone in Winter

A woman in a pink hooded parka with a camera photographing snow-covered trees

Waterproof Parka: In the snowy weather and freezing temperatures of Yellowstone in winter, you’ll want something like this wonderful North Face parka. It’s pricy to be sure, but it comes with a lifetime guarantee (which I’ve tested by sending in my zipper to be fixed after four years of use and abuse cycling in it all winter long – my jacket came back looking like new!).

I’ve had this one for ten years and it’s held up beautifully from everything to biking in NYC in winter to visiting north of the Arctic circle in Tromso and Abisko. It’ll certainly do you just fine in Yellowstone National Park in winter!

>>> Get yours here! <<<

Waterproof Pants: If you’re doing any winter hiking, skiing, snowshoeing, snowboarding, etc. (basically, anything more intense than just a stroll around town) you’ll want waterproof pants: trust me, jeans just won’t do when you’re dealing with snow this deep.

Snow Boots: For snow boots for walking around Yellowstone National Park as well as whatever town you’re using as your base, I suggest these cute and cozy Sorel boots for women, which are waterproof and warm but also have plenty of traction. Add some Yaktrax to the bottom for grip on icy surfaces and pathways. These are a godsend!

Warm Leggings: You have two options for ultra-warm leggings in winter – fleece-lined for people with sensitive skin like me, and merino wool for people who don’t find wool itchy like I do. I own several pairs of these fleece-lined leggings in a variety of colors (I have black, gray, and maroon). I wear these underneath my waterproof pants in the snow. For people who like wool, merino wool leggings are the way to go – the absolute warmest you can get!

Fleece-Lined Knit Hat: I live in several different colors of knit hats in the winter. Since your jacket is likely a dark or neutral color, it’s fun to liven up your look (and photos) with a selection of colorful beanies. I like a snug knit hat lined in fleece and with a pom pom that does absolutely nothing to add warmth but tons to add cuteness!

Thermal Top Layer: Again, this’ll depend on if you like wool or not. I don’t, so I go for thin performance thermals like this Heat Plus layer from 32 Degrees. However, if you’re a fan of wool, a merino wool base layer will keep you insanely warm and it won’t trap odors, meaning you can re-wear it several times before it needing a wash — great if you like to pack light.

An Enormous Scarf: The bigger and thicker and more wrappable the scarf, the better. I tend to opt for bright, bold colors to liven up my look. I love these ones — they’re cheap and feel soft like cashmere but aren’t pricy (or in my opinion, itchy!) like it!

Touchscreen Friendly Gloves: Taking off your gloves to use your phone when navigating on GPS, looking up something you’ve bookmarked, etc. is so annoying. Most gloves these days tend to be touchscreen friendly, but check before you buy. These gloves are adorable, touchscreen-compatible, and affordable.

Waterproof Gloves: You’ll also want to layer waterproof gloves over your touchscreen gloves if you’re snowshoeing or cross-country skiing and generally out and about a lot in the snow when you can’t put your hands in your pockets.

Headlamp (and Extra Batteries): Yellowstone National Park in winter can get dark early — and quickly — due to the early sunset time plus the mountains making it get darker even before that. Bring a headlamp in case any hikes take longer than expected! This Petzl headlamp is highly-rated and affordable.

Waterproof Backpack: You’ll want to keep your belongings dry, especially if you’re doing long hikes in the snow or freezing rain. Bring a waterproof backpack — you won’t regret it, especially if you’re carrying pricy camera equipment.

Snowshoes (optional): Many trails in Yellowstone in winter will require proper snowshoes (different than snow boots!) and poles if you want to do some winter trekking. You can also rent them, but they’re pretty cheap to buy and will last you for future winter trips!

Camera: You’ll want a camera to capture all that Yellowstone winter beauty. I use and love my Sony A6000! It’s mirrorless, so it’s lightweight and perfect for a high-quality camera that won’t weigh your pack down. Bring extra batteries as they burn out faster in the cold.

Battery Pack: Cold weather depletes cell phone batteries insanely quickly, so if you’re using your cell phone as your primary camera and navigation device (and who doesn’t these days?) you’ll absolutely want the ability to power up without a wall outlet while you’re out enjoying nature. I rely on an Anker battery pack to keep all my devices charged in the cold — and as a blogger who takes frequent winter trips to the Arctic and beyond with way more gear than a normal person needs, it’s served me very well!

Cooke City Excursions

A misty close up view of the peaks near Cooke City

Cooke City is a fun destination for self-guided winter trips into Yellowstone National Park. Here, winter is the primary season!

It’s not uncommon for folks to be snowmobiling in the surrounding national forest area into late June or even July!

If you’re planning on spending the morning searching for wildlife in the Lamar Valley, Cooke City makes a great place to enjoy a hot meal around lunchtime.

***

Bundle up and enjoy your winter adventure into Yellowstone National Park!

Pin This Guide to Yellowstone in Winter

7 Best Hikes in Joshua Tree National Park

Joshua Tree National Park is one of Southern California’s iconic parks, known for its trails and hikes. Its dreamy terrain expands over 800,000 acres providing 114 hiking trails, running tracks, viewing trails, and much more.

The stunning views and rewarding hikes attract thousands of visitors to Joshua Tree each year.

If you are planning to visit the park, you can go for the best hikes in Joshua Tree for a good workout. It will be unjust to the magnificent setting if you won’t lace up your hiking boots once you are there.

While it is not easy to pick a favorite, here are seven best hikes in Joshua Tree that will make your trip worthwhile.

All About Joshua Tree

The Joshua Tree National Park gets its name from the Yucca brevifolia or Joshua tree. With about 800,000 acres of park, Joshua Tree provides dozens of experiences for people from around the world.

Apart from the park’s namesake trees, you will find other exotic flora, whimsical rocks, and dozens of trails waiting to be explored. The amazing hiking, biking, and horse riding trails make Joshua Tree one of America’s most attractive rock climbing places.

In spring, the place is laden with wildflowers so tourists can enjoy wildflower viewing and appreciate the exotic wilderness.

When the night comes, the desert sky clears out, revealing thousands of stars worth gazing at. The park is an ideal site for photography as every design looks like an artist sketched it.

It makes for a great fit for any type of trip whether that’s family, solo or as a couple. Use the awesome family travel hacks if you plan to go as a family to ensure you have everything prepared to make for an amazing trip.

7 Best Hikes in Joshua Tree

One of the best experiences of Joshua Tree is hiking along the magnificent trails of the park. If you are seeking a steep hike, you’ve got ten mountain peaks rising to the skies with an elevation of 5,000 ft.

Or, you can explore Joshua Tree’s five fan oases that display the most splendid sights.

Lace-up your shoes and bring your favorite travel backpack because we have listed down seven best hikes in Joshua Tree that are too tempting to resist.

Hidden Valley Trail

The Hidden Valley Trail lies in the heart of Joshua Tree Park, right after Park Blvd. While you hike around the 1-mile loop, you can experience a little piece of history in the Hidden Valley, which was once popular with castle thieves who would hide their loot there.

Natives strongly believe that the entrance of the Hidden Valley — the beginning of the trail — was created by Keys, who wanted to make a larger entrance for his castle.

The Hidden Valley Trail is an easy hike through giant rocks and boulders adorned by different trees and cacti varieties. You will also find picnic tables and BBQ grills along the trail to stop and have lunch. It is a great hike for people of all ages looking for an easy and fun hiking adventure.

Barker Dam Nature Trail

Barker Dam Nature Trail is another short 1.4 miles hike located east of the Hidden Valley. The trail is almost like a stroll through splendid scenery with giant rock formations. There is also a wide variety of flora along the trail as you enter into the open valley where you will find the dam.

The Barker Dam was built a long time back to collect water for livestock. There is also an old stone horse trough by the dam, and the water collected there attracts all kinds of birds.

When the dam is filled up, you are likely to find wildlife along the hike too. It’s a good hike when the dam is full, but make sure to look out for the bighorn sheep.

Ryan Mountain Trail

One of the most popular and best hikes in Joshua Tree is the Ryan Mountain Trail. It is a 3-mile hike to reach the summit of the mountain. While it’s a short trail, you will have to climb over a 1000 ft for 1.5 miles from the desert sands to the summit.

The hike is nowhere near a stroll. But, once you get to the top, it will be well worth the effort.  From the top, you can have a panoramic view of Joshua Tree Park and even enjoy a snack while watching the sunset.

Boy Scout Trail

A classic hike in Joshua Tree Park, Boy Scout Trail is a seven-mile trip that lets you discover the Wonderland of Rocks. If you hike deeper into the rocks, you will find the secret haven of dense willow trees.

With only 400 ft of elevation, the hike is a favorite of photographers and backpackers who are looking for some solitude and, of course, wildflowers.

About 3.5 miles in, your turn-around spot will be Willow Hole. It is a water source circled by lush green vegetation and desert wildlife. If you see some water there, you might want to stick around the area as you might encounter the bighorn sheep too.

Cholla Cactus Garden Loop

One of the shortest and best hikes in Joshua Tree, Cholla Cactus Garden Loop, is a hike through the Colorado Desert cactus garden. The view of thousands of natural cholla cactus makes the trail a must-see for every park visitor.

If you walk too close to the Cholla Cactus, it might jump onto your skin or clothes, which is why it is also known as Jumping Cactus.

The area is great for photography throughout the day. But, watch out for the cactus needles in the dark as they are a bit hard to get off.

Warren Peak Trail

If you are looking for a longer hiking experience, the six-mile Warren Peak Trail is the one for you. Although the last few miles are very steep, the trail is moderate for the most part.

The route is unique because you will find fewer Joshua trees and more pinyon, oak, and juniper trees along the way. You will also come across the Black Rock Spring, a source of water for the wildlife.

At the end of the trail, you will have a view of the western part of Joshua Tree. You will also be able to admire the Santa Rosa, San Jacinto, and San Bernardino Mountains.

Before hiking the Warren Peak Trail, you want to plan out a few things.

As the trail is exposed to the sun, you have to stay prepared with enough water and sunscreen. Some parts of the trail are more sandy, which might affect your pace. Therefore, pick your timings wisely.

Wall Street Mine Trail

All the history lovers out there will love the 2.8 mile Wall Street Mine Trail. It is one of the best hikes in Joshua Tree for learning the history of the park. In the 1900s, Bill Keys processed gold ore in the Wall Street Mine.

The miners carted the ore to the top of the hill, where they crushed it into the sand. They mixed the sand with water and mercury to wash away the useless gravel with water.

If you hike the trail, you can explore the ruins of the gold past. These include the preserved gold mine area and a gravestone. On your way to the mine, you’ll come across the ruins of Wonderland Ranch and an old windmill that pumped water from the mill.

Make sure you have at least two hours to fully explore all the colorful ancient history.

Know Before You Go

Before you go hiking in Joshua Tree, you should know a few things about the location and climate.

Since the park consists of two deserts, the temperature can soar up pretty quickly during summer, early fall, and late spring. The high temperature and dry air can make hiking extremely difficult for some people. So, try to apart yourself to the climate before going for longer or tougher hikes.

If you are visiting Joshua Tree in summer, you can also eliminate any potential risks by an early start, carrying plenty of water, and wearing enough sunscreen to stay protected.

We recommend that you visit the park in spring when the temperature is mild, and the flowers are blooming everywhere. Fall is also a good time to visit the park, but the air can be dry during this time, so stay prepared. In winters, the area gets cold enough to force you to put on layers of clothing.

Another thing to keep in mind is that there are no services in the park. So, you will have to carry everything you will need during the day, including water, food, sunscreen, and a first-aid kit. Since the area is pretty rocky, you also want to carry your best hiking boots for a tension-free adventure.

Conclusion

Joshua Tree is a great place for nature lovers seeking adventure, beauty, and some action in their hiking boots. The park provides its visitors with endless opportunities to explore the history of the region to its depths.

No matter which hike you pick from our list of best hikes in Joshua Tree, you will fall in love with the scenic views, unique flora, and impressive wildlife in the park.

Author Bio: Via Travelers is a modern travel blog providing the best tips, hacks, and itineraries to ensure you have an amazing adventure! Follow us on Instagram, Pinterest, Facebook, and Twitter.

Pin This Guide to Joshua Tree Hikes!

9 Best Hikes in Yellowstone for All Levels of Hikers

With over 900 miles of hiking trails, Yellowstone National Park has plenty of beautiful terrains to explore on foot.

There’s a trail for every experience level and age group from stroller-friendly boardwalk trails abound the colorful geysers near Old Faithful to challenging mountain summits that offer rewarding views of the pristine landscape below.

Pack your backpack, grab your camera, and don’t forget the bear spray. These are the 10 best hikes in Yellowstone National Park you won’t want to miss!

The Best Hikes in Yellowstone for All Levels

Fairy Falls

Distance: 2.5 miles (5 miles return)
Trail type: Out-and-back
Estimated time to complete: 3-5 hours
Difficulty: Moderate
Elevation gain: 250 feet

Who doesn’t love a scenic waterfall hike in Yellowstone? Fairy Falls is arguably the m ost beautiful waterfall in Yellowstone National Park, but lesser-known than Tower Falls, Upper Falls, and Lower Falls of the Yellowstone.

Fairy Falls is most commonly accessed from the Midway Geyser Basin near Grand Prismatic. To hike to Fairy Falls from the Midway Geyser Basin, park in the Fairy Falls Parking Area about 1 mile south of the geyser basin parking.

From the parking area, cross the bridge over the Firehole River and follow signs to Fairy Falls. After about a half-mile of hiking, you’ll be rewarded with a beautiful overlooking view of the Midway Geyser Basin including Grand Prismatic.

This is a perfect spot to stop for photos! The Yellowstone hike to Fairy Falls is about 2.5 miles each way, with under 250 ft of elevation gain. Once you arrive at the falls, you’ll be blown away by the water’s free fall from 200 ft above!

Before you head into the park, check with a park ranger or online for trail conditions. The Fairy Falls Trail is closed in the springtime for bear management.

Avalanche Peak

Distance: 2.1 miles (4.3 miles return)
Trail type: Out-and-back
Estimated time to complete: 3-4 hours
Difficulty: Difficult
Elevation gain: 2,100 feet

Extraordinary views of Yellowstone Lake, remote wilderness, and towering alpine peaks wait at the summit of Avalanche Peak.

At 10,574 ft high, Avalanche Peak is a challenging Yellowstone hike fit for experienced hikers with tolerance to steep terrain and high elevation.

One of Yellowstone National Park’s more physically demanding day hikes is also one of the most rewarding.

Roundtrip, this tough Yellowstone hike is about 4.3 miles. In the first 2.1 miles heading to the summit, the elevation gain is a whopping 2,100 ft!

The switchbacking trail that leads to the summit offers stunning views the entire way.

This trail is not recommended during September or October as grizzly bear activity heightens in the months leading up to their winter hibernation. Always hike in groups, make noise, carry bear spray, and be bear aware whenever hiking in bear country.

Winter is also not recommended due to high levels of snowfall.

Uncle Tom’s Trail

Note: Temporarily closed: check here for updates or check AllTrails trip reports for up-to-date information.

Distance: 0.6 miles (1.2 miles return)
Trail type: Out-and-back
Estimated time to complete: 30 minutes – 1 hour
Difficulty: Easy in length, but lots of stairs, so more like moderate for those with bad knees/mobility limitations
Elevation gain: 350 feet

The view from the observation deck at the base of the Lower Falls of the Yellowstone is a must-see for anyone visiting Yellowstone National Park.

Located in the Canyon Area at the South Rim, this heavily trafficked trail takes hikers from the top of the canyon down 328 steps to the base of the Lower Falls, which is a towering 308 ft high!

The hike down into the canyon is no problem with the well-crafted staircase, but keep in mind you’ll have to climb back out. There are many comfortable places to rest on the return hike, and it’s not a race to the finish.

The original trail, constructed by Uncle Tom Richardson in the 1800s, was not as you see it today. Before the well-constructed series of staircases and switchbacks, the trail was made primarily of rope ladders, which brought hikers down to the base of the falls.

Tower Fall Overlook

Note: At time of writing, this beloved Yellowstone hike is closed. Check AllTrails data for recent updates to see if it’s opened back up!

Distance: 0.9 miles (1.8 miles return)
Trail type: Out-and-back
Estimated time to complete: 1 hour
Difficulty: Easy/Moderate
Elevation gain: 250 feet

Check out the epic 132 ft drop of Tower Creek from the Tower Fall Observation Point! The waterfall is ominously framed by towering pinnacle rock formations, which give the creek its name.

Access to the observation point is very convenient! From the roadside parking area, head towards the trailhead, which is just past the general store.

There’s a popular overlook that’s a short walking distance from the parking area and another that involves covering a little more effort. The second viewpoint includes a 1-mile round trip walk down to the Yellowstone River towards the bottom of the falls.

Unfortunately, the trail ends short of the waterfall’s base due to a mudslide in 2004, but the riverside walk is enjoyable and scenic.

Reward your little hike with a treat from the general store!

Mammoth Hot Springs Trail

Distance: 3.5 miles
Trail type: Loop
Estimated time to complete: 2 hours
Difficulty: Moderate
Elevation gain: 560 feet

If you were hoping to see elk and hot springs, Mammoth is the place to be! Located nearby the North Entrance and Roosevelt Arch, Mammoth Hot Springs is a great place to get an up-close look at hot springs and even spot some wildlife!

Walk along the series of boardwalks through the variety of hydrothermal features.

Choose to stay on the Mammoth Terraces Trail to explore the Upper and Lower Terraces, which are filled with steamy multi-colored hot pots, or use this trail to access a web of remote backcountry hiking trails.

In total, there are about 1.3 miles of boardwalk available to explore around the Mammoth Hot Springs, plus the traditional trails.

There is parking at the Upper Terrace area, however, the parking area at the Lower Terrace is larger making finding a space much easier!

Mount Washburn

Note: This route may be closed — check AllTrails in advance to see if it’s changed

Distance: 3.1 miles one way (6.2 miles return) if coming from Dunraven Pass trailhead
Trail type: Out-and-back
Estimated time to complete: 3-6 hours
Difficulty: Strenuous
Elevation gain: 1,400 ft

If you’re looking to bag a peak in Yellowstone National Park, Mount Washburn is one of the most popular summits and day hiking destinations!

The summit has panoramic views of Yellowstone’s pristine landscape, but that’s not all. The peak also has an active fire lookout, which includes interesting interpretive exhibits.

There are two trails to the summit of Mount Washburn. The first option begins out of the Dunraven Pass Trailhead and is 6.8 miles roundtrip. The second option begins at the Chittenden Road Trailhead and is the shorter route option at 5.8 miles roundtrip.

Both trails offer beautiful scenery and access to the 10,243 ft summit of Mount Washburn. Whichever trail you choose to pursue, be sure to pack all the Yellowstone day hiking essentials including food, water, layers, a trail map, and bear spray.

Keep your eyes peeled as you hike, trail users often report seeing bighorn sheep close to the summit!

Lamar River Trail (Cache Creek Trail)

Distance: 3.5 miles each way, 7 miles return
Trail type: Out-and-back
Estimated time to complete: 3-5 hours
Difficulty: Moderate
Elevation gain: 700 ft

The Lamar Valley is famous for its wildlife sightings and pristine prairie landscape.

While driving through the valley, it’s not uncommon to spot giant herds of bison, wolves patrolling in the hills, or a grizzly bear lumbering around the willows near the river. When visiting Yellowstone National Park, make a visit to the Lamar Valley a high-priority!

Although a drive-by view of the Lamar Valley is nice, an in-depth excursion on foot is even better!

Take one of the best hikes in Yellowstone on the Lamar River Trail/ Cache Creek Trail to explore the area’s rolling landscape, wildflowers, and wildlife. Hikers commonly see herds of bison along the way. Don’t forget to monitor the trail ahead to see who’s footprints have been left in the mud!

Begin your hike into the Lamar Valley at the Lamar River Valley Trailhead and follow the trail toward Cache Creek. The roundtrip distance is around 7 miles with about 700 ft in elevation gain.

Pro tip: Stop often and scan the hillsides using a spotting scope or binoculars to find wildlife. It can be difficult to spot wolves and bear from a distance without one of these tools since they blend so well with the landscape!

West Thumb Geyser Basin Trail

Distance: 1 mile
Trail type: Loop
Estimated time to complete: 30 minutes
Difficulty: Easy
Elevation gain: 60 ft

Located on the West Thumb of Yellowstone Lake, the West Thumb Geyser Basin Trail is a great spot to stretch your legs and enjoy a picnic lunch.

The boardwalk trail here is a 1-mile loop that sees lots of use in the summertime. With the astonishing views, there’s no wonder why!

The West Thumb Geyser Basin Trail takes hikers along the shores of Yellowstone Lake for a closer look at the fascinating hydrothermal features. Stroll the boardwalk and take in the alpine views from this magnificent trail.

Old Faithful Geyser Loop Trail

Distance: 0.7 miles
Trail type: Loop
Estimated time to complete: 20 minutes
Difficulty: Easy
Elevation gain: 15 ft

Watching the timely eruption of Old Faithful is often high on Yellowstone National Park visitor’s bucket list. Many arrive at Old Faithful without realizing how much hiking there is to do in the area!

The Old Faithful Geyser Loop Trail is the perfect short Yellowstone hike to do if you have a little time to spare before the big event! At only 0.7 miles roundtrip, this trail is a nice boardwalk stroll for any experience level.

Pass by the colorful pools and bubbling pots as you make your way around the loop. Watch the time! You’ll want to be back to the Old Faithful Viewing Area with time to grab a seat for the eruption.

Old Faithful Pro Tip: If you’re not interested in watching Old Faithful from the bleachers near the visitor center with everyone else, make your way over to Observation Point in time for the event.

To get to Observation Point, find the trailhead at the end of the boardwalk near the Old Faithful Lodge and Old Faithful Lodge Cafeteria. Follow the trail about 0.75 miles to an obvious lookout area.

Remember to be mindful of the natural landscape when choosing a viewing spot. Stay on the maintained trail and avoid stepping on the fragile alpine vegetation.

***

I hope these tips helped you plan some fantastic Yellowstone hikes for your upcoming trip!

Pin These Best Hikes in Yellowstone!

5 Best Grand Canyon South Rim Hikes

The Grand Canyon is a hiker’s paradise with some of the most beautiful vistas in the entire United States.

While the hike down to the bottom of the canyon is best left to expert hikers, there are several easy to moderate Grand Canyon day hikes worth the effort!

The combination of utter exhaustion and triumphant accomplishment can bring a special sense of clarity and peace to a troubled mind. 

The Grand Canyon has provided that combination to many adventurers over the centuries.  The first humans to see the Canyon, the Ancestral Puebloans, are estimated to have looked over the edge some 12,000 years ago!

Today, the Grand Canyon has hundreds of miles of hiking trails to offer all fitness and adrenaline levels, and just one look at any vista is enough to tell you why this is a place you must visit at least once in your life.

No matter your challenge, physical or emotional, the grandest of all canyons has a gorge, a side canyon, a drainage gully, or ravine to draw you in and wrap around you, and bring you peace.

This post covers only hikes in the South Rim; I have a few North Rim hikes mentioned in this post comparing the South Rim to the North Rim.

Beginner Grand Canyon Hikes

There are two main “corridor” hiking trails along the South Rim: the South Kaibab and the Bright Angel trails.

Corridor trails are well marked and well-maintained, albeit heavily traveled. 

You won’t find solitude on these trails, but you will find solace. The Bright Angel Trail has the most options for a variety of skill levels. 

Not wanting to go beneath the rim? For those who are completely new to hiking, there is a 9-mile trail along the South Rim that provides spectacular views of the Grand Canyon along the full length of the trail. 

The Tunnels

Distance to First Tunnel: 0.5-mile roundtrip
Elevation Change: 300 feet
Estimated Time: About 30 minutes

Distance to Second Tunnel: 1.5-miles roundtrip
Elevation Change: Around 800 feet
Estimated Time: About 1 hour – 1.5 hours

A great first Grand Canyon hike below the Rim on the Bright Angel Trail takes you about a quarter of a mile down the trail to the first of two tunnels along the trail.  This is a very popular spot for families with young children and offers plenty of photo options of the Canyon and the hikers. 

Because of the popularity, the walk down may feel a bit like the line at an amusement park, but the thrill at the destination is much different. 

The chattering of hikers on the trail drops off dramatically as everyone stops at the tunnel to take in the scale of the Grand Canyon from below the edge. 

Even in just this short distance, you know you have walked into something extraordinary! 

Continuing down the trail approximately another half of a mile will bring you to the second tunnel which is equally as spectacular.

At this higher elevation, you can see junipers and pinyon thriving between great gaps in the rock.  The occasional shrubs and wildflowers scattered between the trail proper and the rock wall are a testament to nature and her ability to create life and beauty in the most unlikely of places.

Further down the trail, the multicolored cliffs are as inviting as they are imposing and the pull of the wonderful views can make it easy to forget that what goes down must come up.

Any Grand Canyon hiking trail below the Rim requires a significant effort to return to the top.  A safe estimate is twice as long to hike up as it took to hike down. 

The walk back to the surface from either tunnel is not terribly steep, however, any hike out of the Grand Canyon should be celebrated. 

The trail does steepen after the second tunnel, so don’t let the easy stroll down the trail trick you.

Unlike mountain hikes where you do the climb and then get an easy hike back down, in the Grand Canyon hiking down the trail is easy, but then you have to turn around and go back up.

As the park signage reminds hikers, “Down is optional, up is mandatory!”

1.5 Mile Resthouse

Distance: 3 mile roundtrip hike, as the name suggests!
Elevation Change: 1,300 feet elevation
Estimated Time: 2-3 hours

A great turnaround point, and a very popular Grand Canyon day hike for beginners, is another three-quarters of a mile down the trail to the 1.5 Mile Resthouse. 

This stop has composting toilets, seasonal water in the warm months, and an emergency telephone. The small “resthouse” structure has shade and plenty of space to enjoy a snack and a good rest before the climb back to the top. 

The view northward in front of you from this stop includes the full length of Garden Creek drainage gorge, which the trail runs along, and the formation called the “Battleship” directly west of the gorge.

In the Canyon proper, you can see the Bright Angel Canyon scoring the North Rim and providing a stage for the l, the only corridor trail on the North Rim.

Each peak in front of you has a name.  The two most prominent features in the view from 1.5 Mile Resthouse are the Cheops Pyramid to the west of the Bright Angel Canyon, and Zoroaster Temple to the right.

This is my favorite Grand Canyon hike for a beginner.  You get a good feel for the lure of the Canyon and the effort to return to the surface, without waking up sore the next morning. 

Intermediate Grand Canyon Hikes

3 Mile Resthouse

Distance: 6 miles roundtrip
Elevation Change: 2,240 feet
Estimated Time: 3-4 hours

For those with more hiking experience under their belt, there are two great Grand Canyon day hike points further down the trail. Another 1.5 miles down the trail is 3 Mile Resthouse. 

This resthouse, like 1.5 Mile Resthouse, also has composting toilets, seasonal water in the warm months, and an emergency telephone.

The shade structure is slightly larger than at 1.5 Mile Resthouse and I have spent many hours reading, writing, and sketching from this location.

If you’re lucky enough to reach the stop after hikers going down have made their way through, but before the hikers coming up reach the location, you can spend 2 to 3 hours here with very little company. 

Otherwise, this stop is an extraordinarily popular turnaround point and is a bustling location for Grand Canyon hikes!

The view of the Canyon from the 3 Mile Resthouse is not much different than 1.5 Mile Resthouse because the trail is still hugging the walls of the Garden Creek gorge and hasn’t yet turned to a more open view of the main Colorado River gorge. 

However, if you turn around and look back up at the Rim from where you started, the view is very different. 

The cliffs looming from where you came from are spectacular and humbling.  This is when you realize you are merely a guest here and you do not want to overstay your welcome. 

Take your photos, finish your journal entry or sketch, and after a good rest, start the return climb up the trail.  

This is a 6-mile round trip Grand Canyon hike and is the perfect combination of canyon immersion and a good workout.

Indian Gardens Campground

Distance: 9.6 miles roundtrip
Elevation Change: 3,000 feet
Estimated Time: 5-6 hours

Another great turnaround point for an intermediate to advanced hiker is the Indian Gardens Campground.  This oasis in the Canyon is 4.8 miles from the Rim, so a round trip hike is almost 10 miles in a single day. 

This hike takes an average of 2.5 to 3 hours to get to the campground so plan on 5 to 6 hours for the return trip.

For those with the time, this is a beautiful hike.  Indian Gardens is a stunning riparian area filled with cottonwood trees tucked in the crevices of the Canyon walls.

The small creek, Garden Creek, that created the drainage gorge the trail has been hugging, passes through the campground on its way to the Colorado River.

As with both rest houses, there are toilets and an emergency phone.  Indian Gardens also includes a ranger station, a mule corral, and year-round potable water.

The campground here contains 16 tent campsites, each with a table, two ammo boxes for food storage, and a shade structure. 

A backcountry permit is needed if you care to spend the night and be sure to plan ahead as this is a premium backpacking stop and the campsites fill up quickly. 

Despite the time commitment to reach this spot, the effort is well worth it.  This surprising water hole surrounded by the formidable multicolored cliffs is refreshing and energizing.

If planning to turn around here, be sure to leave early enough to reach the top before the sun sets. 

The Expert Grand Canyon Hike

Plateau Point

Distance: 12.2 miles roundtrip
Elevation Change: 3,200 feet
Estimated Time: 8-12 hours

This is the further point you’re recommended to do as a day hike in the Grand Canyon.

You can apply for a permit to hike to Indian Garden if you want to break up this into two portions, or if you want to attempt to hike to the river (which is not recommended as a day hike)

The trail from Indian Gardens to the Plateau Point is considerably less steep than in the upper 3 miles of the trail. 

Can You Hike to the Rim to River and Back in a Day?

In a word, no. The National Park Service adamantly discourages hikers from going to the Colorado River and back in a single day. 

The river is 9.3 miles from the trailhead so a round trip hike is almost 20 miles in a single day!

Of course, there are many visitors to the Canyon who take the risk, and each year, approximately 250 need to be rescued. 

NEVER try to swim in the Colorado River – the water is very cold and moves very fast.  The river water is not drinkable without some form of treatment so plan accordingly if you want to fill up at the River.  

There is an emergency phone and a primitive toilet, but no water at the River Resthouse.

***

Final Notes on South Rim Grand Canyon Hikes

Irrespective of your turnaround point, the hike down into the Canyon is the easy part.  Spend time on the trail taking in the panoramic views. 

Notice the changing colors of the rock as the sun and shadows move across the Canyon.  Allow your mind to quiet itself. 

Enjoy your turnaround point related and in high spirits.  Then start back up the trail with a singular focus.  The euphoria as you take that last step on to the rim surface is immensely satisfying and cathartic.

The physical and emotional effort to hike the Grand Canyon is an accomplishment at any distance and any fitness level. 

Every time I take a hike into the Canyon I shed a little more discontent, and bring home a little more comfort and joy!

Pin These South Rim Grand Canyon Hikes

The Best Things To Do In Rocky Mountain National Park

beautiful mirror lake in rocky mountain national park in summer with small patches of snow remaining

Imagine finding yourself surrounded by nature, breathing in the crisp, cool, mountain air while hearing the rippling sounds of a stream nearby. You look up and see a woodpecker foraging as a pine marten swiftly crosses the path up ahead. These are just a few of the magical moments you might experience while adventuring through Rocky Mountain National Park!

Rocky Mountain National Park (RMNP) has so much to offer- from relaxing, scenic drives to heart-pounding hikes. RMNP is made up of 415 square miles of pristine mountain landscapes.

It offers snow cap mountain views in the winter and beautiful waterfall scenes during the summer. The park is located northwest of Denver and only about an hour and a half drive from the city and airport.

If you happen to visit the Mile High City, RMNP is an area you must see if you enjoy nature! Here are just a few of the best things to do in Rocky Mountain National Park if you’re looking for some outdoor adventures!

Go for a Scenic Drive to see Beautiful Landscapes and Abundant Wildlife

The park offers various scenic byways that showcase a variety of different landscapes and peaceful views. I live 45 minutes away from this amazing park and one of my favorite things to do is pack up the car and head over to RMNP for the day.

Upon arriving you will pass by the visitors center. This is a great place to take a quick bathroom break before starting the drive of your life!

The visitors center offers information on the history of the park, souvenirs, and daily updates regarding which trails and highways are open and/or closed in the park. I highly recommend always popping into the visitor’s center to get any important news that might affect your visit.

The rangers at the visitor’s center will also let you know which areas the elk are currently traveling through, along with the most recent reported wildlife encounters.

Gather information on the different trails to ensure you take the path that best suits what you are seeking!

My favorite tool I use to find different drives and hikes that suit my comfortability is the AllTrails app. AllTrails gives you the length of the trail/drive, the activities the trail offers (such as a waterfall or wildflowers), driving directions to the trailhead, and recent reviews so you can have a better idea of the weather conditions you may come across.

The early morning sunrise is the best time to hit the path if you are hoping to see elk foraging in the meadows or a moose wandering near the road.

However, if you are not fond of chilly morning temperatures, a sunset drive may be more appealing when you decide to pop out to capture a stunning picture! If you are just looking to see some beautiful, eye-catching views, then anytime during the day is a wonderful time to get out and experience a variety of extraordinary spots and stop for a picnic lunch.

Pick a Trail and Take a Hike

Rocky Mountain National Park is one of the best hiking areas in Colorado as it offers over 300 miles of hiking trails that range from easy to difficult, allowing anyone to find adventure!

Bear Lake is one of the most exquisite lakes and one of the easiest to get to. Visitors can drive right up to it and has an easy, flat walking path to the lake.

Emerald Lake is just a short walk from Bear Lake and comes with breathtaking views of an immensely blue lake with an alpine backdrop! Breathing at high altitudes and hiking up inclines can be challenging, but Bear Lake is accessible to folks of all abilities.

The lake area has more visitors during the summer due to the beautiful weather and the accessibility of a variety of hiking trail heads starting at the lake.

During the winter months, Bear Lake is covered in snow with small, yet impressive frozen waterfall features.

If you are more of a daring soul, I recommend the Sky Pond hike which starts at Bear Lake.

On this trail you will encounter three different lakes and a beautiful waterfall! I love hiking, but I was surprised when I did this hike in early June and there was still snow on the ground.

At first this adventure will seem fun and easy as you pass by beautiful lakes, raging waterfalls, and encounter a lot of wildlife as you hike up the trail. However, you will be tested when you get past Glass Lake on the last leg of the hike up to Sky Pond.

Climbing the waterfall is one of the more challenging obstacles you will encounter during this hike. One thing to note for this trail is you will need walking sticks or snow chains for your shoes. Even in the summer, these are necessary once you make it to the alpine portion of the hike.

Catch the Sunrise for Incredible Wildlife Photography Captures

As a wildlife photographer, this is definitely one of my favorite things to do in the park.

I recommend getting to the park by sunrise before all the animals have gone into hiding for the day, and this will also help to avoid other tourists enjoying the sites.

During sunrise, you will have access to some incredible animal sightings including a variety of bird species, elk, moose, pine marten, yellow-bellied marmot, and pika. These are just a handful of the amazing creatures I have had the opportunity to capture within the park!

Aside from wildlife photography, the landscape photography within the park is absolutely breathtaking as well. If you enjoy peaceful mornings with your camera as much as I do, then you will not be disappointed by the pictures you will leave with!

I recommend taking a casual drive through the park before deciding where you find the most beauty. When you know where you are heading, you can set up by the time sunrise occurs!

Meadows and open spaces are the best place to set up if you are hoping to capture birds, elk, and moose. While higher in the rocky alpine is a better place to capture yellow-bellied marmots and pikas. Pine martens are sneaky, but if you are lucky you might come across one while hiking in the forest.

Go Rock Climbing to Feel the Thrill

Rocky Mountain National Park is world-renowned for mountain and rock climbing, and it’s easily one of the best national parks in the US for rock climbing.

However, most climbing within the park is very committing and should be taken into consideration for any experience level.

Almost all the climbing within the park is between 12,000 and 14,000 feet making it even more of a challenge to conquer climbing within this park.

A good climb for a beginner (with a guide) is the North Ridge of Spearhead, while a more advanced trail would be the steep Hesse-Ferguson on Hallett.

Climbing can be a safe and fun activity when completely prepared. Unlike other activities offered in the park, climbing can be extremely dangerous, so you should always make plans well ahead of time.

nform friends or family where you are going and give an estimate of how long you will be gone. If you decide to go climbing, gear up and strap in for some of the most stunning views you will come across in the Rocky Mountains and probably in your life!!

Note: a good website that offers information regarding weather patterns and important climbing info is Mountain Project. Always check snow and weather stats before starting your journey – the weather can change very fast in the Rocky Mountains.

Go Shopping in Downtown Estes Park and Stop by the World Famous Stanley Hotel

While taking a scenic drive through the park, another relaxing opportunity is to spend the afternoon in the town of Estes Park.

Estes Park is at the base of Rocky Mountain National Park and has a cute, small-town mountain vibe that leaves you wanting to see more!

In the winter, this little town looks like a scene from a movie and is picture perfect! My favorite part of the town is the stores selling local art and showcase how intimate the town is.

Parking is easy to find and there are loads of restaurants to choose from that offer delicious meals, and many use local meat and produce.

If you find yourself in Estes, you simply must drive five minutes up from the town center to the Historic Stanley Hotel! The Stanley offers day and night tours, an intimate restaurant, and a whiskey bar.

The Stanley is known from the iconic movie “The Shining” and although the building itself was not used in the film, it is where Stephen King got the inspiration for the movie.

Take a step back in time by visiting the free museum inside this 1909 Historic Hotel. It is always recommended to call ahead if you are hoping to get a tour; otherwise, the hotel is open to passers-by who pop in to see the small museum and grab a drink at the Whiskey Bar!

***

I hope by now you are packing your bags with excitement and on your way to visit Rocky Mountain National Park!

A few tips to plan your trip are:

(1) Always call to make sure roads are open: this is an area where heavy snowfall can result in road closures and these can change daily (October-May);

(2) Pack lots of water, a map, and gloves- these are always necessities I have found myself in need of;

(3) Have fun!! There is so much adventure to be found within this park, make sure you take your time and slow down during your trip to enjoy all the things to do that Rocky Mountain National Park has to offer!

About the Author

Christine is a travel writer and eco-enthusiast living in Denver, Colorado.

7 Jaw-Dropping Hikes in Zion National Park

With canyons, red rock peaks, plateaus, and more than 10,000 years of archaeological history, Zion National Park is an ideal destination to hike your heart out, pitch a tent, or relax in luxury at one of the rural rustic lodges. 

Better yet, why not park at Kolob Canyon, at 8,726 feet in elevation, to watch the sunset over this 100+-year-old park founded in 1909 by President Taft.

Zion National Park lies close to the city of Springdale, near Kolob County, and covers over 229 miles of valley riverways, scenic dirt trails, red-rock cliffs, forged canyons, and rock formations, all of which can be seen on a quick weekend trip, but would be best navigated for a week or more to milk the most of each magnificent mountain landscape.

Averaging about 2,000 feet deep and boasting some of the world’s most beautiful scenic natural rock arches, Zion National Park lays exposed rock layers that uncover millions of years of geologic history.  Hiking Zion is the best way to see this history, and for some, the chance to escape the city and enjoy a rustic return to nature.

While there is no shortage of breathtaking trails and wildlife viewing, the following hikes, ranging from easy to moderate to strenuous, are some of the most popular, and they come highly suggested if you have as short as a weekend to visit Zion.  Are you ready?  Dive in!

5 Must-Have Things to Pack for Zion Hikes

Before we get started on these Zion hikes, let me just warn you that it pays to be prepared here. Hiking in Zion is strenuous and difficult at times, and many trails have very limited shade. At a bare minimum, you need water and ample sun protection.

Here are my recommendations for what to pack for Zion.

1) Proper Hiking Boots: Do not attempt to hike any strenuous hikes in Zion without proper hiking boots. Angels Landing, Observation Point, and the Narrows, plus a handful of other hikes not listed here, are all too difficult and potentially dangerous to do without proper footwear. If you’re doing only easier hikes like Lower Emerald Pools and the Grotto, you’ll be fine with sneakers.

For hiking the harder trails, I recommend these Ahnu boots for women and these Keen boots for men. Both are waterproof in case you want to tackle the Narrows, but they’re great for any of the Zion hikes.

Water Bottle with Filter: You will want way more water than you anticipate when you are hiking in Zion! You can either carry liters upon liters of water, which can be heavy, or you can pack a backup water bottle and use your water bottle with a filter to refill anywhere along the trail — streams, rivers, springs, anywhere! I use the Grayl for its ease of use and to reduce my plastic footprint.

Headlamp: If you’re planning to do any hikes in the afternoon or any hikes that have even the slightest chance of getting you back after dark, you’ll absolutely want to pack a headlamp like this one. It’s safer than a flashlight or using the torch on your phone since it still gives you both hands free, and it’s an absolute lifesaver (sometimes literally) if your sunset hike has you hiking down in the dark.

Sunscreen, hat, and sunglasses: You’ll absolutely want all the sun protection! This means a broad spectrum SPF 30-50 sunscreen (I recommend a mineral sunscreen like this CeraVe to avoid polluting nearby runoff water when you shower), a sun hat or baseball cap, and sunglasses. Also, don’t forget lip balm!

Trekking poles for the Narrows: If you’re doing a section of the Narrows, you’ll definitely want to bring a pair of collapsible trekking poles with you! I wouldn’t recommend bringing these on hikes like Angel’s Landing, where they’ll get in the way more than help, but other hikes welcome these trekking poles as well.

The 7 Best Hikes in Zion National Park

While not exhaustive of all the hikes in Zion, the below Zion hikes include a taste of the diversity of the majestic peaks of Southern Utah rocks and all that Zion National Park offers.

The Grotto Trail

If you only have a short weekend and are aiming to see as much of Zion National Park as possible, Grotto Trail clocks in at just 0.6 ½ miles, a quick easy 30-minute round trip. 

This fairly flat, sand-packed trail is a family-friendly hike that is fun for all ages.  Whether you are carrying a baby on your back or are allowing your little ones to run ahead, this wide-sand packed trail is good for families. With an elevation change of 35 feet, it parallels the Zion shuttle roadway, connecting you with the Zion Lodge, making this a safe and convenient trail to try with tykes.

Fortunately, with Zion National Park running a shuttle service from 9 AM to 4 PM daily, Grotto Trail is easily accessible by shuttle between the fifth and sixth shuttle stop.

At the beginning of the trail is a small picnic area and bathroom stop should you or the children want to take a short break before you gear up for the walk. 

The Grotto Trail lies in a valley star-studded with peaks on both sides of the trail. Famous for its red-rock canyons, you can view cliffs of up to 2,000 feet in elevation on either side of the trail, all the while walking by a dry river-bed, and most importantly Emerald Pools, while on this path.

The Grotto Trail is an easy, family-friendly, and quick hike if you are looking to wet your pallet with all of the scenic variations that Zion National Park offers.  After the hike, stop at Zion Lodge for some water, souvenir shopping, and food at the restaurant located inside the lodge.

Kayenta Trail & Upper Emerald Pools

If your children have some more energy, or you aren’t traveling with young ones in tow, hikers can extend their hike by making a loop from the picnic area down to Zion Lodge. 

After walking past the picnic area, cross the dry riverbed by taking Kayenta Trail, a winding zig-zagging trail that is located in a low-lying walking area at the base of Mount Moroni.

You’ll enjoy stunning views of the river and canyon, but keep in mind the trail is rather steep with a few drop offs on the side, so always keep your eyes on the track ahead of you and don’t get distracted. The last 500 feet or so are rather difficult, but the reward at the end — a stunning waterfall and the Upper Emerald Pools — are well worth it.

It’s a 3.1-mile out-and-back trail to the Upper Emerald Pools, and you can also make a loop via the Lower Emerald Pool trail below, which recently reopened after being shut down after mudslides.

Lower Emerald Pool Trail

This is a rather easy hike in Zion if you’re not particularly fit or if you’re traveling with youngsters or elders.

At only 1.2 miles in length round trip, it’s a perfect hourlong hike if you want an easy hike in Zion to balance out more difficult hikes, or if you’re traveling with less experienced or less mobile hikers. This path is paved all the way through, so it’s great if you’re traveling with someone in a stroller or wheelchair.

You’ll see waterfalls, pools, and beautiful scenery along this easy stroll. Do keep in mind though that the waterfalls are season-dependent so if you visit in the height of summer you will likely not see much more than a trickle!

Angel’s Landing

If you are looking for a hike that will give you a real workout, located near the Grotto Trailhead is Angels Landing, a 2.4 mile, one-way, exposed and strenuous hike that winds its way up a dirt and rock-studded trail.

Angels Landing starts in the valley of Zion National Park and scales up an elevation change of 1,500 feet, leading to the peak at 5,790 feet.  Expect about a 4-5 hour roundtrip hike.

If taking the Zion Canyon Shuttle, stop at the 6th stop at The Grotto Trailhead.  Located just near the stop is a bridge over the Virgin River where hikers can follow a paved trail to the West Rim trailhead.  

After walking for five minutes, hikers can find the trailhead at a split in the road, with the right side of the split beckoning towards Angels Landing. 

Expect for legs to burn and shake, as hikers will wind up a sand and rock trailhead with chain-links connected to metal posts along steep precipices overlooking drops into green-fern valleys.  As hikers wind up the final 500 feet of narrow switchback trails, be prepared for a slow crawl but well-worth the walk.  Do not despair!  Once hikers pass this last narrow climb, they can find the cliff’s edge, sit on top of it, and look over the 5,000 feet of canyon below.

After baring the sun and strain of muscles, hikers are rewarded with breathtaking views of green covered valleys, exposed red-rock, centuries of rock-eroded mountain faces, and a view of the river below.  Now is the time to whip out those peanut butter sandwiches, Clif bars, and cameras and enjoy the breathtaking perspectives of the 229-mile expanse that is Zion National Park.

Warning: Please bring at least 3 liters of water with you to keep you well-hydrated and fully aware while hiking.  Be very aware that this is a strenuous hike that is for those who have stamina and a healthy thirst for adventure — and not for those with a fear of heights!

Observation Point

While Angel’s Landing is an absolutely epic Zion hike, it’s also one of the park’s most popular — making it rather crowded at times, which can be a pain especially on the parts where you have to use chains to traverse the ridges and you have to pause a lot to allow for hikers to come down as well as you coming up.

If you want similar views of Zion as you’d get in Angel’s Landing, but on a less crowded and more strenuous hike, head to Observation Point. This hike is at a higher elevation than Angel’s Landing, but it gives you those sweeping views in the same direction.

Start at Weeping Rock, which is available on the Zion Shuttle Stop #7. The hike is 8 miles return, and it involves a strenuous elevation gain of 2,100 feet — so expect the hike to take at least a solid 5-6 hours or more, depending on your skill level.

The Narrows

The Narrows is a great hike for both easy, moderate, and strenuous hiking, depending on how far you take this Zion hike.

Located at the base of the Zion Canyon valley, this 9.4-mile total long hike can take as short as 30 minutes or as long as eight hours, depending on how deep hikers desire to explore these hollowed-out caverns. 

The trail is located at bus stop number 9, Temple of Sinawava, the last shuttle stop on the Zion Canyon Shuttle route.  The last shuttle of the day leaves at 8:15 PM, so be sure to return in time.

Once hikers arrive, they can expect to walk a third of a mile along a sand trail before reaching a gorge and dry riverbed.  If needing wheelchair access, the one-mile Riverside Walk from the Temple of Sinawava is available to those seeking an accessible way to see the beautiful Narrows.

If continuing past the first mile, hikers can expect to wind through ankle to calf high water flowing downstream.  The rest of the nearly eight miles of this hike includes wading through gentle downstream water, and one can expect to marvel at the blasted-out stone created by years of changing ecologic and geologic activity.

A sign and placard posted by the Zion National Park ranger service, and near the shuttle stop, is posted to help hikers plan the time of day when to hike.  Hikers can use these signs to determine when the tide of the stream is lowest in order to gauge how far and deep hikers would like to walk into the narrow 20-30 feet wide caverns.

Suitable for all ages, the Narrows winds along the canyon floor of Zion National Park and is generally open during all seasons.  During heavy rain, the caverns can flood, and therefore it may be closed for day-use.  Hike at your own discretion, and do pay attention to the Park Service announcements and tide placards located at various places in the park. 

So long as hikers are mindful of their safety, the Narrows via Riverside Walk will reward hikers with a delightful reprieve from Utah’s heat.  The hike also serves as a fascinating archaeological exploration, as hikers are literally hiking along thousands of years old riverbeds.

If going in the summer, the gorge and riverbed tend to fill with crowds (and sometimes algae), so be mindful of when you go, bring sturdy hiking or water shoes for those slippery rocks below the surface, and make sure to bring plenty of water and a filtered water bottle (I use a Grayl), that is, if you choose to fill your canteen from the riverbed.

Note: There are two ways to hike the narrows, ‘top down’ or ‘bottom up’. The hike listed is the latter. If hiking ‘top down’, you need a wilderness permit (secure yours online here) and to arrange a private shuttle to its starting point 1.5 hours outside the park.

If you just want to hike a stretch of the Narrows, or do the ‘bottom up’ trail, there is no need for permits.

The Watchman

Sunset over Zion National Park with a river and Watchman Mountain

The Watchman Trail is an easier, 3.3-mile roundtrip starting at the Zion Visitor Center.  With short drop-offs along the trail, this hike ends at a viewpoint of the Towers of the Virgin, as well as lower Zion Canyon and the town of Springdale.

With an elevation change of 368 feet, this two-hour roundtrip hike is often overlooked by visitors who are gung-ho on visiting the larger-than-life views of Angel’s Landing or the archaeological variety of the Narrows.

The Watchman Trail, located a half-mile from the South Entrance to Zion National Park, is host to desert flora and fauna, ponderosa pine, prickly pear cacti, and small shrubbery. 

This easy Zion day hike has very few areas of shade, so hikers will want to bring a liter of water for every mile hiked. 

The trail itself provides breathtaking views of the Watchman Spire, Watchman Overlook, and Bridge Mountain. With little elevation gain, this hike is perfect for a quick detour and a short introduction to the vastness that is Zion National Park.

Where to Stay When Hiking in Zion National Park

Hiking in Zion on a budget? Airbnb has cute and affordable glamping options, like Base Camp 37°

With more than ten hiking trails, over 124,000 acres of protected wilderness, and 1,000 different types of plants, Zion National Park boasts more than 90 miles of hiking.  

For those with a quick weekend getaway and an itch for the great outdoors, there is plenty of camping or even lodging. 

For those on a mid-range budget, opt to stay at Zion Canyon Lodge or in nearby Cable Mountain Lodge, located in Zion’s closest neighboring city, Springdale, a five-minute walk from Zion Canyon Visitor Center — perfect for catching the Zion shuttle and hiking without needing to worry about parking.

Traveling on a budget? You’ll likely want to head to Hipcamp for the best options, and you’ll want to stay a bit outside of Springdale for the best prices. My top choice would be the glamping tents at Zion Family Ranch Campground, which starts from $59/night, located a couple of minutes off Highway 89, this is the perfect stopover between Zion and Bryce Canyon National Parks.

Find this property on Hipcamp. First time booking with Hipcamp? I have a bonus for you! Get $10 off your first stay using my code: ALLISONG61751E or booking through my link.

Want to travel in luxury? Springdale has a number of ultra-luxurious properties, but my top two choices would have to be the stunning Springhill Suites (just look at that wall of windows and view! Absolutely incredible!) or the super-luxe Zion Ponderosa Ranch Resort to reward yourself after a day out hiking in Zion.

Pin These Hikes in Zion!