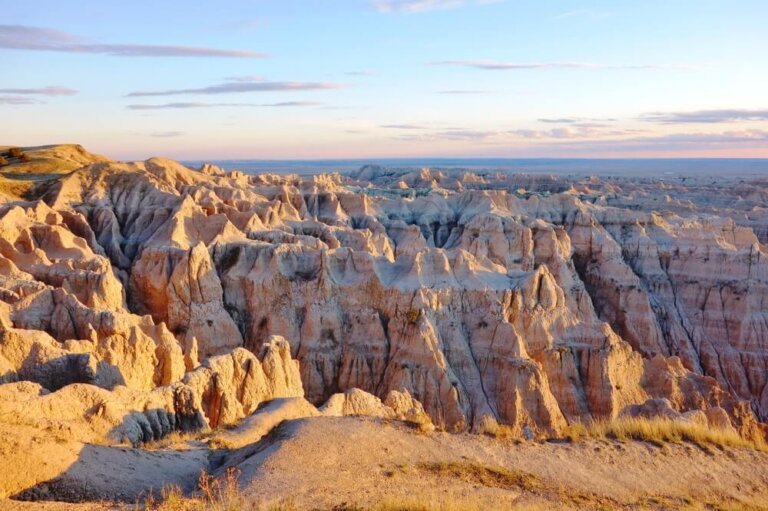
North Rim Vs. South Rim Grand Canyon: Which Side is Right for You?

grand canyon lodge at sunset in the north rim grand canyon

The Grand Canyon is rightfully one of the most renowned landmarks in all of America, and there’s no wonder that it figures high on nearly everyone’s national parks bucket list.

The Grand Canyon was formed by the rushing waters of the Colorado River after many million years of erosion and assisted by plate tectonics which uplifted the Colorado Plateau, creating an even more…. well, grand, of a canyon!

The Grand Canyon National Park site encompasses a massive 1,902 square miles. At its longest point, the Grand Canyon measures 277 miles across, and is up to 18 miles wide… which means that the North and the South Rims are quite far apart!

In fact, to drive from the visitor center at the North Rim to the visitor center at the South Rim takes about 4 hours!

As a result, you’ll likely want to pick one or the other. 

Allison standing at the South rim of the grand canyon
Me standing at the edge of the South Rim of the Grand Canyon in 2017

If you are doing a huge, long Southwest road trip and have 2+ more weeks in the region, you can easily see both sides, but frankly, seeing one side of the Grand Canyon is plenty for one trip.

I spaced out my visits to the South Rim and the North Rim, visiting the South Rim in May of 2017 and just completing my visit to the North Rim in July of 2021.

In this post, I’ll quickly cover a few frequently asked questions about visiting the Grand Canyon, explain the difference and pros and cons of the North Rim vs. the South Rim of the Grand Canyon, and give some tips to help you pick which side of the Grand Canyon is better for your trip.

I’ll also include things to do on each side of the Grand Canyon, specific to the North Rim or the South Rim.

Finally, I’ll also have some tips on where to stay, including some feedback about the campsite I stayed at as well as suggestions for accommodations.

Grand Canyon FAQs

Which is better to see: the North Rim or the South Rim of the Grand Canyon?

Honestly: either!

If we are strictly talking views, both sides of the Grand Canyon offer exquisite ones. There is no real reason to privilege one side over the other in terms of what you can see.

When I go into whether you should pick the North Rim vs. the South Rim, views aren’t a factor, but itinerary, how far in advance you are planning, and time of year you are visiting the Grand Canyon all are!

Allison at the South Rim of the Grand Canyon in 2017
At the South Rim of the Grand Canyon near sunset in 2017

Is visiting the North Rim of the Grand Canyon worth it?

Absolutely! The North Rim of the Grand Canyon is every bit as beautiful as its more popular southern rim. 

However, if you’re already visiting the South Rim for sure, I don’t know that the North Rim warrants a separate journey on the same trip.

I’d suggest picking one side of the Grand Canyon per trip. If you visit the area again on another road trip, then pick the side you haven’t visited before!

At the North Rim of the Grand Canyon at sunrise in 2021

Where is the best view of the Grand Canyon?

Every view of the Grand Canyon is pretty stunning. I’ll list a few of the best viewpoints of the Grand Canyon broken down between the two rims.

North Rim Viewpoints: Bright Angel Point, Cape Royal, Point Imperial, Walhalla Overlook.

South Rim Viewpoints: Mather Point, Yavapai Point, Yaki Point, Moran Point, Lipan Point.

Arizona Grand Canyon National Park Yavapai Point USA
Yavapai Point at the South Rim of the Grand Canyon

Can you drive from the South Rim to the North Rim of the Grand Canyon?

Totally… but it takes time! 4 hours, in fact. 

From the South Rim to the North Rim, you’ll leave the Tusayan / Grand Canyon Village area, drive along Highway 64 until you reach Highway 89 at Cameron. 

From there, you’d drive until Marble Canyon, then take Highway 89A to Jacob Lake. Once reaching Jacob Lake, you’d take Highway 67 the rest of the way.

This driving route would also work in reverse if you were visiting the North Rim first and then going to the South Rim.

However, I wouldn’t really advise this unless you have a ton of time that you only want to dedicate to Grand Canyon National Park. 

If you are visiting the Grand Canyon as part of a larger Southwest itinerary, I’d suggest allocating more time for other destinations and places.

So many places to visit in the Southwest, so little time!

What is the difference between North Rim and South Rim Grand Canyon?

That’s what this post is all about! We’ll go into more detail below, but here’s the TL;DR.

North Rim: Far less crowded (only 10% of the visitors), more remote, fewer amenities, better for a Utah parks road trip, not able to be visited in winter months, better in summer months.

South Rim: Much more crowded (90% of the visitors go here), better for Arizona road trips, better for day trips, more amenities and lodging options, open year-round.

One other thing to keep in mind is the appreciable elevation difference between North and South.

The elevation at the South Rim is 6,804 feet; the elevation at the North Rim is 8,297 feet (and up to 8,803 feet at Point Imperial, the highest point of the Canyon rim).

The South Rim tends to be several degrees hotter in summer as a result. However, hikers should note that the altitude is a little easier to adjust to at the South Rim, whereas hikers at the North Rim will have a little more struggle with the altitude.

Sign that reads "point imperial elevation 8803"
The highest point on the Canyon Rim!

Are there entrance fees to the Grand Canyon?

Yes. Park entrance fees are $35 per vehicle to the Grand Canyon. That grants 7 days of access to both the North and the South Rims, as they are both operated as one National Park Service site.

Both the North and the South Rim are also included in your America the Beautiful Pass, which can be purchased online at REI before your trip.

Which is the best time of the year to go to the Grand Canyon?

It depends! 

If you’re visiting the North Rim, know that it’s only open between May 15 and October 15… and any of those times is a good time to go! The North Rim is not very crowded, so any time will be fine within that period.

If you’re visiting the South Rim, the Grand Canyon is able to be visited year-round! However, the South Rim is very crowded in the summer and even in the shoulder seasons. 

I visited the South Rim in early May and it was packed… I can’t even imagine peak summer!

The South Rim is a popular option if you are visiting the Grand Canyon in winter, as it’s open year-round and is really beautiful under a layer of snow!

Snow covered landscape of the Grand Canyon in the winter months
Views of the Grand Canyon at wintertime (South Rim)

What is the best place to stay at Grand Canyon National Park?

There are so many options when it comes to where to stay!

North Rim: The Grand Canyon Lodge is the main traditional accommodation option. I went here to check out the sunset and it looked like a fantastic place to stay.

There is also the North Rim Campground, where I stayed — and I loved it! For $20 a night, I literally could see Grand Canyon views squeezed between some pine trees. It was incredible.

South Rim: There are so many options! The main lodges are Bright Angel Lodge, Yavapai Lodge, and the Thunderbird Lodge, but these need to be booked well in advance…. like 6+ months, typically.

There are also lots of great vacation rentals near the Grand Canyon if all the traditional accommodations and lodges within the National Park Service site are full!

Additionally, you can also stay at the Mather Campground outside of the South Rim.

Note that Bright Angel Campground is located at the bottom of the Grand Canyon and has limited campsites that can only be accessed via a hike, for which you need a (highly coveted, hard-to-get) backcountry permit.

There’s also the Phantom Ranch located at the bottom of the Grand Canyon as well if you are hiking in!

Rocking Chairs at the North Rim of the Grand Canyon
One of the cabins at the Grand Canyon Lodge (North Rim) — almost worth booking a trip for on its own!

Pick the North Rim if… 

… You want to avoid the crowds.

Grand Canyon National Park sees nearly 6 million visitors each year… but 90% of those visitors will only see the South Rim.

Only 10% of people who visit the Grand Canyon make it to the North Rim of the park…. meaning that only some 600,000 people a year visit the North Rim, period. 

This means that the North Rim is far less crowded than the South Rim all year round.

I went to the North Rim right after the Fourth of July weekend, and it was really quiet and peaceful. 

Meanwhile, I visited the South Rim a few years back in early May, during the shoulder season before school holidays and summer vacations, and it was extremely busy and crowded.

For me, the serenity of the North Rim makes up for the fact that there are fewer amenities and activities around it. But more on that in a bit!

Views as seen from the North Rim

… You are also visiting Utah national parks.

The North Rim of the Grand Canyon gets a bad rap for being “harder to reach” but I’m not really sure why that is.

The North Rim of the Grand Canyon is only open from May 15 to October 15 each year, but within that time frame, it’s very accessible, especially if you are doing a Southwest road trip that involves some of Southern Utah’s Mighty 5.

From Zion National Park to the North Rim, it’s 122 miles and 2 hours and 45 minutes.

From Bryce Canyon National Park to the North Rim, it’s 157 miles and 3 hours. 

Additionally, the North Rim of the Grand Canyon is pretty easily accessible from Page, AZ (where you’ll find Antelope Canyon & Horseshoe Bend). 

From Page, it’s just 124 miles driving, which takes about 2 hours, 20 minutes.

However, from other places in Arizona, such as Flagstaff, Sedona, or points along Route 66, the South Rim is more convenient.

sign for sedona arizona with red rocks in the background
If you want to stay in Sedona, I suggest the South Rim, vs. the North Rim!

… You want to see wild bison.

One of the coolest things about visiting the North Rim of the Grand Canyon is that the park encompasses a massive bison herd! 

Normally people think they need to head all the way to Yellowstone National Park if they want to see bison… but that’s not the case! 

There is a huge herd of bison living on the Kaibab Plateau, which you’ll find after you enter the NPS park boundary and the entrance station, but before you reach the North Rim.

The bison stay very close to the roadside and it’s very easy to spot them. In fact, on my trip into the North Rim, the bison literally were crossing the road and traffic was stopped until they passed!

On my trip out of the North Rim, coming out the same way we came in, there were still plenty of bison quite close to the roadside. 

Keep in mind that bison are wild animals and you should never approach them or make them feel uncomfortable. Staying in the car is the safest way to observe them, unless they are quite far away.

Stay at least 25 yards away as per the NPS guidelines, and watch for signs of them being uncomfortable (eye contact, raised tails). Bison can and do attack humans, so be careful.

A herd of bison at the North Rim of Grand Canyon National Park
Bison standing by the side of the road along the way to the North Rim of the Grand Canyon

Things to Do at the North Rim

Catch the sunrise at Bright Angel Point.

One of the best places to catch the sunrise at the North Rim is at Bright Angel Point, which connects with both the Transept Trail (the trailhead is right in the campground!) and the Grand Canyon Lodge Area.

From the Grand Canyon Lodge, it’s about a 0.3-mile hike one-way, which takes about 10 minutes. The views at sunset are spectacular!

If you’re staying at the North Rim campsite, you can also do a sunrise hike to Bright Angel Point via the Transept Trail. 

Please note that there are no dogs allowed on the trail to Bright Angel Point or anywhere on the Transept Trail.

Rocks and trees at sunrise at sun rising over Grand Canyon panoramic view from Bright Angel Point, North Rim, Arizona
Sunrise at Bright Angel Point is a dream!

Watch the sunset from the Grand Canyon Lodge.

One of the best places to watch the sunset at the North Rim is from the Grand Canyon Lodge area, near the main parking lot for the North Rim.

You can either check out the viewpoints near it, from the dining area in the lodge, from the outdoor patio area of the lodge, or down the stairs there is access to the viewpoint via the Transept Trail.

Seeing the Grand canyon lodge at sunset with brilliant colors in the sky
The Grand Canyon Lodge at sunset at the North Rim is phenomenal!

Walk the Transept Trail.

The beautiful Transept Trail connects North Rim Campground with both the Grand Canyon Lodge and Bright Angel Point.

It’s a serene, easy, and peaceful trail. To the Grand Canyon Lodge from the campgrounds, it’s 1.2 miles one-way (2.4 miles round-trip). To Bright Angel Point, it’s 1.5 miles one-way (3 miles round-trip).

It’s a great and easy day hike option that has you on the rim of the canyon vs. going into it!

walking the transept trail towards bright angel point at sunset with trees and clouds and canyon
Views along the Transept Trail at sunset

Drive the Cape Royal Road.

This beautiful scenic drive is the southernmost point of the North Rim, with the widest panorama of all — 270 degrees of horizon is filled with the beautiful canyon!

The drive is 15 miles from the North Rim Visitor Center along a narrow and winding road, and it’s a bit hair-raising at times — but it’s extremely beautiful, especially as you reach the Walhalla Plateau. 

Once arriving at the Cape Royal parking area, there is a small paved 0.3-mile trail you can take to the overlook, which offers unparalleled views.

You’ll see a number of sights along the trail, including Freya Castle, Wotans Throne, and Angels Window.

Angels Window: one reason to visit the North Rim vs the South Rim!

How to Get to the North Rim of the Grand Canyon

Turn onto Highway 67 once you reach Jacob’s Lake. From Jacob’s Lake, it’s a little under 1 hour drive.

To get to Jacob’s Lake, you’ll be coming on Highway 89A, either from Utah (Kanab area) or from Arizona (Page + Marble Springs).

From Page: 2 hours 20 minutes

From Zion: 2 hours 45 minutes

From Bryce: 3 hours

From the South Rim: 4 hours

From Las Vegas: 4 hours 30 minutes

From Phoenix: 6 hours

the red rocks of zion canyon and hiking trails
Zion National Park is a popular waypoint for North Rim adventures!

Pick the South Rim if… 

… Accessibility is a concern for you and your group.

The South Rim of the Grand Canyon is the far more built-up of the two, which means that there are a lot more accommodations in place for people with disabilities.

However, that’s not to say that the North Rim is inaccessible or not suitable for people with disabilities. 

The Grand Canyon Lodge is wheelchair accessible and the North Rim Campground has 6 accessible campsites, as well as accessible restrooms. Point Imperial and Cape Royal are accessible as well.

Both the Transept Trail and access to Bright Angel Point are not accessible, and the overlook by the Grand Canyon Lodge is definitely not accessible and would be hard for those with mobility limitations (stairs and deep steps).

The South Rim has a lot more accessibility options. Both the Bright Angel Trail and North Kaibab Trail are accessible up to a certain point. 

The shuttle buses that service the South Rim are all wheelchair accessible, with ramps and space to carry wheelchairs (up to 30″ wide by 48″ long). The bus can also ‘kneel’ for those who would like a reduced step up to the bus.

Most overlooks at the South Rim are wheelchair accessible and there are also many scenic drive options with accessible viewpoints and plenty of accessible restrooms

An excellent and far more complete guide to accessibility for people with disabilities is available on Frommer’s here; I’ve merely summarized a bit of the information here, but they cover it all!

Disabled access sign on the walkway, pine trees and cloudy sky background. Grand Canyon National park, Arizona, United States.

… You are primarily visiting Arizona destinations.

One of the main reasons why you might want to choose the South Rim of the Grand Canyon over the North Rim is that it is far better if you are following an Arizona road trip itinerary (like mine!).

The South Rim is easily accessible by day trip from Williams, AZ (part of Route 66!) or Flagstaff, AZ. I personally visited the South Rim on a day trip from Flagstaff and I found it perfect, as it was only 90 minutes away by car. Just enough time for sightseeing and a day hike!

The South Rim is also a popular day trip from Sedona, Arizona, which is about a 2-hour drive each way. It’s a little bit of a long day, but it works!

Sedona church next to cactus
Sedona is an easy day trip destination for Grand Canyon adventures!

The only place in Arizona that the North Rim is easily accessible to is Page, AZ, which is right at the Utah border. 

In fact, the North Rim of the Grand Canyon pairs way better with a Utah National Parks itinerary than an Arizona road trip itinerary! 

If you were to do that, I would sandwich it between Bryce Canyon National Park and Zion National Park to minimize your backtracking.

allison looking over the edge of bryce canyon and its orange hoodoos
Bryce Canyon National Park is an easy stop before or after the North Rim!

… You want lots of activity options.

There are so many things you can do at the South Rim of the Grand Canyon, including a ton of tour options and fun additional activities you can add to your trip. 

Helicopter ride? Those leave right from Grand Canyon Village and there are more helicopter tour companies than you can shake a stick at.

(And if you can afford it, do it — I did a helicopter tour over the Grand Canyon from Las Vegas, and it’s one of my top 5 travel experiences of my entire lifetime).

Book your helicopter tour online here!

Allison in a helicopter taking off for the Grand Canyon
About to take off to check out the Grand Canyon via helicopter!
View over the Grand Canyon via helicopter
Viewing the Grand Canyon from above in a helicopter — priceless!

Small scenic plane tour? Yup, they have those too! 

They cover the Zuni Corridor, Point Imperial, the confluence of the Colorado and Little Colorado Rivers, and even points on the North Rim such as Point Imperial, the Kaibab Plateau, and Kaibab National Forest.

Book your scenic plane tour here!

Pink Jeep Tour? Absolutely! Pink Jeep Tours is one of my favorite tour companies (I’ve used them in both Las Vegas’s Valley of Fire and in Sedona) and they offer incredible sightseeing tours right from the South Rim.

I didn’t get a chance to do a Pink Jeep Tour on my trip to the Grand Canyon’s South Rim, but I wish I had. Judging from past experience, it’s a great way to see the Grand Canyon through rose-colored glasses!

Book your Pink Jeep Tour online here!

Allison standing on top of a pink jeep in the valley of fire of las vegas

And these are but three of the many great Grand Canyon activities leaving from the South Rim.

Below are a few other select activities! The below tours leave from Tusayan and Williams, two spots near Grand Canyon Village.

… You are planning at the last minute.

Because the South Rim is so much more accessible and built-up than the North Rim, it’s not a problem at all to plan at the last minute.

If you want accommodations at the North Rim, you have one option inside the park, one option just outside it, one campground, and then a whole lot of nothing until you reach Jacob Lake one hour away (and there’s not much there, either).

If you are visiting the South Rim at the last minute, you don’t really have to worry because there are dozens of great vacation rentals near the Grand Canyon, plus abundant options in Williams and even Flagstaff. 

The main lodges will likely be booked up well in advance at the South Rim, but I was even able to find campsites at Mather Campground (the big South Rim campground) open with just one-week advance booking in the middle of July, peak season!

one of the lodges at the grand canyon south rim
One of the three lodges at the South Rim of the Grand Canyon

Things to Do at the South Rim of the Grand Canyon

Walk some (or all of!) the Rim Trail.

The Rim Trail is a mostly-paved, easy trail that stretches between the South Kaibab Trail (which you can take into the canyon) all the way west to Hermits Rest.

The Rim Trail offers 13 miles of paved trail, but you can do any fraction of it and return via shuttle bus at any of the designated stops, so it’s easy to tailor to your own preferences and abilities.

girl sitting on the edge of a brick wall on the paved rim trail looking over the expanse of the grand canyon in mid afternoon sunlight

Take one of the many day hikes available.

The South Rim of the Grand Canyon has a ton of fantastic day hikes you can do — including short hikes into the canyon.

No need to sweat the Rim to Rim hike — there are plenty of in-between options!

Here are 5 of my favorite South Rim hikes including very short options that take about 1-2 hours to complete and can be done by total beginners.

a hike in the south rim of the grand canyon

Take a tough descent to Skeleton Point and back.

The South Kaibab Trail will take you all the way into the belly of the beast, but there are plenty of stop and turn-around points that make your hike in the Grand Canyon a lot less cumbersome.

The hike on the South Kaibab Trail to Skeleton Point and back is a great 6-mile hike that’s hard but not insane. Keep in mind the 2,000+ feet of elevation gain (and loss) when considering this hike!

a sign reading skeleton point halfway down into the grand canyon with expansive views of the canyon everywhere you look
The turn-around marker at Skeleton Point, two thousand feet below the Canyon rim

Check out the Desert View Watchtower.

Take the Desert View Drive 23 miles between Grand Canyon Village and the small settlement of Desert View for a beautiful drive.

It’s also home to a really cool viewpoint on the South Rim of the Grand Canyon!

Note that the Desert View Watchtower itself is currently closed due to the pandemic; however, it’s still well worth visiting for its beauty and the gorgeous drive to get there!

a brick-style watchtower towering over the south rim of the grand canyon; a couple wearing backpacks looking over the canyon off in the distance
The Desert View Watchtower is a popular South Rim viewpoint!

How to Get to the South Rim of the Grand Canyon

Williams, Arizona is a great gateway to the Grand Canyon!

Here is where you’ll find the historic and scenic Grand Canyon railway, which is one hell of a way to make an entrance to the South Rim!

Book your Grand Canyon Railway tickets online here!

the historic grand canyon train from a straight-on angle
The scenic Grand Canyon Railway connects Williams and the South Rim of the Grand Canyon

Driving into the South Rim is also totally possible. You can come in via Las Vegas or via Flagstaff, depending on your trip itinerary.

From Vegas, you’ll take I-11 to the Hoover Dam, where you can check out one of the coolest marvels of engineering in the United States.

Did you know that the concrete in the middle of the Hoover Dam is still not dry nearly 100 years later?

You can also walk — on foot! — between Nevada and Arizona.

the giant dam at the hoover dam, holding in water from lake mead, near the border of arizona and nevada
The beautiful engineering of the Hoover Dam

Then you can continue along Highway 93 into Arizona, then turn onto I-40 / Route 66 in Kingman, Arizona.

Take that to Williams, AZ, where you’ll turn onto Highway 64, which brings you right to the Grand Canyon.

If coming from Tucson, Phoenix, Sedona, or any point south in Arizona, first make your way to Flagstaff (likely via I-17)

Then, take either I-40 / Route 66 to Williams then up to Highway 64, or alternately take Highway 180 up to Grand Canyon Junction and then onto Highway 64 to Grand Canyon Village and the South Rim Visitor Center.

What about the Grand Canyon West Rim?

I would advise against it, personally, in favor of the North or the South Rim. 

Yes, there is the Grand Canyon Skywalk attraction, which is $23 per person plus park admission. 

a skywalk deck at the grand canyon west rim, looking over canyon views below
People out on the Skywalk at Grand Canyon West Rim

Other than that there is not too much to see compared to North and South Rims (though there are a few other viewpoints, which you can check out more information on here.)

Plus, it has a separate $45 per person admission fee, as the site is not on national park land, but rather it is owned and operated by the Hualapai Native American tribe. That means your America the Beautiful pass will not apply, either.

In favor of it, I will say that it is beautiful, and it’s convenient if you are coming from Las Vegas, as it’s only a 2-hour, 15-minute drive (and hence it is a popular Vegas day trip!). 

It’s also a popular option for small group rafting trips which can be organized to depart from here.

people rafting on the colorado river which is part of the grand canyon around the sunrise hours
Rafting is a popular activity from Grand Canyon West

It’s a great option if you are coming from Vegas on a day trip and that’s all the time you have for the Grand Canyon. If you want an organized day tour, this is an affordable and easy one that has to option to add the Skywalk.

Book your Grand Canyon West Rim tour here!

But if you have more time, I’d offer that you should pick either the South Rim or the North Rim, especially if it’s your first time at the Grand Canyon!

Pick Both if… 

… You are visiting both Arizona and Utah and have plenty of time.

There is no reason not to visit both the North and the South Rim! 

I am writing this guide targeting people who want to choose between the North Rim or the South Rim, but there’s no law saying you have to visit just one.

If your road trip encompasses both Arizona destinations and Utah destinations, it’s pretty easy to visit both sides without a lot of backtracking!

the brilliant red rocks of sedona arizona, part of a popular arizona road trip itinerary
Sedona is a must-visit in Arizona!

If you want to visit both, this is how I would route it: Nevada / Southern Arizona sights (Las Vegas, Tucson, Phoenix) –> Sedona –> Flagstaff –> South Rim –> Page –> North Rim –> Zion –> Bryce Canyon –> Other Utah National Parks (Capitol Reef, Arches/Canyonlands in Moab).

Obviously the same also works in reverse!

The Perfect 2 Days in Grand Teton Itinerary: Road Trip Style

The Teton Range stands tall over Grand Teton National Park in Wyoming.

Their recognizable formation is alluring to mountaineers, photographers, hikers, and road trippers alike.

We will be traveling across the park from south to north with stops at all of the best attractions! 

Grab your camera, binoculars, and hiking gear, and get ready for an adventure you’ll never forget – a memorable Grand Teton National Park road trip.

view of a marina with all the boats out on the lake with lots of mountains in the distance
PLANNING FOR GRAND TETON AT A GLANCE:

When to Go: While winter in Grand Teton is beautiful, summer is when Grand Teton shines the most. It's also when it's at its most crowded, so get an early start, especially if you are following this itinerary which uses the Moose entrance (the most convenient, but also the most crowded!).

Where to Stay: There are so many places to stay in Jackson Hole area! I stayed at the Gros Ventre Campground right outside the Elk Refuge and Mormon Row and loved it. 

There are a few lodges in the park (Colter Bay Cabins, Jackson Lake Lodge, Jenny Lake Lodge) but they book up quickly, often 6 months in advance.

If the lodges are all booked up, there is usually plenty of availability in Jackson and Teton Village. I suggest Wyoming Inn (mid-range boutique), the Elk Country Inn (budget/mid-range), or the Teton Mountain Lodge & Spa (high-end luxury).

How to Get Around: A car is key for Grand Teton National Park; there is no shuttle, and without a car, you'd have to rely on tours. If you're renting a car, compare car rentals and prices from here. Alternately, you can rent an RV or campervan via RVShare and save on accommodations

Don't want to drive or plan? You can book a wildlife tour of Grand Teton, a Jeep tour with boat ride, or a two-day tour of both Grand Teton & Yellowstone.

3 Things Not to Forget to Pack: Binoculars are key for spotting wildlife like bears, elk, moose, and bison-- I suggest these Nikon binoculars. For hikes, you'll want a sturdy pair of hiking boots -- I love my Ahnu boots -- and some bear spray for safety reasons.

Know Before You Go: If you plan to visit multiple national parks in a year, the America the Beautiful Pass will save you a bundle! It costs $80 for an annual pass (for an entire vehicle traveling together) to all US national parks and federally managed site.  

How This Grand Teton Itinerary Works

The snow-covered Teton Range is reflecting in a pond or river in the afternoon sunlight, surrounded by grass and trees.

This is a self-guided itinerary that assumes you’ll have access to your own car throughout the duration of your time in Grand Teton. 

Road tripping Grand Teton is definitely the best way to experience the park at your own pace and maximize your time.

If you don’t have a car, there is a free shuttle available. It connects Jackson, the Jackson Lake Lodge, Colter Bay Village, and the South Jenny Lake Visitor Center. 

However, besides these stops, there is no shuttle service within the park. As a result, it’d be pretty hard to follow this itinerary, which is designed to be a Grand Teton road trip itinerary.

This itinerary for Grand Teton is best suited for people who want to see the best of Grand Teton National Park’s main highlights, while also having time to hike and experience the beautiful wilderness of the region.

 It affords opportunities for appreciating the area’s wildlife while also seeing the natural wonders and highlights of the park.

However, since this itinerary just allows for 2 days in Grand Teton National Park, it’s not going to be possible to see everything.

We’ve had to make a few omissions in order to have an itinerary that is reasonable, not stressful!

This Grand Teton itinerary will work best if you are staying in the park itself or in the nearby town of Jackson, WY or Teton Village, WY. 

These destinations together (along with Hoback, Kelly, Moose, Moran Junction, and Wilson) make up the region of Jackson Hole, but Jackson and Teton Village have the most accommodation options.

Renting a Car for Grand Teton

An empty road leading towards the distinctive peaks of the Teton Range near Grand Teton National Park on a cloudless summer day.

If you are driving to Wyoming in your own personal vehicle, you can disregard this section!

If you are flying into Grand Teton, you’ll want to pick the Jackson Hole Airport (JAC). 

This offers the easiest access to the park by a long shot. If you are also visiting Yellowstone first, you may want to look into flying into West Yellowstone or Bozeman-Yellowstone Airport.

In the peak season (summer), there are 15 destinations that service Jackson Hole directly, including but not limited to Los Angeles, New York City, Chicago, Denver, Salt Lake City, Dallas-Fort Worth, and more. 

American, Delta, United, Alaska, and Frontier all service the airport, though Alaska and Frontier are only seasonal.

Therefore, I suggest renting a car from the Jackson Hole Airport.

Not sure where to get the best deal on your rental? I’ve rented cars dozens of times through various search engines and have settled on Discover Cars as the best car rental search aggregator – it sifts through dozens of trusted rental companies to find the cheapest price for your rental! Compare prices for your car rental here.

How to Do 2 Days in Grand Teton Without a Car

The pale turquoise water of Jenny Lake, surrounded by evergreen trees and steep mountain peaks in the Tetons, on a sunny day visiting Grand Teton National Park in summer.

Honestly — it would be very tough! 

While there is a shuttle between Jackson and 3 key park stops, it’s not nearly enough to be able to handle this Grand Teton itinerary.

If you were to try to tackle this without a car, you’d end up fairly limited. 

You could spend one day at Jenny Lake and hiking to Inspiration Point and the next day visiting Colter Bay Village and the area around Jackson Lake, including Christian Pond Loop.

However, you’d miss all the wonderful scenic overlooks in between, as well as the National Elk Refuge which is a true highlight of the park (well, technically just outside the park).

If you can’t drive but you want to maximize what you can see inside Grand Teton in 2 days, the best option would be to go with a guided tour. 

I’d recommend this full-day tour which includes stops at Antelope Flats, Mormon Row, Oxbow Bend, Pacific Creek, Jackson Lake, Signal Lake, and Jenny Lake, as well as a light breakfast and hearty picnic lunch.

Book your full-day tour of Grand Teton here!

The following day, you’ll still have plenty of opportunities to enjoy the landscapes around Jackson Hole and the Grand Tetons.

You could enjoy all the fun things to do in the town of Jackson, enjoy a scenic flight over the Grand Tetons or even a sunrise hot air balloon ride, or take a day trip to Yellowstone’s Lower Loop to see all the highlights of Yellowstone National Park in a single day!

Best Time of Year to Visit Grand Teton National Park

Mt. Moran at Oxbow Bend in Grand Teton National Park, reflected in the river which is surrounded by orange foliage in the autumn.

The peak hiking season in Grand Teton is quite short, mostly consisting of late spring, summer, and early fall. 

If you are going to Grand Teton and hoping to hike without significant snow on the ground, you’re best off if you wait until at least late June, and better yet going in July or August. However, note that crowds at that time will be at their peak then!

September is a delightful month to visit Grand Teton National Park: the crowds are far fewer, due to school resuming and families disappearing from the park, and the temperatures are still warm in the day but there’s little risk of snow disrupting your plans.

The fall foliage is brilliant in September, generally from the middle of the month towards the end, and October usually has beautiful leaves as well, though the weather becomes colder and more unpredictable towards the end of the. month. 

However, the fall foliage season does shift year to year, so this is not a guarantee, but end of September / beginning of October is generally the “safest” window for beautiful fall foliage.

However, winter in Grand Teton is not a no-go! The park is absolutely beautiful in the wintertime, with lots of great winter activities and landscapes to enjoy. You simply have to be prepared and know what to expect in terms of closures and access. 

I have a guide to 30 things to know about visiting Grand Teton in winter that will help you plan a trip in the winter season.

Plus, unlike Yellowstone in winter which almost entirely shuts down to passenger vehicles and requiring the pricy booking of snow coaches and snowmobiles, much of Grand Teton National Park is still able to be visited in the winter independently, making it a great choice for the winter season.

Spring in Grand Teton is beautiful, with alpine wildflowers replacing the snow as its melts. 

However, you can expect snow on the hiking trails until at least the end of May, making hiking more treacherous unless you are experienced and equipped for hiking in the snow.

What to Pack for Grand Teton National Park

A female hiker looking at a valley in Grand Teton National Park, well-prepared with a backpack, hiking poles, and a sunhat on her back.

I have a full road trip packing list here, but here’s the quick rundown.

Travel Guides: I have included so much information in this Grand Teton Itinerary that I believe will be helpful in your trip planning process but sometimes guide books provide more than I can fit in one piece! Combine my personal experiences with this Moon Yellowstone & Grand Teton guide and you’ll be set for an adventure of a lifetime.

Layered Clothing: Even if you are visiting Grand Teton in the summer, due to the high elevation, it can get chilly at night so plan accordingly!

For summer or early fall, you’ll want at least 2 shirts (synthetic or wool, long and/or short sleeve depending on the season), 2 pairs of leggings or pants, 2 pairs of shorts, 1 fleece outer layer, a waterproof jacket, a beanie, gloves, and 3 pairs of socks.

For winter, you’ll skip the short sleeves and shorts and add in thermal layers, a parka, a scarf, waterproof pants, waterproof gloves, and snow boots.

Comfortable Footwear: Visiting the Grand Tetons is all about hiking! A sturdy pair of hiking boots with strong ankle support is really worth the investment. I love my Ahnu Sugarpine boots for women, and for men, I suggest the KEEN Durand boot.)

However, if you pick sneakers, make sure they have good traction and are comfortable enough for several 2-4 mile hikes over the course of this Grand Teton itinerary. Be sure your choice of footwear is waterproof if visiting any time there might be snow on the ground.

Sunscreen: At 6,500+ feet elevation for much of the park (such as Jenny Lake, Taggart Lake, etc. — you’ll go higher on any mountain hikes!), it’s easy to get sunburned, even if the weather seems cloudy. Trust me — I’ve learned this the hard way. Wear sunscreen every day, and ensure that you reapply it every few hours. I suggest this chemical-free organic sunscreen –especially if you plan on swimming, you don’t want to be polluting the pristine lakes with chemical-filled sunscreen!

Sunhat: I recommend a lightweight but packable hat that has a strap, so that you can ensure it won’t get blown off, never to be seen again, by a gust of wind. It’s also handy because you can just wear it on your back when you don’t feel like having it on your head (or for Instagram pics — no judgment).

Day pack: A lovely lightweight day pack is essential to have when in Grand Teton so you can easily put everything you need for a day out hiking in a place that is both easily accessible yet unobtrusive for active days out. I like this inexpensive and lightweight Osprey day pack, which has mesh panels on the back to allow for airflow (goodbye, sweaty backs!).

Snacks: None of these Grand Teton hikes are that strenuous, but I strongly recommend you always have some snacks on you when you hike, just in case you get hungry. You also may not want to waste time on your Grand Teton itinerary waiting for a sit-down lunch or heading to Moose or Jackson for a meal.

I suggest you make or pick up a picnic lunch on your way into the park, or have plenty of snacks for the day. I suggest things like protein bars (I love CLIF bars), nuts, or other high-density snacks that give you a lot of caloric energy for their weight!

Camera: I absolutely love my Sony A6000! It’s a mirrorless camera, not a D-SLR, so it’s lightweight and perfect for a high-quality camera that won’t weigh your daypack down like a larger camera will. That’s just the body: I also suggest bringing a zoom lens for wildlife and a wide-angle lens for landscapes, as the kit lens is OK, but nothing to write home about.

First aid kit: Don’t let a little thing like blisters ruin your Grand Teton trip! I recommend always keeping a first aid kit like this HART Weekend First Aid kit in your daypack. It’s lightweight and unobtrusive, but if you ever need it, you’ll be glad to have it.

Headlamp (and extra batteries): If you want to do any sunrise or sunset hiking, I recommend bringing a headlamp like this Petzl headlamp.

Water filter bottle: While there are water fountains around Grand Teton, I still suggest having a water bottle with a filter so you can fill up anywhere there’s a water source — like all the beautiful alpine lakes around you!

There are a wide variety of water filtration systems, but I personally have and love the GRAYL Geopress, which allows you to filter water from any source. It’s perfect for filling up on a hike if you see water anywhere on the trail. It’s compact and easy to use and filters out 99.99% of microplastics, viruses, bacteria, and other nasty particles, making water instantly safe to drink without plastic waste.

Where to Stay in Grand Teton

A two-story cabin overlooking a lake in Grand Teton National Park, surrounded by mountains and trees, with a few boats out on the lake on a sunny day.

There are lots of options for where to stay when visiting Grand Teton on a road trip! If you’re visiting in the summer, you can stay in the park… but you’ll need to book way in advance!

For where to stay in the park itself, I recommend Jenny Lake Lodge. It has a beautiful location and they have cute rustic cottages, each with its own entrance, as well as an on-site bar and restaurant serving delicious meals, including a 5-course dinner every night.
>> Book your stay at Jenny Lake Lodge on Booking.com | Book it on Hotels.com

However, for most people, unless you plan extremely far ahead in advance, lodging within the park isn’t that feasible. If you find yourself booked out of park lodging, I suggest staying in Jackson, WY or Teton Village, WY.

It’s just a short drive and there’s so much to do in Jackson any time of year (especially in winter!) that it’s worth the extra drive time… especially since the road between Jackson and the Moose entrance of the park is one of the prettiest in the United States!

Jackson Hole Accommodations

BOUTIQUE | If you love a hotel with design that’s packed with a punch of personality, I’d stay at the Wyoming Inn. This charming hotel is super cozy and rustic, with Western-inspired decoration on the interior: we’re taking roaring fireplaces, woodsy colors with lots of natural light, rustic touches and design elements, and large, renovated rooms.
>> Check photos and reviews on Booking.com | Book it on Hotels.com

BUDGET | While Jackson isn’t the biggest budget destination, if you’re trying to save a few bucks on accommodations without sacrificing comfort, I’d suggest The Elk Country Inn. It’s very highly reviewed and offers modern, clean rooms with plenty of space, just 4 blocks from the Town Square in Jackson.
>> Check photos and reviews on Booking.com | Book it on Hotels.com

LUXURY |  While not technically in Jackson but rather in Teton Village, the beautiful  Teton Mountain Lodge and Spa is an absolute stunner. The rooms each have their own fireplace, kitchen, and seating area, and the property has both indoor and outdoor heated pools and hot tubs, as well as a world-class massage and spa center perfect for some well-deserved R&R.
>> Check photos and reviews on Booking.com | Book it on Hotels.com

CABIN | The incredible views you get on the Grand Teton are why you should sleep at this beautiful cabin.

With large windows and a rustic but modern interior, you’re guaranteed an amazing stay at this place while taking in beautiful mountains views from every room. The cabin has a large kitchen, sitting area, a dining area, and a number of bedrooms to accommodate even big groups. The best part is that it’s near Teton River and Big Hole Mountains so you’ll never run out of outdoor activities to do.
>> Check photos and reviews on Vrbo

Your Grand Teton Itinerary

Day 1 of Your Grand Teton Road Trip

This Grand Teton National Park road trip departs from Jackson, Wyoming.

A popular ski town in the winter, Jackson becomes the ultimate gateway town to the Tetons for summer road trips and recreation.

National Elk Refuge

Focus on two elk interlocking horns, several other elk in the background with a tiny bit of snow on the ground on a summery day.

As you make your way north toward the Moose Entrance, the National Elk Refuge hugs the road to the right.

This area is home to one of the largest elk herds ever recorded! There is no fee to enter the refuge if you’re interested in getting a closer look.

Stop and take some photos of these gorgeous elks and start to get pumped for the wildlife and scenery that await you once you enter the park proper!

Mormon Row Historic District

The historic barn or homestead along Mormon Row with the Teton Range in the background

One of the first stops in the national park itself is the Mormon Row historic district located in the Gros Ventre section of the park. 

This is likely one of the photos you’ve seen in all the travel guides (including this one!) to promote Grand Teton. 

The view of the historic barns and homesteads from the 1800s, built by Mormon settlers, juxtaposed against the Teton Range are simply unforgettable.

Stop here to walk around and take some photos, but let’s keep it moving: you have a full day itinerary ahead of you!

Moose Junction

View of Moose Junction and the river snaking below it with a sunburst coming out of the trees as the sun sets behind the Teton range.

Welcome to the park! When you arrive at the Moose Junction, clearly marked, turn left onto Teton Park Road.

Soon after turning, you’ll cross over the Snake River, the largest tributary to the Colombia River.

The Moose Visitor Center is located down a road on the left and is a great place to ask questions about the park.

Windy Point Turnout

A grassy, brushy landscape with mountains in the distance and spotty clouds.

As you’ve probably noticed, there are no bad views in Grand Teton National Park!

If you’re eager to get some early morning photos of the mountains, use the Windy Point Turnout soon after the Moose Entrance Station.

From here, you’ll be able to see Grand Teton, Mount Owen, Middle Teton, and Teewinot Mountain in the distance.

Taggart Lake

Very clear lake water, showing rocks and logs at the shallow end of the lake, deepening in color as the water goes out deeper, and mountain peaks behind it.

Time to get the blood flowing with a 3-mile short hike to Taggart Lake. Fair warning, the Taggart Lake Trailhead parking area fills up early in the day. Arriving in the morning will be worth it!

From the Taggart Lake Trailhead, head down the trail until you come to the loop junction. Take a right at the junction to stay on the Taggart Lake Trail. 

A little farther down the trail, you’ll cross a bridge over Taggart Creek. Check out that waterfall!

Not much farther now, Taggart Lake sits at the base of the Teton Range with the mighty peaks standing proudly in the background.

After completing your photo op and taking in some mountain air, continue back the way you came… or add an extra mile to your round-trip by taking Beaver Creek Trail back to the Taggart Creek Trailhead. Both paths lead back to your vehicle and onto the next adventure!

Jenny Lake

Deep blue water reflecting two large mountains, and two pines in front of the lake.

There is so much to do at Jenny Lake! 

If the views weren’t enough for you, there’s also a visitor center, boat shuttles, camping, concessions, and amazing trail access.

All aboard! Park near the Jenny Lake Visitor Center and take the short trail towards the docks to catch the boat. 

The boat shuttle runs every 15 minutes and there is a small fee for riding. Worth every penny! 

Enjoy the ride until you hop off the boat ride on the west side of the lake at the base of the magnificent peaks.

The fun is just getting started. Any waterfall lovers here? From the dock, Hidden Falls is only a 2-mile round trip hike. This easy-to-access falls drops 100 feet!

Close up of a section of a waterfall cascading down rocks with some green trees in the foreground.

If you’re looking to add in some more hiking miles and really want to earn that ice cream waiting for you at the Jenny Lake Store, forgo the return boat shuttle.

Instead, take the loop trail 4 miles along the southern half of the lake for prime wildlife and mountain viewing opportunities! 

If you want to spend more time at Jenny Lake, there’s also the Cascade Canyon area near the West Shore Boat Dock area, which is really beautiful and scenic. 

hike to Inspiration Point is also fairly easy from the West Shore Boat Dock, taking about 1.8 miles roundtrip and gaining about 500 feet.

Back at the parking area, it’s time to refuel and relax by the rocky shore before hitting the road!

String Lake

Perfectly still water acting like a mirror to reflect the evergreen trees and green-covered low mountains at String Lake, a must on a summer Grand Teton itinerary.

Take the One Way South scenic road and don’t forget to stop at the Cathedral Group Turnout for more breathtaking mountain views. 

Not much farther down the road, you’ll want to make a right to head to the String Lake Picnic Area.

Hot summer days and String Lake were meant for each other! 

The picnic area at the crystal clear lake has an inviting sandy beach with plenty of room to set out chairs and towels for an afternoon swim.

If your legs aren’t cooked from the day’s hikes, there is an easy 4-mile loop trail that rounds the lake and offers additional views of the neighboring Leigh Lake. Keep your eyes peeled for wildlife as you make your way around the loop.

Day one ends back at the beaches of String Lake. 

Insider Tip: Watch the sunset over the Teton Range from the Jenny Lake Overlook off of the One Way South scenic road, take a peek at the uninterrupted starry night sky and rest up for another exciting day. 

Day 2 of Your Grand Teton Road Trip

Good morning road trippers! Ready to start this adventure-filled day?

The northern half of Grand Teton National Park awaits! Make your coffee to go because this mountain sunrise is going to be epic.

Mountain View Turnout

Alpenglow (the reddish glow at sunrise on mountain peaks) illuminating a peak of the Teton Range with a pastel lavender sky.

Just past the turn to head toward Sting Lake on the Teton Park Road, you’ll find the Mountain View Turnout on the left.

Appropriately named, this viewpoint is a great spot to set up a tripod. Bring some camp chairs, blankets, and that hot coffee we talked about to watch the sunrise over the Teton Range.

Signal Mountain Road

Trees in front of a lake in the distance with a large mountain with a little bit of snow on it far away, on a clear sky day in summer in Grand Teton National Park.

Soon after leaving the Mountain View Turnout, Jackson Lake begins to come into sight.

Sitting at 6,772 feet above sea level,  this massive lake has a surface area of 4,750 acres! 

Take the scenic drive up Signal Mountain Road to get a look at the lake from above via the Jackson Point Overlook. 

Take this road slowly. There’s no rush. The switchbacks become very tight at the top and require conservative speeds to travel safely.

Up for a longer hike? You can get to the Jackson Point Overlook on Signal Mountain on foot. The moderate 7-mile round trip hike is well worth the early morning incline. 

For the sake of time, it may be worthwhile to opt for the scenic drive up to the viewpoint today, but if you’re a quick hiker, you may want to make the hike!

Jackson Lake Dam

A very large cement dam showing rushing water in a long exposure photo rushing underneath the dam, turquoise water coming from the dam, and pine trees on the sides of the dam.

Just after passing over the Jackson Lake Dam, there is a road on the right leading down to a parking area next to the river.

Walk up the steps toward the sidewalk and make your way across the dam for awesome views of the Tetons over Jackson Lake. 

Across the road, there are some paved interpretive trails along the lake that are fun and easy to explore.

The parking lot next to the Snake River at the dam’s outflow is a popular spot to stop and cast a fly!

Christian Pond Loop

Yellowing grass surrounding the pond at Christian Pond with brilliant blue water and rolling hills in the background on a blue sky summer or fall day.

Wildflowers and wildlife wait for you along the Christian Pond Loop Trail! 

This easy 3.5-mile hike departs from the trailhead parking next to the horse corrals at the Jackson Lake Lodge. 

As you approach the pond, be on the lookout for moose and elk grazing as well as trumpeter swans gliding through the shallow water.

The trail leads to the shores of Emma Matilda Lake before looping back toward the trailhead. Take a little detour and hike along the lake’s edge. Another great spot for wildlife viewing! 

When you’ve taken it in all in, head back to the Christian Pond Loop and back to the parking area.

Colter Bay Village

A mountain perfectly reflecting in the still water at Colter Bay, with lots of boats sitting still in the water, anchored.

It’s easy to spend a full day in the Colter Bay Village area, so we have narrowed it down to the best activities!

From the Colter Bay Visitor Center, take a leisurely hike along the Lakeshore Trail. 

This 2-mile nature trail offers amazing views of Mount Moran behind Jackson Lake. The trail will bring you along the lake’s astonishing shore. Don’t forget the camera!

After your short hike, make your way over to the nearby Colter Bay Marina just in time for the Jackson Lake Scenic Lunch Cruise! 

The boat will take you to the shore of Elk Island in the middle of the lake, where you can explore and enjoy a picnic-style lunch. There’s nothing like the panoramic views from this scenic cruise.

Want to guide your own watercraft around the lake? You can also rent canoes and kayaks at the marina and explore the lake shores on your own time! 

Paddling away from the high-use areas around Colter Bay provides great opportunities to catch a glimpse of wildlife along the water.

Lakeview Picnic Area

Boats on Jackson Lake in Grand Teton in summer

Take in one last good view of Jackson Lake at the Lakeview Picnic area on the northern part of the lake. From the picnic area, there is easy access to the lake’s shore for photos.

Those who are feeling extra brave can jump in for an icy swim!

Your exciting two-day Grand Teton itinerary ends on the shore of Jackson Lake.

From here, continue north toward Yellowstone National Park, where we leave you to discover your next adventure!

Have More Time in Grand Teton?

While this itinerary will completely fill 2 days in Grand Teton, if you are tempted to add extra time — and you should be! — there is a number of ways you could spend more time in the park.

If you want to get more hiking in, consider a hike to Surprise Lake and Amphitheater Lake. This is a hard hike, numbering 10 miles roundtrip and 3,000 feet of elevation gain. 

It is spectacular, though, so if you have the prowess for a hike of this difficulty, consider it! If not, I have a post on several other day hikes in Grand Teton that are a little easier.

Tired of hiking but want some outdoor adventure? You could go rafting on the Snake River with one of the many rafting outfitters that operate within the park. 

This 7-mile float down the river is a low-intensity rafting trip with a guide that would make an awesome addition to your Grand Teton itinerary.

Book your rafting excursion here!

Your Perfect Arches Itinerary: 2 Days in Arches National Park

The perfect desert adventure is waiting for you in Moab, Utah, at Arches National Park!

This outdoor playground is home to the highest density of natural sandstone arches in the world: we’re talking over 2,000 documented to date!

Full of breathtaking red rock features and scenic hiking trails, Arches National Park is sure to impress every US national park enthusiast. 

But there’s a lot to see here, spread across 50+ miles of roads, and it can get overwhelming to plan the perfect route to hit all of the bucket list musts in Arches National Park.

Don’t sweat (save that for when you hit the trails!) — we’ve broken down the top things to do in Arches National Park, day by day, into this easy two-day Arches itinerary!

Travel Tips for Arches National Park

Allison exploring Arches National Park on a sunny day

Go early. This is one of the most popular national parks in the Southwest, so don’t expect solitude. Usually, there is a line to enter the park starting as early as 9 AM. 

Try to get an early start on both days, since you only have two days in Arches. Aim for at least one day where you wake up early enough for a sunrise hike!

Be sure to have a car. Arches National Park does not have a bus or shuttle system, so you’ll need a car to access the trailheads and viewpoints in this itinerary. If you’re not driving to Arches from your home state, you’ll likely want to fly into Salt Lake City and rent a car there — flights to Canyonlands Regional Airport are expensive and rentals are limited there.

Not sure where to get the best deal on your rental? I’ve rented cars dozens of times through various search engines and have settled on Discover Cars as the best car rental search engine – it searches over 500 trusted rental companies to find the cheapest price for your rental! Compare prices for car rental from Salt Lake City here.

If you don’t have a car, plan tours. It is possible to do Arches National Park without a car, but you’ll want to book some tours of the National Park and some Moab activities in order to fill up your itinerary.

Slather on the sunscreen. Arches National Park is hot, hot, hot in the summer! Be sure to apply sunscreen at least 10 minutes before a hike, and reapply every two hours or so (or more if you’re sweating a lot). 

Don’t forget exposed skin on the back of your body, like the back of your next, behind the knees, lower calves, etc! This is where I typically end up burned when I’m not diligent.

Bring a lot of water. As mentioned in the previous point, Arches gets quite hot in the summer season and it can be quite easy to get dehydrated. 

In every road trip packing list, I make sure to impress upon how important it is to have a large supply of water in your car just in case of an emergency. 

Define your accessibility needs. Not all of the park is accessible to people with mobility limitations. The following places are wheelchair accessible: Park Avenue Viewpoint, Balanced Rock Viewpoint, Lower Delicate Arch Viewpoint, and Wolfe Ranch Cabin. 

There is an accessible campsite at Devils Garden (#4H) and the Visitors Center and the restrooms are accessible all throughout the park.

It’s best not to bring your pet. Arches National Park is not a particularly dog-friendly national park. Dogs are not permitted on hiking trails or at overlooks, nor in the backcountry, which basically eliminates all of this itinerary! 

Dogs are only permitted at the Devils Garden campsite, picnic areas, and along paved roads. If traveling with a pet, check out these other dog-friendly hikes in Moab.

Where to Stay when Visiting Arches National Park

Glamping tent lit up from within with starry sky behind it

We give some details on campsites below in the itinerary, but if you’re not planning to camp — or the campsites in Arches are all full — here is where we suggest you stay in Moab!

GLAMPING | Not into full-on roughing it and camping? Glamping is the perfect middle ground where you can experience comfort and ease while also being in nature. Under Canvas Moab knocks it out of the park in terms of comfort, style, and entertainment, and is frequently cited as one of the best glamping lodges in the entire United States.

Book your stay at Under Canvas Moab here!

BUNGALOWS | The charming Moab Springs Ranch has private bungalows that are the perfect place to stay in Moab if you want more privacy than the typical hotel. Each bungalow has its own little terrace, and each room has A/C, TV, a kitchenette and dining area, and a private bathroom. The property also has a restaurant, garden, and BBQ facilities on-site.

Book your stay at Moab Springs Ranch here!

INN | For a rustic stay that nonetheless has all the amenities you need, Red Stone Inn is a fantastic choice. Rooms all come with a kitchenette, AC, TV, and en-suite bathroom. In terms of shared amenities, there is a hot tub and free WiFi throughout the property.

Book your stay at Red Stone Inn here!

5 Things Not to Forget to Pack for Arches

man standing below delicate arch in utah wearing hiking boots

Sunscreen. I’m weaning myself off of chemical-based sunscreens, especially if I’m doing any water activities like rafting or swimming. I love SunBum SPF 50 with Vitamin E as it’s all-natural and moisturizing without feeling icky and sticky.

Hydration backpack. You’ll want to rehydrate a lot while hiking in Arches, especially if visiting in the summertime! I recommend bringing a hydration pack like this Camelbak which you can wear on your back and sip water from, totally hands-free. It has a zipper pocket so you can throw in other essentials — car keys, cell phone, granola bars, etc. and use it in place of a day pack.

Hiking boots. This Arches itinerary includes a number of hiking trails that are rather rocky and uneven, and having ankle support is really key in these instances if you don’t want to roll an ankle and ruin your trip. 

I love my pair of Ahnu hiking boots (for women) and for men, I suggest these similar Keen boots. Whatever boots you pick, be sure to break them in with a hike or two before heading to Arches.

Hiking socks. Don’t forget to pack hiking socks! Regular old cotton socks in hiking boots can lead to massive amounts of blisters — I’ve learned this lesson firsthand, unfortunately! Moisture-wicking hiking socks are cheap but can save your vacation. These DriTech socks are a great and inexpensive option, or you may want to invest in some merino wool quick-drying socks.

Headlamp. Because this Arches itinerary includes some sunset hikes and sunrise hikes, you’ll need a headlamp like this one. Trust me, as someone who hiked back from a sunset hike at Corona Arch in the dark without a headlamp, you’ll absolutely want one! A smartphone flashlight won’t cut it.

Day One of Your Arches National Park Itinerary

Start the day at the Arches National Park Visitor Center.

the rugged landscape of arches national park, starting at the visitor center

Time to get ready for a full day exploring the beautiful red rock landscapes of Arches. 

However, the rugged landscape that makes up the 119 square mile park is more fragile than you may think!

Luckily, the Arches National Park Visitor Center near the entrance station is well-equipped to provide information about park stewardship. 

They also offer important insider details on how to access and appreciate the park’s many famous attractions.

Also, they’ll let you know of any important closures. For example, on my last visit, unfortunately, the Devil’s Garden was temporarily closed.

The visitor center is also a great place to top off all your water bottles! Although there are fill stations sprinkled throughout the park, it’s important to carry plenty of water at all times.

Summertime temperatures often exceed 100ºF/38°C, so proper hydration while tackling this Arches itinerary is extra important — especially if you’re hiking a lot!

Begin your exploration at the Moab Fault Overlook.

view from the moab fault overlook viewpoint over the red rock landscape of this beautiful utah national park.

As you continue into the park from the visitor center, you will begin to gain elevation.

Look around at the sandstone features as you make the switchbacks above the park entrance.

To the left, you will see three pinnacles called the Three Penguins. Can you make out the penguin shapes?

The turnout for the Moab Fault Overlook will be one of the first viewpoints in the park on the right side of the road. 

Check out the impressive fault and read through the helpful interpretive signs to understand the tectonic plates and how they have impacted the beautiful Utah landscape.

Hike the scenic Park Avenue Trail.

red rock formations seen from a hike on this arches national park itinerary.

From the Moab Fault Overlook, continue on the main road to the Park Avenue Trail and Viewpoint

The views are epic right from the parking lot — this stop makes a great backdrop for a group photo, even if you’re not planning to do a hike!

Park visitors that are unable to hike long distances can enjoy an amazing lookout here. The first section of the hiking trail is paved to be wheelchair and stroller accessible.

For those who wish to continue past the paved section, the trail leads toward the astonishing Courthouse Towers in the distance. 

The 2-mile out-and-back trail takes hikers to the canyon floor for a close-up of the various towers and fins!

The trail connects with the main road at the 1-mile turnaround point, so it’s possible to arrange for a private shuttle.

If you want to arrange a shuttle, be sure to do it in advance, especially if you don’t want to hike back to the Park Avenue Trailhead or if you are trying to save time on this Arches itinerary to maximize your trip!

Gaze at the La Sal Mountains Viewpoint.

the famous 'three sisters' rock formation seen from the la sal mountains viewpoint in arches national park

After a nice walk through the sandstone monoliths, head back to the main road and stop at the La Sal Mountains Viewpoint.

There’s not much of a trail here, but it’s a nice place for scenic views with some interpretive posters to read through. 

You’ll also be able to spot the Three Sisters rock formation here, one of the most beautiful landmarks in Arches National Park!

The La Sal Mountains that you can see in the distance are about 20 miles south of Moab and are the second-highest mountain range in Utah.

They offer great recreation opportunities for locals and visitors with skiing in the wintertime! But in summer, boy, do they make one beautiful backdrop.

Visit Arches’ very own ‘Great Wall’.

large red sandstone 'wall' next to a road with a car on it driving in arches national park on a sunny partly cloudy day.

This feature isn’t quite the same as the great wall you may be thinking of on the other side of the globe. It is, however, really beautiful and impressive!

The Great Wall in Arches National Park is a towering row of naturally formed sandstone cliffs and towers.

Take in a drive-by view of this phenomenal feature or stop at the Petrified Dunes Viewpoint.

From the designated viewpoint, you can see the Great Wall in the distance and the petrified dunes with the La Sal Mountains in the background. It’s picture-perfect!

Hike to the viewpoint at Balanced Rock Trail.

hoodoo holding up a rock that looks like its balancing. mountains capped with snow in the distance at sunset.

This next tower is going to blow your mind! If you’re looking closely, you can even spot it as you drive to the trailhead…

Continue past the Great Wall on the main road until you see the well-marked parking area for the Balanced Rock Trail on the right.

Near the trailhead, there are bathrooms and a nice picnic area. Take some time to regroup, hydrate, and refuel with a well-deserved picnic lunch before you head out on a hike to Balanced Rock.

Feeling rejuvenated? Good!

Now, it’s time to get a closer view. The short and easy 0.3-mile scenic loop will take you around the base of the iconic feature.

This rock formation, known as a hoodoo (the likes of which you’ll see all over Utah, in particular, Bryce Canyon National Park) appears to be balancing a bolder that is 55 feet in diameter.

The total height of the structure is 128 feet!

Explore the Windows Section of Arches National Park.

a giant rock with an arch showing blue sky behind it in arches national park

Not far past the Balanced Rock Parking Area is a side road marked with signs leading to The Garden of Eden, Double Arch Trail, and The Windows Section.

The first hike takes off at the very end of the side road. Park in The Windows Section Parking Area and look for signs that lead to The Windows Trail. 

The Windows Trail is an easy 0.65-mile loop that takes hikers to the North Window and South Window (nicknamed ‘the Spectacles’ for its unique shape)

The hike finishes off with an up-close view of Turret Arch. You can take epic photos of Turret Arch through the North Window for a beautifully composed shot.

As another option, hikers can take Windows Primitive Loop Trail for an alternate view of the North and South Windows. 

Truth be told, all the trails are all scenic in this section of Arches National Park!

Hike the Double Arch Trail.

low angle shot looking up to the double arch off the trail in moab.

The second trail that you must hike on this side road is the Double Arch Trail.

The Double Arch Trailhead Parking area is just a short drive from the Windows Section, so it’s great to pair these two Arches activities back-to-back. 

Set aside ample time to explore this next arch and don’t forget your camera!

This easy 0.25-mile hike begins in a cool desert forest of juniper trees. Continue on the trail until you come to the unmistakable Double Arch! There’s nothing quite like it.

Set up camp at Devils Garden Campground, if camping.

the campsite at arches national park, devils garden, surrounded by trees and red rocks.

A fun-filled day in Arches National Park is best rewarded with an overnight at Devils Garden Campground. It’s also the only campground in Arches proper.

As the only campground in Arches, you’ll want to book it well in advance online at recreation.gov

Bookings open six months in advance ($20 site fee), and so you’ll want to book as far in advance as time allows if you are trying to camp within the park. 

There are only 50 sites in all of Arches National Park for camping, and it is full pretty much every day between March 1 and October 31, when it is by reservations only.

If Devils Garden is all booked up, you may want to check out the Slickrock campground outside of the park.

Not trying to camp? Refer back to the top of the post where we suggest places to stay in Moab, and skip forward to the sunset hike in the next section. After that hike, you’ll return to your hotel.

Located right inside the park, this campground makes a perfect starting point for your next day’s adventures. The sites in this campground are all well laid out providing some shade and red rock views.

It’s also a great place for stargazing in Arches!

Take in the sunset at Skyline Arch.

skyline arch seen with brilliant colors and red rocks.

Did you think you were done for the day? No way! Arches National Park is famous for its glowing golden hour!

Right from the campground, take the short and easy walk over to the Skyline Arch. The round trip walk will be less than 0.5 miles from the trailhead.

If you have extra time, you could also tack on the short 0.3-mile hike to Sand Dune Arch, located just a short walk from the Skyline Arch. 

However, if you have to pick one, Skyline is better at sunset.

If you brought your headlamp along, stick around for the star show. The uninterrupted night sky is sure to reveal some stellar views of the Milky Way.

That’s officially all for day one. Now, it’s time to rest up for an early start!

Day 2 of your Arches Itinerary

Catch sunrise on the Broken Arch Trail.

view of an arch that looks partly broken, with a small crack in the rock, seen at sunrise.

Rise and shine!

Grab your headlamp, camp stove, instant coffee, and a breakfast bar for the trail, because this is a sunrise you will not want to miss. Mornings are hard, I know, but this will be 100% worth it.

Right from the campground (or driving in from your hotel), hop on the Broken Arch Trail

The arch is located less than a mile from the trailhead, and it offers a perfect spot to sit and brew some morning coffee as you watch the sun come up over Arches National Park. 

This is one of those great short hikes with an epic reward, especially if you time it for sunrise.

From Broken Arch, you can complete the loop to pass by Sandstone Arch on your way back to the campground or go back the way you came. The distances are about the same.

Trek through Devils Garden on one of Arches’ best hikes.

two hikers walking down a trail in the devils garden section of arches national park.

Take your time breaking down your campsite as you prepare for another day of adventure in this desert playground! 

Don’t forget to top off on water here, as refill spots can be few and far between in Arches National Park.

No trip to Arches is complete without a hike on the Devils Garden Trail. Within only 2 miles of hiking, you will pass by a dozen natural sandstone arches, including Landscape Arch.

Landscape Arch is the longest sandstone arch in the national park, stretching nearly 300 feet across. 

It looks impossibly thin at points — its thinnest section is only 6 feet across — which is wild when you consider its size!

This is a good hike to do earlier in the day before temperatures become too hot (hence the name Devil’s Garden!).

With detours to grab a closer look at some of the arches, the total distance on this hike becomes about 5 miles — so it’s not for the faint of heart. 

Be prepared to tackle this hike and bring lots of water, preferably in a Camelbak for easy access.

To amp up the difficulty, you can tack on the Double O Arch, also accessible off the Devils Garden Trail. 

However, this is on the hard side of moderate difficulty, so be sure to be prepared with proper footwear and water. 

Note that this is not for the faint of heart as there is quite a bit of drop in some sections of the hike, as well as some sections where you need to scramble and do some wayfinding.

Whatever hiking adventure you choose, return to the parking area to find some shade and a cool drink of water!

Take a scenic drive to the beautiful Fiery Furnace Viewpoint.

lots of beautiful red rocks at the fiery furnace viewpoint in arches

On the main road headed toward the park entrance, there is a parking area for the Fiery Furnace Viewpoint. 

From here, you can get an epic view into the thick fins, hoodoos, and arches of this area.

To hike in Fiery Furnace, you must obtain a permit from the visitor center or join in on a ranger-led hike (I recommend this latter option). 

You can book a ranger-led hike on recreation.gov: note that you need to book at least 4 days in advance, and it’s suggested to book several weeks ahead if possible as these are all small groups of no more than 25 people.

Note that since there are no maintained trails through Fiery Furnace, it’s easy to become disoriented and lost — another reason a ranger-led hike is a fabulous idea.

Visit Delicate Arch for sunset.

sunset at the scenic and iconic delicate arch with sunset colors and mountains in the distance.

We saved the most iconic arch in Arches National Park for last! You will probably recognize Delicate Arch from the many social media snaps of it, and even from Utah’s license plate!

To reach the trailhead, continue on the main road toward the park entrance until you reach the turn for Wolfe Ranch / Delicate Arch Viewpoint Road on the left. 

Continue down the side road and park at the Wolfe Ranch Parking Area — this is where you’ll start your hike to Delicate Arch.

The hike to Delicate Arch is a little challenging and requires hikers to follow the cairns marking the trail to avoid getting lost. 

However, there are usually a fair number of hikers here, so it’s hard to get too lost.

Take your time and be observant. At 3 miles round trip, this hike is well worth the close-up view of the arch!

Say goodbye – for now – to Arches at the pristine Panorama Point.

one last look at arches national park before finishing up this itinerary

Take one last good look at Arches National Park from Panorama Point.

This is the perfect place to reminisce and plan your next Utah adventure — trust me, there will be another one!

Take one last good look at Arches National Park from Panorama Point.

This is the perfect place to reminisce and plan your next Utah adventure — trust me, there will be another one!

Have More Time in Arches National Park?

the red rocks of tower arch in a more remote park of arches national park, seen shortly after sunrise in the morning light

This is already a fairly ambitious Arches National Park itinerary, but if you’re a fast hiker who doesn’t spend a lot of time soaking up views or photographing, you may want to tack on a few additional hikes in the park where it makes sense.

You may also want to keep these in your back pocket in case the crowds of Arches start to get to you: these are lesser-visited and a bit off the tourist path, though they are by no means a secret.

Here are a few additional arches in the park worth the hike!

Tower Arch: A moderate 2.7-mile roundtrip hike in a more secluded section of the park — this is great if you’re tiring of the crowds on the more on-the-beaten-path part of Arches and want to make a detour to shake off the crowds.

Pine Tree Arch & Tunnel Arch: These can easily be added onto a hike to Landscape Arch while hiking the Devils Garden section of the park. These are less-visited than some of the other arches in the section, but the Devils Garden area is still rather popular, so don’t expect total solitude.

Additionally, you can add some more fun activities in Moab, like this sunset cruise on the Colorado River, a half-day rafting tour, or a 4WD tour in Hell’s Revenge.

Where to Go Before or After Arches National Park

Allison visiting Mesa Arch in Canyonlands national park sitting in the middle of Mesa Arch

Arches National Park is often visited in conjunction with other incredible Utah bucket list destinations.

If you base yourself in Moab, you’ll likely also want to visit Canyonlands National Park (where you’ll find Mesa Arch — contrary to popular belief, this arch is not in Arches!).

You’ll also want to spend at least a half-day exploring Dead Horse Point State Park, where the Colorado River bends beautifully in a way similar to Horsehoe Bend in Arizona.

People often spend a few days in Salt Lake City before making their way to Arches, but you can also do this in reverse.

Other stops people often make include Zion National Park, Bryce Canyon National Park, and Capitol Reef National Park. 

I’ve included all of these on my one-week Utah Mighty 5 road trip itinerary, so if you are planning a longer stay, be sure to read that post!

I also have a post that combines all the best Utah attractions with some stops in Arizona like the Grand Canyon as well as Nevada in this Southwest USA itinerary.

15 Best Grand Canyon Airbnbs & Vacation Rentals: Glamping, Tiny Houses + Beyond

The Grand Canyon is one of those places that figures highly on nearly everyone’s U.S. bucket lists.

This stunning natural wonder was one of the first national parks in the United States, the result of erosion from the Colorado River over 6 million years.

At a whopping 277 miles long and a maximum depth over a mile (6,000 feet) at its deepest points, the Grand Canyon defies explanation. It’s a place that must be seen, not merely described.

One way to get an idea of the scale of the Grand Canyon is this: archaeologically speaking, looking at the Grand Canyon is looking at the past, the past 2 billion years of Earth’s geological history through all the different layers of rock and earth.

The Grand Canyon is part of the National Park Service, which means that accommodation options are strictly controlled and limited within the park. There are some campsites and some official lodging within the park, but they are expensive and tend to sell out months upon months in advance/

As a result, many people stay in Airbnbs near the Grand Canyon, or other similar vacation rentals which offer the best combination of price point, ease of access, and amenities!

Note: All these Grand Canyon options are located by the South Rim, not the North Rim, because there are far more accommodation options down south!

Here are my top choices for the best rentals near the Grand Canyon!

Best Grand Canyon Rental for Budget Glamping: Nomad’s Pad

Nomads Pad
Image via Nomad’s Pad

Price: From $130/night and up
Guests: 3
Bedrooms: 1
Nearest City: Williams
Book via Instagram or find this property on Hipcamp. First time booking with Hipcamp? I have a bonus for you! Get $10 off your first stay using my code: ALLISONG61751E or booking through my link.

Located a mere 30 minutes (by car) from the Grand Canyon South Rim, Nomad’s Pad Glamping Tent offers the unique experience of turning an open Arizona landscape into your own personal kitchen and living room, as long as you don’t mind getting a little dirty.

The nomadic-style tents has the only ‘indoor’ amenities you really need – a bed and a heater. With that said, the tent is quite resistant to the elements and there are insect screens to protect you from unwanted guests, so you can truly immerse yourself in nature and not worry about pests or unforeseen weather changes ruining your outdoor vacation.

The tent is about as environmentally friendly as it could be, as everything on the property is powered by solar energy, propane, and batteries.

The property has multiple tents which are well spaced-out, so you can expect absolute privacy without feeling completely alone in the wilderness.

The only things that are shared among the tents are the toilet and shower (which has an unending supply of hot water).

Each tent area has its own seating, fire pit, stove, and hammocks. This location is ideal for people who want to forget that their phones exist for a few days and just want to experience the great outdoors with family or friends, distanced from others.

>>>
Book via Instagram or Hipcamp

<<<

Best Grand Canyon Rental for Eco-Friendly Glamping: Shash Dine’ EcoRetreat

Image via Shash Dine’ EcoRetreat

Price: From $248/night and up
Guests: 5
Bedrooms: 1
Nearest City: Page
Book it on Booking.com

Striking the perfect balance between eco-friendly and well-furnished, Shash Dine’ EcoRetreat features accommodation with free private parking for all glamping units.

Every tent or hogan include a terrace, a seating and a dining area, comfy camp beds, and a log burner. Moreover, it’s possible to enjoy a vegetarian or a gluten-free breakfast too.

The eco-friendly lodgings also feature a garden with a barbecue at this property and guests can go hiking and fishing nearby.

The limited space is utilized to its maximum potential, and there’s room for up to five people to sleep in the tent, making it a great place to visit if you’re traveling with friends.    

>>>
Book it on Booking.com
<<<

Best Grand Canyon Rental for Families: Under Canvas Grand Canyon

Under Canvas Grand Canyon
Image via Under Canvas Grand Canyon

Price: From $300/night and up
Guests: 4
Bedrooms: 2
Nearest City: Valle
Find it on Booking.com: Under Canvas Grand Canyon

If you’re looking for a vacation house near the Grand Canyon and you’d like to go there with your family or friends, Under Canvas Grand Canyon is just the place for you.

There are different tents for you to choose from. And when you compare the Stargaze tent, the Safari tent, and the Deluxe tent with a Kids tent, it’s not easy to make up your mind! They’re all gorgeous.

This is the perfect Arizona getaway spot for up to four people, with spacious interiors enough for everyone to be able to sit and get around.

Located in the wilderness, the property offers plenty of interesting sightseeing options. The suites are super comfortable and it’s even possible to use the barbecue facilities. Vegetarian or American breakfasts are also served to guests.

Most importantly, the house is a 45-minute drive from Flagstaff, yet because it’s quite isolated, you’ll be able to get to one of America’s greatest natural landmarks without worrying about crowds and tourists along the way.

>>>
Check availability and book your stay here
<<<

Best Grand Canyon Rental Close to the Park: Grand Canyon Bungalow

Image via Grand Canyon Bungalow

Price: From $250/night and up
Guests: 6
Bedrooms: 3
Nearest City: Grand Canyon Village
Book it on VRBO

Grand Canyon Bungalow 3 is conveniently located 1 mile from the Grand Canyon National Park — meaning you don’t need to sweat parking at the often crowded South Rim parking lot!

This simple yet cozy house can accommodate up to 6 guests, and its minimalistic design and tastefully chosen furniture make it feel like a genuine home. The large amount of indoor space and the relative seclusion of the location make the house great for unwinding and enjoying the peaceful environment.

There’s plenty to be done outdoors, too – the perimeter of the house is covered in trees, so exploring the forest may lead to some interesting discoveries, and visitors can expect a beautiful morning view from the windows.

Additionally, the Arizona trailhead is nearby, adding to the already long list of locations of interest in Grand Canyon NP, and the front porch makes for a beautiful place to look at the sunset and the night sky if you just want to sit back and relax after a long day of hiking.

There are plenty of beautiful things to be seen in these parts of Arizona besides just the Grand Canyon main viewing area, and those who choose to stay at Grand Canyon Bungalow will really be able to make the most of their trip.

>>>
Book it on VRBO
<<<

Best Grand Canyon Rental for the Nostalgic: Sheep Wagon

Image via Hipcamp

Price: From $203/night and up
Guests: 2
Bedrooms: 1
Nearest City: Page
Find it on Hipcamp: Sheep Wagon. First time booking with Hipcamp? I have a bonus for you! Get $10 off your first stay using my code: ALLISONG61751E or booking through my link.

Have you ever wanted to sleep in a covered wagon in the middle of nowhere under a brilliant starry sky? This unique and beautifully restored sheepherder’s wagon from the early 1900s will make your dream come true!

Remember that water is a precious commodity in the desert, so for your comfort, bathing water is provided in a container heated by the sun. Note that there is no running water on the Navajo nation.

This stay is very minimalist, but it will definitely help you relax and connect with nature, surrounded by outstanding natural beauty.

The property provides a breakfast of fresh fruit, breakfast bars, and your choice of coffee or Navajo Tea. Cooking of other meals can be done over open fire at the outdoor fire pit. Small wood bundles of firewood or charcoal to cook can be purchased at any outlet in the town of Page.

If what you’re looking to get out of your trip is an unforgettable stay in a dreamy lodging, then this beautiful wagon is for you.

>>>
Check availability and book on Hipcamp here
<<<

Best Rental for Hipsters on a Budget: Rustic Airstream

Image via Rustic Airstream

Price: From $45/night and up
Guests: 4
Bedrooms: 1
Nearest City: Williams
Book it on VRBO

Those in the market for an off-the-grid experience near the Grand Canyon will appreciate what the Rustic Airstream has to offer – conveniently located around 35 minutes from the GC National Park (by car), this camper makes for a great hub for resting in between hikes and trips.

A heater is provided for winter visits, and you’ll have access to a fire pit for evening relaxation. 

Up to 3 people can sleep inside the camper, but the hosts can provide you with tents in case you want to come with a larger group, making this place a great pick for a family of seasoned outdoorsmen

As is typical for open-field camping, you can expect all kinds of beautiful sights and an amazing view of the night sky. The outside property is communal, as other travelers and campers frequent locations near the Grand Canyon, but you can expect absolute peace, quiet, and privacy inside this cozy domicile.

The Rustic Airstream is best suited for those who are looking for basic protection over luxury, and who just want to ensure that their camping trip won’t be ruined by unforeseen forces of nature.

>>>
Book on VRBO
<<<

Best Grand Canyon VRBO for Nostalgia & Western Lovers: The Old West

Price: From $142/night and up
Guests: 4
Bedrooms: 1
Nearest City: Williams
Book it on VRBO

Want to feel like you’re staying on the set of a Clint Eastwood movie?

Aficionados of the Wild West period and aesthetic will certainly enjoy staying at The Old West Loft – with a style reminiscent of the kinds of lofts you’ve seen in cowboy movies, this property is certainly one-of-a-kind!

The interior combines modern furniture and retro decorative elements, all while retaining the old-school flooring – this gives the place a lot of character and a rustic ambient without detracting from its coziness. It’s also very spacious, so it makes for a great spot to gather a group of people and relax. 

Another draw of The Old West Loft is its relative isolation, as it’s about 30 minutes from Williams with practically no one else in the vicinity, making it the perfect spot for an isolated vacation.

Also, it’s only about a 20-minute drive to the from the South Rim of the Grand Canyon, so you get to relish in the peace and quiet of the location while still being relatively close to the region’s trademark tourist attraction.

As far as the simpler pleasures go, if you’ve ever wanted to see a Western-style sunset looming over the Arizona cliffs, the porch of the property offers an amazing view.

>>>
Book it on VRBO
<<<

Best Grand Canyon Airbnb for Camper Comfort: Grand Canyon RV Glamping

Image via Grand Canyon RV Glamping

Price: From $298/night and up
Guests: 4
Bedrooms: 2
Nearest City: Williams
Find it on Booking.com: Grand Canyon RV Glamping

Grand Canyon RV Glamping goes above and beyond what the average camper experience can offer.

The camper is about one hour from the Grand Canyon National Park and only 20 minutes from the center of William. This is a perfect choice for tourists and sightseers in groups of up to 4 people.

The interior has everything you would expect a full-fledged house to have, including a fully furnished kitchen and dining area, air conditioning, a seating area, a flat-screen TV with cable channels, and a private bathroom with free toiletries.

The interior is stylish but minimalistic – the sleek combination of black furniture and silver kitchenware give the camper a very luxurious feel,

That said, if you’re traveling to this part of America, you aren’t likely to be spending a lot of time inside the RV anyway, so whenever you’re not out and about exploring the Grand Canyon NP, you can spend the day off on the lawn chairs by the picnic table outside or by having a relaxing barbecue with family and friends.

People looking to isolate themselves for a vacation of peace and quiet will really appreciate the location.

>>>
Check availability and book online here
<<<

Best Grand Canyon Airbnb For Digital Nomads: Legends RV

Image via Legends RV

Price: From $149/night and up
Guests: 4
Bedrooms: 1
Nearest City: Williams
Find it on Airbnb: Legends RV with High Speed WiFi

The Legends RV truly lives up to its name – the layout of the interior puts a lot of large houses and apartments to shame.

Recreational vehicles can often be an eyesore inside and out, but this particular camper doesn’t have that problem, as its eye-catching interior is colored in every shade of brown under the sun, and the reflective wooden surfaces are beautifully accentuated in the Arizona sunshine.

It can fit up to four guests, and on top of being cozy, it has its own water and power supplies, high-speed WiFi, as well as a modern kitchen.

Aside from being a top-of-the-line camper, another feature of note is that Legends RV is only a 20-mile drive from the south rim of the Grand Canyon National Park.

Once you make your way back, you can relax on the outdoor seating and fire up the barbecue grill for a tasty dinner and a night of stargazing – needless to say, the vast expanse of land makes for a beautiful nighttime view.

Alternatively, if you’ve had enough of the outdoors for one day, you can relax inside by watching a Netflix show on the smart TV and relaxing on one of the futons. Now that’s a camper with comfort!

>>>
Check availability and book online here
<<<

Best Grand Canyon Rental for Experiencing Indigenous Culture: Navajo Hogan Earth House

Image credit: VRBO

Price: From $124/night and up
Guests: 4
Bedrooms: 1
Nearest City: Cameron
Find it on VRBO

The Navajo Hogan Earth House is unlike any rental you’ve probably ever seen – it’s a one-room hut made of earth, built in the style of Navajo Indian dwellings.

Positioned by the Little Colorado River, around 30 miles from the Grand Canyon, this little Native-owned haven is ideal for a couple looking to explore the National Park and to truly become one with nature.

The complete lack of electricity and running water, in conjunction with the minimalistic design of the interior, are in fact the selling points of this particular property, as going all-natural lets visitors truly soak in the beauty of their surroundings.

You can even bring your pet along if you suspect you might get lonely, as long as you keep it off the bedding.

This is not to say, however, that the hogan is insufficiently furnished – the beds are comfortable, and a stove is provided for outdoor cooking and to keep warm if you’re visiting when it’s colder.

You can use the outside stove and firewood for cooking, and you will be provided with a supply of water to use at your discretion. This house is ideal for people who want to immerse themselves in the Navajo culture or are just looking for something completely different.

IMPORTANT: Note that this property is located in Navajo Nation. Please follow all local laws and respect tribal sovereignty, and check current restrictions here before planning a trip, as at the time of writing, Navajo Nation is closed for tourism (as per Executive Order 2020-021).

Please also familiarize yourself with the protocols of staying on Navajo land so you can treat your Indigenous hosts with respect for their culture, religion, and customs.

>>>
Find it on VRBO
<<<

Best Grand Canyon Rental for Hogans: The Hogan

The Hogan
Image via The Hogan

Price: From $190/night and up
Guests: 4
Bedrooms: 1
Nearest City: Cameron
Book it with VRBO.

Located on Navajo Nation land, this beautiful homestead hosts hogans (Navajo one-room dwellings — learn more about them here) for all kinds of travelers.

The Hogan is an eight sided traditional Navajo dwelling that can host up to 4 people. It is owned by Native American family and it is located in a large acreage working sheep ranch and off grid glamping hotel. for your comfort, a traditional breakfast is included in the price.

The places offers guests a unique stay on the Navajo Nation. Immersion in nature, near zero light pollution and unparalleled views.

IMPORTANT: Note that this property is located in Navajo Nation. Please follow all local laws and respect tribal sovereignty, and check current restrictions here before planning a trip, as at the time of writing, Navajo Nation is closed for tourism (as per Executive Order 2020-021).

Please also familiarize yourself with the protocols of staying on Navajo land so you can treat your Indigenous hosts with respect for their culture, religion, and customs.

>>>
Book it on VRBO
<<<

Best Airbnb for Couples on a Budget: The Majestic – Historic Mini Motel

The Majestic Historic Mini Motel
Image via Hipcamp

Price: From $69/night and up
Guests: 2
Bedrooms: 1
Nearest City: Meadview
Book it with VRBO or Hipcamp. First time booking with Hipcamp? I have a bonus for you! Get $10 off your first stay using my code: ALLISONG61751E or booking through my link.

If you’re looking to explore the Grand Canyon with your significant other and on a budget, then this historic mini motel is the place for you. 

This room is The Majestic, a historic motel room that used to be used to house the workers of Route 66. The place has been completely restored but still maintains a unique vintage charm.

You will be able to rest in a full-sized bed with a gel memory foam mattress topper. The room also features a desk space, a dresser, and a full bathroom with a vanity area and closet space.

The campground just 10 miles from Lake Mead and 17 Miles from the Colorado River. Here you can enjoy top-notch stargazing, bird watching, fishing, off-roading, and more. There are also kayaks available to rent.

>>>
Check availability and book online here
<<<

Best Rental for Romance: The Bell Tent Suite

the bell tent suite
Image via The Bell Tent Suite

Price: From $235/night and up
Guests: 2
Bedrooms: 1
Nearest City: Williams
Book with VRBO or Hipcamp. First time booking with Hipcamp? I have a bonus for you! Get $10 off your first stay using my code: ALLISONG61751E or booking through my link.

Nothing complements a nature trip quite like a tent in the desert, and the Bell Tent Suite is no exception.

The tent is very well appointed and fully furnished. Outfitted with all the amenities for a pleasant stay, including bedding, linens, and wool blankets.

You will also find candles, candle lanterns, a flashlight, and a solar light. Books, games, snacks, juice, and water. This tent is equipped with just about everything you could reasonably expect, and more.

It can comfortably fit two guests, and a small child as well. The stay is very minimalist, to be immersed in outstanding natural beauty. Cooking can be done over an open fire at the outdoor fire pit. There is also a grill for the open fire. 

As is the case with any other tent, you are highly incentivized to spend as much time outside as possible, and The Bell Tent Suite location really allows for that. Furthermore, the view of the night sky is simply beautiful.

The tent is an ideal basecamp for Antelope Canyon, Horseshoe Bend, Lake Powell, and the Grand Canyon!

>>>
Check availability and book
<<<

Best Grand Canyon Rental for Animal Lovers: Nest in a Retro Wagon

Image via Hipcamp

Price: From $82/night and up
Guests: 3
Bedrooms: 1
Nearest City: Williams
Book with Hipcamp. First time booking with Hipcamp? I have a bonus for you! Get $10 off your first stay using my code: ALLISONG61751E or booking through my link.

The retro wagon is a great off-grid recreational vehicle for a pair of travelers passing through northern Arizona and looking to visit the Grand Canyon.

The inside is incredibly cozy thanks to the futon mattress, and you’ll have access to a nearby community bathroom, shower (where, thanks to the water heater, you have a guaranteed supply of hot water in the summer), and kitchenette (equipped with supplies for a healthy organic breakfast).

The Retro Wagon is about a 30-minute drive from the Grand Canyon. Having worked in the GC National Park, the hosts would be more than happy to answer any questions you may have about the park.

You’ll see a wide assortment of animals on the property, including cats, a donkey, chickens, an alpaca, and a dog, and you’re encouraged to interact with and feed them (except for the dog who is on a special diet).

>>>
Find this property on Hipcamp.
<<<

Best Grand Canyon Airbnb for Minimalists: The Kyoob

thekyoob

Price: From $310/night and up
Guests: 3
Bedrooms: 1
Nearest City: Williams
Find it on VRBO: The Kyoob

Only 5 minutes to Horseshoe Bend, the Kyoob is a modern architectural cabin at Shash Dine.

The idea of the house is to provide you with a basic level of comfort and to let you immerse yourself in nature by getting out and exploring the beautiful terrain. However, the cabin was designed for light, openness, and immersion in nature through the fantastic windows.

The view from the outside is beautiful, and you can expect to catch some unforgettable sunrises, sunsets, and constellations. Also, the house is only eleven miles from Antelope Canyon.

>>>
Check availability and book on VRBO here
<<<

National Park Gift Guide: 30+ Thoughtful Gifts for National Park Lovers

view of swiftcurrent pass in glacier national park with beautiful views

If you’re wondering what to get someone who loves National Parks, this is the perfect gift guide for you!

Here are all the best national park gifts, from Acadia to Zion!

How Do I Gift a National Parks Pass?

Easy! REI sells the America the Beautiful Annual Pass online. 

If you want to get a great gift for someone whose park pass is expiring soon, or who doesn’t have one yet, this is a great and thoughtful gift!

For just $79.99 for the year, your giftee will get access to all of the National Parks and over 2,000 unique NPS-managed sites! 

Best of all? They donate 10% of proceeds from sales to the National Parks Foundation!

US National Park Board Games

There are a number of board games dedicated to national parks!

If you’re looking for a gift for a kid who loves national parks — or a family — this is a great NPS gift!

PARKS Board Game

This strategy game is a great choice for families.

The game works a little similar to Settlers of Catan in that you collect resources, but the gameplay is a lot more simplified. Players traverse different “trails” and collect resources in order to exchange their resource tokens for different national parks! 

The resource tokens are made of wood, representing the unique flora and fauna of the parks, and the cards feature unique illustrations from dozens of artists.

The game can be played solo or with a group of up to 4 people, and it’s perfect for families with kids over the age of 10.

Buy it on Amazon here.

Trekking the National Parks Board Game

Here’s another great strategy game perfect to give to a parks-loving family!

This game functions really similarly to Ticket to Ride, which is one of my favorite board games of all time!

It’s not as educational about the national parks as the PARKS board game above, but it will certainly spark curiosity and nostalgia when you play. 

It’s a great gift to teach kids a bit of USA geography and inspire them to travel to more parks. It’s suitable for kids aged 10+.

Buy it on Amazon here.

Trekking the National Parks Trivia Game

This is a trivia game that is the most educational of the bunch, but it’s also a lot of fun even if you have very little national park knowledge.

The cool thing about the game is that the answer to every question is a number, and you don’t have to be exactly right to win! You just have to be the closest to the correct number without going over (Price is Right rules, anyone?) to win the round.

The focus on “guesstimation” makes the game a little more inclusive for families with young kids and gives them a shot at taking on family members who may have a little more knowledge than they do.

Buy it on Amazon here.

Monopoly National Parks Edition

If you are getting a gift for someone who loves national parks and board games, the classic park-themed Monopoly game is a great gift idea!

This doesn’t necessarily break any new ground, but does it need to? Monopoly is tried and true and classic for a reason. 

The gameplay is the same, so no need to learn a whole bunch of new rules, but there are updates like park-themed tokens, battlefield parks and historic sites cards instead of the ‘community chest’ and ‘chance’ cards, and NPS sites instead of streets. And instead of houses and hotels, you can build campsites!

Buy it on Amazon here.

National Parks Playing Cards

You can never have enough playing cards, and I’m a sucker for a beautifully illustrated deck designed around a theme.

This set of national park playing cards is just that, with each card dedicated to a retro ‘poster’ like quality image, with the traditional suits and cards marked in the corners. 

They have a high-quality heavy weight and look stunning. They come in a sturdy box and are the perfect gift for minimalists because they’re super useful and don’t weigh a lot — easy to throw in your bag for any parks trip or an RV vacation!

It’s also a great stocking stuffer!

Buy it on Amazon here.

National Park Posters

National Parks Scratch Off Maps

This National Park scratch-off map by Mappinners is so cute! 

It has a handmade feel to it, and each little “letter” you scratch off reveals a beautiful illustrated postcard of the national park.

It’s a great gift to someone who has “visit all the national parks” on their bucket list, as they can add to their national park map as they explore and see more.

It’s also a romantic gift to give your partner if your goal is to visit more of America’s national parks together!

Buy it on Amazon.

National Park Themed Gifts & Stocking Stuffers

National Park Bucket List Keychain

This keychain with tokens is one of the easiest way to keep track of your National Park bucket list!

You can customize this exactly to fit the national parks you want, and you can buy as many tokens as you want… from 1 to 63!

National Park Stickers

These beautiful Anderson Group-designed National Park stickers are a great gift for a parks collector! 

This complete set includes 62 stickers — one for each National Park Service site* — printed on high-quality die-cut vinyl. 

*Note that it’s missing one national park, New River Gorge, the newest park that was just added in 2020.

Stick them on your water bottle, notebooks, journals, laptops — whatever you like!

Buy it on Amazon.

National Parks Passport Book & Journal

If you know a hiker who loves to take notes after their trail excursions in the National Parks, this is a fantastic gift idea.

It’s also great to give to a young person who is just starting their parks exploration, as it can serve as a memory bank for the future!

It has spots for passport stamps from the different parks as well as notes on all different aspects of their park experience.

Buy it on Amazon.

Pocket-Sized National Parks Journal

This is another cute journal that is ultra-customizable. If you’re artistic, you can draw, if you’re not, you can just add park passport stamps!

It’s done in a “bullet journal” style where it has spreads for things like hikes you’ve taken, as well as notes for each park you’ve visited.

It’s ultra-cute and well-designed, and it would be a fantastic gift for someone whose goal it is to visit every one of America’s beautiful national parks!

Buy it on Amazon.

Home Decor for National Park Lovers

National Parks Postcards

These postcards could very well be mailed, but I think they’re really cute as a simple home decor item!

Hang them up on a clothesline with clothespins for a super cute, low-cost way to add a lovely design element to your favorite national park enthusiast friend’s home!

Alternately, buy a few frames and frame them for your gift recipient — pick the parks you’ve been to together and it’ll have a memorable, customized touch.

Buy it on Amazon here.

National Park Coffee Table Books

Nothing is more inviting to dive into than a beautiful coffee table book full of gorgeous imagery and fun facts.

Here are the most beautiful coffee table books about the national parks!

Atlas of the National Parks

Created by National Geographic, it should be no surprise that this is all about the beautiful photography! 

It is full of information, maps, infographics, text, and photography about 61 of our national parks! 

Note that it doesn’t include our newest NPS, White Sands in New Mexico, which wasn’t made a national park until the end of 2019 — this book was published earlier in 2019.

Buy it Amazon here.

Parks

This beautiful coffee table book is a great gift for those who merge their love of design and nature.

This nearly 400-page coffee table book contains all sorts of beautiful graphic design from over 100 years of National Parks maps, brochures, and other printed parks memorabilia.

Buy it online at the Parks Project. 

National Park Guidebooks

There are a few great national park guidebooks that offer a super in-depth and detailed guide to all the parks.

Here are the ones I recommend!

Moon U.S. National Parks

Moon is one of my favorite brands of guidebooks. This National Parks travel guide book covers all the national parks and features the best outdoor adventures in each park. 

It notes what the park is best for (ex: scenic drives, hikes, family-friendly, etc.) and gives road trip itineraries for linking several parks back-to-back (and where to stop in between the parks!

It also comes with a section for your NPS stamps and a foldable poster map to track your travels!

Buy it on Amazon here.

National Geographic Guide

There’s no brand more trusted when it comes to wildlife and nature photography — and so is it any surprise that National Geographic hit it out of the park (pardon the pun) when they created this guide?

This is the 2021 edition so it’s the most up-to-date, with 62 national parks covered within its 500+ pages.

This book is a behemoth resource your favorite parks enthusiast will love for years to come!

Buy it on Amazon.

Experiential National Park Gift Ideas

Sometimes, one of the best gifts you can give someone is an experience they would maybe never purchase for themselves.

For example, a helicopter ride over their favorite national park!

National Park Gifts for Hikers

Pendleton Socks

These cute Pendleton socks are dedicated to different National Parks, and they’re cozy and thick so they won’t rub or chafe.

The colors represent the parks so it’s a subtle reference to the parks without being overly covered in insignia.

Buy it on Amazon here.

National Park Gifts for Kids

Junior Ranger Activity Book

This fun activity book is perfect for the future park ranger in your life!

A great gift for a niece or nephew who loves the parks, it’s educational, fun, inexpensive, and guaranteed to include hours of fun. 

It’s a great gift for a little one who knows they have a national park road trip coming up!

Buy it on Amazon here.

Gift Ideas for Specific National Parks

Did you visit a specific park together and you want to give a gift that commemorates that particular national park adventure? 

A park-specific gift is a great idea, as it feels a lot more personal. Add a little note to it for an extra perfect national park gift!

Read through this carefully because if you have a specific park in mind, it might be available even if it’s not listed. For example, there are candles for many different national parks, and the Pendleton boots come in several park themes.

Yosemite National Park

Yosemite Candle

This beautiful candle is dedicated to Yosemite National Park. It’s a thoughtful, potentially romantic gift option for people who have left their heart in Yosemite!

It’s part of the Elsewhere Candle Company’s National Parks collection. Each candle is handmade in Boulder, Colorado and is dedicated to a specific place.

For the Yosemite candle, it’s an earthy blend of cedar, oak moss, sandalwood, and juniper berries.

They also have several other national park-themed candles: Olympic National Park, Rocky Mountain National Park, Joshua Tree National Park, Acadia National Park, Yellowstone National Park, and more!

Buy it on Etsy here.

Yosemite Sweatshirt

This cute printed Yosemite sweatshirt is the perfect gift for someone who loves coziness and hikes in Yosemite!

It’s an affordable option and best of all, it’s unisex so it would be perfect gift for her or for him!

Buy it on Etsy here.

Yosemite Valley Topographic Map Carving

This gift is truly unique, and it’s a little insider-y and abstract, as not everyone will be able to tell right away that it’s a topographic map of Yosemite Valley.

It’s beautifully crafted from wood and would make the perfect gift for someone who is always California dreaming.

Buy it on Etsy here.

Glacier National Park

Glacier National Park T-Shirt

This charming Glacier National Park illustrated T-shirt is a great gift to commemorate a special time in Montana’s beautiful national park.

It’s a simple design but the illustration does capture the magic of this jewel of a national park!

Buy it on Etsy here.

Glacier National Park Ornament

This cute Christmas ornament is the perfect Christmas gift for a Glacier NP fan!

The ornament is in the shape of Montana and it’s made of a beautiful ceramic on a piece of Paracord. Each is hand-fired to order and unique!

They also make this ornament for other national parks, including Denali, Yellowstone, Grand Teton, etc.

Buy it on Etsy here.

Yellowstone National Park

Pendleton Short Rain Boots

This charming gift is as practical as it is personal! 

I’m a big fan of the Yellowstone yellow color — they would pop so beautifully on a rainy day! — but there are all sorts of different colors and decals on this group of National Park themed boots.

There’s also Acadia Black, Crater Lake Navy, Olympic Smoke, Rainier Red, Rocky Mountain Olive, Yosemite Icy Blue, Glacier White, and Grand Canyon Navy!

Buy it on Amazon here.

Yellowstone Glasses

These pretty glasses have a print of a topographical map of Yellowstone on it!

It’s at once artistic and subtle and pretty cool for a friend who can’t get over their trip to Yellowstone.

Buy it on Etsy here.

Grand Canyon National Park

Coordinates Necklace

Another super-customizable national parks gift, you can pick your favorite place in the park system and have its coordinates engraved on a metal necklace!

This one includes the Grand Canyon’s coordinates, but you can customize it to whatever park you like.

Buy it on Etsy here.

Rocky Mountain National Park

Pendleton Tall Rain Boots

The same range of cool rainboots also come in a tall size!

I’m partial to the Rocky Mountain Olive, personally, as the tall size calls for a more muted color in my book!

Each rain boot comes with some stripes in a color pattern that speaks to the park as well as a small, subtle decal of the park featured. 

It’s definitely not too loud a statement: it’s very well designed in that regard!

Buy it on Amazon here.

Grand Teton National Park

Grand Teton Necklace

There are few mountain ranges as distinctive as the Teton Range… so why not commemorate that with a beautiful necklace?

This gorgeous silver necklace embraces the simple beauty of the Tetons with a very minimalist design on one of three kinds of metal, so you can customize it to your taste.

Buy it on Etsy here.

11 Best Hikes in Glacier National Park

landscapes of glacier n ational park with the highline trail in sight

With over 734 miles of scenic hiking trails, Glacier National Park has a wealth of hiking to explore.

There’s a trail for every experience level and age group from a family-friendly boardwalk hike around the massive old-growth cedars near Lake McDonald to challenging mountain passes that offer rewarding views of the pristine landscape below.

Pack your backpack, grab your camera, and don’t forget the bear spray. These are the best day hikes in Glacier National Park you won’t want to miss!

Best Hikes in Glacier National Park

Grinnell Glacier

Brilliant turquoise blue water surrounded by white glacial ice, with green grass with red wildflowers on the edge, surrounded by tall mountain edges lightly covered in snow.

Mileage: 10 miles or 7 miles using the boat shuttle

Elevation Gain: 1,600 feet

The Many Glacier Valley in Glacier National Park is a true hiking paradise. One of the most commonly suggested hikes in this area is to see Grinnell Glacier.

There are at least 35 named glaciers in the park, and Grinnell is one of the most accessible… and seeing a glacier has got to be on the top of your list of things to do in Glacier National Park.

Now, let’s talk about how to get there…

From the Grinnell Glacier Trailhead, hike along the north shores of Swiftcurrent Lake and Lake Josephine. The mountain views from this section of the trail are beautiful!

The trail doesn’t begin to gain much elevation until you have passed the lakes. The last 3 miles are fairly steep, but at least there are plenty of wildflowers to occupy your attention as you climb. Seeing a glacier up close is worth the effort!

If you’re short on time or can’t manage a 10-mile hike, you can shave off 3 miles from the trek by using the park shuttle boats. Taking the shuttle boats costs a small fee and may require advanced registration. The boats can be used to shuttle across Swiftcurrent Lake and Lake Josephine.

Grinnell Glacier Alternative: Grinnell Lake Trail

Male hiker wearing blue jacket and blue backpack sitting after doing some Glacier National Park hiking, looking over the teal colored Grinnell Lake, surrounded by mountains dusted with some remaining snow.

Mileage: 7 miles

Elevation Gain: 1,600 feet

The trail to Grinnell Glacier can hold snow for much longer than the lake trail below.

If hiking through snowfields on a steep trail sounds uncomfortable, you can still enjoy a nice view of Grinnell Glacier from a lower elevation at Grinnell Lake.

Hikers can also use the boat shuttle to eliminate a few hiking miles.

St. Mary and Virginia Falls

Waterfall cascading over a cliff, with trees surrounded the edges of the cliff with a small sunburst poking through the trees.

Mileage: 3 miles

Elevation Gain: 450 feet

Hiking in Glacier National Park isn’t complete without a trip to St. Mary and Virginia Falls!

At the western end of St. Mary Lake, there is trailhead parking for the falls. You can also use the shuttle bus to get to this scenic waterfall trail.

Once you’re at the trailhead, hike downhill toward the St. Mary River. You will mostly be hiking through a historic burn area, which has beautiful wildflowers every spring.

Soon after you reach the river, you will come across St. Mary Falls. Take the bridge across St. Mary River to continue on your way toward Virginia Falls.

You can continue hiking on what is now the Continental Divide Trail for as long as you’d like, or flip around and head back to the trailhead.

Avalanche Lake

Green mountains with waterfalls cascading down the sides of it, towards the pool at the bottom that is Avalanche Lake, surrounded by pine trees and blue sky.

Mileage: 4.5 miles

Elevation Gain: 750 feet

Early in the springtime, many of the park roads are still closed for snow removal. Avalanche Lake is one of the first alpine lake trails to become accessible as the roads reopen!

From the Trail of Cedars Trailhead, follow signs to the Avalanche Lake Trail. The trail climbs steadily uphill while paralleling the icy blue waters of Avalanche Creek.

For a more secluded experience, continue 0.7 miles to the other end of the lake. It’s arguably a better view than the main beach!

Trail of Cedars

The brilliant turquoise Avalanche Creek, surrounded by mossy boulders and cedar trees on this easy Glacier National Park hike.

Mileage: 1 mile

Elevation Gain: 50 feet

The Trail of Cedars can be wandered before or after visiting Avalanche Lake.

The area includes boardwalks that weave through the impressive cedar trees.

There are plenty of interesting interpretive displays to read through and if you look carefully you may be able to spot the resident deer roaming around. This is a great place to wander with young or new hikers!

Redrock Falls

Small cascade over red rocks at Redrock Falls, a popular hike in Glacier National Park, surrounded by trees and blue sky.

Mileage: 4 miles

Elevation Gain: 285 feet

Head to the end of the road in the Many Glacier Valley to access this scenic waterfall. Park at the Swiftcurrent Trailhead and follow the Swiftcurrent Pass Trail.

You will come to the cascading waterfall after about 2 miles of hiking. Many small side trails wander around the falls offering different viewpoints.

If you were hoping to spot a moose during your trip to Glacier National Park, this is your best bet! Moose frequent the wetland area about 1.5 miles into the trail.

No luck? Take the short detour to Fishercap Lake and scan the shoreline. The best times to spot moose are in the mornings and evenings.

The first best part of this hike is the waterfall, but the second-best is that it ends close to the general store, which sells huckleberry ice cream!

Swiftcurrent Pass

View of glacial mountains which have eroded to leave a valley behind, covered in green grass and foliage, with small emerald greenish-blue lakes in the deep valley below it.

Mileage: 14 miles

Elevation Gain: 3,766 feet

Often considered the most challenging day hike in Glacier National Park, the trail to Swiftcurrent Pass is full of outstanding views, alpine meadows, emerald lakes, and wildlife. If you are rugged enough to take on this trail, you won’t be disappointed by the beauty it holds!

As you would if you were hiking to Redrock Falls, park at the Swiftcurrent Trailhead and follow the appropriately named trail. You will get to see Redrock Falls, Redrock Lake, and Bullhead Lake along the way. Both lakes offer great views and provide excellent habitat for moose!

Soon after Bullhead Lake, you will begin your ascent up toward the pass. Make your climb up the many switchbacks for an excellent view of the valley below. The trail is pretty narrow and steep in some spots, which doesn’t pair particularly well with a fear of heights.

Iceberg Lake

Blue glacial water topped with some unmelted glacial ice, surrounded by reddish-brown rocks lit up orange-red by the last of the afternoon light, on a popular hike in Glacier National Park

Mileage: 9.3 miles

Elevation Gain: 1,450 feet

Begin your trek to Iceberg Lake from the Iceberg Ptarmigan Trailhead, which is nearby the trailhead used to access Redrock Falls and Swiftcurrent Pass.

From the trailhead, follow signs to stay on the Iceberg Ptarmigan Trail. Soon after you reach Ptarmigan Fall, you will arrive at a junction. Here, you will veer left and follow the Iceberg Trail.

Your efforts will be rewarded with an epic view of the emerald blue lake and floating ice chunks. The lake is surrounded by 2,000’ tall cliffs that are frequented by mountain goats.

In addition to the goats and bighorn sheep you will probably see, keep an eye out for moose, bear, and deer. This trail is a wildlife photographer’s dream!

Highline Trail

A dirt path winding through the beautiful green mountains of Glacier National Park, with some purple wildflowers and views of the other glacial mountains in the park.

Mileage: 15 miles

Elevation Gain: 2,578 feet

Due to the long mileage and difficulty of this scenic hiking trail, it is often done as an overnight backpacking trip. Although challenging, seasoned hikers could make this particular trek in a single day.

For those wishing to embark on a multi-day adventure, the Highline Trailhead is the starting point for endless miles of exploring, including a popular route that traverses most of the park.

Park at the Logan Pass Parking Area or take the shuttle bus to access the trailhead. You’ll want to get on the trail early! Follow signs to Highline Trail and begin your steady climb up. This scenic trail will bring you along the garden wall followed by an opportunity to detour to the Grinnell Glacier Overlook. Adding the detour to Grinnell Glacier makes the total distance closer to 17 miles.

Continuing on, you will  eventually reach the Granite Park Chalet, which historically provided accommodations for visitors to Glacier National Park. Now, it is a National Historic Landmark and a comfortable backcountry camp for backpackers.

After taking in the view at the chalet, head back the way you came toward Logan Pass. Keep an eye out for wildlife, there are many reports of hikers encountering grizzly bear and mountain goats!

This trail is very exposed, and anyone with a sensitivity to heights is encouraged to seek other options.

Upper McDonald Creek Trail

Brilliant emerald-turquoise waters at Upper McDonald Creek, surrounded by rocks covered in green moss and trees.

Mileage: 5 miles

Elevation Gain: 278 feet

Hikers of all levels will love this scenic creek-side trail. Beginning from the Upper McDonald Creek Trailhead, which is only a short drive past Lake McDonald.

The trail starts by wandering through an old-growth forest. This section of trail is a common place to spot grazing mule deer. As you continue, you will encounter the glacial-blue Upper McDonald Creek.

This is an out and back trail, so continue as far as you feel comfortable before turning around and heading back toward the trailhead.

Florence Falls Trail

Mileage: 9 miles

Elevation Gain: 1,174 feet

This is just one of the many spectacular waterfalls in Glacier National Park. Begin this out and back hike at the Jackson Glacier Overlook, where there is a good amount of parking available.

Along the way, you’ll pass Deadwood Falls. This 10’ falls may be stout, but it’s quite loud as it spills into Reynolds Creek. The main event is further down the trail.

Florence Falls is a tower of cascading falls. Each cascade ranged in height from 30 to 50 feet! Bear frequent this trail in the springtime because of the abundance of cow parsnip that grows in the area.

Be bear-aware anytime you are hiking in Glacier National Park!

Pin This Guide to Glacier National Park Hikes

The 10 Best Grand Teton Day Hikes

Many people travel to Grand Teton National Park to get a glimpse of the iconic Teton Range, scout out some of the area’s diverse wildlife, and go on a scenic hike in the Tetons.

With over 200 miles of beautiful hiking trails in Grand Teton National Park, there’s no shortage of choices.

Every experience level and age group can find a trail they will enjoy from a family-friendly nature walk in Colter Bay to challenging mountain passes that offer rewarding views of the pristine landscape below.

Load up your backpack, grab your camera, and don’t forget to pack the bear spray. These are the best day hikes that Grand Teton National Park has to offer!

Best Day Hikes in Grand Teton National Park

Taggart and Brady Lakes

Still lake at Taggart Lake reflecting the Teton range above it, surrounded by trees, rocks, and foliage.

Distance: 6 miles

Elevation Gain: 585 feet

A trip to Grand Teton National Park is not complete without a hike to Taggart and Brady Lakes. These lakes are nearby each other and are both worth visiting.

Being such a scenic hike, this is a well-well-trafficked trail. With that said, there is limited parking at the Taggert Lake Trailhead, and arriving early is highly recommended so you can find a parking spot easily.

Take in the stunning views of Grand Teton, the tallest mountain in the Teton Range, from the parking area. When you are ready to get your blood flowing, depart from the trailhead and hit the trail. When you come to the first trail junction, veer right and follow the sign toward Taggart Lake Trail.

A little farther down the trail, you will come to yet another junction. The trail is very well marked. Just remember you are following the signs to Taggart and Brady Lakes! A map helps too!

Next, cross the sturdy footbridge over Taggart Creek. Look upstream to get a glimpse of the cascading waterfall. The trail begins to climb a bit starting here. Make your way through the forest of lodgepole pines and thick aspen groves.

After you’ve hiked about 1 mile, you will come to another trail junction. Heading left will take you to Taggart Lake. However, if you wish to visit both of the lakes keep right and check out Brady Lake first. Just a little way farther, and you will be rewarded with multiple scenic overlooks of Taggert Lake!

Once you come to the Valley Trail Junction, keep right and you will shortly arrive at the shores of Bradly Lake. When you are finished soaking up the Teton views, head back to the Valley Trail Junction and take the Valley Trail this time to get a closer look at Taggart Lake and complete the loop back to the trailhead.

String and Leigh Lake

Narrow footbridge crossing a section of String Lake surrounded by green trees at the start of this Grand Teton hike.

Distance: 4 miles

Elevation Gain: 50 feet

Begin your hike at the String Lake Picnic Area. At the trailhead, you will find stunning mountain views from the sandy beach at String Lake. This is a great spot to refuel with some lunch or cool off with a dip in the chilly lake.

The trail wraps around the shore of String Lake until you come to a junction that will lead toward Leigh Lake. Unlike String Lake, accessing the shore of Leigh lake can be a little trickier. Keep an eye out for a well-used trail down to the lakeshore.

From Leigh Lake, continue back the way you came and complete the loop around String Lake. For a much longer hike, you can choose to hike to Bear Lake from Leigh Lake. This would add an additional 4 miles to the hike.

Jenny Lake: Inspiration Point and Hidden Falls

Giant boulders in front of the view from Inspiration Point, showing lots of evergreen trees in front of a brilliant blue lake with some clouds on the horizon but an otherwise clear sky.

Distance: 2.5 miles

Elevation Gain: 330 feet

If you make a visit to hike in Grand Teton National Park, definitely plan for a stop at Jenny Lake! There is so much to do at Jenny Lake, it is well worth dedicating a half-day to.

Who doesn’t love a waterfall hike? The hike to Hidden Falls is one of the most beautiful in the park. This trail is short enough that it is considered a novice and great for families. Hop on the boat shuttle at the docking area. This will cut off about 5 miles from the hike and offer beautiful mountain views as you cross the lake. There is a small fee for taking the boat shuttle.

Once on the other side of the lake, begin your hike on the Cascade Canyon Trail. The trail climbs quite a bit before reaching Hidden Falls and the viewing area. Hidden Falls is a towering 100’ and is often regarded as the most scenic waterfall in Grand Teton National Park!

Continue on your way up to Inspiration Point. Since it is less than a half-mile from Hidden Falls, it’s worth the climb, but if your legs are exhausted, you can always choose to turn back to the boat dock. Inspiration Point offers a great view of Jenny Lake and the distant mountains.

Jenny Lake Loop

Hiking in Grand Teton National Park along the perimeter of Jenny Lake, a brilliant sapphire blue lake surrounded by rocks and pine trees.

Distance: 7.5 miles

Elevation Gain: 275 feet

This scenic loop around Jenny Lake offers countless photo opportunities and chances to gaze up at the stunning peaks known as the Cathedral Group in the Teton Range!

The loop begins at the Jenny Lake Trailhead and stays fairly close to the lake throughout the entire hike. This is a great long hike for those hoping to avoid super strenuous hills or elevation gain.

Along the way, you can choose to veer off to visit Hidden Falls and Inspiration Point, which are mentioned previously.

If you were hoping to experience solitude while hiking in Grand Teton National Park, this may not be the ideal trail for you. Although scenic and rewarding, this is a very popular trail. The road is nearby part of the trail too, and it can interrupt the quiet of nature at times.

Phelps Lake Overlook

View over the sapphire blue Phelps Lake surrounded by pine forest on a clear, cloudless day with mountains on the horizon.

Distance: 2 miles

Elevation Gain: 400 feet

The Phelps Lake overlook is a fairly easy hike that wanders through a pine forest and aspen groves before opening up to a scenic viewpoint. This hike begins at the Death Canyon Trailhead, which is located at the end of a rutted dirt road.

From the trailhead, you will enter the forest and follow the well-maintained trail for 1 mile. Phelps Lake sits at over 7,000’ in elevation and is a common place to spot moose and waterfowl.

Surprise and Amphitheater Lakes Trail

Still lake reflecting back the mountains and foliage above it, covered in some light snow that hasn't yet melted.

Distance: 10.2 miles

Elevation Gain: 2,900 feet

This hike is perfect for anyone looking for a low-mileage overnight backpacking trip or a challenging day hike! At just over 10 miles round trip, you can expect the first half of the trail to be an uphill slog. However, the dessert of this rugged incline is two pristine alpine lakes surrounded by beautiful rocky cliffs.

Begin the trek at the Lupine Meadow Trailhead and head toward Glacier Gulch. After many switchbacks, you will first reach Surprise Lake. A little farther down the trail awaits Amphitheater Lake.

Lake Solitude

Green and brown grass, with some pine trees sparsely populating the landscape, and a tiny blue lake at the foot of mountains on a remote Grand Teton hike.

Distance: 7.5 miles

Elevation Gain: 2,350 feet

Another hike that begins at Jenny Lake is the beautiful hike to Lake Solitude. Surrounded by mighty peaks, Lake Solitude is a great challenge for anyone looking to experience an alpine lake, possible wildlife sightings, and seasonal wildflowers.

The hike to Lake Solitude begins just like the hike to Inspiration Point, with a boat ride across Jenny Lake. This time, when you make it up to Inspiration Point, you will continue climbing on the trail instead of turning around.

The trail will level out a bit after Inspiration Point as you enter into Cascade Canyon. In the early summer, you will see a variety of colorful wildflowers. As you always should while hiking in Grand Teton National Park, be bear aware as you make your way deeper into the canyon.

The trail passes by a series of ponds before the scenery transformed into a pine forest. Keep trekking along until you finally arrive at the lake!

Lake Solitude sits just above 9,000’ in elevation and should only be tackled by experienced hikers that are prepared for a challenge.

Christian Pond Loop

A blue river or pond surrounded by yellowing grass with some low mountains behind it

Distance: 3.5 miles

Elevation Gain: 250 feet

This easy loop is well-known for wildlife and wildflowers!

Begin your hike to Christian Pond from the trailhead parking next to the horse corrals at the Jackson Lake Lodge. As you approach the pond, be on the lookout for moose and elk grazing as well as trumpeter swans gliding through the shallow water.

The trail leads to the shores of Emma Matilda Lake before looping back toward the trailhead. Take a little detour and hike along the lake’s edge. Another great spot for wildlife viewing! When you’ve taken in all in head back to the Christian Pond Loop and back to the trailhead.

Colter Bay Lakeshore Trail

A mostly still lake reflecting the mountains of the Teton Range beautifully in its glassy, slightly rippled surface.

Distance: 2 miles

Elevation Gain: 150’

The Lakeshore Trail in Colter Bay is a perfect walk for families or anyone new to hiking in a national park! The trail is made up of two scenic loops and can be shortened as necessary to meet your experience and comfort level.

From the Colter Bay Visitor Center, walk toward the marina and find the trailhead for the Lakeshore Trail. From the trail, hikers can easily access the rocky shore of Jackson Lake to take photos or scout for wildlife.

Pin This Guide to Grand Teton Hikes!

Winter in Zion National Park: What to Know Before You Go

Many outdoor enthusiasts argue that winter in Zion is the best time to visit this beloved national park in southwest Utah!

Home to Angels Landing and the famous Emerald Pools, Zion National Park is often ranked as one of the most visited national parks in the United States.

However, in the winter, Zion’s tall canyon walls become accented in powdery white snow, and the crowds of summer become a distant memory. 

Although the shift in seasons may change the scenery, there are still many fun activities in Zion National Park in the winter! However, there are a few things you should know about visiting Zion in winter, first.

Zion Winter Road Closures

Curve in the road going through a snow covered section of Zion National Park in the winter on a sunny day

Zion Scenic Drive

During peak visitation in the summertime and between December 24th – January 2nd, the Zion Scenic Drive can not be accessed by personal vehicle.

All visitors wishing to explore the Zion Scenic Drive by vehicle must use the park’s shuttle bus system.

The wintertime buses generally run between 8 am and 5 pm and can be used to access trailheads for hikes like Emerald Pools and the West Rim.

When the shuttle bus is not operating in Zion National Park, visitors can use their personal vehicles to access the trailheads and attractions along the Zion Scenic Drive.

The park service recommends arriving at trailheads early in the day because trailheads do fill up. Once a trailhead is full, there will be no more parking allowed, so it is a good idea to have a secondary plan in place.

Zion Mount-Carmel Highway

For visitors traveling from Springdale, UT to the eastern side of the park near Mt Carmel Junction, the Zion Mount-Carmel Highway is the shortest route. This drive does pass under the famous Zion Mount-Carmel Tunnel, which is just over 1 mile long!

Passenger vehicles can pass through the tunnel at any time, but oversized vehicles do have a few prerequisites and restrictions.

All vehicles 11’4” tall or taller or 7’10” wide or wider, including attachments and accessories, will require a tunnel permit. Tunnel permits can be obtained at the entrance stations and cost $15 in addition to park entrance fees.

The final obligation of oversized vehicles using the tunnel is that the vehicles must use the tunnel during operating hours, which are between 8:00 am and 4:30 pm in the winter.

Semi-trucks, vehicles over 13’1”, and single vehicles over 40’ long are prohibited. For more information on prohibited tunnel vehicles or using the tunnel, contact Zion National Park at (435) 772-3256.

Kolob Canyons Road

Wintertime conditions such as impassable snow and icy roads can cause frequent temporary closures on Kolob Canyons Road. The road is maintained throughout the wintertime and is open to private vehicles year-round.

Kolob Terrace Road and Lava Point Road

The Kolob Terrace Road is open year-round. However, 4-wheel drive and tire chains may be required to pass safely through the winter driving conditions.

West Rim Road

The West Rim Road closes during the winter season.

Zion Winter Hours of Operation and Facilities

Snow on the valley floor of Zion National Park, next to a small river, with snow-covered trees and red cliff rock faces showing a winter Zion landscape

Although Zion National Park is always open to the public, some of the facilities do undergo reduced hours of operation come wintertime.

If you are visiting Zion National Park in the winter, you will want to be aware of these facility hours and seasonal closures:

Zion Canyon Visitor Center: 8:00 am – 4:00 pm

Zion Canyon Wilderness Desk: 8:00 am – 10:00 am and 3:00 pm – 4:30 pm

Park Store: 8:00 am – 5:00 pm

Kolob Canyons Visitor Center: 8:00 am – 4:30 pm

Zion Human History Museum: closed

Zion Nature Center: closed

It is always a good idea to begin a national park trip with a stop at the visitor center. This is a great way to make sure you have the most up to date information, and it allows you to review your itinerary with professional park staff. They may even have some insider tips to share with you!

Winter Camping in Zion National Park

Snow-covered mountain near the Watchman Campground, with a partly cloudy sky in the background. Red rock showing behind the snow.

Many who come to Zion National Park choose to camp during their visits. During the summer months, there are three different campgrounds: Watchman Campground, South Campground, and Lava Point Campground.

However, Lava Point and South close in the fall leaving Watchman Campground as the only front country year-round camping option in Zion National Park in winter.

Although there are many other lodging accommodations and campgrounds in the town of Springdale, UT, winter visitors with their hearts set on camping at Watchman Campground should plan to arrive early for first come, first serve camping beginning in December.

The campground capacity does reduce for the winter season in Zion!

Winter Safety in Zion National Park

Icy Trails

With limited daylight and cold nighttime temperatures in the wintertime, one of the greatest cold season hazard in Zion Canyon becomes icy trails and icy chains.

Many of the most popular trails, including Angels Landing, remain open year-round. It’s not uncommon to have clear dry trails.

However, ice may be lingering in the shady sections of high elevation trails, which can be especially dangerous on trails like Angels Landing which have sheer-face drops and require the use of chains for leverage!

To combat icy trails, many hikers choose to carry along Yaktrax or spikes. These handy accessories will help you keep your footing on slick surfaces.

Hypothermia

A woman in a lavender top and leggings hiking the ridge of Angel's Landing covered in a light snow, looking over a snow-covered valley in Zion in winter.

When your body temperature falls to dangerously cool levels, you begin to experience hypothermia.

Although Zion National Park is well-known for its mild wintertime temperatures, wet clothes combined with lower temps found in the narrow canyons can create a high-risk.

To avoid hypothermia, the park service recommends wearing non-cotton clothing and eating high-energy foods before chill takes effect.

Thermal layers and leggings will keep you a lot warmer than cotton, and be sure to also bring a waterproof jacket in case of rain, sleet, or snow.

Rockfall

Rock formations covered in snow, surrounded by fog on a wintry day in Zion national park

Rockfall is a year-round hazard in Zion National Park. When recreating within the steep canyon, be aware and alert.

If a rockfall occurs, the park service advises visitors to safely move out of the way. If it is not possible to move out of the way of falling rock, seek shelter behind a large and stable rock feature and place your backpack over your head.

Although rockfall can occur at any time, the risk can become increased due to water freezing behind the cliff walls. When the water freezes, it can cause the cracks behind rocks to expand occasionally lodging the rocks out of place.

Rain is also a big risk for causing rockslides, so even if it’s not freezing or snowing, you do have to be aware when visiting Zion in the winter!

Things to Do in Zion in Winter

Snowshoe to Observation Point

Kolob Canyon walls covered in a light snow which shows from underneath the red rock, a stormy sky with dark clouds above.

If you are fortunate enough to visit Zion National Park after a fresh snowfall, you may be able to cross country ski or snowshoe on some of the park trails! The higher elevation areas in Zion can hold snow from late October until March.

Kolob Canyons’ high  elevation makes it a great place to have fun in the snow all winter long. However, if you are looking for a snowshoe adventure in the main part of Zion National Park, you must check out the trail to Observation Point!

Beginning from the Weeping Rock Trail, hike up the switchbacks and out of the deep canyon. You may not need snowshoes at the beginning part of the hike, but the East Rim is known for holding deep snow. Check current conditions with a ranger before departing!

The trail to Observation Point is much wider than the trail to Angels Landing, but it has quite a bit more elevation gain. From Observation Point, you will be 700 feet higher than the summit at Angels Landing! This 8-mile round trip hike includes a look at Echo Canyon as well as one of the most iconic views in all of Zion National Park.

Take a Scenic Drive Through Zion Canyon

Snow-covered canyon walls with a sunny sky with some clouds, a plowed road that is empty winding through Zion in winter.

Parts of the Zion Scenic Drive are closed to private vehicles during the summer season. Once the crowds disperse, the shuttle bus shuts down, and visitors are allowed to travel through this section of Zion National Park in their own vehicles.

Traveling this scenic route in your personal vehicle allows for the opportunity to stop as needed and take in the gorgeous canyon views. This 57-mile scenic drive is well worth the trip with chances to see wildlife and the ability to stop frequently for photographs. The drive takes about 1.5 hours depended on the number of detours you choose to explore!

Most travelers begin the drive near St. George, UT, and continue through Zion National Park toward Mt Carmel Junction.

Try for Wildlife Viewing

Two goats or sheep with horns looking at the camera, perched on some snow on a red rock landscape in Zion National Park in winter.

There is no better season than winter to spot some of Zion National Park’s wild turkeys roaming the canyon.

Although some of the park wildlife hibernates during the wintertime, it is still possible to spot mule deer, bighorn sheep, and even eagle along the Virgin River!

Binoculars and a keen eye may be necessary to spot some of these well-camouflaged residents. Roaming the park after a fresh snowfall may make it easier to spot deer and bighorn sheep.

Practice Your Wintertime Photography

View of Zion's red rock cliff landscape juxtaposed with bits of white snow in the higher elevation crevices of the canyon on a blue sky winter day in Zion National Park

Zion National Park’s beautiful landscape becomes something even more picturesque once the snow begins to fall. The tall cliffs become dusted with powdery white snow and the wall’s red colors begin to pop.

Visitors hoping to capture Zion’s winter landscape can travel the Zion Scenic Drive while using turnouts and designated parking areas to find the perfect angle. Since many of the trails stay open year-round, photographers can also hike to scenic vistas like Angels Landing and Observation Point.

Pin This Guide to Visiting Zion in Winter!

Winter in Glacier National Park: 21 Things to Know Before You Go!

Towering peaks, lush meadows, alpine lakes, and abundant wildlife sightings await visitors in Glacier National Park no matter the time of year.

A well-known piece of the Crown of the Continent, Glacier National Park is home to over 700 miles of hiking trails, making it a paradise for outdoor adventures!

In the summertime, grizzly bear can be spotted grazing in the meadows and the tall peaks of the Northern Rocky Mountains reflect in the icy blue waters of Lake McDonald. The highest peaks in Glacier can hold deep snow all summer long depending on the year, but many of the hiking trails are accessible without snowpack between June and September.

Glacier National Park quickly begins to transform into a winter wonderland come late fall. Although the backcountry in Glacier National Park is more accessible during the warm season, there is still much to explore and see once the snow begins to fall.

However, a winter vacation to Glacier National Park still requires some forethought and planning due to challenges that snow and closures present. Here’s everything you need to know about visiting Glacier National Park in winter!

Glacier National Park Winter Road Conditions

Going to the Sun Mountain from the East Tunnel of the Going to the Sun Road, the sides of the mountain are covered in a light snow, road has been plowed before the road closes in Glacier National Park in winter.

Going-to-the-Sun Road

The stretch of road between the Lake McDonald Lodge and St. Mary Entrance is closed throughout the wintertime. When the road closes is entirely dependent on weather and road conditions.

The Going-to-the-Sun road reopens again once the national park operators can plow the alpine section of road clear of snow and it is deemed safe for private vehicle traffic. Due to the somewhat unpredictable mountain weather, there are no set opening or closing dates.

This road is considered one of the best scenic drives in the USA, but in the wintertime, it is socked in under many feet of snow with even deeper snowdrifts!

Once spring approaches, the road sees various stages of reopening. Be sure to call ahead for an accurate and updated road conditions report.

West Entrance to Lake McDonald Lodge

This is the only section of road that stays open year-round, weather permitting. This ten-mile stretch of road from the West Entrance to the Lake McDonald Lodge is plowed throughout the winter to allow for private vehicle traffic.

Just beyond the Lake McDonald Lodge, the road is gated to prevent further travel.

Many Glacier Road

The road to the Many Glacier Hotel is closed between November and April due to impassable winter road conditions. Folks who wish to explore this section of the park in the snow must either snowshoe or ski down the road.

Two Medicine Road

This road also goes unplowed during the wintertime and is considered closed once the snow is impassable. Call to talk to a ranger at Glacier National Park for current road conditions.

Inside North Fork Road

The Inside North Fork Road travels the western boundary of Glacier National Park leading travelers towards the Canadian Border. During the summer, the road is bumpy and is best taken at a leisurely pace. Once the snow begins to pile up, the road closes to private vehicle traffic.

Camas Road

The Camas Road, which connects West Glacier to Polebridge closes due to impassable snow conditions. However, it does transition into a fun scenic snowshoe trail once the snow is deep enough.

Winter Weather in Glacier National Park

An empty bench with footstep tracks next to it, looking out over Lake McDonald and all the snow-covered mountains surrounding it.

Winter in Glacier National Park can be summed up in a word: cold. I mean, the word ‘glacier’ in the name should be a hint!

Here is the average temperatures for winter months in Glacier National Park (which I’ll call November through March)

November: Average highs of 33° F and average lows of 21° F, with approximately 19 days of rain or snow.

December: Average highs of 27° F and average lows of 14° F, with approximately 19 days of rain or snow.

January: Average highs of 30° F and average lows of 17° F, with approximately 19 days of rain or snow.

February: Average highs of 32° F and average lows of 14° F, with approximately 16 days of rain or snow.

March: Average highs of 39° F and average lows of 20° F, with approximately 18 days of rain or snow.

Winter Hours of Operation and Facilities in Glacier NP

Snow-covered evergreen trees next to a lake, in front of a pyramid-shaped mountain covered in light snow.

Although recreation in Glacier National Park is technically open year-round, some of the facilities undergo reduced hours of operation or close completely come wintertime.

However, note that restrooms and potable water are available at the Apgar Visitor Center year-round.

If you are planning to visit Glacier National Park during the off-season, which is between late September and early May, you will want to be aware of these changes to facility operations:

Apgar Visitor Center: Closed during the winter. Outdoor informational exhibits are open year-round.

Logan Pass Visitor Center: Closed during the winter.

St. Mary Visitor Center: Closed during the winter.

Apgar Village Camp Store: Open intermittently throughout winter.

Backcountry Permit Offices: Call to assure staffing.

Note: All in-park lodging is closed during the wintertime, so you will want to stay in a nearby town, like West Glacier, Hungry Horse, or Whitefish.

Since Glacier National Park is home to such a rugged winter environment, it is a good idea to begin your trip by calling ahead to talk with a park ranger.

Where to Stay near Glacier National Park in Winter

Since you can’t actually stay in the park in the winter, you’ll have to stay nearby. Luckily, there are plenty of great options: these ones are all in Whitefish, which has the most options in terms of accommodations, but you can also look at West Glacier, Hungry Horse, or Kalispell.

Luxury

Lodge at Whitefish Lake: This cozy 4-star lodge boasts a beautiful location, an on-site spa, cozy rooms, and an award-winning restaurant — what else could you want when visiting Glacier in winter? The Spa is a great place to relax after a day recreating in Glacier National Park, with massages, facials, treatments, a steam room, a hot tub, a relaxation room, and more in their wellness center!
>> Book your stay the Lodge at Whitefish Lake here

Mid-Range

The Firebrand: This chic boutique hotel is one of Whitefish’s newest offerings, and it’s a great place with tons of personality. Amenities include a fitness center, ski storage and ski pass sales, and on-site restaurants and bars. Cozy robes and luxe en-suite bathrooms make each room feel spa-perfect.
>> Book a stay at the Firebrand here

Budget

Grouse Mountain Lodge: This cozy lodge is no-frills, but it’s a lovely place to stay in the winter when all you want is a roaring fireplace, lovely log cabin vibes, and snow-covered scenery! It has some great amenities including an outdoor firepit and hot tub as well as an indoor pool and a Finnish-style dry sauna.

Winter Camping in Glacier National Park

The unfrozen surface of Lake McDonald in early winter in Glacier National Park, reflecting the snow-covered mountains with a patch of fog on a sunny winter day.
Lake McDonald, where you’ll find the only winter Glacier campground at Apgar Campground

Many national park travelers like to camp during their outdoor adventures. Glacier National Park is home to thirteen front-country campgrounds, which are spread throughout the one million acre park!

During the busy season between May and most of September, many of the popular campgrounds are on an online reservation system and are full each night.

Out of the thirteen front-country campgrounds, Apgar Campground on Lake McDonald is the only one that stays open year-round.

The campground sees reduced site availability and primitive camping only during the cold season. Primitive camping in Glacier National Park means there are vault toilets open, but no potable water available.

Luckily, if you are unable to snag a site inside the park, there are plenty of camping opportunities and lodging accommodations ranging in levels of luxury nearby in West Glacier and Hungry Horse.

Winter Safety in Glacier National Park

A man wearing weather-appropriate clothing hiking through the snow, exhibiting winter safety guidelines in Glacier National Park in the snow.

Hypothermia

When your body temperature falls to dangerously cool levels, you begin to experience hypothermia. Wet clothes combined with freezing outside temperatures can create a high-risk environment.

To avoid hypothermia, the park service recommends wearing non-cotton clothing and doing everything possible to avoid submerging yourself in water.

According to the National Park Service, water is the number one cause of fatality in Glacier. If you are recreating near water, avoid walking on slippery rocks and crossing over moving water on thin snowbridges.

Staying Found

Trails covered in a fresh layer of snow can become difficult to follow. As you snowshoe, ski, or hike along, pay close attention to trail markers and junctions signs. Cell phone coverage is spotty to nonexistent in most areas of Glacier National Park. If you do become lost, stay where you are, and wait for rescue.

Always pack a map with navigation tools, and remember to tell someone where you are going before departing for the trail. If you are unsure of your abilities, always go with companions.

Avalanche

The deep powdery snow combined with the steep mountain terrain in Glacier National Park is the perfect formula for avalanches.

If you plan to recreate in the backcountry during the winter season, you should be professionally trained in avalanche safety and know how to use the appropriate safety gear.

Snowbridges

The thin layers of snow and ice covering water, crevasses, or massive snow caves can be difficult to detect. The fragile ice can give way to your body weight and leave you victim to the hazards below.

Before recreating on glaciers, in snowfields, or near bodies of water in the winter, be sure to talk to a park ranger about snowbridge safety.

Wildlife

Glacier National Park is home to diverse and magnificent wildlife. Although there will be many great opportunities to view wildlife, always make sure you are doing so safely. If it is a hoofed animal, such as moose, elk, sheep, and goats, keep back 75 feet. For grizzly and black bears, always try to maintain a distance of at least 300 feet.

Although bear hibernate in the wintertime, Glacier National Park is still grizzly country. Carry bear spray and follow appropriate bear aware protocol while recreating.

Things to Do in Glacier National Park in Winter

Go for a Scenic Drive

Icy surface of Lake McDonald as seen in winter, wth snow and ice on the banks of the lake, with snow-covered mountains in the distance.

As you have learned, many of the roads in Glacier National Park shut down due to impassable snow in the wintertime. However, there is still enough roadway open to private vehicle traffic for a fun drive through the snowy mountains!

The section of road between the West Entrance and the Lake McDonald Lodge remains open year-round due to the exceptional plow operators. The 10-mile stretch of road winds along the scenic and picturesque shore of Lake McDonald.

Although you may not get to see the lake’s colorful rock shores in the wintertime, you can still appreciate the towering peaks, such as Stanton Mountain, McPartland Mountain, and Heavens Peak, in the background.

This drive is perfect for photographers hoping to capture the beauty of Glacier National Park’s front country. As you drive along, use the frequent turnouts to access the lake’s shore and capture every accessible angle.

It is common to spot whitetail deer roaming along the roadway, but keep an eye out for other wildlife like moose, elk, fox, and coyote.

The bear may be fast asleep during your visit, but if you’re coming during the late fall or early spring, it is possible to spot bear grazing along the shore.

Go cross-country skiing and snowshoeing

Female hiker in snowshoes with trekking poles wearing a black jacket and baby blue pants, looking over a snow-covered mountainous landscape in Glacier National park in the winter time.

Winter is the dominant season in Glacier National Park and all of northern Montana, since all the other seasons are so short-lived!

To make the best of the snowy months and continue exploring, strap on a pair of snowshoes or cross country skis.

The Apgar Village has a variety of ski and snowshoe trails for everyone to enjoy. For a short 3-mile outing, consider exploring the Lower McDonald Creek Trail.

Those who are looking for something a little longer in the Apgar Village area might like the 6-mile round trip trail to Rocky Point, which offers multiple viewpoints featuring Lake McDonald and surrounding peaks!

Take a scenic snowmobile ride

Snowmobile tracks on the frozen lake at Whitefish Lake in Whitefish, MT with houses and lodges in the background.

For those looking for a little high-octane adventure, rent a snowmobile and explore the backcountry areas around Glacier National Park for yourself.

While snowmobiling is not permitted within the park itself, you can snowmobile just outside of the park’s limits. Snowmobiling is one of the most popular winter activities for visitors to Northern Montana, with snowmobile tours departing from common bases like Whitefish and West Glacier.

I recommend traveling with Action Rentals, who offer independent and guided snowmobile rentals departing from Whitefish, MT.

Book a snowmobile rental here!

Go ice climbing

A woman in a pink jacket and red pants climbing up the icicles of a frozen waterfall with climbing equipment and harness.

Winter’s answer to rock climbing is ice climbing!

This fun activity allows you to scale up beautiful, otherworldly landscapes like frozen waterfalls and icy, snow-covered cliff edges, equipped with little more than ice picks and a harness.

Ice climbing is dangerous to do solo, so make sure you go with a trusted guide like Whitefish Vertical Adventures.

What to Pack for Glacier National Park in Winter

Baby blue and pastel pink sky at sunrise over the trees and mountains of the Montana winter landscape in Glacier National Park

Waterproof Parka: In the snow of Glacier in winter, you’ll want a really warm winter jacket, like this ultra-insulated North Face parka. I admit it’s a bit pricy, but it comes with a guarantee that it’ll last a lifetime.. and I tested this guarantee by sending in a zipper to be fixed which got damaged after 4 years of abuse wearing it every winter day to cycle 15 miles — my jacket came back like new and better than ever.

I’ve had my North Face parka for literally 10 years, and it’s held up from winters biking through New York City to multiple trips north of the Arctic Circle in places like Tromso and Abisko. It’ll serve you well in Glacier in winter!

Get the exact jacket I have here! 

Waterproof Pants: If you’re cross-country skiing or snowboarding or doing some winter hiking, you’ll absolutely want waterproof pants. Jeans put you at risk of hypothermia if you get wet, so avoid at all costs.

Snow Boots: Since you’ll likely be trudging through quite deep snow both in Glacier National Park and wherever you set up your base, you’ll absolutely need proper snow boots for a trip to Glacier in winter. I love these stylish and warm Sorel boots for women, which are waterproof and warm but also have plenty of traction. For added steadiness on your feet, throw on some Yaktrax to the bottom for grip on icy surfaces and pathways. These are a godsend (they saved me from eating it many times when I was in Tromso!)

Warm Leggings: There are two choices when it comes to a cozy base layer for your bottom half: fleece-lined for people with sensitive skin like me, and merino wool for people who don’t find wool itchy like I do. I own several pairs of these fleece-lined leggings in a variety of colors (I have black, gray, and maroon). Be sure to wear waterproof layers over this if you’ll be out in the snow, though! For people who like wool, merino wool leggings are the way to go – the absolute warmest you can get. However, it’s too much wool for me to handle, but I have particularly sensitive skin.

Fleece-Lined Knit Hat: If you enjoy fashion, winter can be a bit of a drag because you basically commit to one jacket (typically in a neutral color) for an entire season. I absolutely live for livening up my look with tons of different colors of knit hats. I have one in virtually every color, but I love red and yellow best for the best ‘pop’ of color against the snow. Since I have so many hats, I don’t really have anything special: just a snug knit hat lined in fleece and with a pompom that does absolutely nothing to add warmth but I love them anyway.

Thermal Top Layer: Again, what kind of thermal you go for will definitely depend on whether or not you have any skin sensitivities and if you can handle wool. I hate wool on anything but socks, so instead, I go for thin performance thermals like this Heat Plus layer from 32 Degrees. However, if you’re a fan of wool, a merino wool base layer will keep you insanely warm. Better yet, wool doesn’t trap odors the same way other materials do, meaning you can re-wear it several times before your under-layers will need to be washed — great for people who pack light!

An Enormous Scarf: I go for big, warm, and infinite-style scarfs. I tend to opt for bright, bold colors to liven up my look. I love these ones — they’re cheap and feel cashmere-soft, but they aren’t pricy like it.

Touchscreen Friendly Gloves: You’ll likely want to have your hands out of your pockets at times when you’re navigating on Google Maps, looking up something you’ve bookmarked (maybe this blog?), etc.! Most gloves these days tend to be touchscreen-friendly, but check before you buy. These gloves are cute, smartphone-compatible, and inexpensive.

Waterproof Gloves: You’ll also want to layer waterproof gloves over your touchscreen gloves if you’re snowshoeing or cross-country skiing, or anything where you are out and about in the snow and need your hands out for balance or gripping poles, etc.

Headlamp (and Extra Batteries): Glacier National Park in winter can get dark early — and quickly! — due to the early sunset time that naturally occurs in winter… plus the mountains making it get dark long before that! Bring a headlamp in case any outdoor excursions take longer than expected. You don’t want to get lost after dark in the snow. This Petzl headlamp is highly-rated and affordable.

Waterproof Backpack: You’ll want to keep your belongings dry, especially if you’re doing long treks on cross-country skis or snowshoes in the snow or freezing rain. Bring a waterproof backpack — you won’t regret it, especially if you’re carrying pricy camera equipment.

Snowshoes (optional): Many trails in Glacier National Park in winter will require proper snowshoes (different than snow boots — these allow you to ‘float’ on top of snow instead of sinking through it!) as well as trekking poles if you want to do some winter exploring. You can also rent them, but they’re pretty cheap to buy and will last you for future winter trips, so I recommend investing in them if you are a fan of snow travel.

Camera: You’ll want a camera to capture all that Glacier National Park winter beauty. I use and love my Sony A6000! It’s mirrorless, so it’s lightweight and perfect for a high-quality camera that won’t weigh you down. Be sure to bring a handful of extra batteries! Trust me, I’ve learned from many an experience in the cold photographing the Northern Lights that batteries burn out sooo much faster in the cold.

Battery Pack: Going off of what I said above, extend that to your phone as well! Cold weather depletes cell phone batteries extra quickly, so if you’re using your cell phone as your primary camera and navigation device (and who doesn’t these days?) you’ll absolutely want the ability to power up without a wall outlet while you’re out enjoying nature. I rely on an Anker battery pack to keep all my devices charged in the cold — and as a blogger who takes frequent winter trips to the Arctic and beyond with way more gear than a normal person needs, it’s served me very well!